# Challenge 4: Work with Azure Pipelines

# Here is what you will learn 🎯
- Create a CI build to create SCM Contacts API's deployment artifacts
- Create a Pull Request validation build, that is triggered to validate a Pull Request
- Create a CD Build to deploy SCM Contacts API to the stages Development and Testing
# Table of Contents
- Create the CI Build
- Create the Pull Request Validation Build
- Create the CD Build
- Create a Pull Request
- Trigger the PR-Build to validate a Pull Request
- See the Build Flow in Action
- Wrap-Up
# Create the CI Build
Go to Azure Boards and set the User Story S4 and S5 to active. We create a new build definition with the steps as follows:
- Build the SCM Contacts API
- Copy the ARM Template to the artifact location
- Publish the artifacts
- Create a feature branch "features/scmcontactscicd" and check it out
- Add a file named
_scm-contacts-ci.yaml_in the directory_day4/apps/pipelines_ - Add the following yaml snippet that defines the build Trigger:
pr: none
trigger:
  branches:
    include:
      - master
  paths:
    include:
      - day4/apps/infrastructure/templates/scm-api-dotnetcore.json
      - day4/apps/dotnetcore/Scm/*
Here we specified when the build must be triggered. The build is triggered only if changes were made to the master branch and when the changes were made to either _day4/apps/infrastructure/templates/scm-api-dotnetcore.json_ or to any files under directory \*day4/apps/dotnetcore/Scm/\*\*
- Add the following yaml snippet to define the needed build steps:
jobs:
  - job: Build
    displayName: Build Scm Contacts
    pool:
      vmImage: ubuntu-latest
    steps:
      - task: DotNetCoreCLI@2
        displayName: Restore
        inputs:
          command: restore
          projects: 'day4/apps/dotnetcore/Scm/**/*.csproj'
      - task: DotNetCoreCLI@2
        displayName: Build
        inputs:
          projects: 'day4/apps/dotnetcore/Scm/**/*.csproj'
          arguments: --configuration Release
      - task: DotNetCoreCLI@2
        displayName: Publish
        inputs:
          command: publish
          publishWebProjects: false
          projects: day4/apps/dotnetcore/Scm/Adc.Scm.Api/Adc.Scm.Api.csproj
          arguments: --configuration Release --output $(build.artifactstagingdirectory)
          zipAfterPublish: True
      - task: CopyFiles@2
        inputs:
          sourceFolder: day4/apps/infrastructure/templates
          contents: |
            scm-api-dotnetcore.json
          targetFolder: $(Build.ArtifactStagingDirectory)
      - task: PublishPipelineArtifact@1
        inputs:
          targetPath: $(Build.ArtifactStagingDirectory)
          artifactName: drop
- Commit your changes and push the branch to your remote repository.
- Navigate to your Azure DevOps project
- In your project navigate to the Pipelines page. Then choose the action to create a new pipeline
- Walk through the steps of the wizard by first selecting Azure Repos Git as the location of your source code
- Select your college repository
- Select "Existing Azure Pipelines YAML file"
- Select your feature branch and specify the path: "/day4/apps/pipelines/scm-contacts-ci.yaml"
- Run your CI Build by clicking the action "Run"
- Rename your CI Build to "SCM-Contacts-CI"
- Navigate to the Pipelines page and open the last run of the build "SCM-Contacts-CI". You see that the artifact is linked to your build.
# Create the Pull Request Validation Build
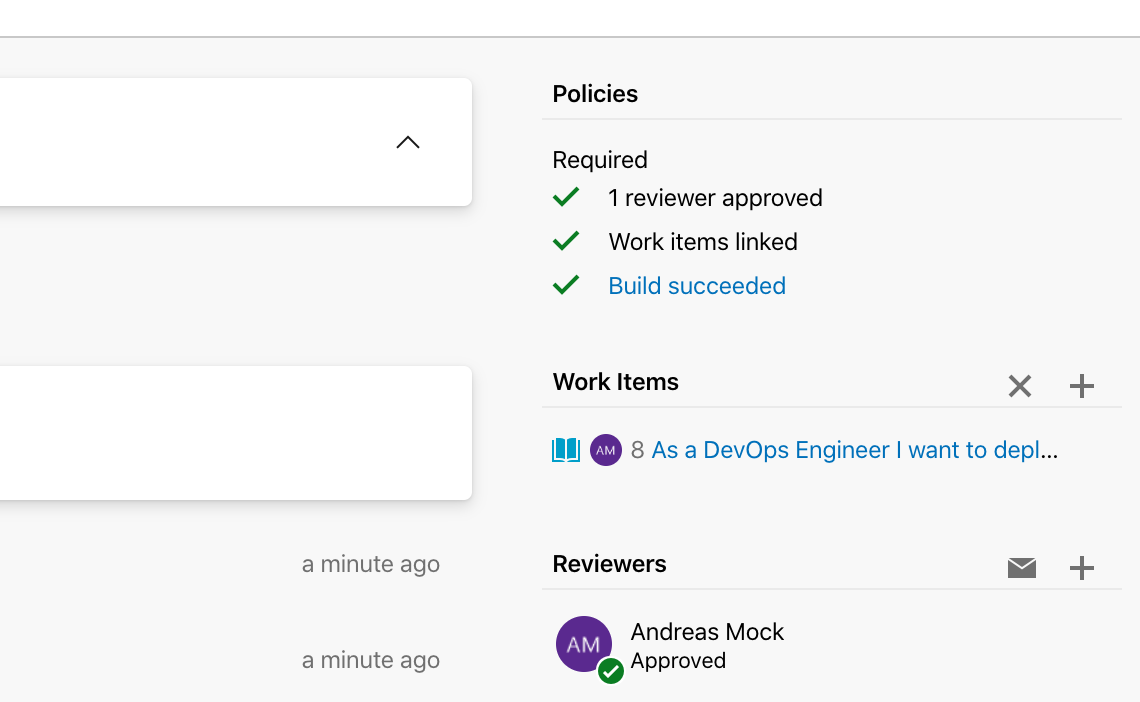
In Challenge 2 we configured the master branch's policies to require a Pull Request before changes are merged into the master. With Azure Pipelines you can define a build that is executed whenever a Pull Request is created in order to validate a merge into the master branch.
- Add a file named
scm-contacts-pr.yamlin the directory_day4/apps/pipelines_ - Add the following yaml snippet:
trigger: none
jobs:
  - job: Build
    displayName: Build Scm Contacts
    pool:
      vmImage: ubuntu-latest
    steps:
      - task: UseDotNet@2
        displayName: 'Acquire .NET Core Sdk 3.1.x'
        inputs:
          packageType: Sdk
          version: 3.1.x
      - task: DotNetCoreCLI@2
        displayName: Restore
        inputs:
          command: restore
          projects: 'day4/apps/dotnetcore/Scm/**/*.csproj'
      - task: DotNetCoreCLI@2
        displayName: Build
        inputs:
          projects: 'day4/apps/dotnetcore/Scm/**/*.csproj'
          arguments: --configuration Release
      - task: DotNetCoreCLI@2
        displayName: Publish
        inputs:
          command: publish
          publishWebProjects: false
          projects: day4/apps/dotnetcore/Scm/Adc.Scm.Api/Adc.Scm.Api.csproj
          arguments: --configuration Release --output $(build.artifactstagingdirectory)
          zipAfterPublish: True
- Commit your changes and push the branch to your remote repository.
- Navigate to your Azure DevOps project
- In your project navigate to the Pipelines page. Then choose the action to create a new pipeline
- Walk through the steps of the wizard by first selecting Azure Repos Git as the location of your source code
- Select your repository
- Select "Existing Azure Pipelines YAML file"
- Select your feature branch and specify the path: "/day4/apps/pipelines/scm-contacts-pr.yaml"
- Run your PR Build by clicking the action "Run"
- Rename your PR Build to "SCM-Contacts-PR"
# Create the CD Build
Now we have created the deployment artifacts with the build SCM-Contacts-CI. It is time to create a Release build to deploy the SCM Contacts API to Azure. As in Challenge 3 we deploy the artifacts to the stages Development and Testing and we create a manual Pre-deployment condition to approve the deployment to the Testing stage.
Create a new release pipeline and name it SCM-Contacts-CD
Add the SCM-Contacts-CI build's artifacts
Create a Development stage
Add the the following variables and replace 'prefix' with your own value:
Variable Value Scope ResourceGroupName ADC-DAY4-SCM-DEV Development Location westeurope Development ApiAppName 'prefix'-day4scmapi-dev Development AppServicePlanSKU B1 Development Use32BitWorker false Development AlwaysOn true Development ApplicationInsightsName your ApplicationInsights instance name of stage Development Development SqlServerName 'prefix'-day4sqlsrv-dev Development SqlDatabaseName scmcontactsdb Development SqlAdminUserName your Sql Admin's username Development SqlAdminPassword your password Development ServiceBusNamespaceName your ServiceBus namespace name of stage Development Development Go to the Tasks section of the "Development" stage and use the latest Ubuntu version to run the agent on
Add the task "ARM template deployment"
Select your Azure Subscription
Set the name of the ResourceGroup, use the variable $(ResourceGroupName)
Set the Location, use the variable $(Location)
Select the template from your drop location
Override the template parameters as follow:
-sku $(AppServicePlanSKU) -webAppName $(ApiAppName) -use32bitworker $(Use32BitWorker) -alwaysOn $(AlwaysOn) -applicationInsightsName $(ApplicationInsightsName) -sqlServerName $(SqlServerName) -sqlUserName $(SqlAdminUserName) -sqlPassword "$(SqlAdminPassword)" -sqlDatabaseName $(SqlDatabaseName) -serviceBusNamespaceName $(ServiceBusNamespaceName)Make sure that you copy the whole line.
Add Azure App Service deploy task
Select your Azure Subscription
Choose API App as AppService type
Use the variable $(ApiAppName) to set the App Service name
Add your dotnet core deployment zip file from your artifact location
Save the release definition and create a release to check if everything works
# Create the Testing stage
Edit the Release definition and go to the task view
Clone the Development stage and rename the cloned stage to Testing
Open the Release definition's variable view and add new variables as follow:
Variable Value Scope ResourceGroupName ADC-DAY4-SCM-TEST Testing Location westeurope Testing ApiAppName 'prefix'-day4scmapi-test Testing AppServicePlanSKU B1 Testing Use32BitWorker false Testing AlwaysOn true Testing ApplicationInsightsName your ApplicationInsights instance name of stage Testing Testing SqlServerName 'prefix'-day4sqlsrv-test Testing SqlDatabaseName scmcontactsdb Testing SqlAdminUserName your Sql Admin's username Testing SqlAdminPassword your password Testing ServiceBusNamespaceName your ServiceBus namespace name of stage Testing Testing Save the definition and create a release
# Create a Pull Request
Create a Pull Request and merge all changes into the master branch. Don't forget to link the User Stories S4 and S5.
# Trigger the PR-Build to validate a Pull Request
Now we have to enable the PR-Build to be triggered whenever a Pull Request is created and when files are changed that belongs to the SCM Contacts API.
Open the branch policies of the master branch
Add a build validation and select your SCM-Contacts-PR build
Set the path filter as follow:
/day4/apps/infrastructure/templates/scm-api-dotnetcore.json;/day4/apps/dotnetcore/Scm/*With this filter the PR build is only triggered when files were changed that belongs to the SCM Contacts API
Save your changes
# See the Build Flow in Action
Now it's time to see the whole build flow in action.
Checkout the master branch and pull the latest changes
Create and checkout a new feature branch features/scmcontactsflow
Open the file day4/apps/dotnetcore/Scm/Adc.Scm.Api/Startup.cs and change the name of the API in the Swagger configurations:
// here
c.SwaggerDoc("v1", new OpenApiInfo { Title = "ADC Contacts API", Version = "v1" });
// and here
c.SwaggerEndpoint("/swagger/v1/swagger.json", "ADC Contacts API v1");
Commit your changes and push the feature branch to your remote repository
Create a Pull Request to merge the changes into the master branch. Don't forget to link the User Story S5. You will see that the PR-Build is part of the required policies of your Pull Request.
Complete your Pull Request
Navigate to the Pipelines view and you will notice that the SCM-Contacts-CI build is triggered
 Wait until the build is finished and the deployment artifacts are available.
Navigate to the Release view and you will see that the CD Pipeline is triggered and starts to deploy the artifacts to the Development stage.
Go to Azure Boards and set the User Stories S4 and S5 to completed.
# Wrap-Up
🥳 Congratulation - You have completed the User Stories S4 and S5. 🥳
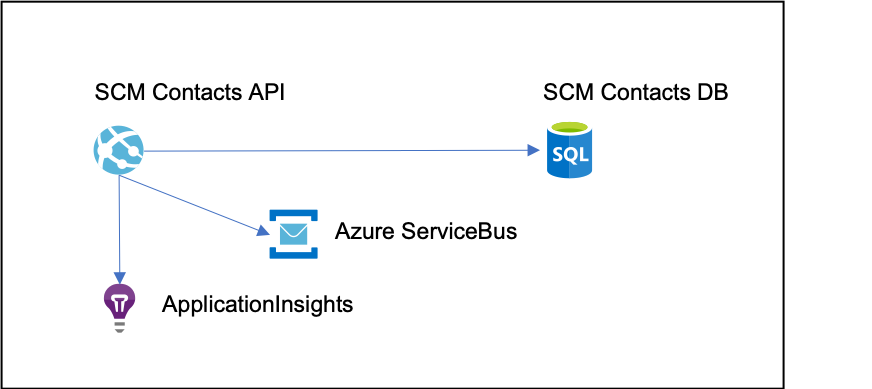
Now you have seen how you can create a Pull Request validation build that protects your master branch from build breaks. After changes are merged into the master branch, the CI build is triggered and it creates the deployment artifacts. The deployment artifacts are then deployed to your stages. After this challenge we have the following architecture deployed to Azure:
Now navigate to the Azure portal, open the SCM Contacts API's API App in the ResourceGroup ADC-DAY4-SCM-TEST and browse to the Swagger UI.
If you want you can test the API.