# Azure SQL DB
# Here is what you will learn 🎯
In this challenge you will learn how to:
- create an Azure SQL DB (Single Database)
- add Data to the Azure SQL DB
- setup Dynamic Data Masking
# Table Of Contents
- Basics
- Deployment models
- Purchasing models
- Create a single SQL Database
- Add Data to SQL DB
- Add Data to SQL DB using the Azure Data Studio
- Setup Dynamic Data Masking
- Access Management for Azure SQL DB
- SQL Database backup and retention policies (optional)
- Connect the Azure SQL DB to a Web Application (optional)
- Cleanup
# Basics
Azure SQL Database is a general-purpose relational database, provided as a managed service. It's based on the latest stable version of Microsoft SQL Server database engine (opens new window). In fact, the newest capabilities of SQL Server are released first to SQL Database, and then to SQL Server itself. You get the newest SQL Server capabilities with no overhead for patching or upgrading, tested across millions of databases.
To get started with SQL Database consult the documentation here (opens new window).
# Deployment models
Let us have a look at the different deployment models of SQL Database first:
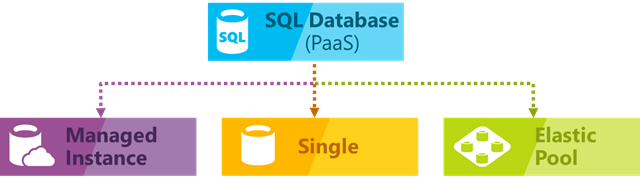
- Single database (opens new window) represents a fully managed, isolated database. You might use this option if you have modern cloud applications and microservices that need a single reliable data source. A single database is similar to a contained database in Microsoft SQL Server Database Engine.
- Managed instance (opens new window) is a fully managed instance of the Microsoft SQL Server Database Engine. It contains a set of databases that can be used together. Use this option for easy migration of on-premises SQL Server databases to the Azure cloud, and for applications that need to use the database features that SQL Server Database Engine provides.
- Elastic pool (opens new window) is a collection of single databases with a shared set of resources, such as CPU or memory. Single databases can be moved into and out of an elastic pool.
# Purchasing models
SQL Database offers the following purchasing models:
- The vCore-based purchasing model lets you choose the number of vCores, the amount of memory, and the amount and speed of storage.
- The DTU-based purchasing model offers a blend of compute, memory, and I/O resources in three service tiers, to support light to heavy database workloads. Compute sizes within each tier provide a different mix of these resources, to which you can add additional storage resources
- The serverless model automatically scales compute based on workload demand, and bills for the amount of compute used per second. The serverless compute tier also automatically pauses databases during inactive periods when only storage is billed, and automatically resumes databases when activity returns.
You see that each purchasing model refers to compute, memory and I/O resources, because these are the most important and crtical resources a databse uses.
# Create a single SQL Database
The single database deployment option creates a database in Azure SQL Database with its own set of resources and is managed via a SQL Database server. With a single database, each database is isolated from each other and portbale, each with its own service tier within the DTU-based purchasing model or vCore-based purchasing model and a guaranteed compute size.
Navigate to the azure portal and open the cloud shell. We use the Azure CLI to create the needed Azure resources:
Create a resource group:
az group create --name adc-sql-db-rg --location westeuropeCreate the server instance and note down the fullyQualifiedDomainName of your server from the output
TIP
📝 The Azure SQL Server name has to be unique. The password should be at least 8 letters, must contain capital letters and numbers, refrain from using $.
az sql server create --name <name of the server> --resource-group adc-sql-db-rg --location westeurope --admin-user <name of your admin> --admin-password <pwd>Per default the access is not permitted via the Azure SQL Server. Configure the server's firewall to allow your IPv4
az sql server firewall-rule create --server <name of your server> --resource-group adc-sql-db-rg --name AllowYourIp --start-ip-address <your public ip> --end-ip-address <your public Ip>Create the SQL Database with vCore-based purchasing Gen5, 1 vCore and max 32GB in size. Here (opens new window) you will find a good overview of the vCore model.
az sql db create --name MSFTEmployees --resource-group adc-sql-db-rg --server <name of your server> --edition GeneralPurpose --family Gen5 --capacity 2 --max-size 32GB --zone-redundant false
# Add Data to SQL DB
Now that your SQL Database is up and running it's time to add some data. First we will use the Azure CLI to do so:
- Get to know your environment
az sql server list --resource-group adc-sql-db-rg
az sql db list --resource-group adc-sql-db-rg --server <name of your server>
- If you run the command like this you are getting a lot of information to make sense of. You can restrict this by using a query:
az sql db list --resource-group adc-sql-db-rg --server <name of your server> --query '[].{Name: name}'
az sql db show --resource-group adc-sql-db-rg --server <name of your server> --name MSFTEmployees --query '{Name: name, maxSizeBytes: maxSizeBytes, status: status}'
# Connect to your SQL DB
az sql db show-connection-string --name MSFTEmployees --server <name of your server> --client sqlcmd
For the next part to work you either have the sqlcmd extension or go on using the Azure Cloud Shell. Copy the sqlcmd command and enter your admin name and password. The command should look something like this:
sqlcmd -S tcp:[Name of your Server].database.windows.net,1433 -d MSFTEmployees -U <name of your admin> -P <pwd> -N -l 30
TIP
📝 You might need to renew the firewall-rule at this point:
az sql server firewall-rule create --server <name of your server> --resource-group adc-sql-db-rg --name AllowYourIp --start-ip-address <your public ip> --end-ip-address <your public Ip>
After running this you should see a 1>. Now you can run SQL Queries. If you are unfamiliar with their Syntax feel free to take some time getting used to it:
- Add a table.
CREATE TABLE CEOs (EmployerID int, LastName varchar(255), FirstName varchar(255), Age int, StartYear int);
GO
- Add Data to your table
INSERT INTO CEOs (EmployerID, LastName, FirstName, Age, StartYear) VALUES (42, 'Nadella', 'Satya', 51, 2014);
GO
- Update the Age of Satya Nadella in the Table
UPDATE CEOs SET Age=53 WHERE EmployerID=42;
GO
- Query the data
SELECT * FROM CEOs
GO
- Add the other CEOs Microsoft has had to the list as well (the ID is fictional). To exit the sqlcmd utility program enter
exit.
# Add Data to SQL DB using the Azure Data Studio
Another, more simple approach is using the Azure Data Studio. Azure Data Studio is a cross-platform database tool for data professionals using the Microsoft family of on-premises and cloud data platforms on Windows, MacOS, and Linux.
Azure Data Studio offers a modern editor experience with IntelliSense, code snippets, source control integration, and an integrated terminal. It's engineered with the data platform user in mind, with built-in charting of query result sets and customizable dashboards.
- Open the
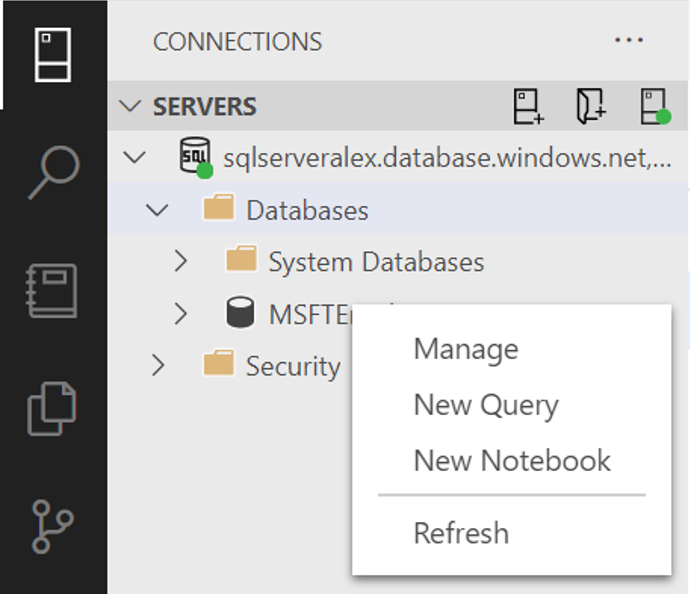
Azure Data Studioand connect to your server:

- After you have connected to your server,
Azure Data Studiowants you to add your Azure account. Follow the instructions and add your account. Next we want to create our first table in the MSFTEmployee. Navigate to the MSFTEmployee, open the context menu and selectNew Query.
TIP
📝 If your server is not detected under your account you might need to renew the firewall-rule again.
az sql server firewall-rule create --server <name of your server> --resource-group adc-sql-db-rg --name AllowYourIp --start-ip-address <your public ip> --end-ip-address <your public Ip>
- Add and run the following query, creating a new Table:
CREATE TABLE PrtnrEmployees (EmployerID int, LastName varchar(255), FirstName varchar(255), PartnerCompany varchar(255), StartYear int);
- Create a new query and insert additional contacts :
INSERT INTO PrtnrEmployees (EmployerID, LastName, FirstName, PartnerCompany, StartYear) VALUES ( ... ), ( ... ), ( ... );
- View the data returned by a query
SELECT * FROM PrtnrEmployees;
SELECT * FROM CEOs;
# Setup Dynamic Data Masking
Dynamic data masking (DDM) limits sensitive data exposure by masking it to non-privileged users. It can be used to greatly simplify the design and coding of security in your application. Take a look at the documentation here (opens new window) to get more information about Dynamic Data Masking.

To see Dynamic Data Masking in action we first add a column to the CEOs table with a Data Masking Rule. Back in Azure Data Studio create a new query and run a command as follows:
ALTER TABLE [dbo].[CEOs]
ADD Email varchar(256) MASKED WITH (FUNCTION = 'EMAIL()');
Run another query to add another row:
INSERT INTO CEOs (EmployerID, LastName, FirstName, Age, StartYear, Email) VALUES (43, 'Nadella', 'Satya', 52, 2014, 'snad@microsoft.com');
When we select the top 1000 rows of the Contacts table we still see the email's actual value.

The reason behind this is that the account we have used has elevated privileges. To show you how Dynamic Data Masking works we create a user and grant select on CEOs. Create a new query in the Azure Data Studio and run the commands as follows:
CREATE USER TestUser WITHOUT LOGIN;
GRANT SELECT ON CEOs TO TestUser;

EXECUTE AS USER = 'TestUser';
SELECT * FROM CEOs;
# Access Management for Azure SQL DB
Under Access Management we are taking a look at authentication and authorization. Authentication is the process of proving the users are who they claim to be. Authorization refers to the permissions assigned to a user within an Azure SQL Database, and determines what the user is allowed to do.
Azure SQL Database supports two types of authentication: SQL authentication, as we have used before in creating the TestUser. And Azure Active Directory authentication.
Let's have a look at the SQL authentication. As server admin you can create additional SQL users - which enables other users to connect to the SQL Database. Create a new query.
CREATE USER Marvin WITH PASSWORD = '42_as_ANSWER!';
Now you can sign up as this user.
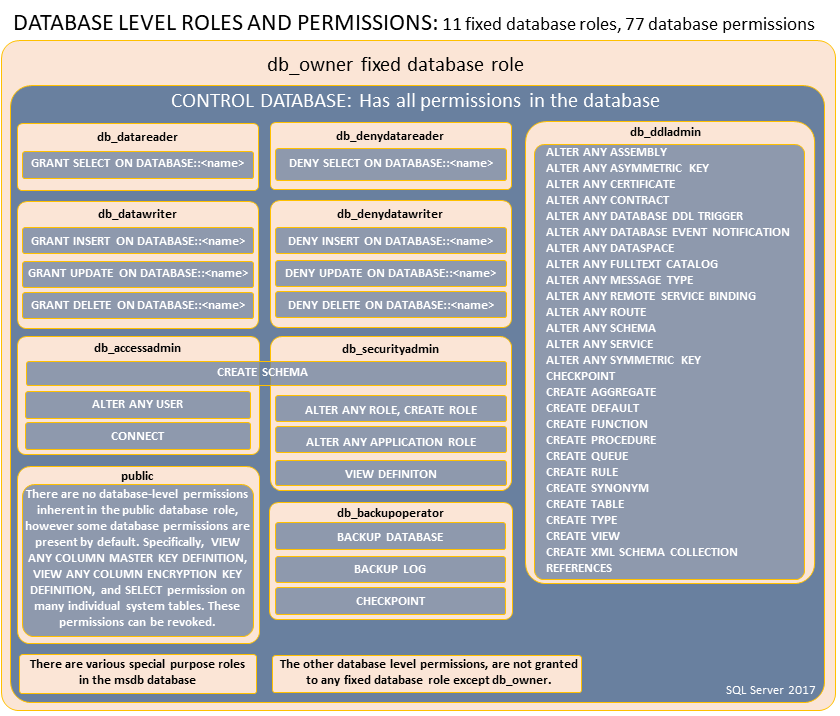
Before we did grant the TestUser select access to the Table CEOs. Similarly you can create a custom role. There is also a set of fixed roles. They can be assigned as followes:
ALTER ROLE db_backupoperator ADD MEMBER Marvin;
# SQL Database backup and retention policies (optional)
You make the choice between configuring your server for either locally redundant backups or geographically redundant backups at server creation.
After a server is created, the kind of redundancy it has, geographically redundant vs locally redundant, can't be switched.
While creating a server via the az sql server create command, the --geo-redundant-backup parameter decides your Backup Redundancy Option. If Enabled, geo redundant backups are taken. Or if Disabled locally redundant backups are taken.
In our current database geo redundant backups therefore are not possible.
- Go to the Azure portal and navigate to your SQL server
- Under Manage Backups you will find the retention policies
- Change the retention policy for MicrosoftEmployees to Monthly Backups that should be kept for 8 weeks.
- On the Available backups tab, you will find backups from which you can restore a specific database.
As a declarative abstraction on top of the existing active geo-replication feature, Auto-failover groups are a SQL Database feature that allows you to manage replication and failover of a group of databases on a SQL Database server or all databases in a managed instance to another region. They are designed to simplify deployment and management of geo-replicated databases at scale.
When you are using auto-failover groups with automatic failover policy, any outage that impacts one or several of the databases in the group results in automatic failover. Typically these are incidents that cannot be self-mitigated by the built-in automatic high availability operations. The examples of failover triggers include an incident caused by a SQL tenant ring or control ring being down due to an OS kernel memory leak on several compute nodes, or an incident caused by one or more tenant rings being down because a wrong network cable was cut during routine hardware decommissioning. For more information, see SQL Database High Availability.
- Create another Azure SQL Server in another azure region
az sql server create --name <name of your second server> --resource-group adc-sql-db-rg --location <a different Azure region> --admin-user <name of your admin> --admin-password <pwd>
- Create a failover group between the servers and add the database
az sql failover-group create --name <name of your fg> --partner-server <name of your second server> --resource-group adc-sql-db-rg --server <name of your server> --add-db MSFTEmployees --failover-policy Automatic
- Verify which server is secondary
az sql failover-group list --server <name of your server> --resource-group adc-sql-db-rg
- Failover to the secondary server
az sql failover-group set-primary --name <name of your fg> --resource-group adc-sql-db-rg --server <name of your second server>
- Revert failover group back to the primary server
az sql failover-group set-primary --name <name of your fg> --resource-group adc-sql-db-rg --server <name of your server>
# Connect the Azure SQL DB to a Web Application (optional)
This tutorial shows how to create a .NET Core app and connect it to a SQL Database. When you're done, you'll have a .NET Core MVC app running in App Service.
- Clone the sample application
git clone https://github.com/azure-samples/dotnetcore-sqldb-tutorial
cd dotnetcore-sqldb-tutorial
- Install the required packages, run database migrations, and start the application.
   dotnet tool install --global dotnet-ef
   dotnet restore
   dotnet ef database update
   dotnet run
Navigate to
http://localhost:5000in a browser. Select the Create New link and create a couple to-do items. To stop .NET Core at any time, pressCtrl+Cin the terminal.Create a new database in the previously created SQL Server.
az sql db create --resource-group adc-sql-db-rg --server <name of your server> --name coreDB
- Create the connection string
az sql db show-connection-string --name coreDB --server <name of your server> --client sqlcmd
- The result should look something like this:
Server=tcp:<name of your server>.database.windows.net,1433;Database=coreDB;User ID=<name of your admin>;Password=<pwd>;Encrypt=true;Connection Timeout=30;
- Configure a local git deployment. FTP and local Git can deploy to an Azure web app by using a deployment user. Once you configure your deployment user, you can use it for all your Azure deployments.
az webapp deployment user set --user-name <name of your app user> --password <pwd>
- Create an App Service plan. An App Service plan defines a set of compute resources for a web app to run. These compute resources are analogous to the server farm in conventional web hosting. One or more apps can be configured to run on the same computing resources (or in the same App Service plan).
az appservice plan create --name <name of your asp> --resource-group adc-sql-db-rg --sku FREE
- Create a web app in the recently created App Service plan.
az webapp create --resource-group adc-sql-db-rg --plan <name of your asp> --name <your app name> --deployment-local-git
- Configure the connection string. To set connection strings for your Azure app, use the az webapp config appsettings set command in the Cloud Shell. In the following command replace the [Your Connection String] parameter with the connection string you created earlier.
az webapp config connection-string set --resource-group adc-sql-db-rg --name <name of your app> --settings MyDbConnection="<Your Connection String>" --connection-string-type SQLServer
- In ASP.NET Core, you can use this named connection string (
MyDbConnection) using the standard pattern, like any connection string specified inappsettings.json. In this case,MyDbConnectionis also defined in yourappsettings.json. When running in App Service, the connection string defined in App Service takes precedence over the connection string defined in yourappsettings.json. The code uses the appsettings.json value during local development, and the same code uses the App Service value when deployed.
Configure environment variable. Next, set ASPNETCORE_ENVIRONMENT app setting to Production. This setting lets you know whether you're running in Azure, because you use SQLite for your local development environment and SQL Database for your Azure environment.
az webapp config appsettings set --name <name of your app> --resource-group adc-sql-db-rg --settings ASPNETCORE_ENVIRONMENT="Production"
- Connect to SQL Database in production by opening the Startup.cs and finding the following code in your local repository:
services.AddDbContext<MyDatabaseContext>(options =>
     options.UseSqlite("Data Source=localdatabase.db"));
- Replace it with the following code, which uses the environment variables that you configured earlier.
// Use SQL Database if in Azure, otherwise, use SQLite
   if(Environment.GetEnvironmentVariable("ASPNETCORE_ENVIRONMENT") == "Production")
     services.AddDbContext<MyDatabaseContext>(options =>
         options.UseSqlServer(Configuration.GetConnectionString("MyDbConnection")));
   else
     services.AddDbContext<MyDatabaseContext>(options =>
         options.UseSqlite("Data Source=localdatabase.db"));

   // Automatically perform database migration
   services.BuildServiceProvider().GetService<MyDatabaseContext>().Database.Migrate();
If this code detects that it's running in production (which indicates the Azure environment), then it uses the connection string you configured to connect to the SQL Database.
TIP
📝 The Database.Migrate() call helps you when it's run in Azure, because it automatically creates the databases that your .NET Core app needs, based on its migration configuration.
- Save your changes, then commit it into your Git repository.
git add .
git commit -m "connect to SQL DB in Azure"
- Push to Azure from Git. Add an Azure remote to your local Git repository. Replace [Local Git URL] with the URL of the Git remote from step 7, when ypu did create the web app.
git remote add azure <Local Git URL>
- Push to the Azure remote to deploy your app with the following command. When Git Credential Manager prompts you for credentials, make sure you enter the credentials you created in Configure a deployment user, not the credentials you use to sign in to the Azure portal. This might take some time.
git push azure master
- Browse to the deployed app using your web browser.
http://<name of your app>.azurewebsites.net
# Cleanup
Remove the sample resource group:
az group delete --name adc-sql-db-rg