# Azure (Cognitive) Search
# Here is what you will learn 🎯
In this challenge you will learn how to:
- create an Azure Search Service in the Portal
- add Cognitive Skills to Azure Search
- integrate Azure Search in an Node.js application
- create an Azure Cognitive Search index in Python using Jupyter notebooks (optional)
# Table Of Contents
- What is Azure Cognitive Search?
- What are the Features of Azure Cognitive Search?
- Create an Azure Search Service in the Portal
- Querying Content
- Add Cognitive Skills to Azure Search - to index unstructured content (e.g. images, audio, etc.)
- Integrate Azure Search in an Node.js Application
- Cleanup
# What is Azure Cognitive Search?
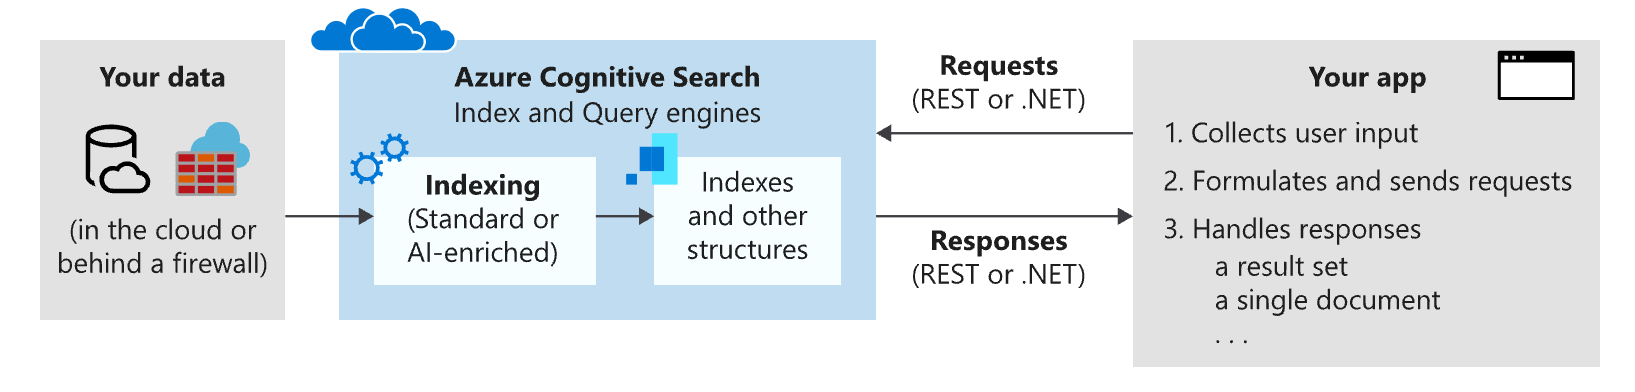
Azure Cognitive Search is a search-as-a-service cloud solution that gives developers APIs and tools for adding a rich search experience over private, heterogeneous content in web, mobile and enterprise applications. Your code or a tool invokes data ingestion (indexing) to create and load an index. Optionally, you can add cognitive skills to apply Artificial Intelligence processes during indexing. Doing so, you can add new information and structures useful for search and other scenarios.
Regarding your application, your code issues query requests and handles responses from Azure Search. The search experience is defined in your client using functionality from Azure Cognitive Search, with query execution over a persisted index that you create, own, and store in your service.
# What are the Features of Azure Cognitive Search?
| Core Search | Features |
|---|---|
| Free-form text search | Full-text search (opens new window) is a primary use case for most search-based apps. Queries can be formulated using a supported syntax. Simple query syntax (opens new window) provides logical operators, phrase search operators, suffix operators, precedence operators. Lucene query syntax (opens new window) includes all operations in simple syntax, with extensions for fuzzy search, proximity search, term boosting, and regular expressions. |
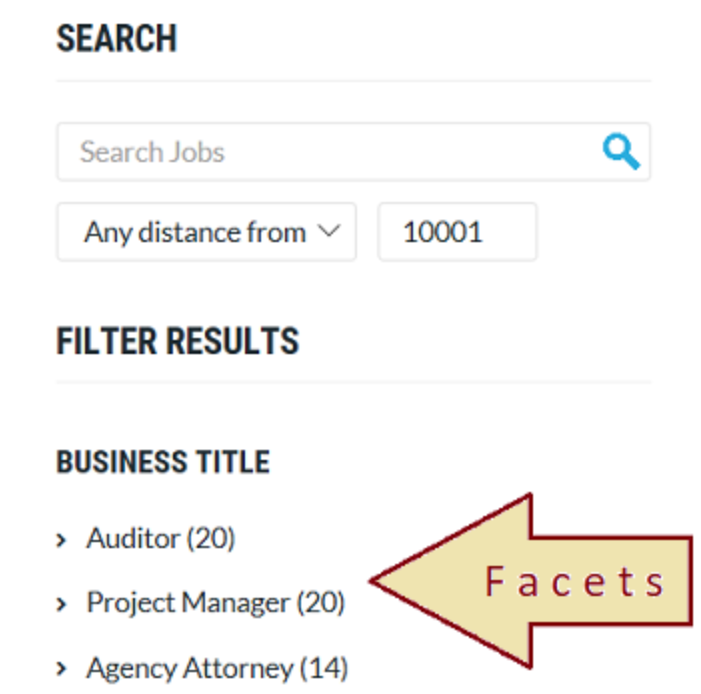
| Filters and facets | Faceted navigation (opens new window) is enabled through a single query parameter. Azure Cognitive Search returns a faceted navigation structure you can use as the code behind a categories list, for self-directed filtering (for example, to filter catalog items by price-range or brand). Filters (opens new window) can be used to incorporate faceted navigation into your application's UI, enhance query formulation, and filter based on user- or developer-specified criteria. Create filters using the OData syntax. |
# Facet Filters in a Search App
Faceted navigation is used for self-directed filtering on query results in a search app, where your application offers UI controls for scoping search to groups of documents (for example, categories or brands), and Azure Cognitive Search provides the data structure to back the experience.
In code, a query that specifies all parts of a valid query, including search expressions, facets, filters, scoring profiles– anything used to formulate a request, can look like the following example:
var sp = new SearchParameters()
{
    ...
    // Add facets
    Facets = new[] { "businessTitle" }.ToList()
};
This example builds a request that creates facet navigation based on the business title information.
Facets are dynamic and returned on a query. Search responses bring with them the facet categories used to navigate the results.
TIP
📝You can find more details here: Search-Filters-Facets (opens new window)
In the SCM Application, we are using the Lucene query syntax (Lucene Query Syntax Examples (opens new window)).
TIP
📝 View the full Azure Cognitive Search Feature list here: Azure Cognitive Search Feature list (opens new window)
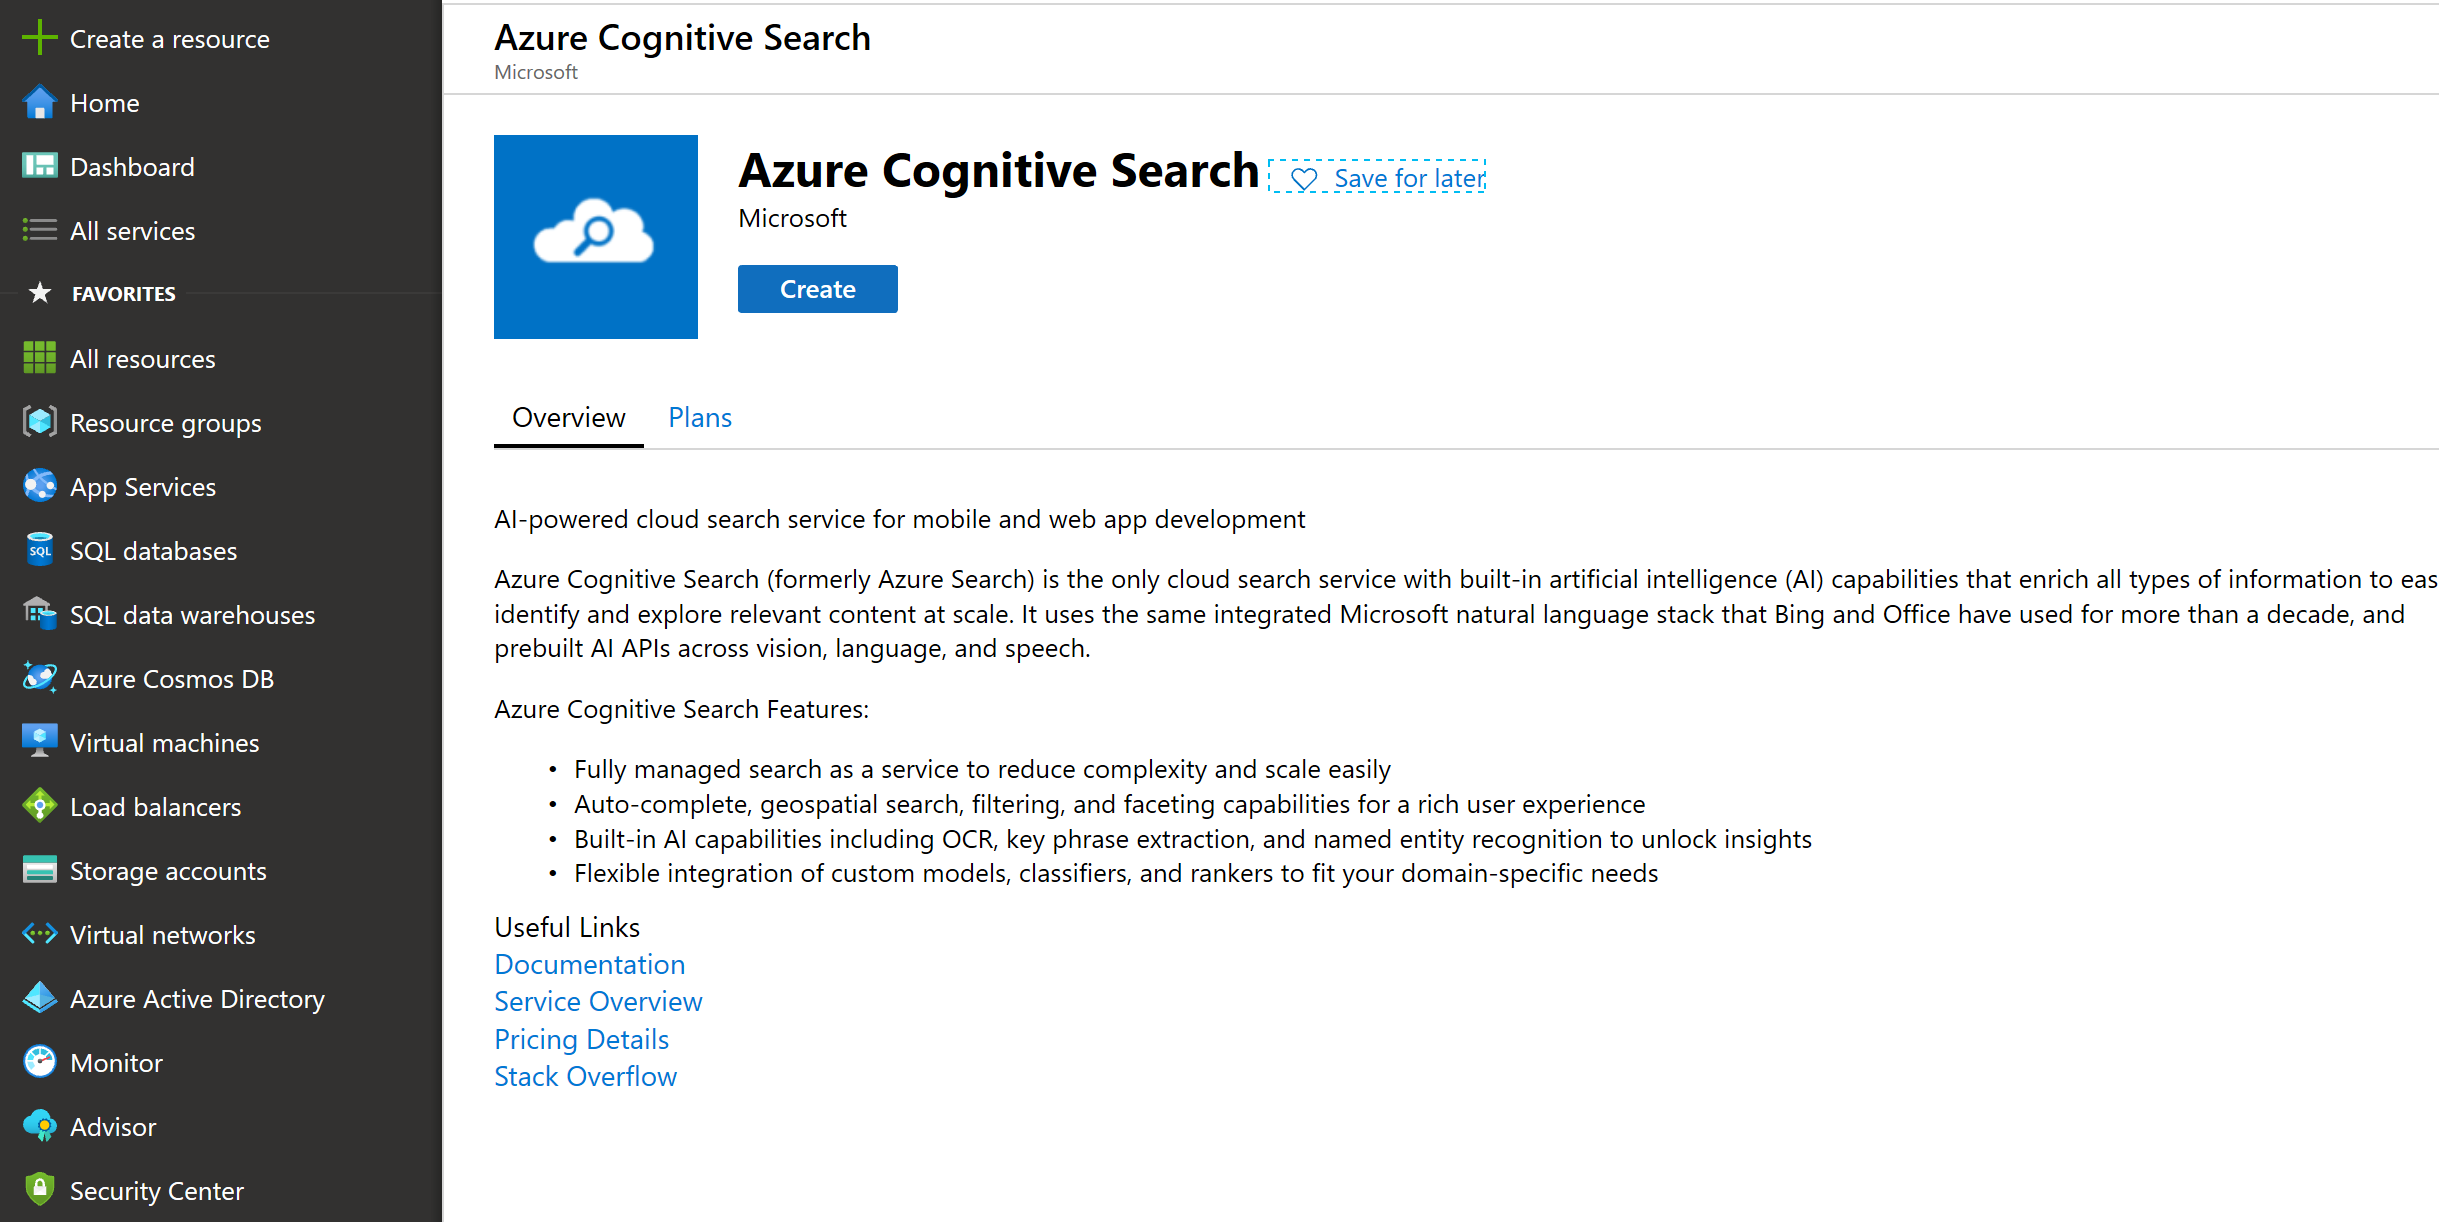
# Create an Azure Search Service in the Portal
Create a new resource group, e.g. adc-azsearch-db-rg and add a service of type Azure Cognitive Search
First, create a
Azure Searchinstance in the Azure PortalFor our purposes, the
Free Tieris sufficient
However, the Free Tier does not support additional replicas, scaling and is only able to index documents with up to 32000 characters/document. If we want to index larger documents, we need to go to a bigger tier (64000 for Basic, 4m for Standard and above).
View the Details of Creating an Azure Search Service in the Portal:
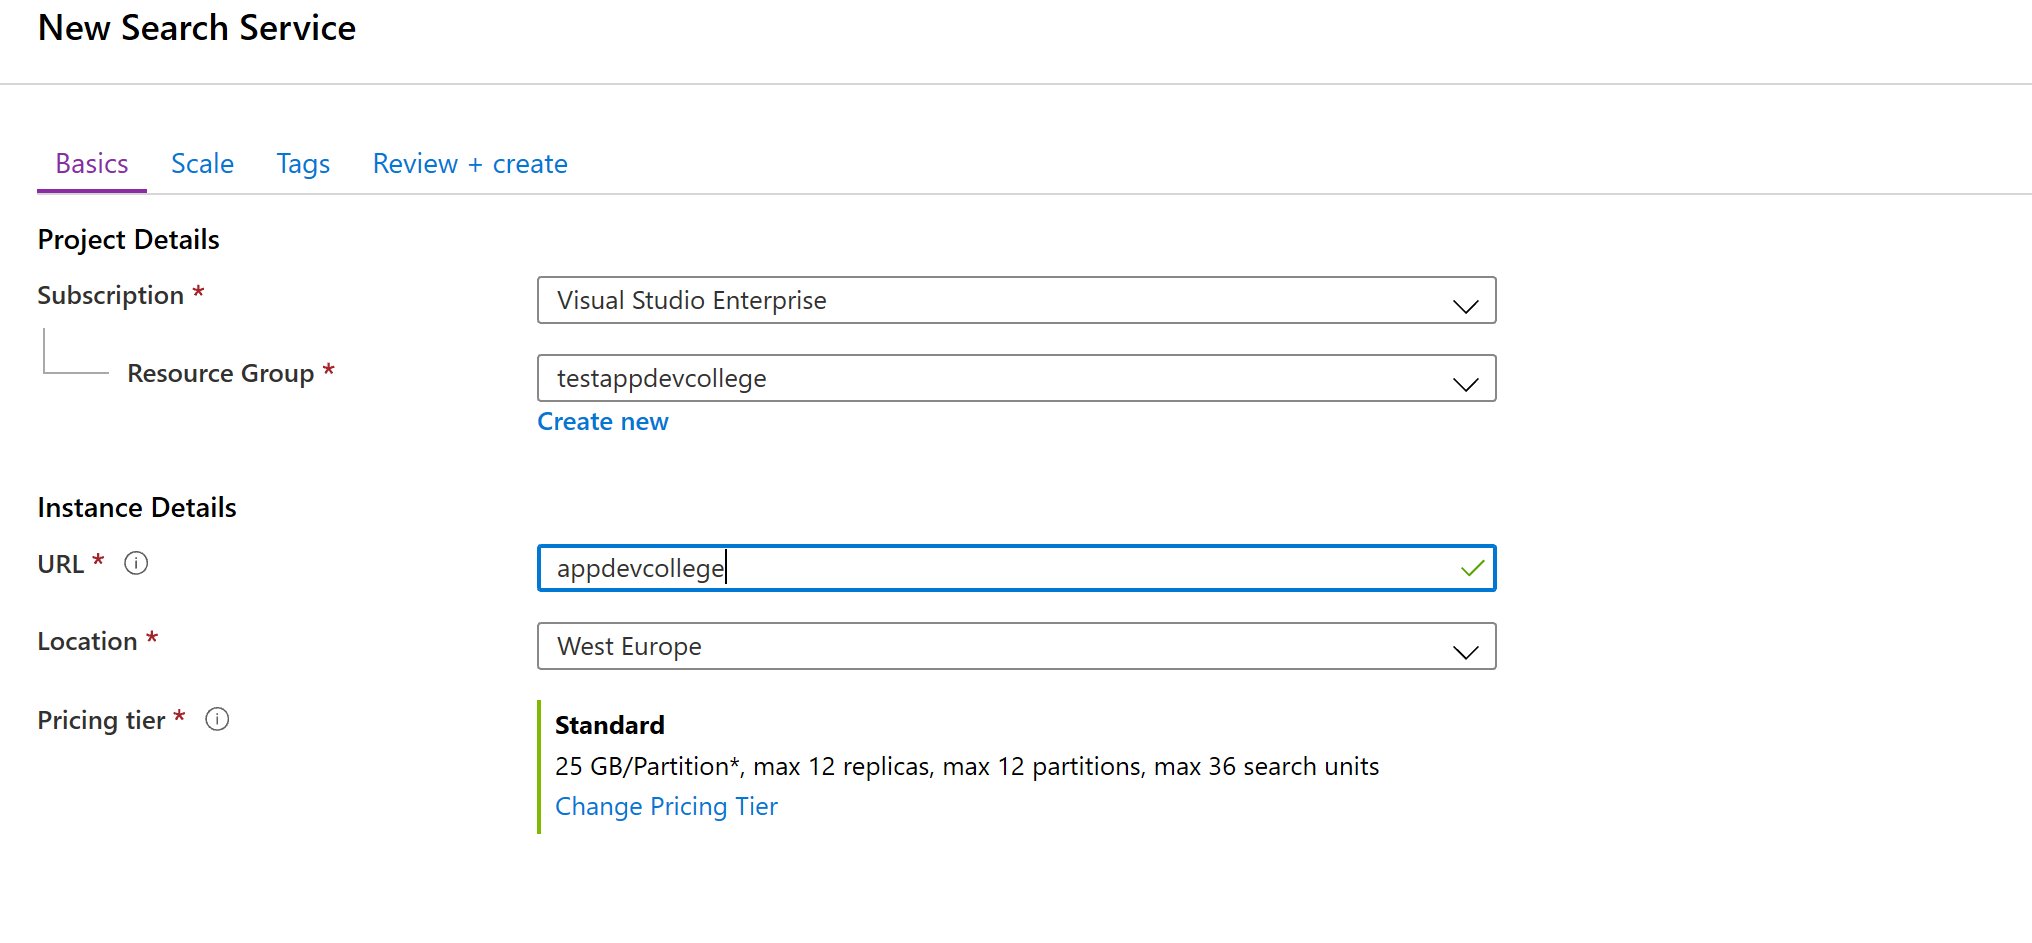
Once provisioned, our service will be reachable via https://xxxxxxx.search.windows.net
Azure Search can index (opens new window) data from a variety of sources:
- Azure SQL Database or SQL Server on an Azure virtual machine
- Azure Cosmos DB
- Azure Blob Storage
- Azure Table Storage
- Indexing CSV blobs using the Azure Search Blob indexer
- Indexing JSON blobs with Azure Search Blob indexer
In general, you can upload your data to one of the sources and let Azure Search index it from there. You can do this completely through the Azure Portal, use Storage Explorer (opens new window) or use the API/CLI.
In our case, we'll choose a sample dataset called hotel-sample
Open your Azure Search instance and go to
Import DataNext, we need to define the
Data Sourceand choose Samples and selecthotels-sampledataset
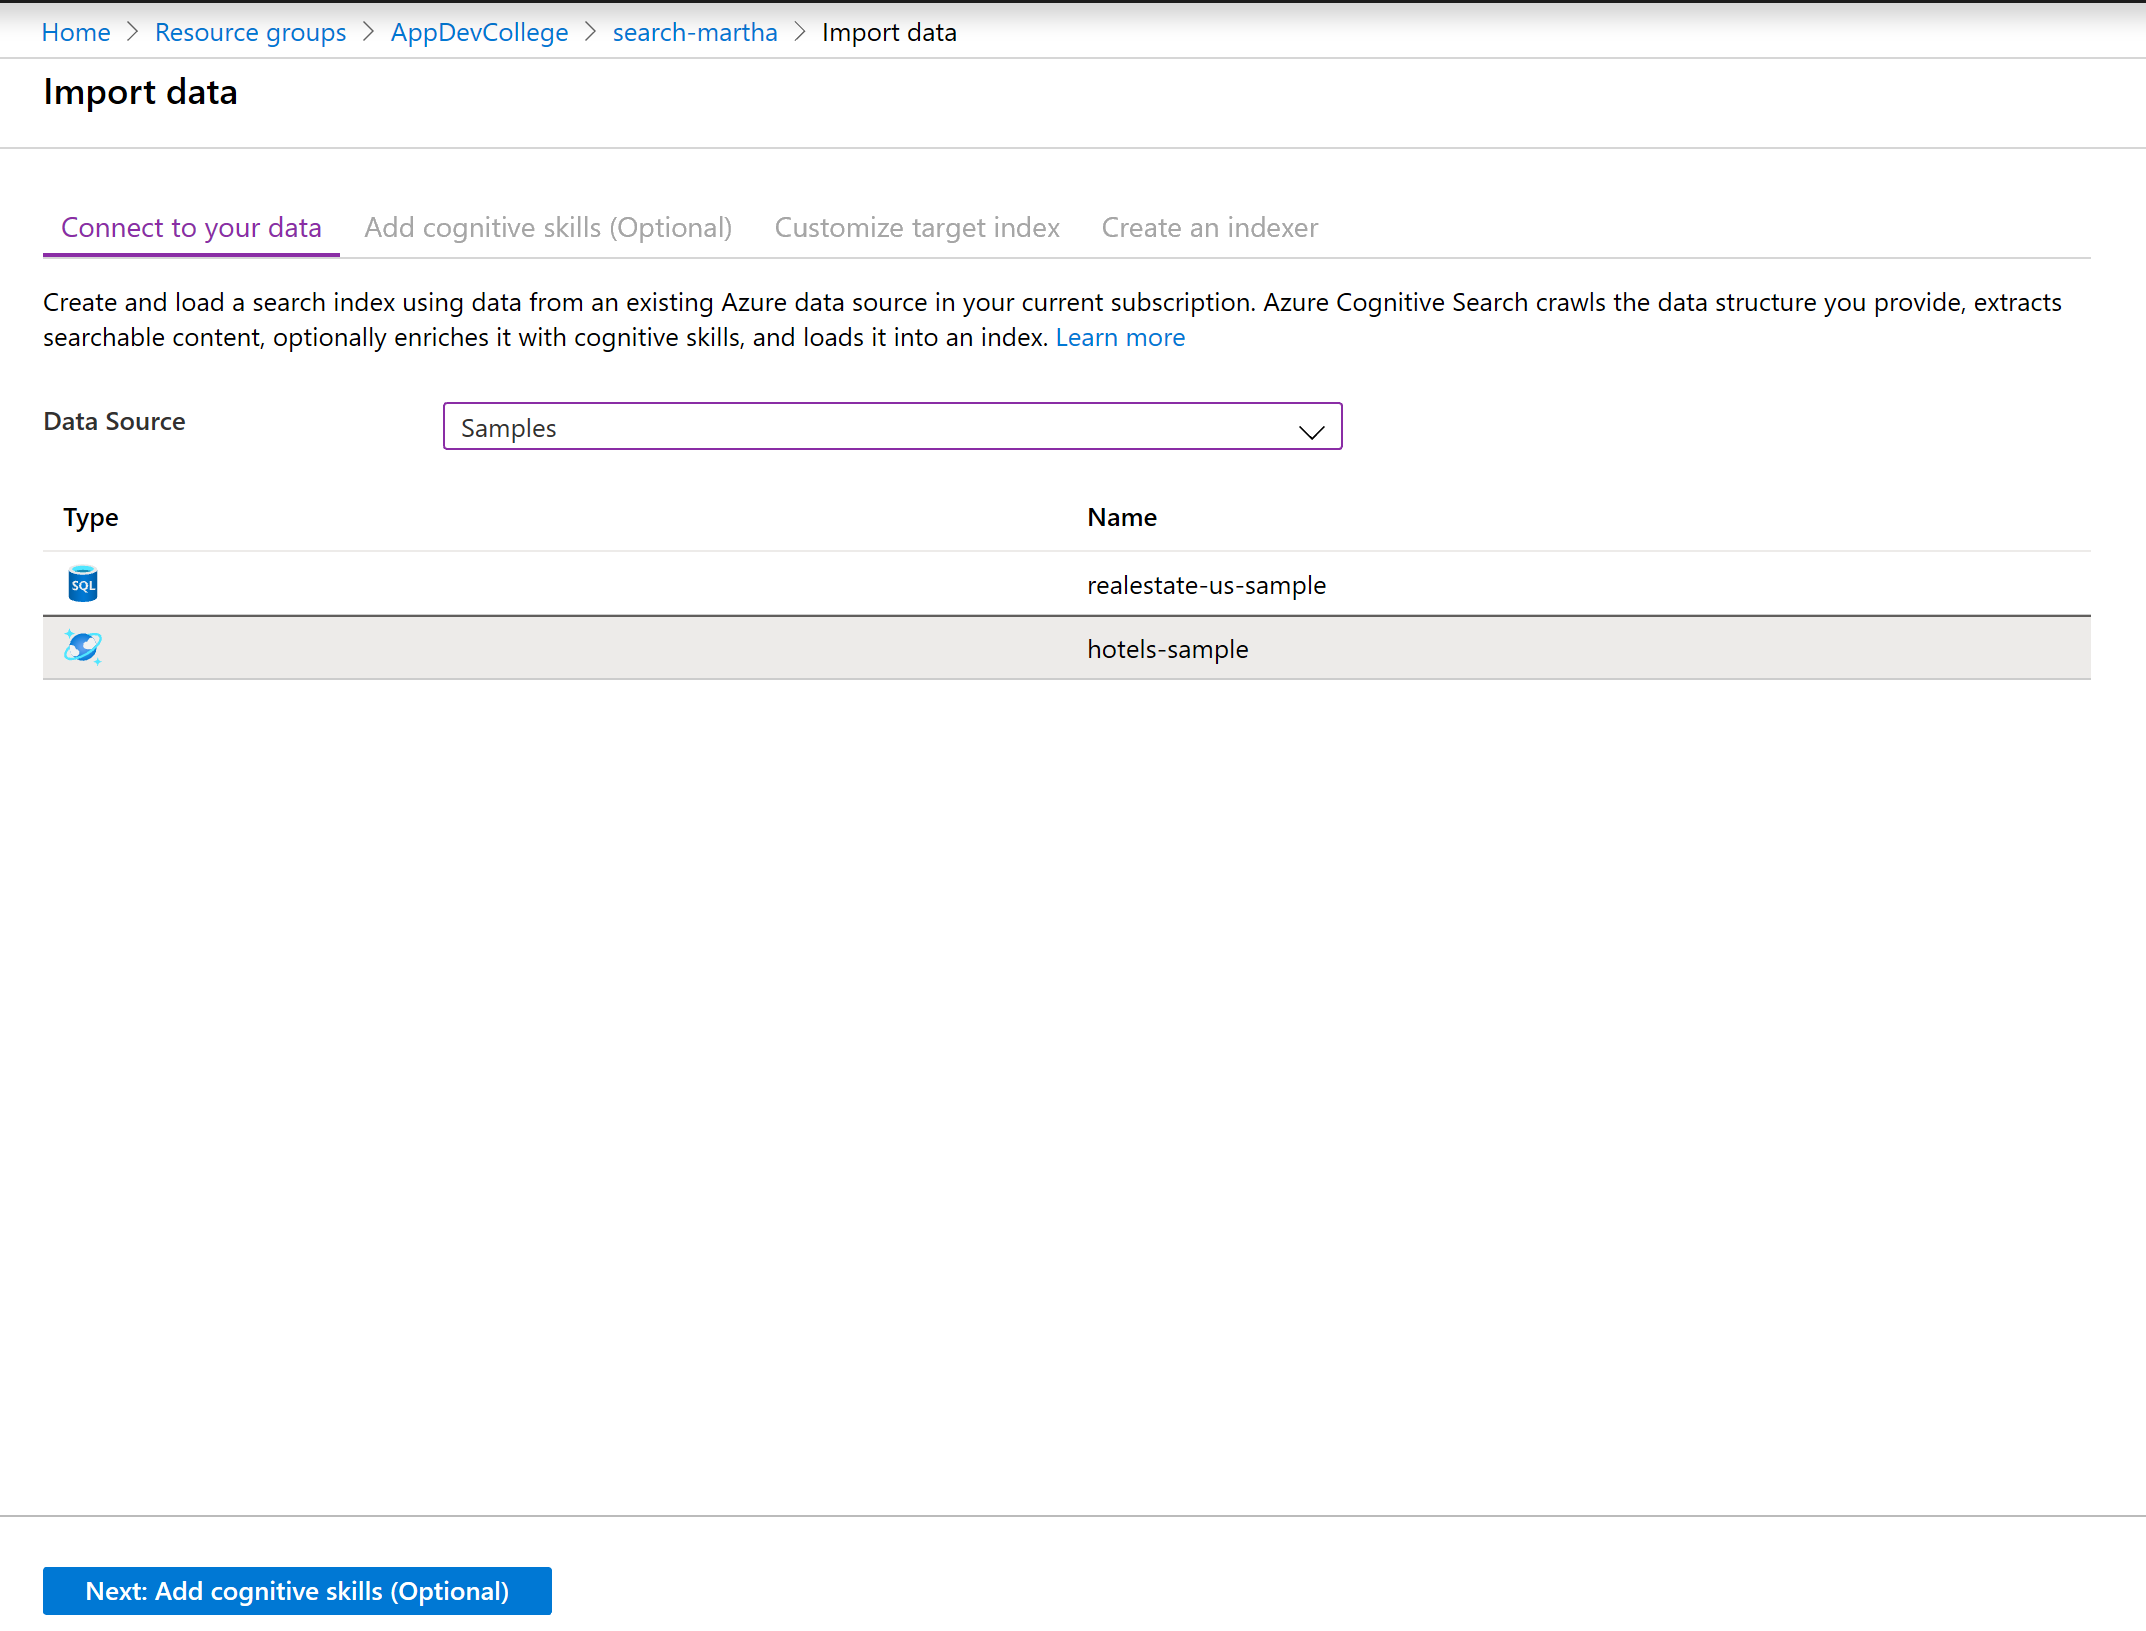
We'll skip
Cognitive Searchfor this example.Now let's proceed to creating an index. Minimally, an index requires a name and a fields collection; one of the fields should be marked as the document key to uniquely identify each document. Additionally, you can specify language analyzers or suggesters (type-as-you-go services), if you want autocomplete or suggested queries.
Fields have data types and attributes. The check boxes above the list are index attributes, controlling how the field is used.
- Retrievable means that it shows up in search results list. You can mark individual fields as off limits for search results by clearing this checkbox, for example for fields used only in filter expressions or security-related fields.
- Key is the unique document identifier. It's always a string, and it is required.
- Filterable, Sortable, and Facetable determine whether fields are used in a filter, sort, or faceted navigation structure.
- Searchable means that a field is included in full text search. Strings are searchable. Numeric fields and Boolean fields are often marked as not searchable.
Storage requirements do not vary as a result of your selection. For example, if you set the Retrievable attribute on multiple fields, storage requirements do not rise.
By default, the wizard scans the data source for unique identifiers as the basis for the key field. Strings are attributed as Retrievable and Searchable. Integers are attributed as Retrievable, Filterable, Sortable, and Facetable.
Accept the defaults.
If you rerun the wizard a second time using an existing hotels data source, the index won't be configured with default attributes. You'll have to manually select attributes on future imports.
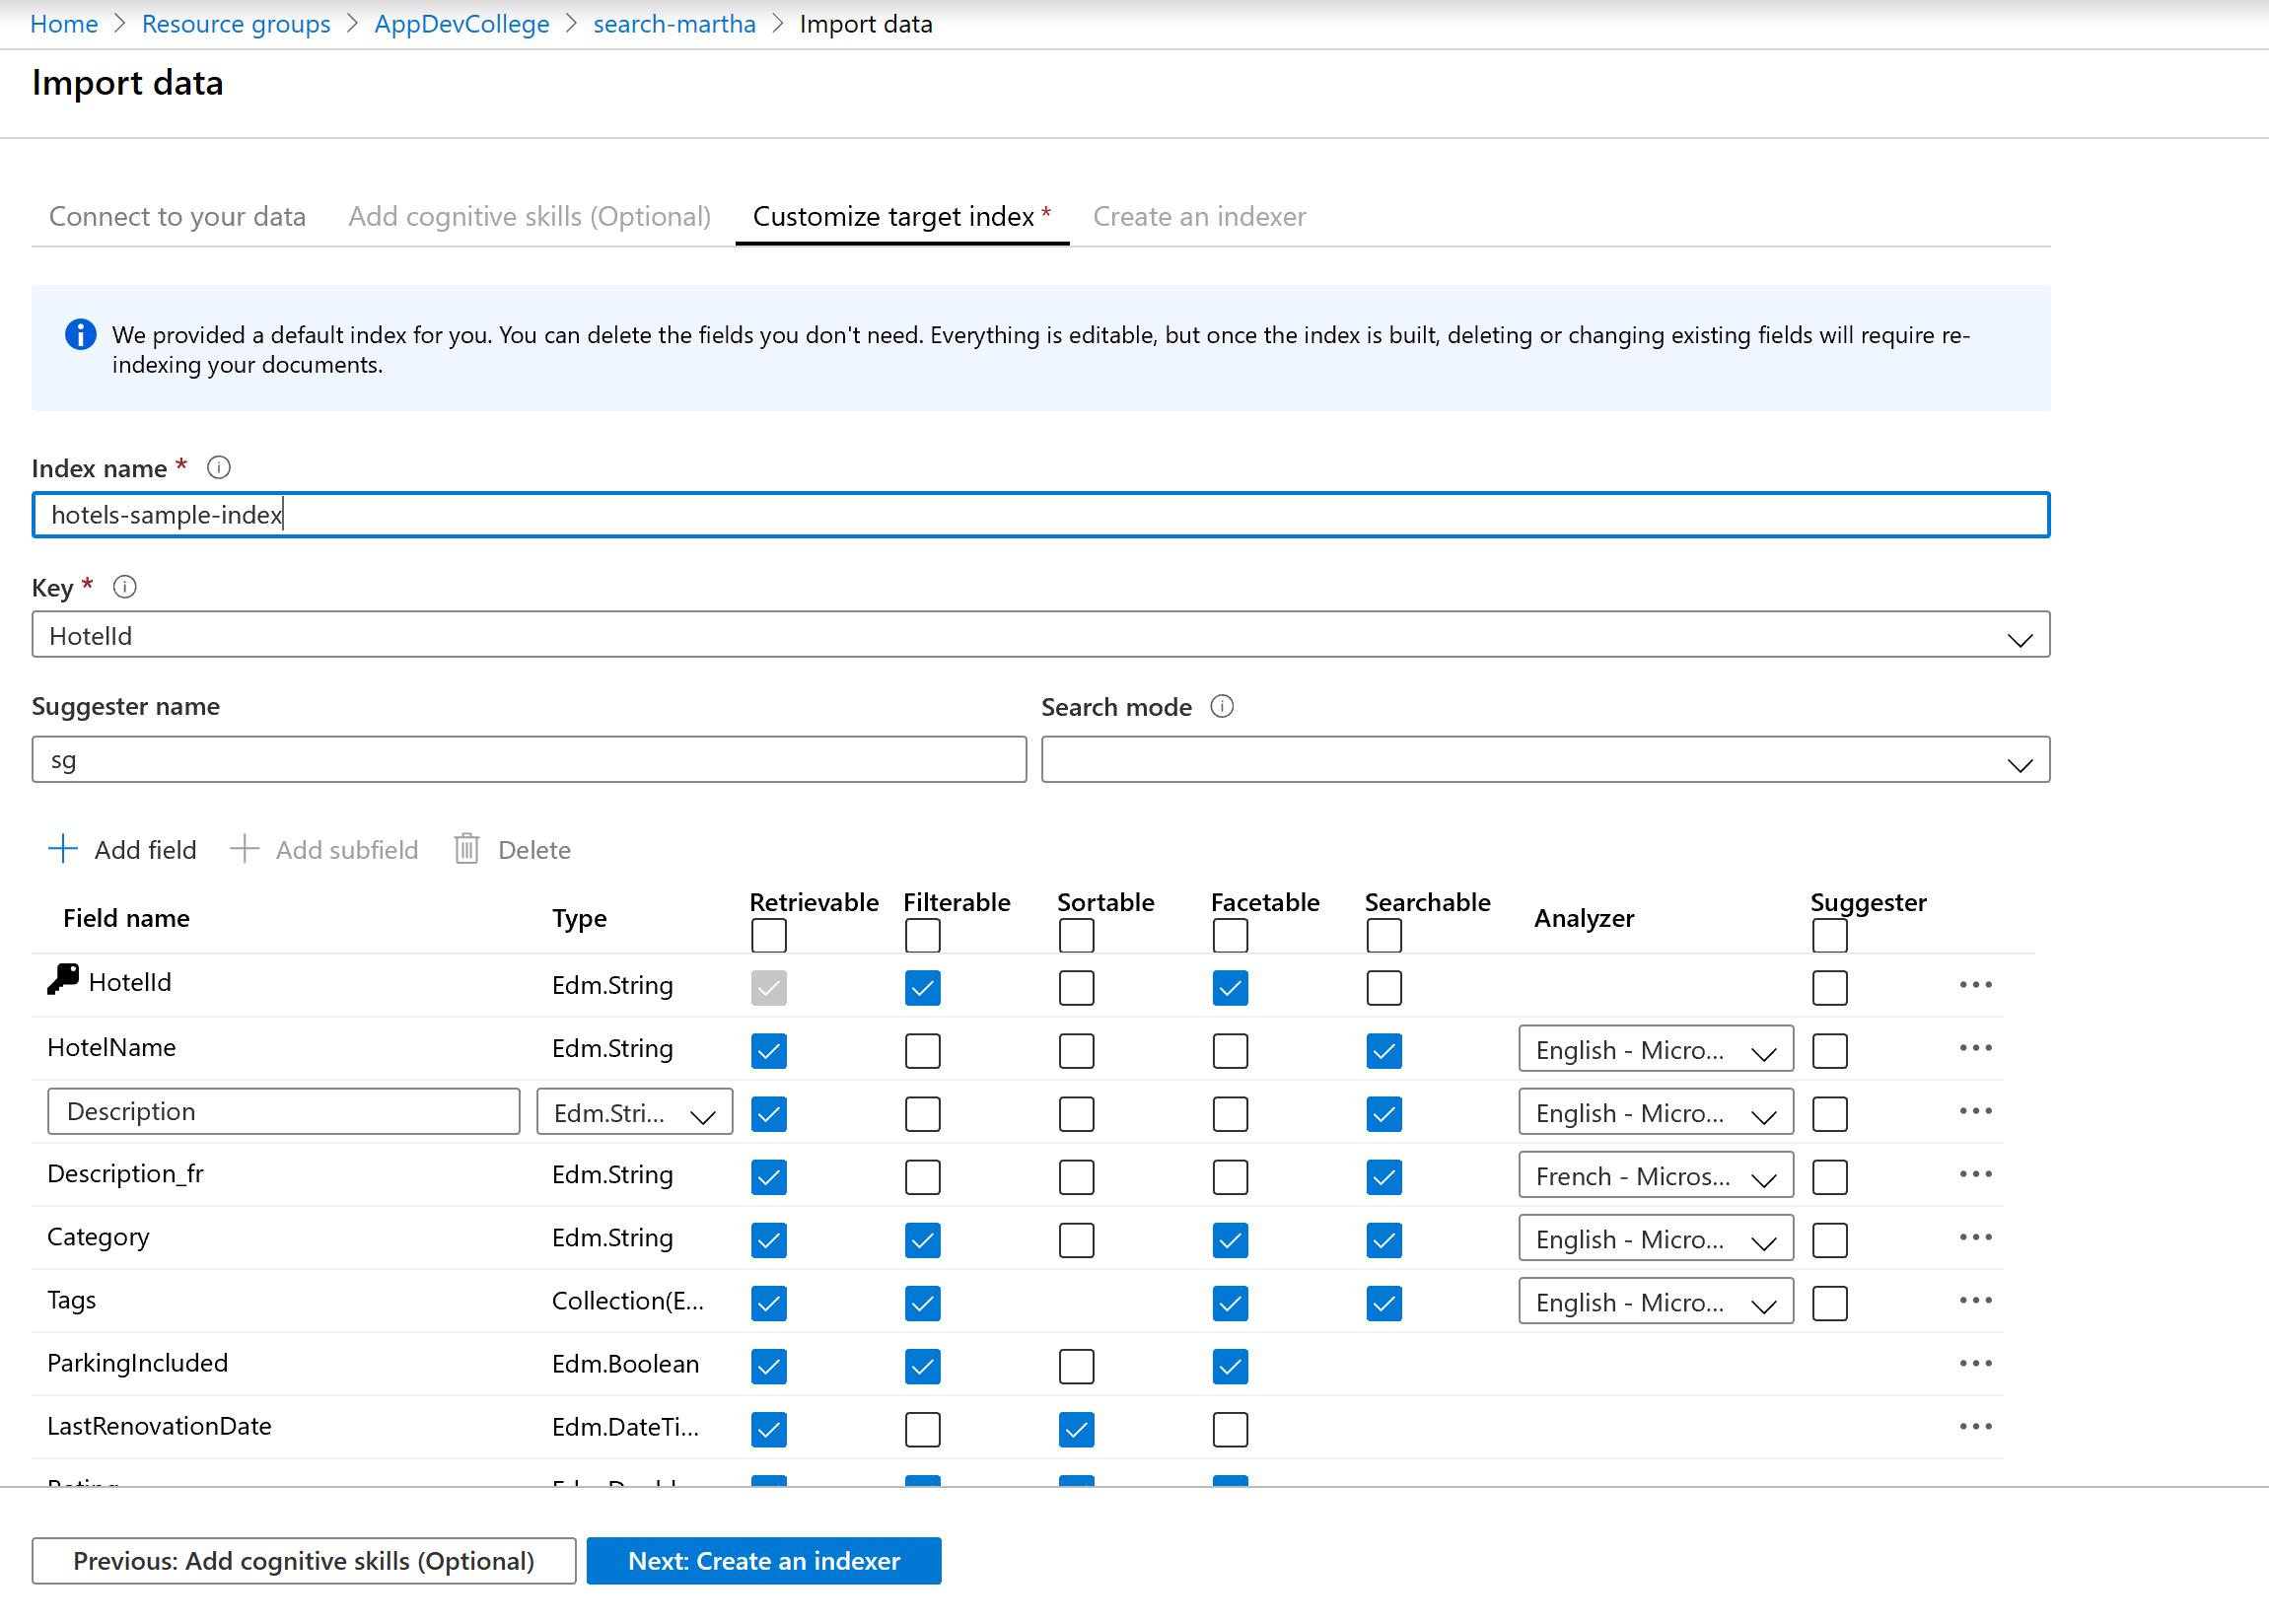
Continue to the next page.
Still in the Import data wizard, click Indexer > Name, and type a name for the indexer.
This object defines an executable process. You could put it on recurring schedule, but for now use the default option to run the indexer once, immediately.
Click Submit to create and simultaneously run the indexer.
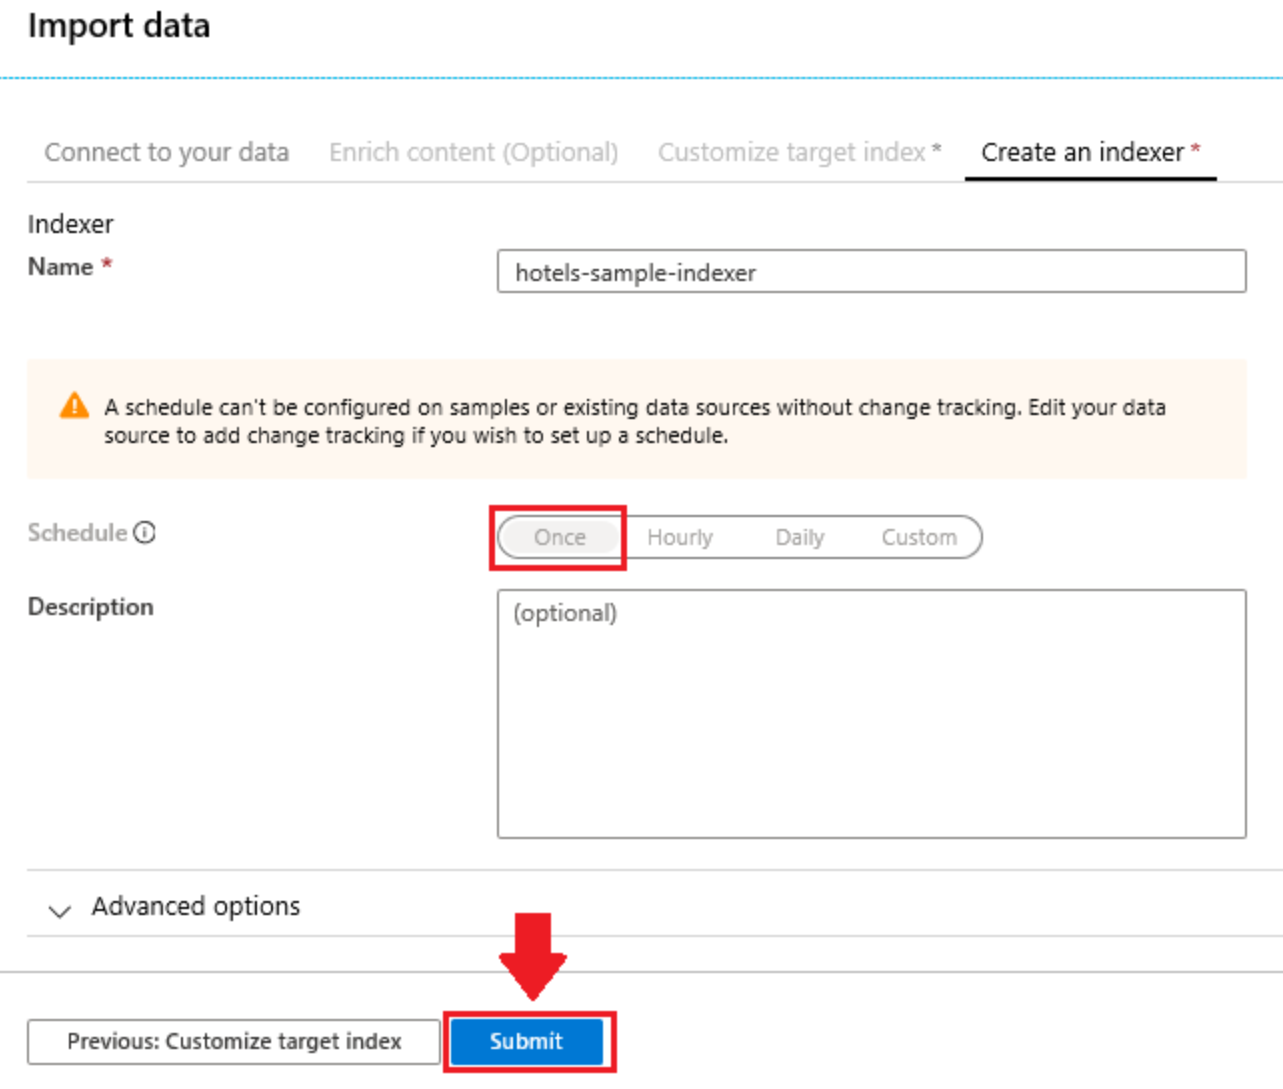
- After a minute or two, our Indexer will have indexed the hotel dataset and we should be able to query them.
# Querying Content
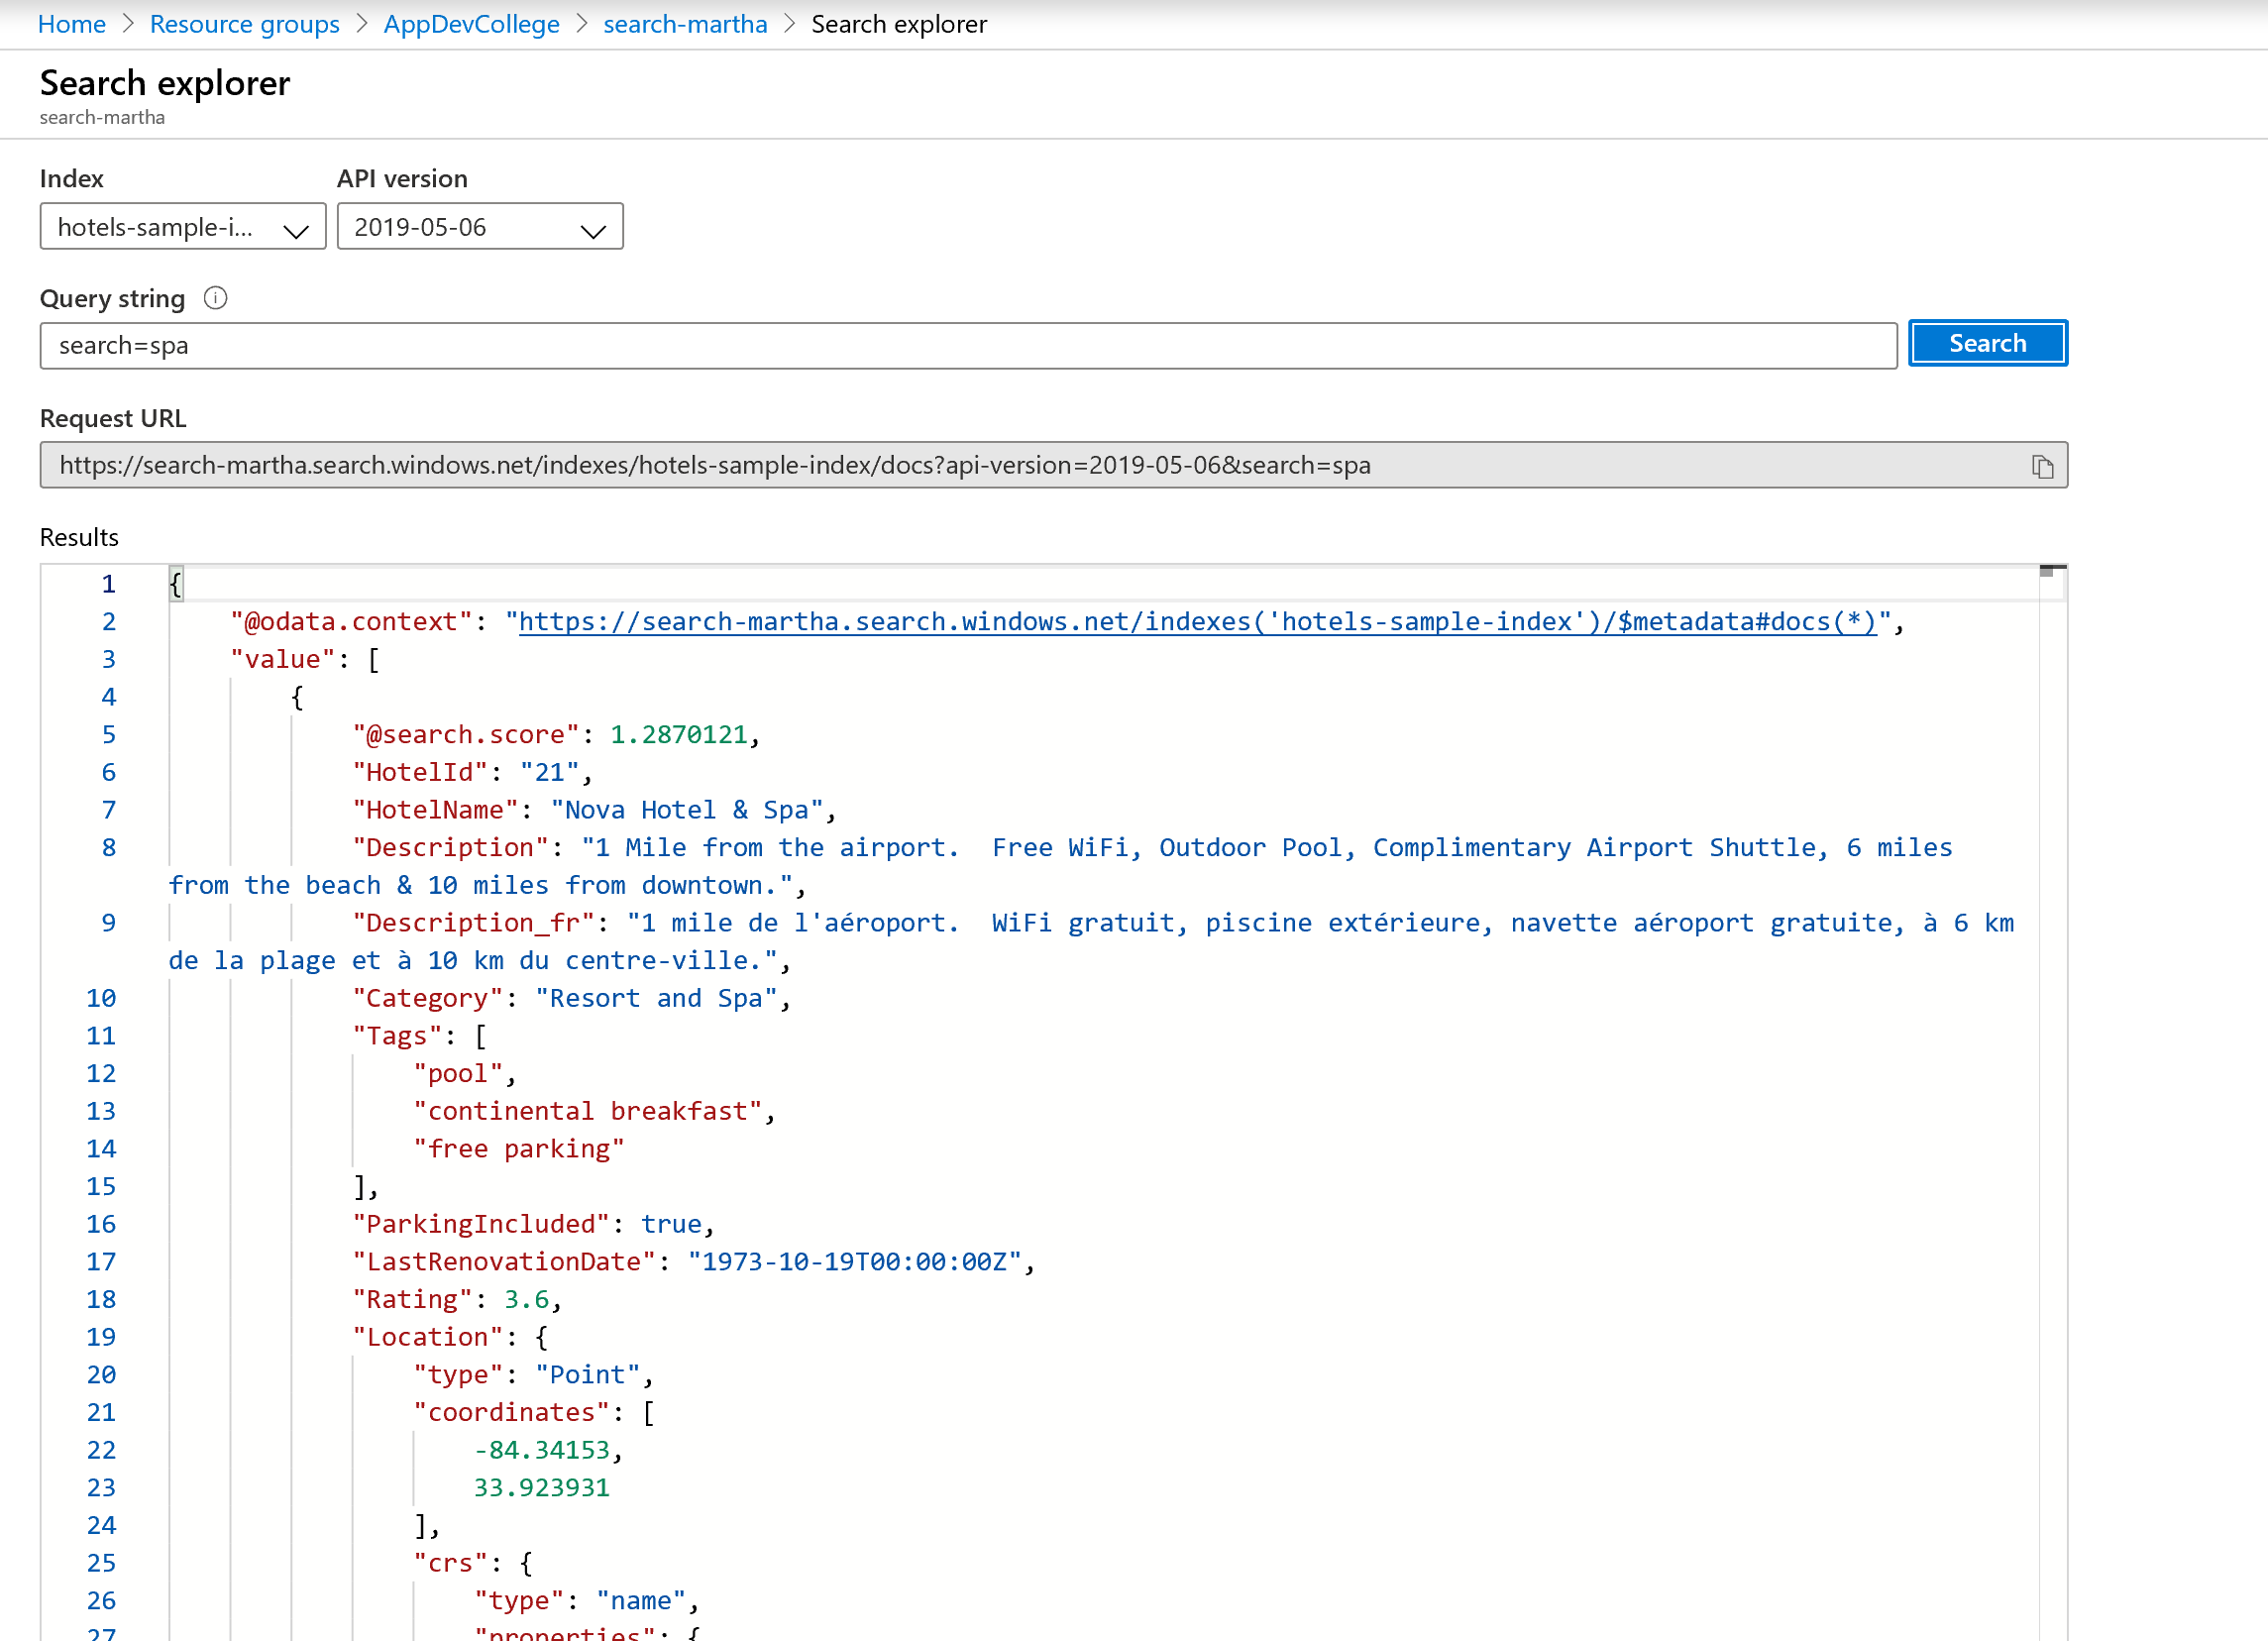
Open the Search Explorer in the Azure Portal, copy the queries (see below) and get familiar with the results of the queries:
# Simple query with top N results
# String Query: search=spa
The search parameter is used to input a keyword search for full text search, in this case, returning hotel data for those containing spa in any searchable field in the document.
Search explorer returns results. You see that results are returned in OData notation making them easily readable by any language/other service.
Documents are composed of all fields marked as "retrievable" in the index. To view index attributes in the portal, click hotels-sample in the Indexes list.
# Parameterized Query: search=spa&$count=true&$top=10
The & symbol is used to append search parameters, which can be specified in any order.
The $count=true parameter returns the total count of all documents available/found in the Azure Search index - not returned. You can verify filter queries by monitoring changes reported by $count=true. Smaller counts indicate your filter is working.
The $top=10 returns the highest ranked 10 documents out of the total ($count). By default, Azure Cognitive Search returns the first 50 best matches. You can increase or decrease the amount via $top parameter.

# Filter the query
Filters are included in search requests when you append the $filter parameter.
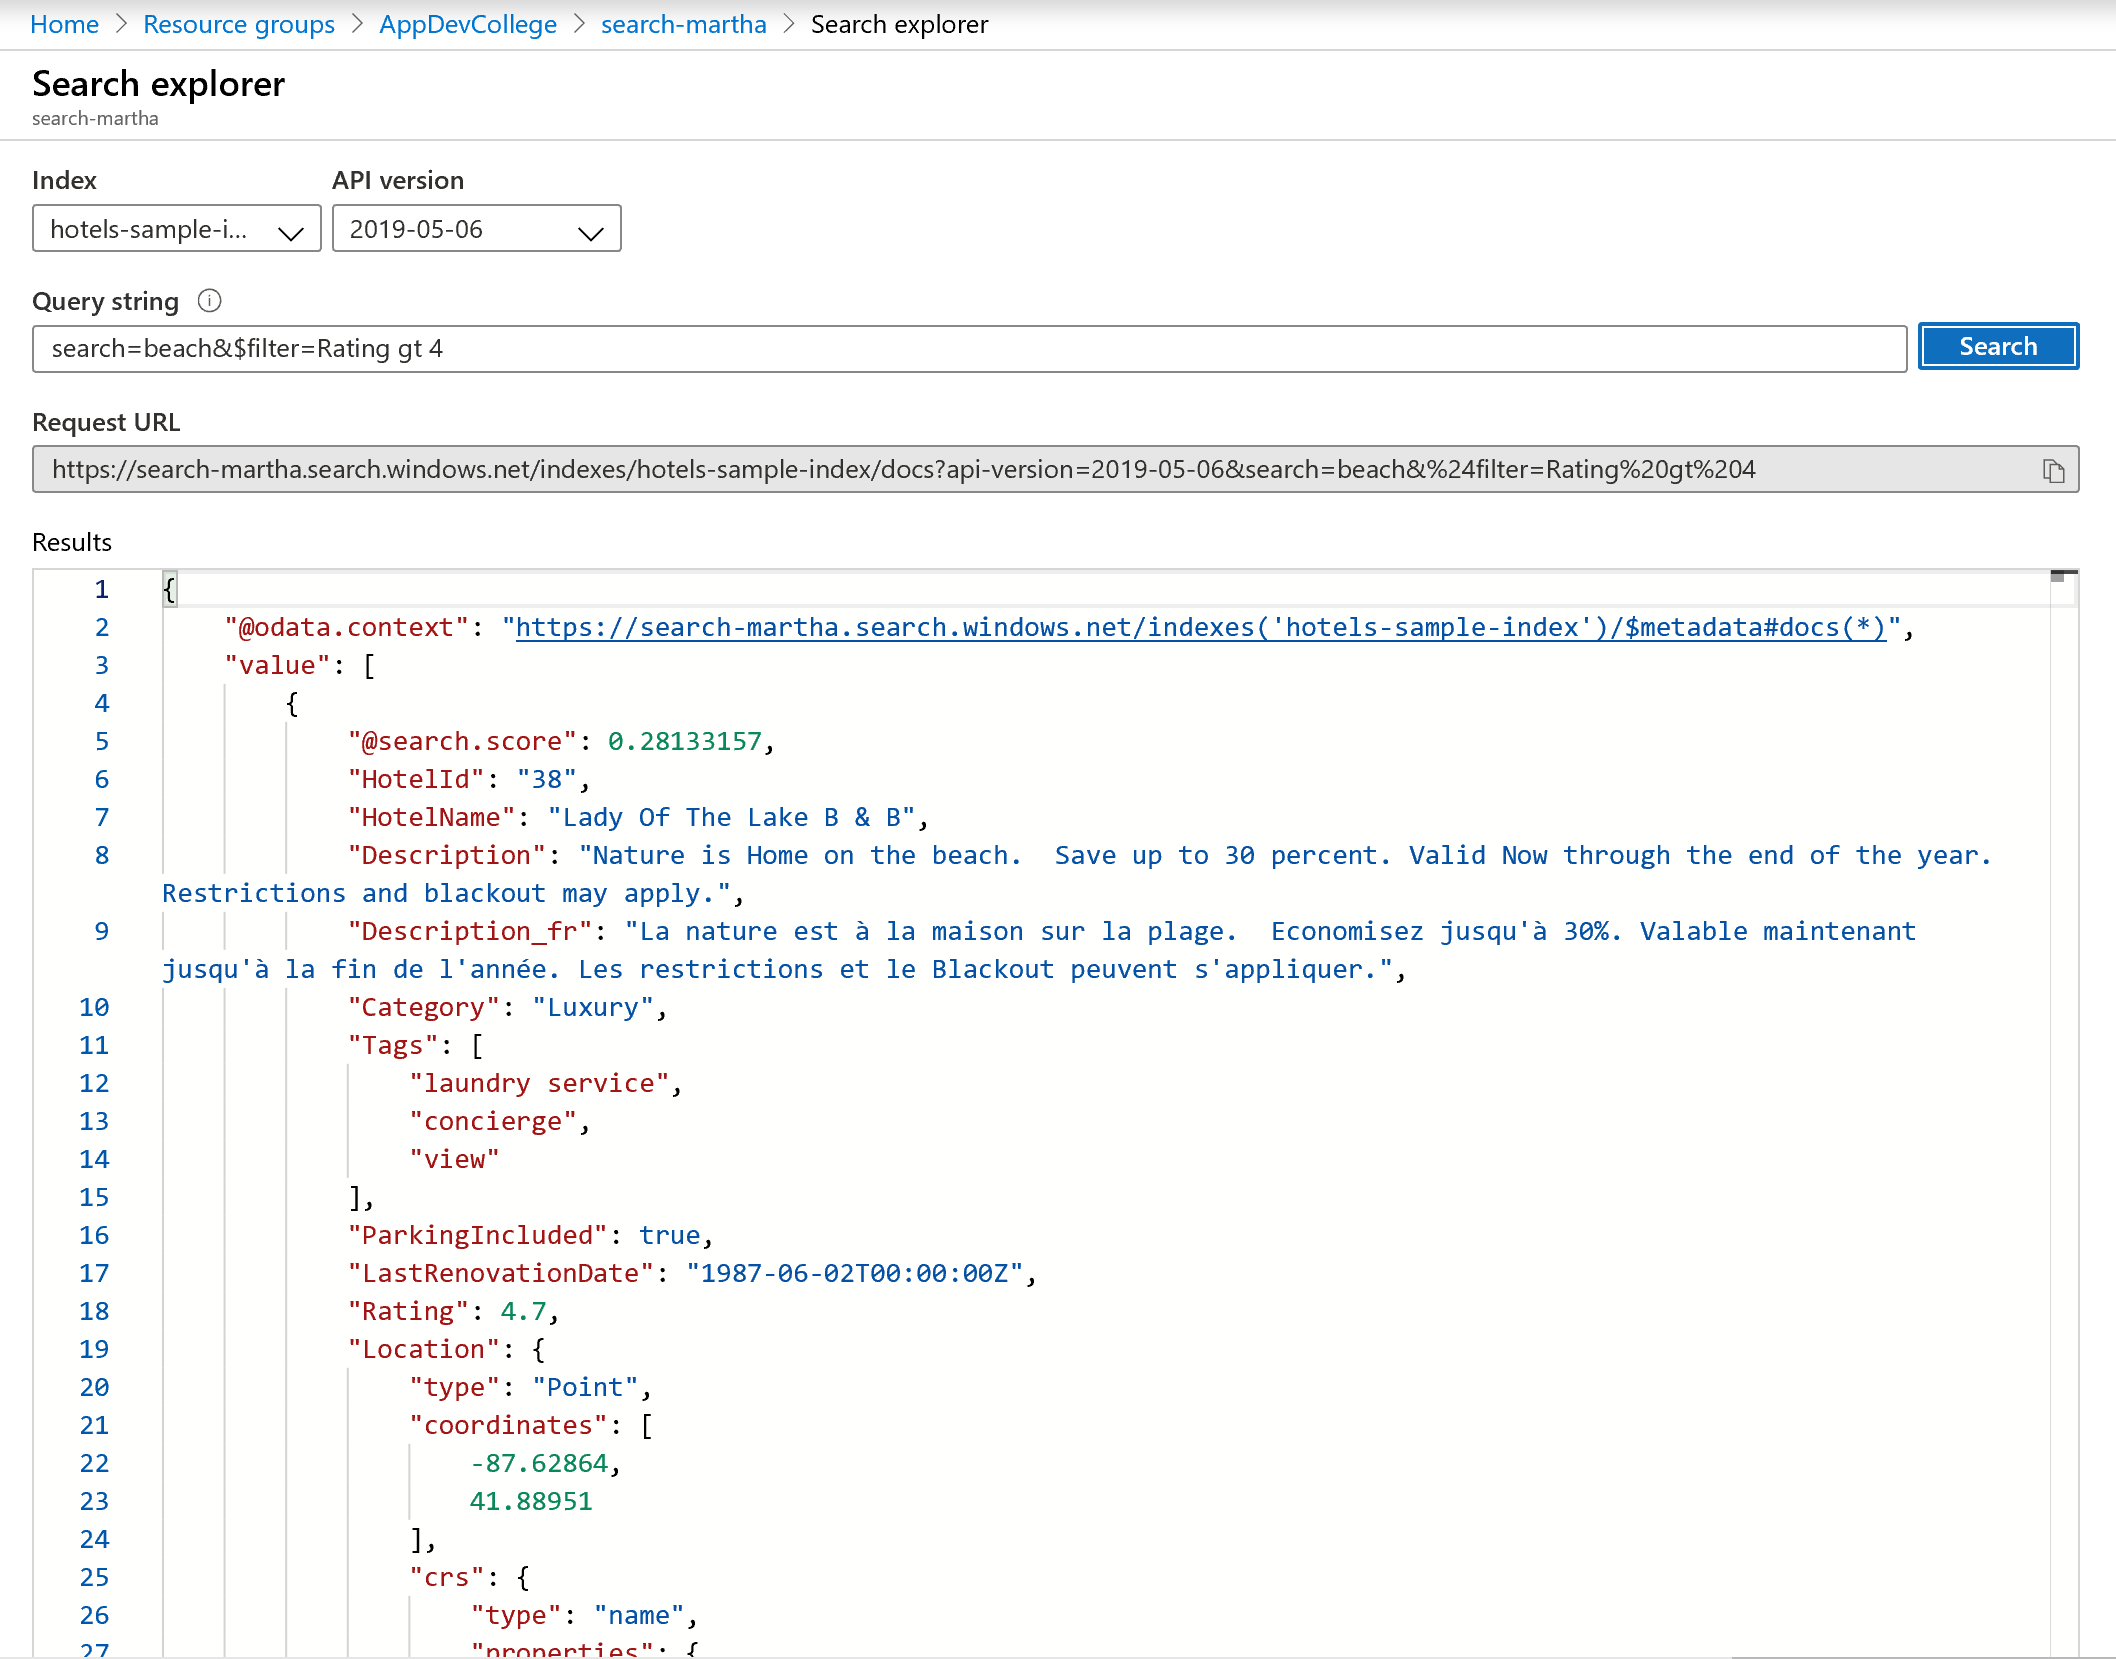
# Filtered Query: search=beach&$filter=Rating gt 4
The $filter parameter returns results matching the criteria you provided. In this case: ratings greater than 4.
Filter syntax is an OData expression.
TIP
📝For more information, see Filter OData syntax (opens new window).
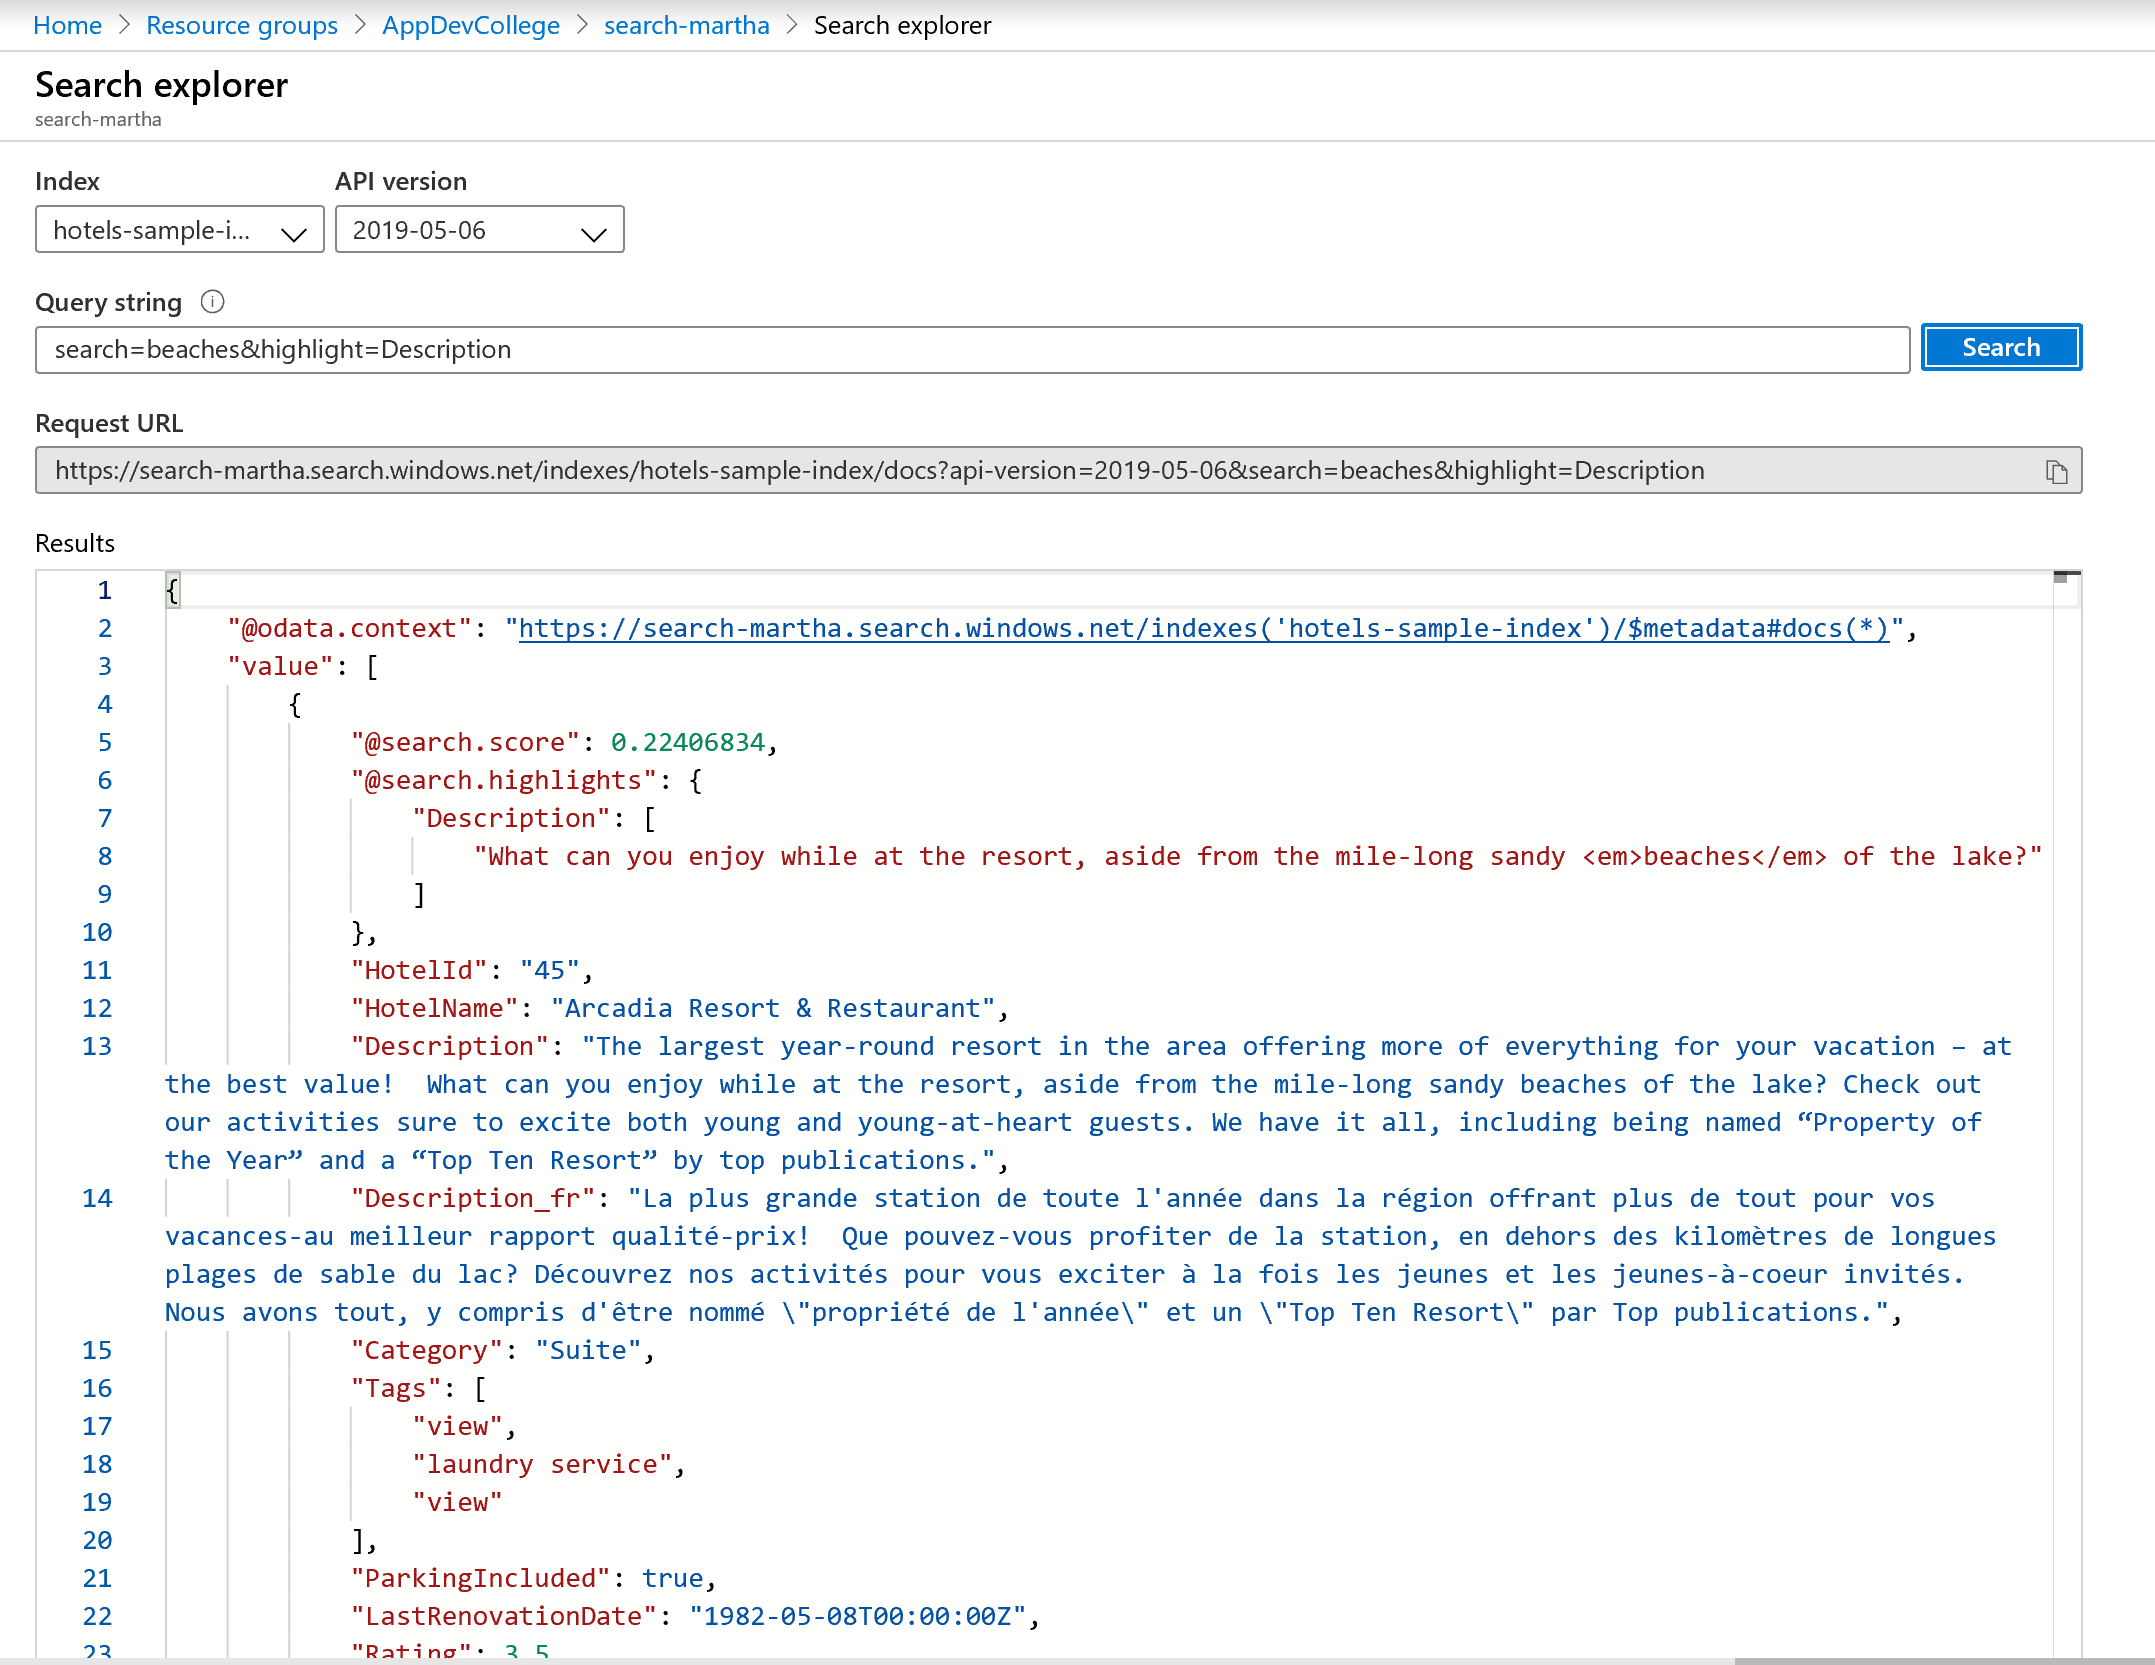
# Linguistic Analysis Query: search=beaches&highlight=Description
Full text search recognizes basic variations in word forms. In this case, search results contain highlighted text for "beach", for hotels that have that word in their searchable fields, in response to a keyword search on "beaches". Different forms of the same word can appear in results because of linguistic analysis.
TIP
📝 Highlighting works by inserting HTML tags ```´´´. You have to add the corresponding CSS (or functionality), to handle the highlighting in your application.
Azure Cognitive Search supports 56 analyzers from both Lucene and Microsoft (including the same that are used in Office 365). The default used by Azure Cognitive Search is the standard Lucene analyzer.
# Try fuzzy search
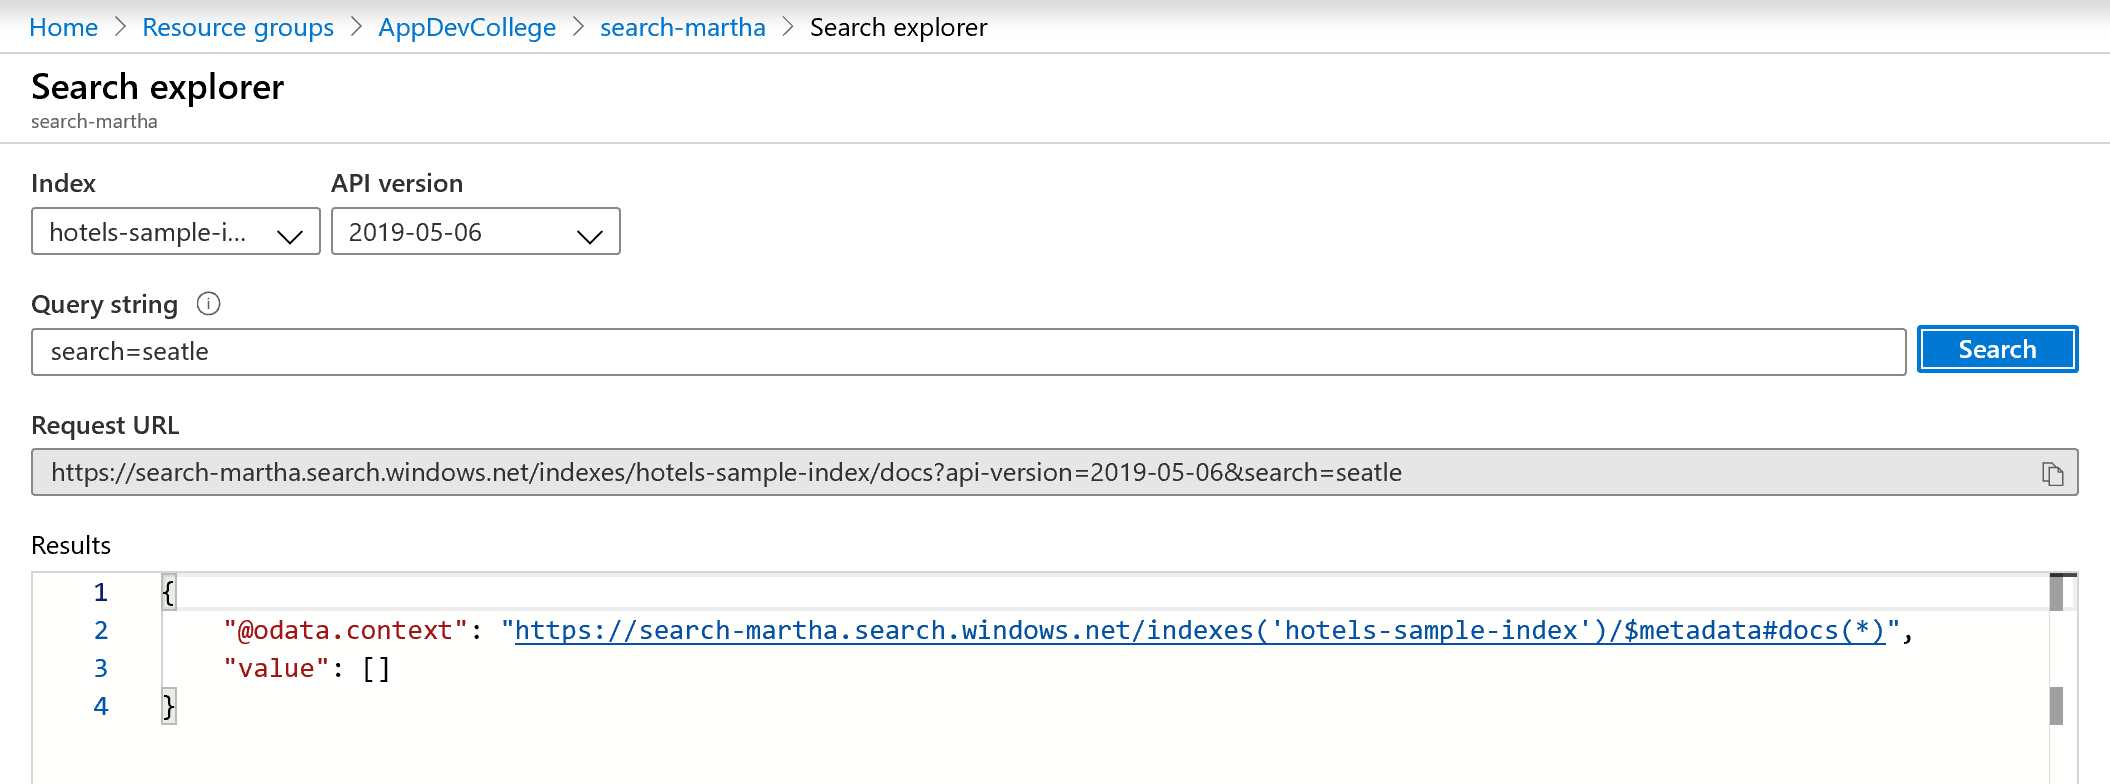
By default, misspelled query terms, like seatle for "Seattle", fail to return matches in a typical search. The following example returns no results.
# Example (misspelled term, unhandled): search=seatle
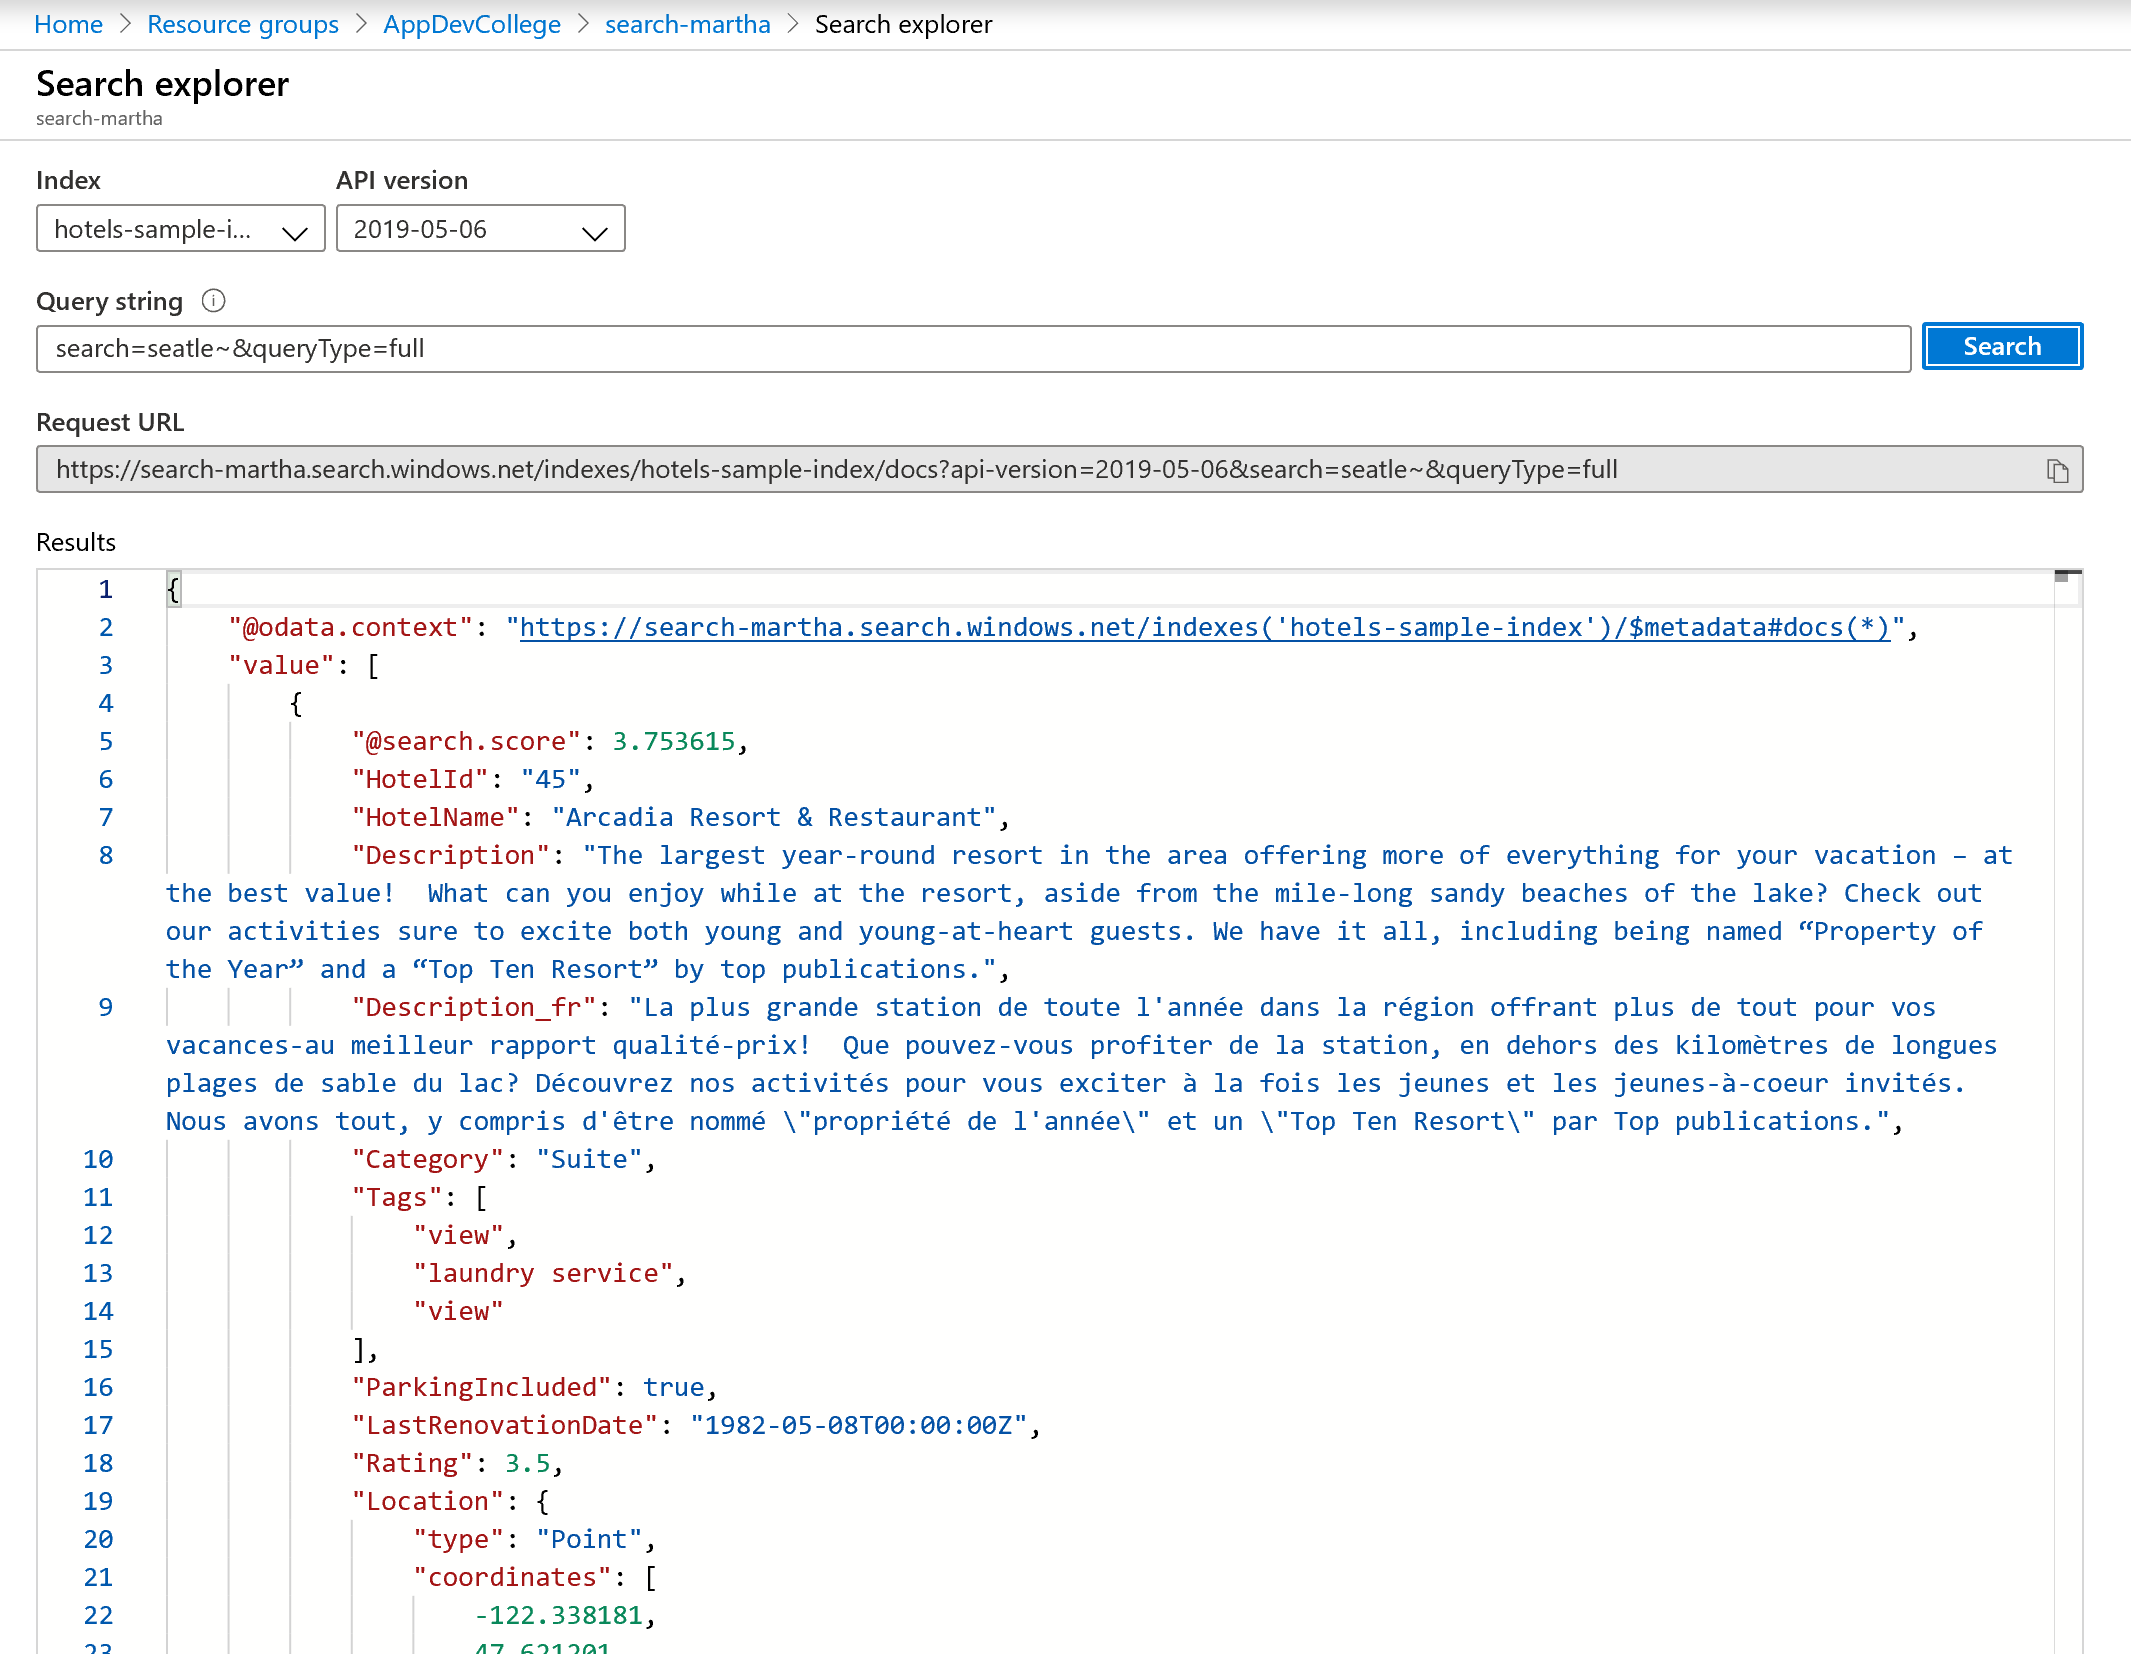
To handle misspellings, you can use fuzzy search. Fuzzy search is enabled when you use the full Lucene query syntax, which occurs when you do two things: set queryType=full on the query, and append the ~ to the search string.
# Example (misspelled term, handled): search=seatle~&queryType=full
This example now returns documents that include matches on "Seattle".
When queryType is unspecified, the default simple query parser is used. The simple query parser is faster, but if you require fuzzy search, regular expressions, proximity search or other advanced query types, you will need the full syntax.
# Add Cognitive Skills to Azure Search - to index unstructured content (e.g. images, audio, etc.)
Azure Cognitive Search (opens new window) allows us to also index unstructured data. More precisely, it add capabilities for data extraction, natural language processing (NLP), and image processing to Azure Search indexing pipeline (for more see here (opens new window)). In Azure Cognitive Search, a skill set is responsible for the pipeline of the data and consists of multiple skills. Some skills have been pre-included, but it is also possible for us to write our own skills.
Azure Cognitive Search (opens new window)
Let's see it in action. As before, let's choose a sample dataset and choose the SQL DB realestate-us-sample. Go to the Azure Search Service an click on Import Data.
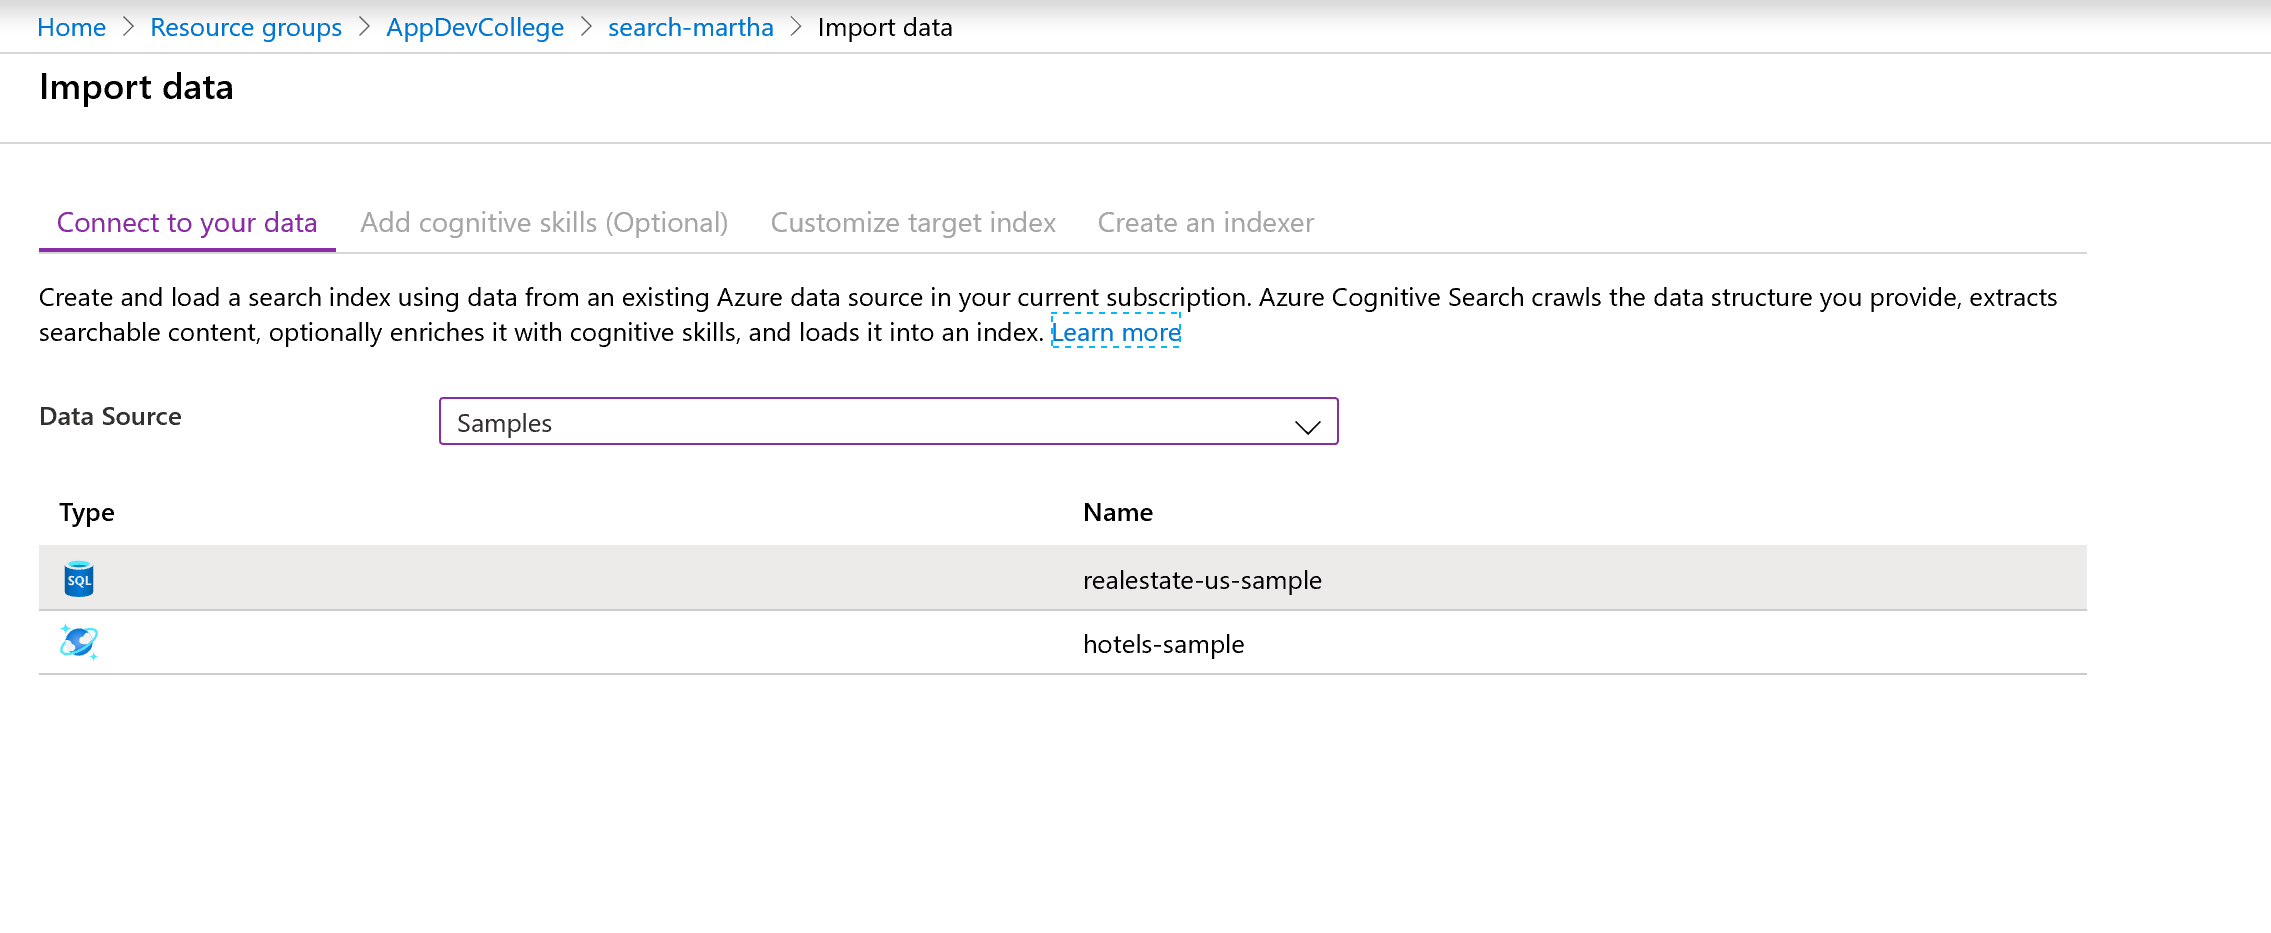
Once we're done, we'll repeat the steps from before, Import Dataset, walk through the wizard, but this time, we'll configure the Cognitive Search part in the second tab.
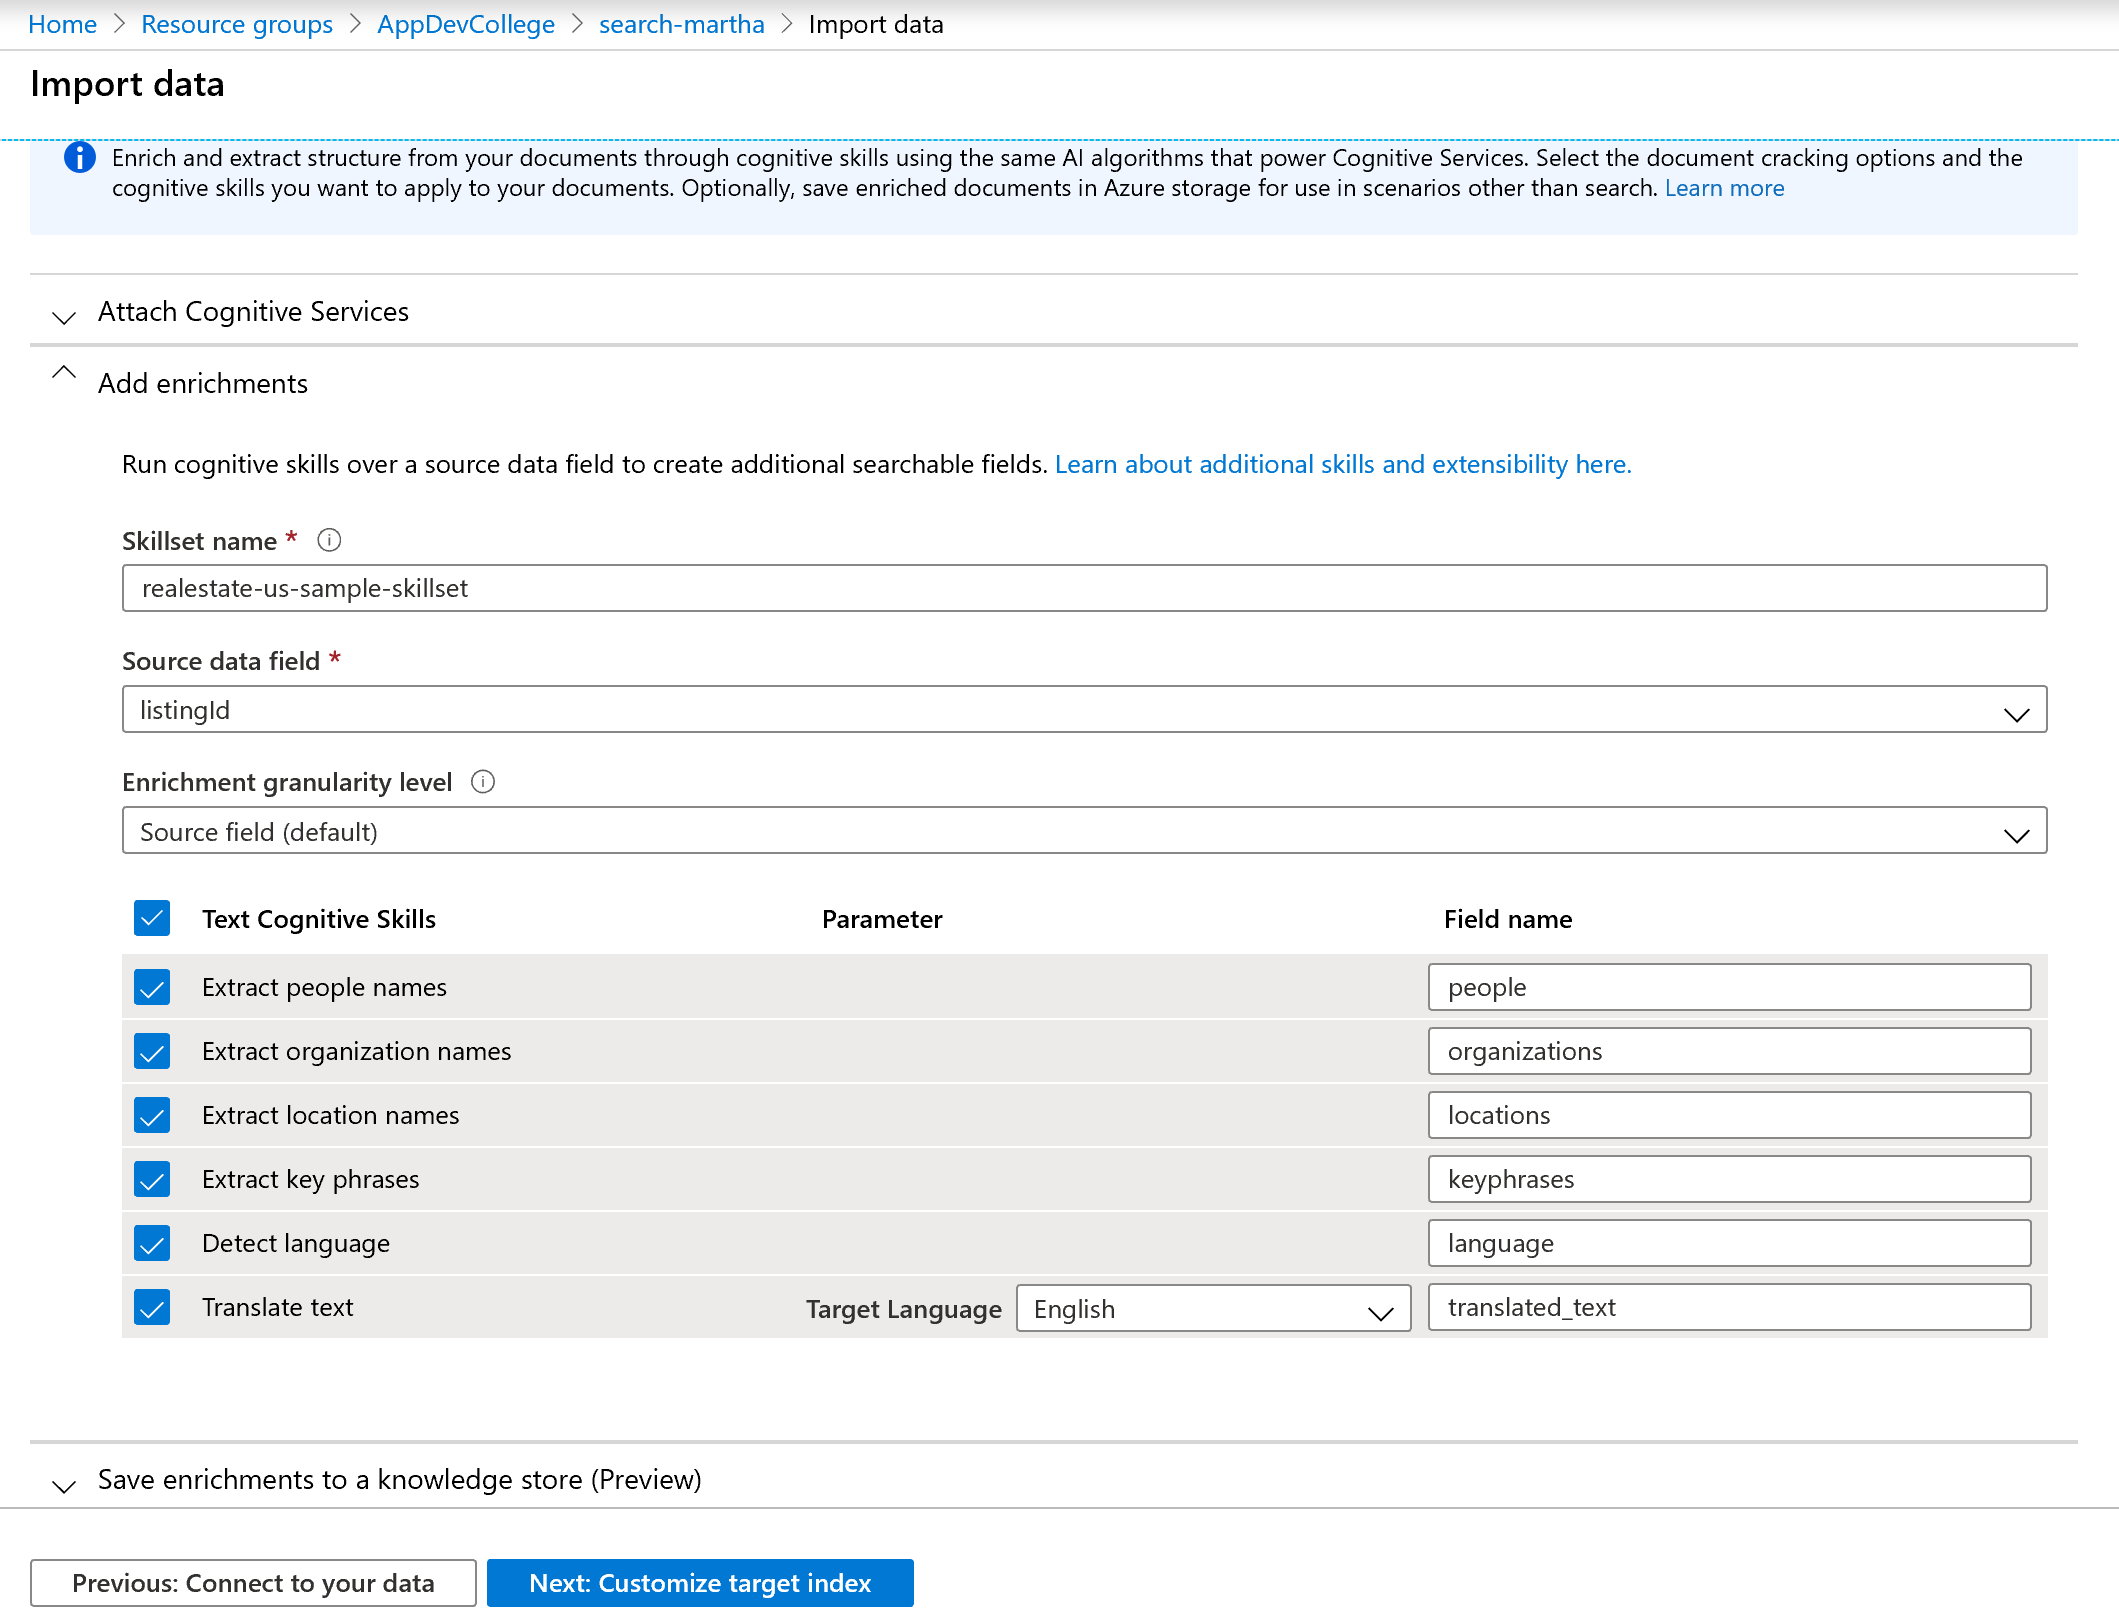
So, we need to define the skillset. In our case, we'll enable all features under Add enrichments):
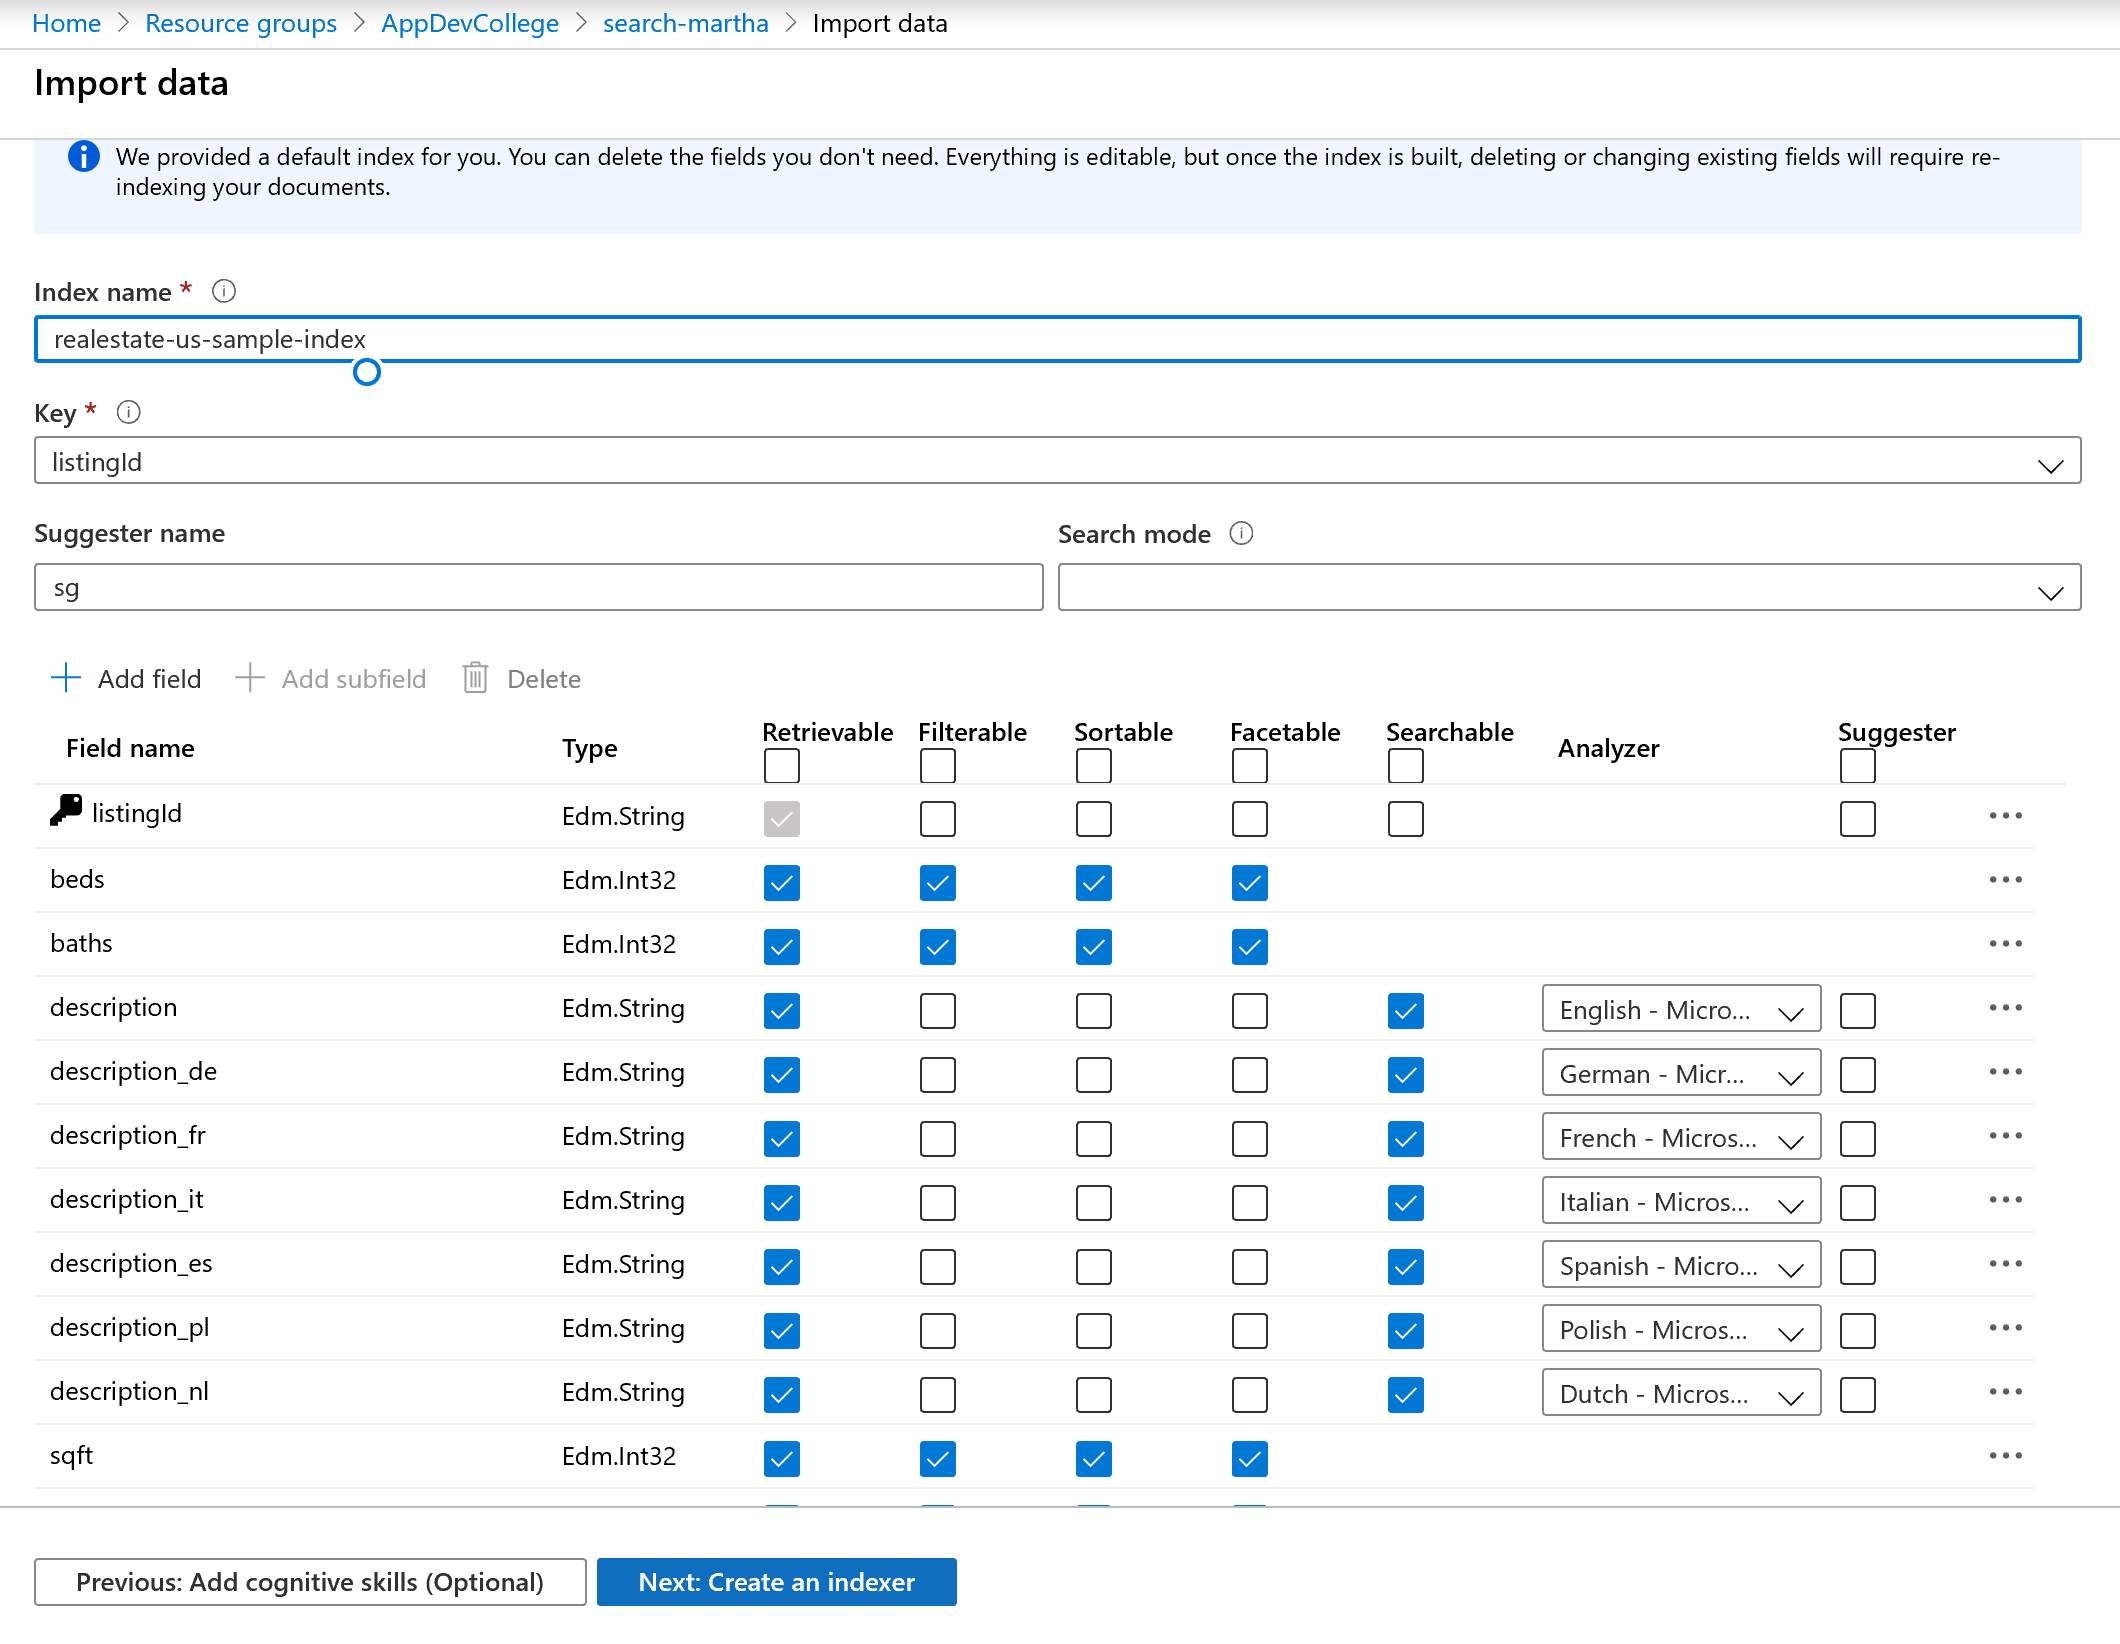
Accept the defaults of the Index. Once we have finished the next two tabs (Hit Submit to run the indexer), Azure Cognitive Search will start indexing our data (this will take a bit longer, as it needs to run image recognition, OCR, etc. on the files).
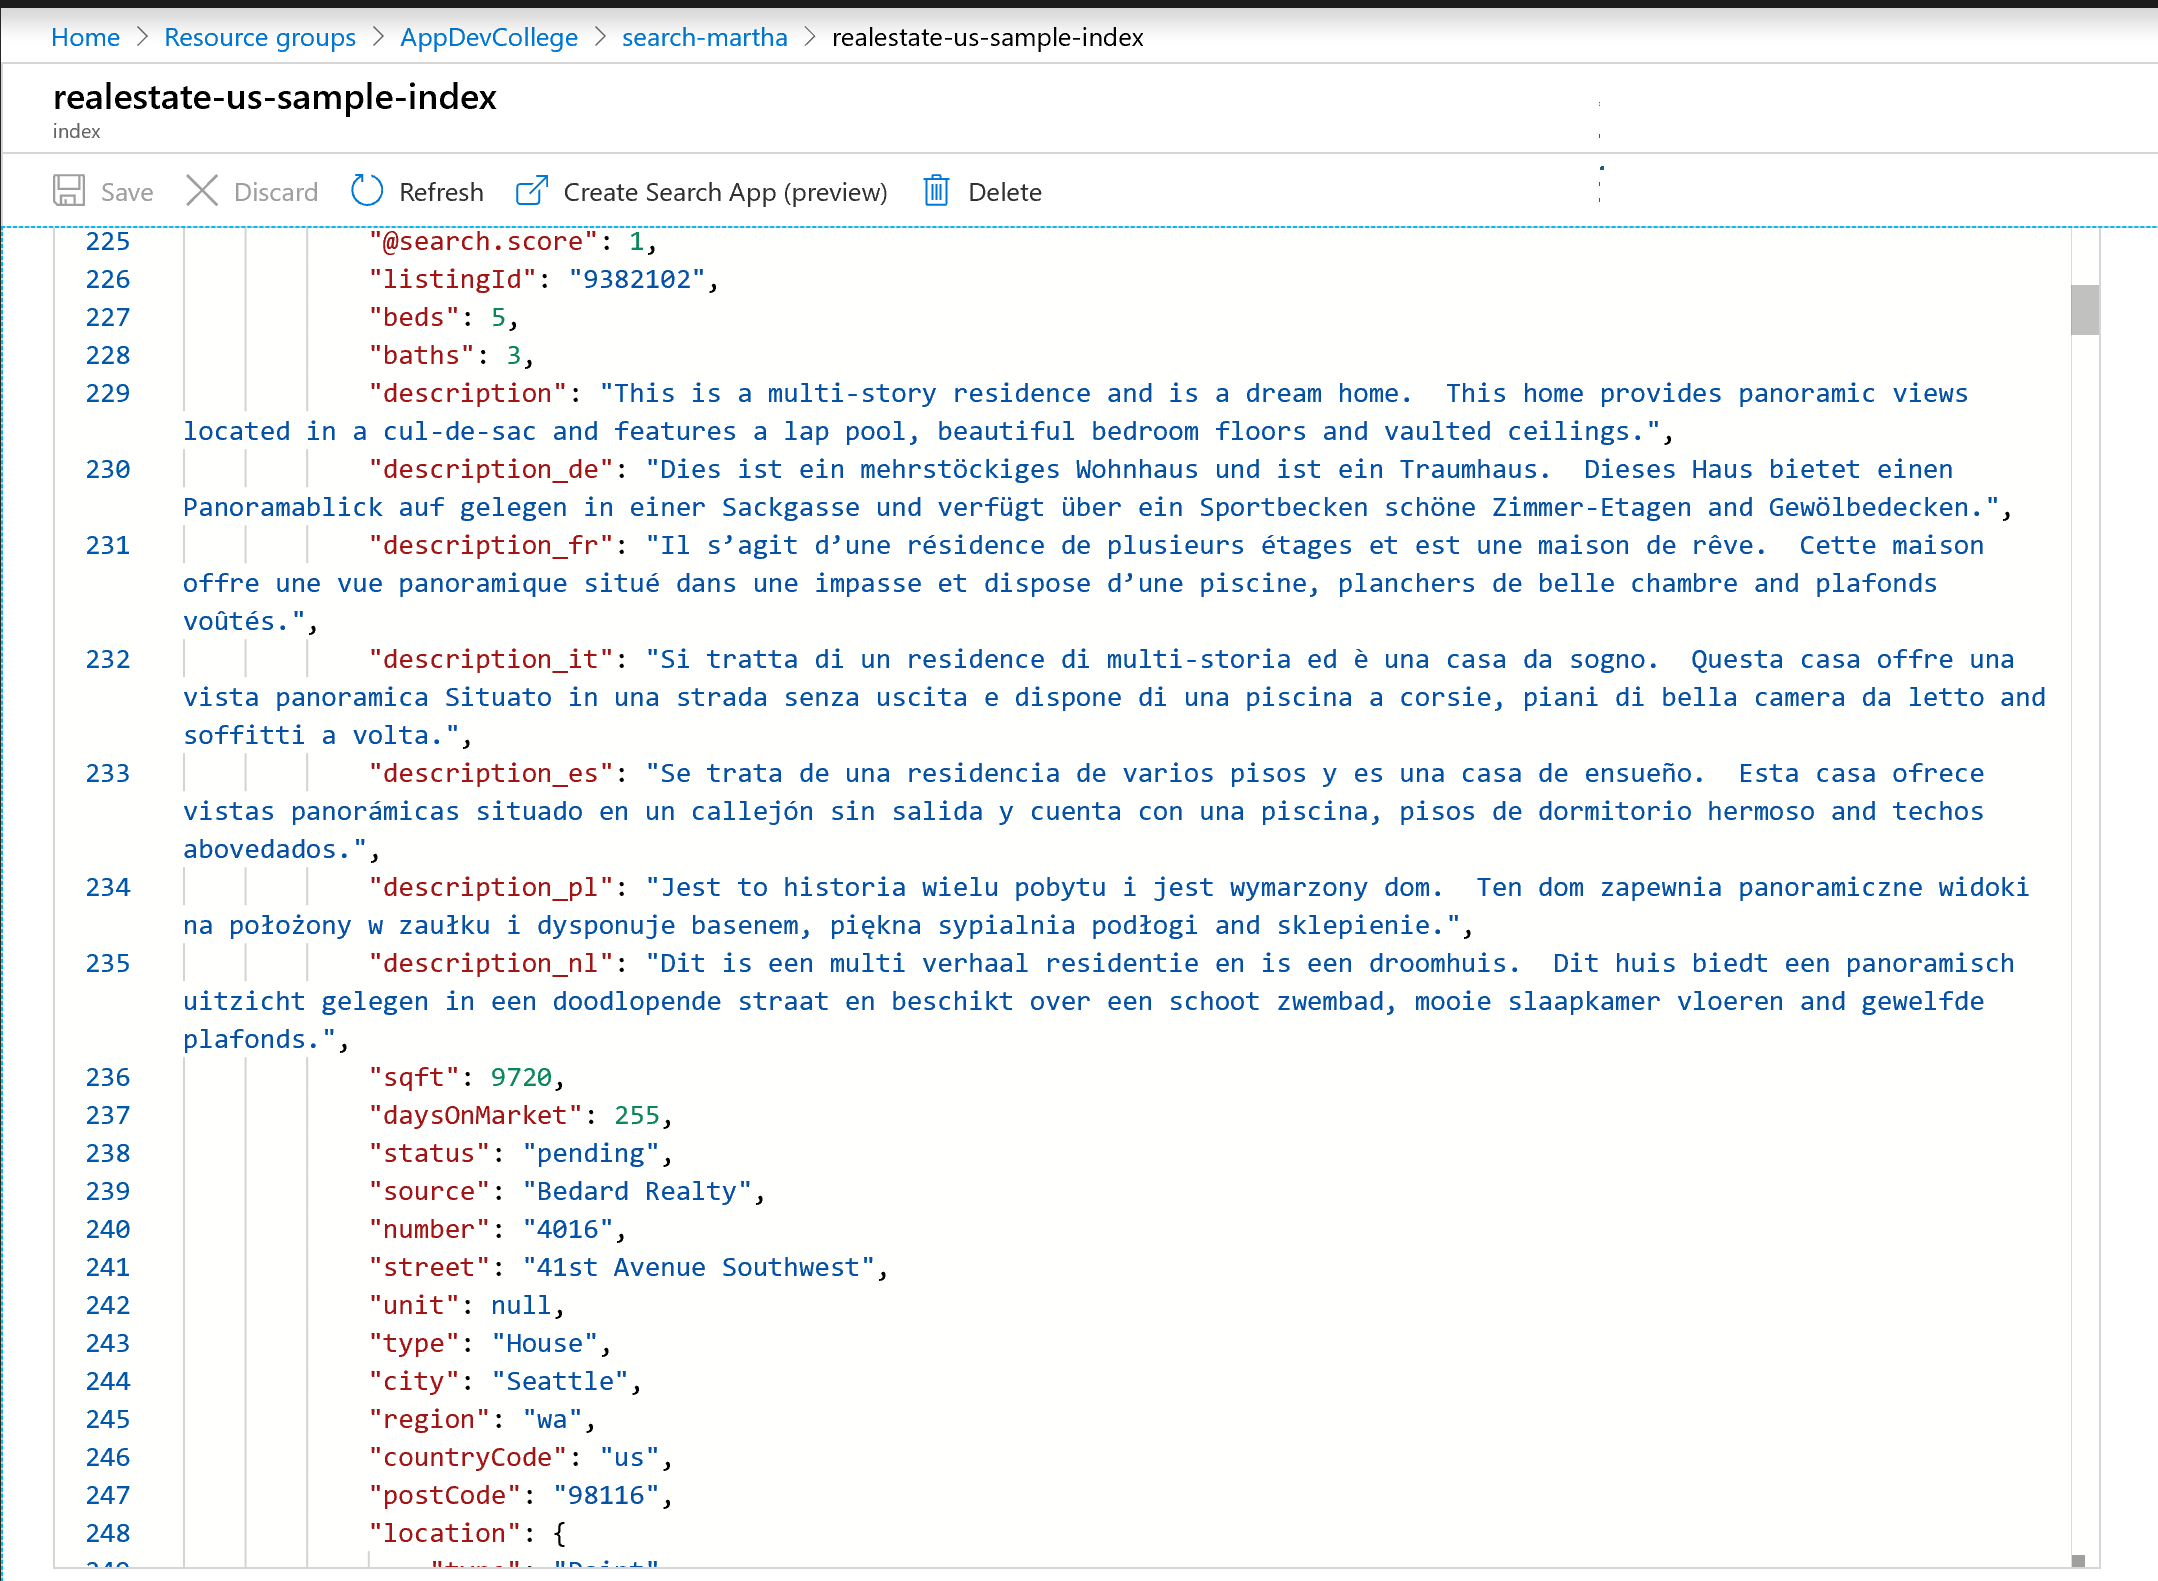
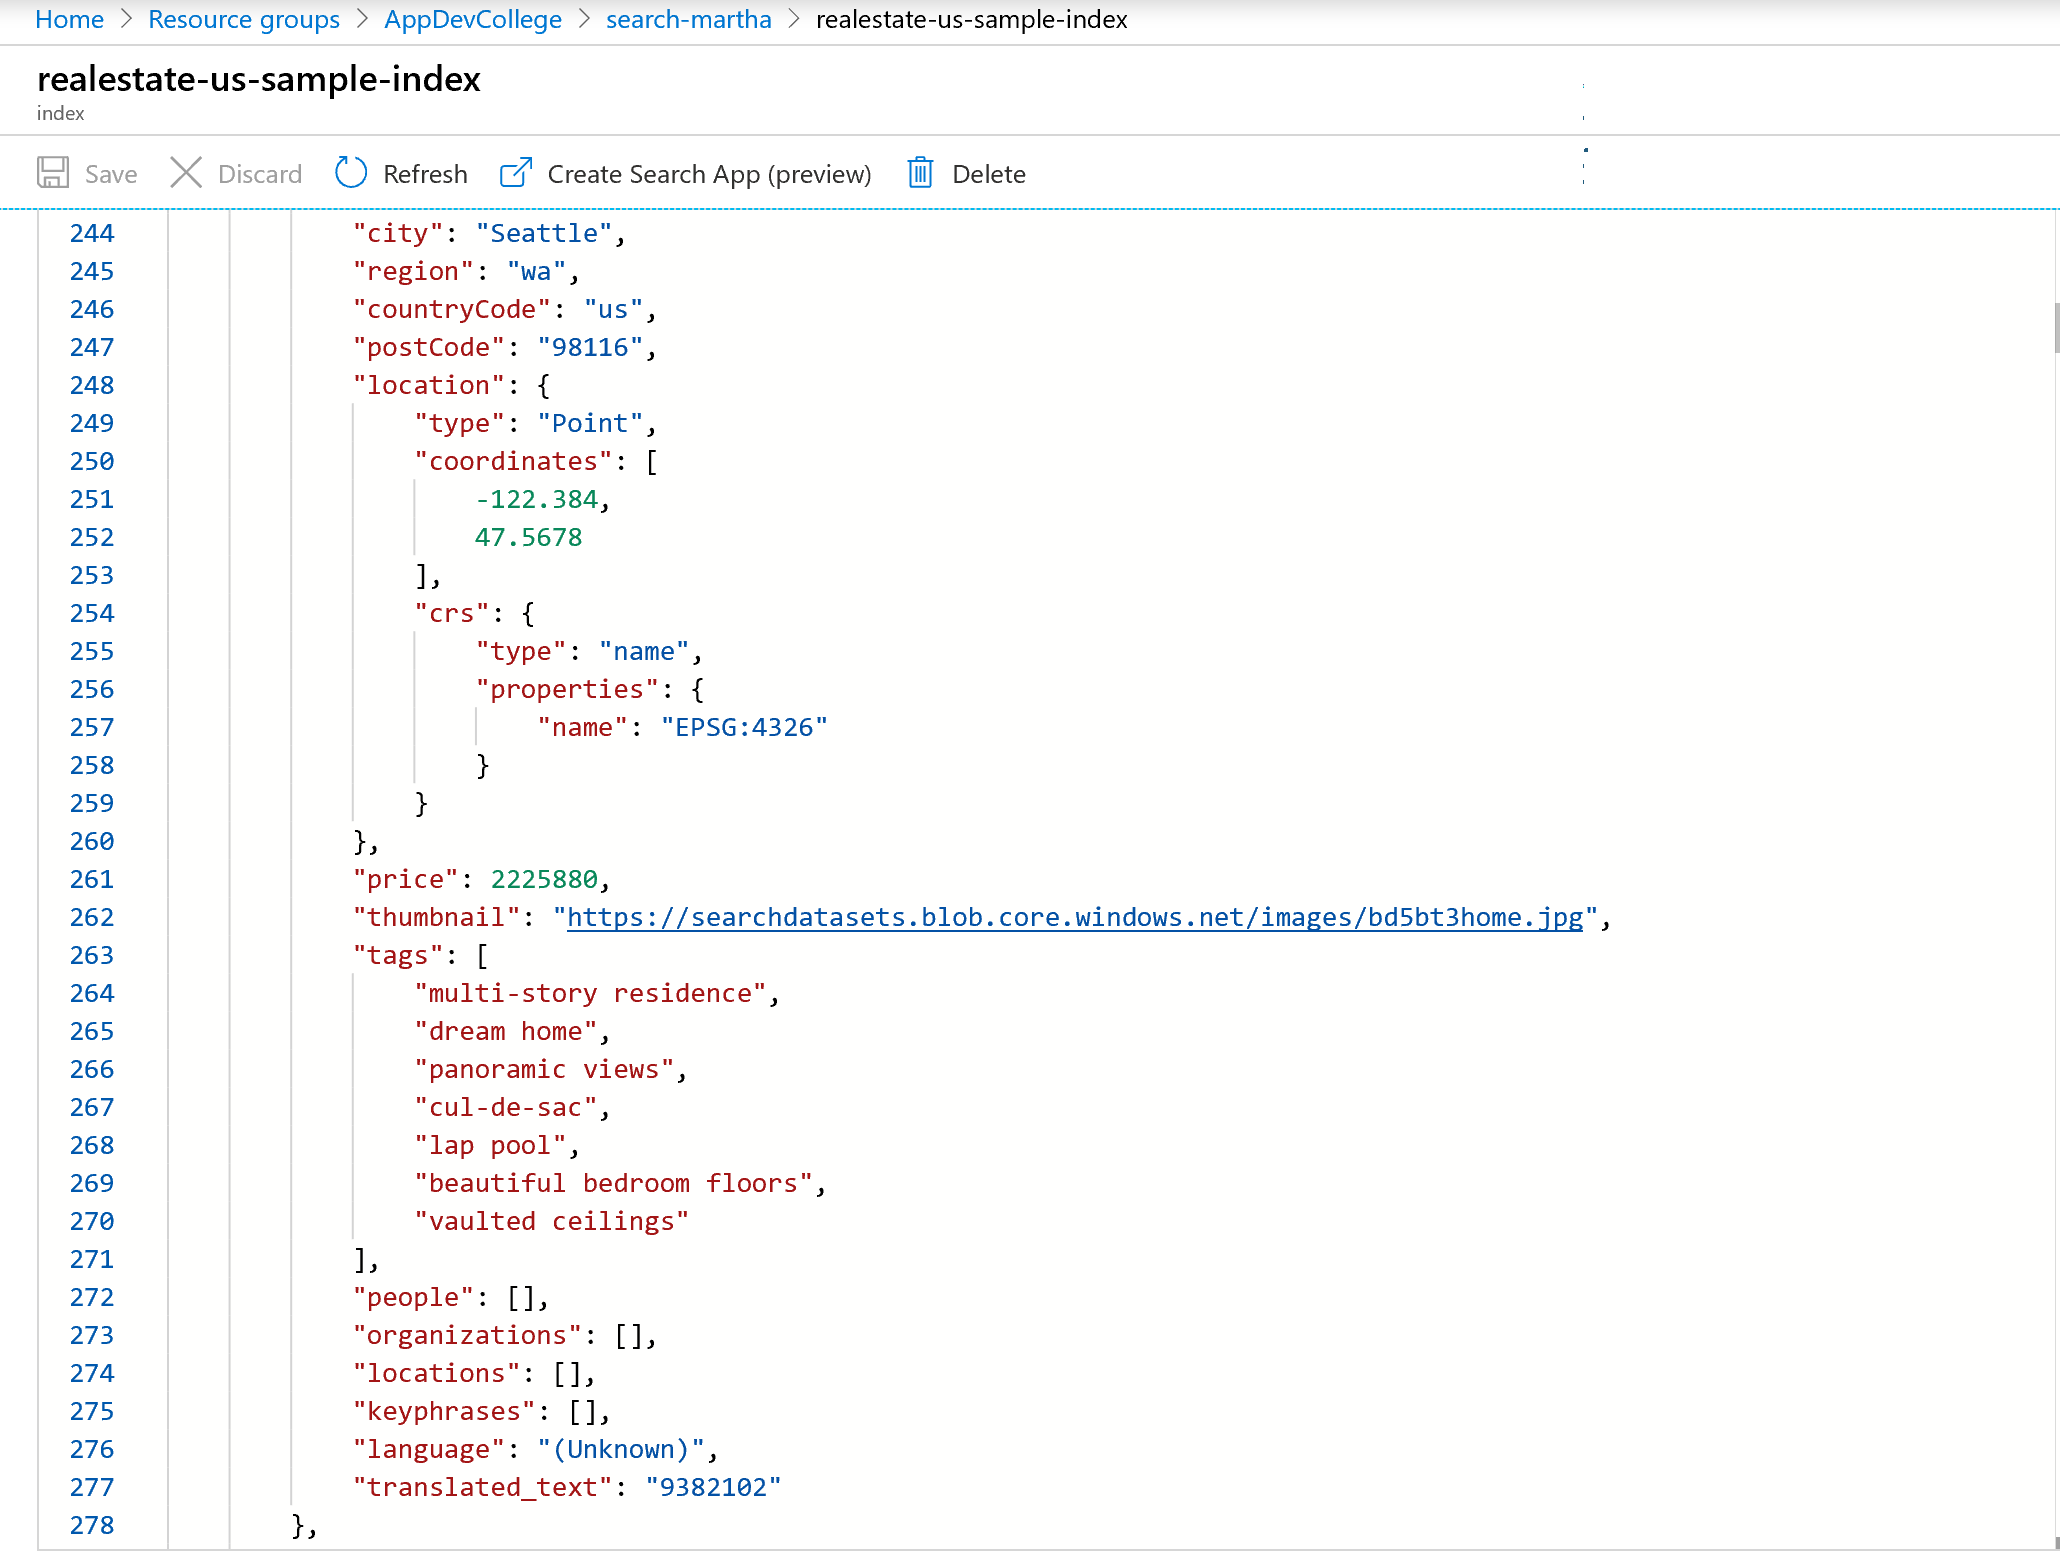
When you select the Indexes Tab on the Overview Page (in the Azure Portal) and select the Realestate Index, you can use the default query and will see (as shown in the following JSON) that the cognitive skills are enabled and that the Translate Skill has a result:
TIP
📝 Here you find more information about the query syntax:
# Using the API
We've been lazy and did everything through the portal - obviously not the way we want to work in the real world. Especially data ingestion and search should (and most likely needs) to be performed through the API:
# Integrate Azure Search in an Node.js Application
Now let's jump into code. We will create a Node.js application that that creates, loads, and queries an Azure Cognitive Search index. This article demonstrates how to create the application step-by-step.
# Set up your environment
Begin by opening the Cloud Shell in the Browser, a Bash console, Powershell console or other environment in which you've installed Node.js.
Create a development directory, giving it the name
adv-search:md adv-search cd adv-search git clone https://github.com/Azure-Samples/azure-search-javascript-samples.git cd azure-search-javascript-samples/quickstart/REST code .Insert your search service data in the file azure_search_config.json:
{
    "serviceName" : "[SEARCH_SERVICE_NAME]",
    "adminKey" : "[SEARCH_SERVICE_ADMIN_KEY]",
    "queryKey" : "[SEARCH_SERVICE_QUERY_KEY]",
    "indexName" : "hotels-quickstart"
}
Replace the
[SEARCH_SERVICE_NAME]value with the name of your search service. Replace[SEARCH_SERVICE_ADMIN_KEY]and[SEARCH_SERVICE_QUERY_KEY]with the key values you recorded earlier.
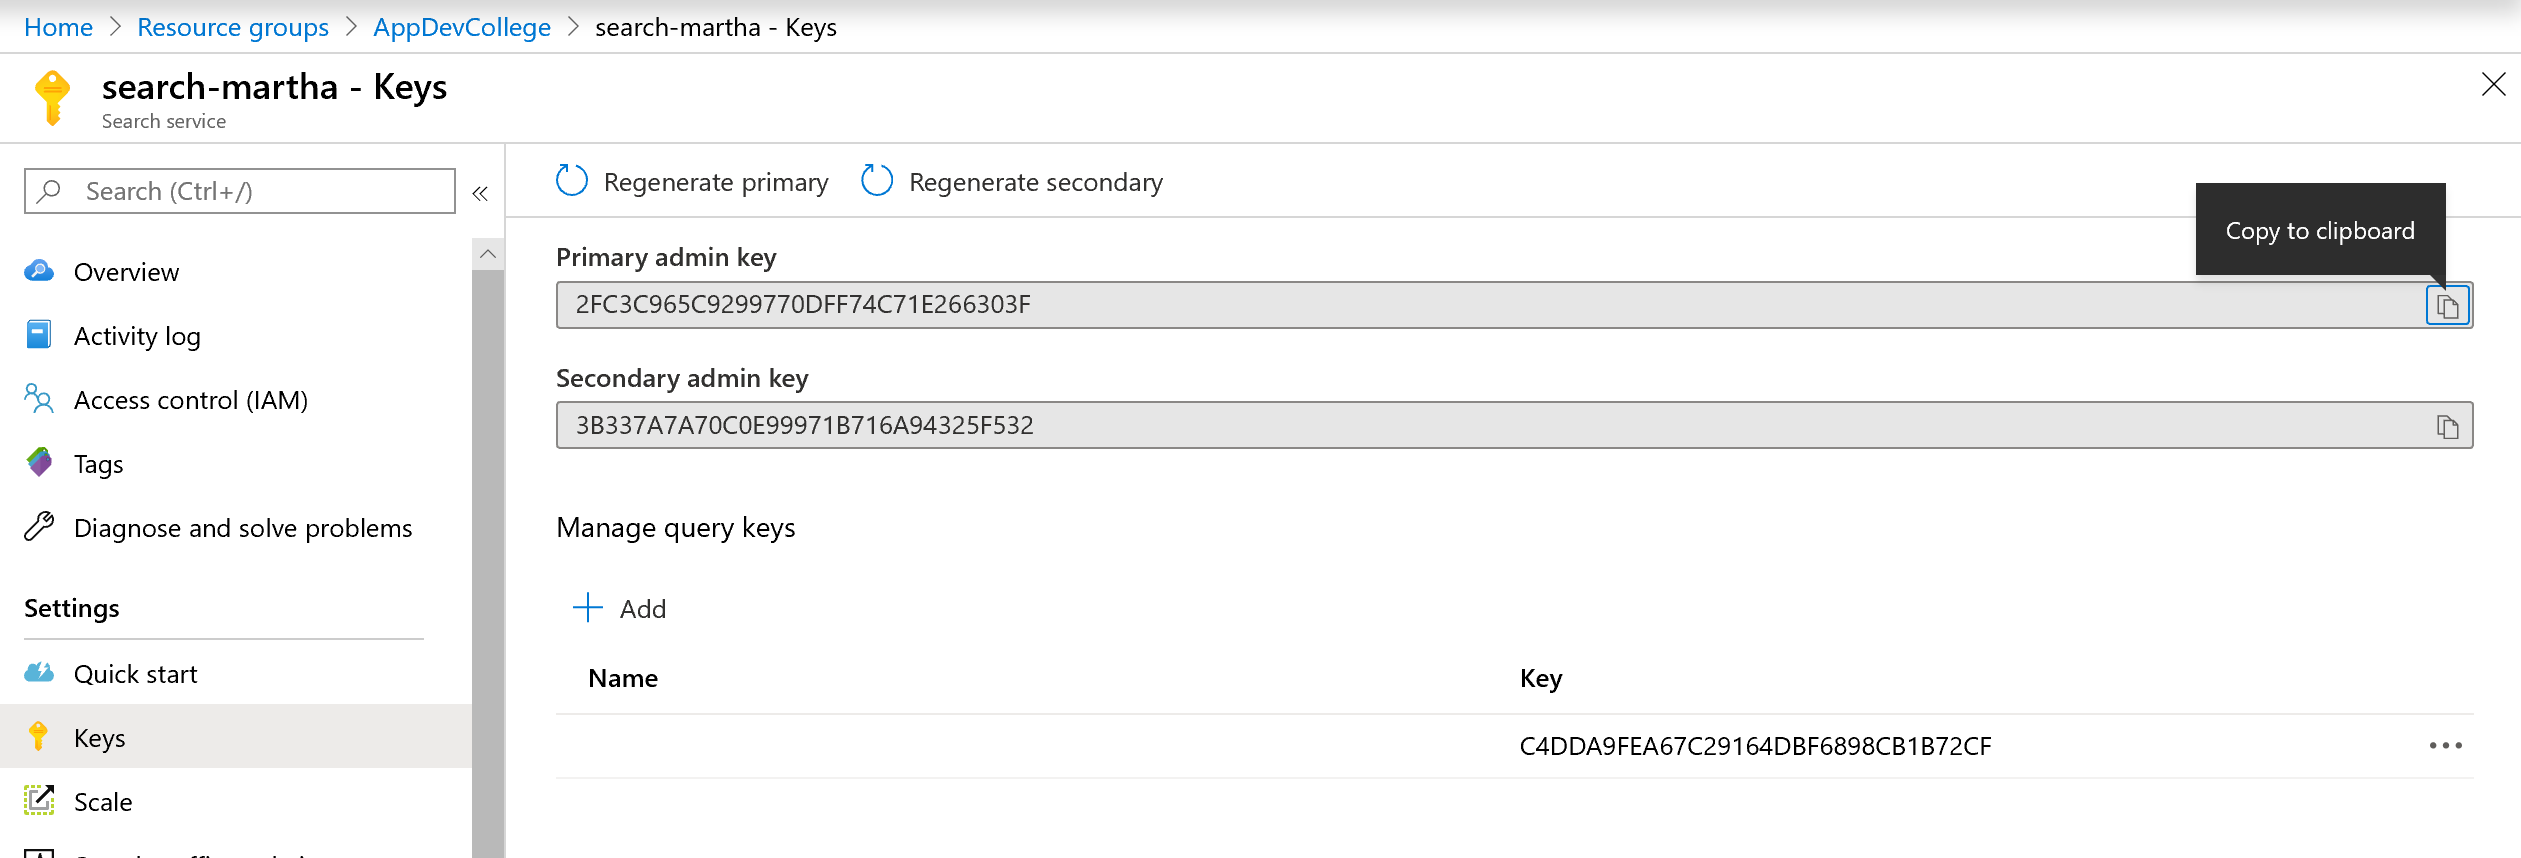
If your endpoint URL were https://mydemo.search.windows.net (opens new window), your service name would be mydemo.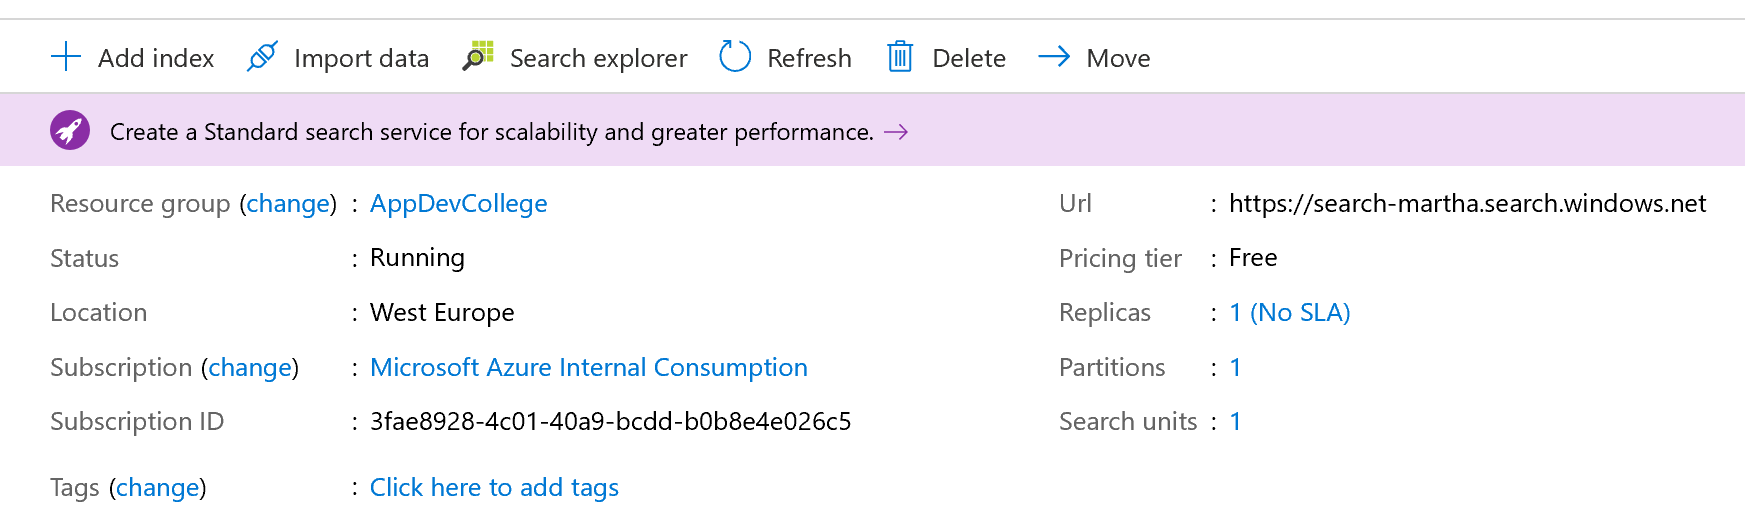 In Settings > Keys, get the primary admin key for full rights on the service.
There are two interchangeable admin keys, provided for business continuity in case you need to roll one over. You can use either the primary or secondary key on requests for adding, modifying, and deleting objects.
TIP
📝 Get the query key as well. It's a best practice to issue query requests with read-only access. Use the key underneath the Manage query keys (e.g. C4DD...)
# Important Parts of the Quickstart Application
Find the file hotels_quickstart_index.json. This file defines how Azure Cognitive Search works with the documents you'll be loading in the next step. Each field will be identified by a name and has a specified type. Each field also has a series of index attributes that specify whether Azure Cognitive Search can search, filter, sort, and facet upon the field.
TIP
📝 Most of the fields are simple data types, but some, like AddressType are complex types that allow you to create rich data structures in your index. You can read more about supported data types (opens new window) and index attributes (opens new window).
Have a look at the hotels_quickstart_index.json and get familiar with its setup/content.
{
    "name": "hotels-quickstart",
    "fields": [
        {
            "name": "HotelId",
            "type": "Edm.String",
            "key": true,
            "filterable": true
        },
        {
            "name": "HotelName",
            "type": "Edm.String",
            "searchable": true,
            "filterable": false,
            "sortable": true,
            "facetable": false
        },
        {
            "name": "Description",
            "type": "Edm.String",
            "searchable": true,
            "filterable": false,
            "sortable": false,
            "facetable": false,
            "analyzer": "en.lucene"
        },
        {
            "name": "Description_fr",
            "type": "Edm.String",
            "searchable": true,
            "filterable": false,
            "sortable": false,
            "facetable": false,
            "analyzer": "fr.lucene"
        },
        {
            "name": "Category",
            "type": "Edm.String",
            "searchable": true,
            "filterable": true,
            "sortable": true,
            "facetable": true
        },
        {
            "name": "Tags",
            "type": "Collection(Edm.String)",
            "searchable": true,
            "filterable": true,
            "sortable": false,
            "facetable": true
        },
        {
            "name": "ParkingIncluded",
            "type": "Edm.Boolean",
            "filterable": true,
            "sortable": true,
            "facetable": true
        },
        {
            "name": "LastRenovationDate",
            "type": "Edm.DateTimeOffset",
            "filterable": true,
            "sortable": true,
            "facetable": true
        },
        {
            "name": "Rating",
            "type": "Edm.Double",
            "filterable": true,
            "sortable": true,
            "facetable": true
        },
        {
            "name": "Address",
            "type": "Edm.ComplexType",
            "fields": [
                {
                    "name": "StreetAddress",
                    "type": "Edm.String",
                    "filterable": false,
                    "sortable": false,
                    "facetable": false,
                    "searchable": true
                },
                {
                    "name": "City",
                    "type": "Edm.String",
                    "searchable": true,
                    "filterable": true,
                    "sortable": true,
                    "facetable": true
                },
                {
                    "name": "StateProvince",
                    "type": "Edm.String",
                    "searchable": true,
                    "filterable": true,
                    "sortable": true,
                    "facetable": true
                },
                {
                    "name": "PostalCode",
                    "type": "Edm.String",
                    "searchable": true,
                    "filterable": true,
                    "sortable": true,
                    "facetable": true
                },
                {
                    "name": "Country",
                    "type": "Edm.String",
                    "searchable": true,
                    "filterable": true,
                    "sortable": true,
                    "facetable": true
                }
            ]
        }
    ],
    "suggesters": [
        {
            "name": "sg",
            "searchMode": "analyzingInfixMatching",
            "sourceFields": [
                "HotelName"
            ]
        }
    ]
}
Now, have a look at the file AzureSearchClient.js and take your time to understand what happens here. You will find methods to check, if an index exists, to create and delete an index as well as methods to add data to the index (postDataAsync) and - of course - query data (queryAsync).
TIP
📝 If you have any questions regarding the code, feel free to reach out to one of the proctors.
# Prepare and run the sample
Use a terminal window for the following commands.
- Navigate to the source code folder azure-search-javascript-samples/quickstart.
- Install the packages for the sample with
npm install. This command will download the packages upon which the code depends.
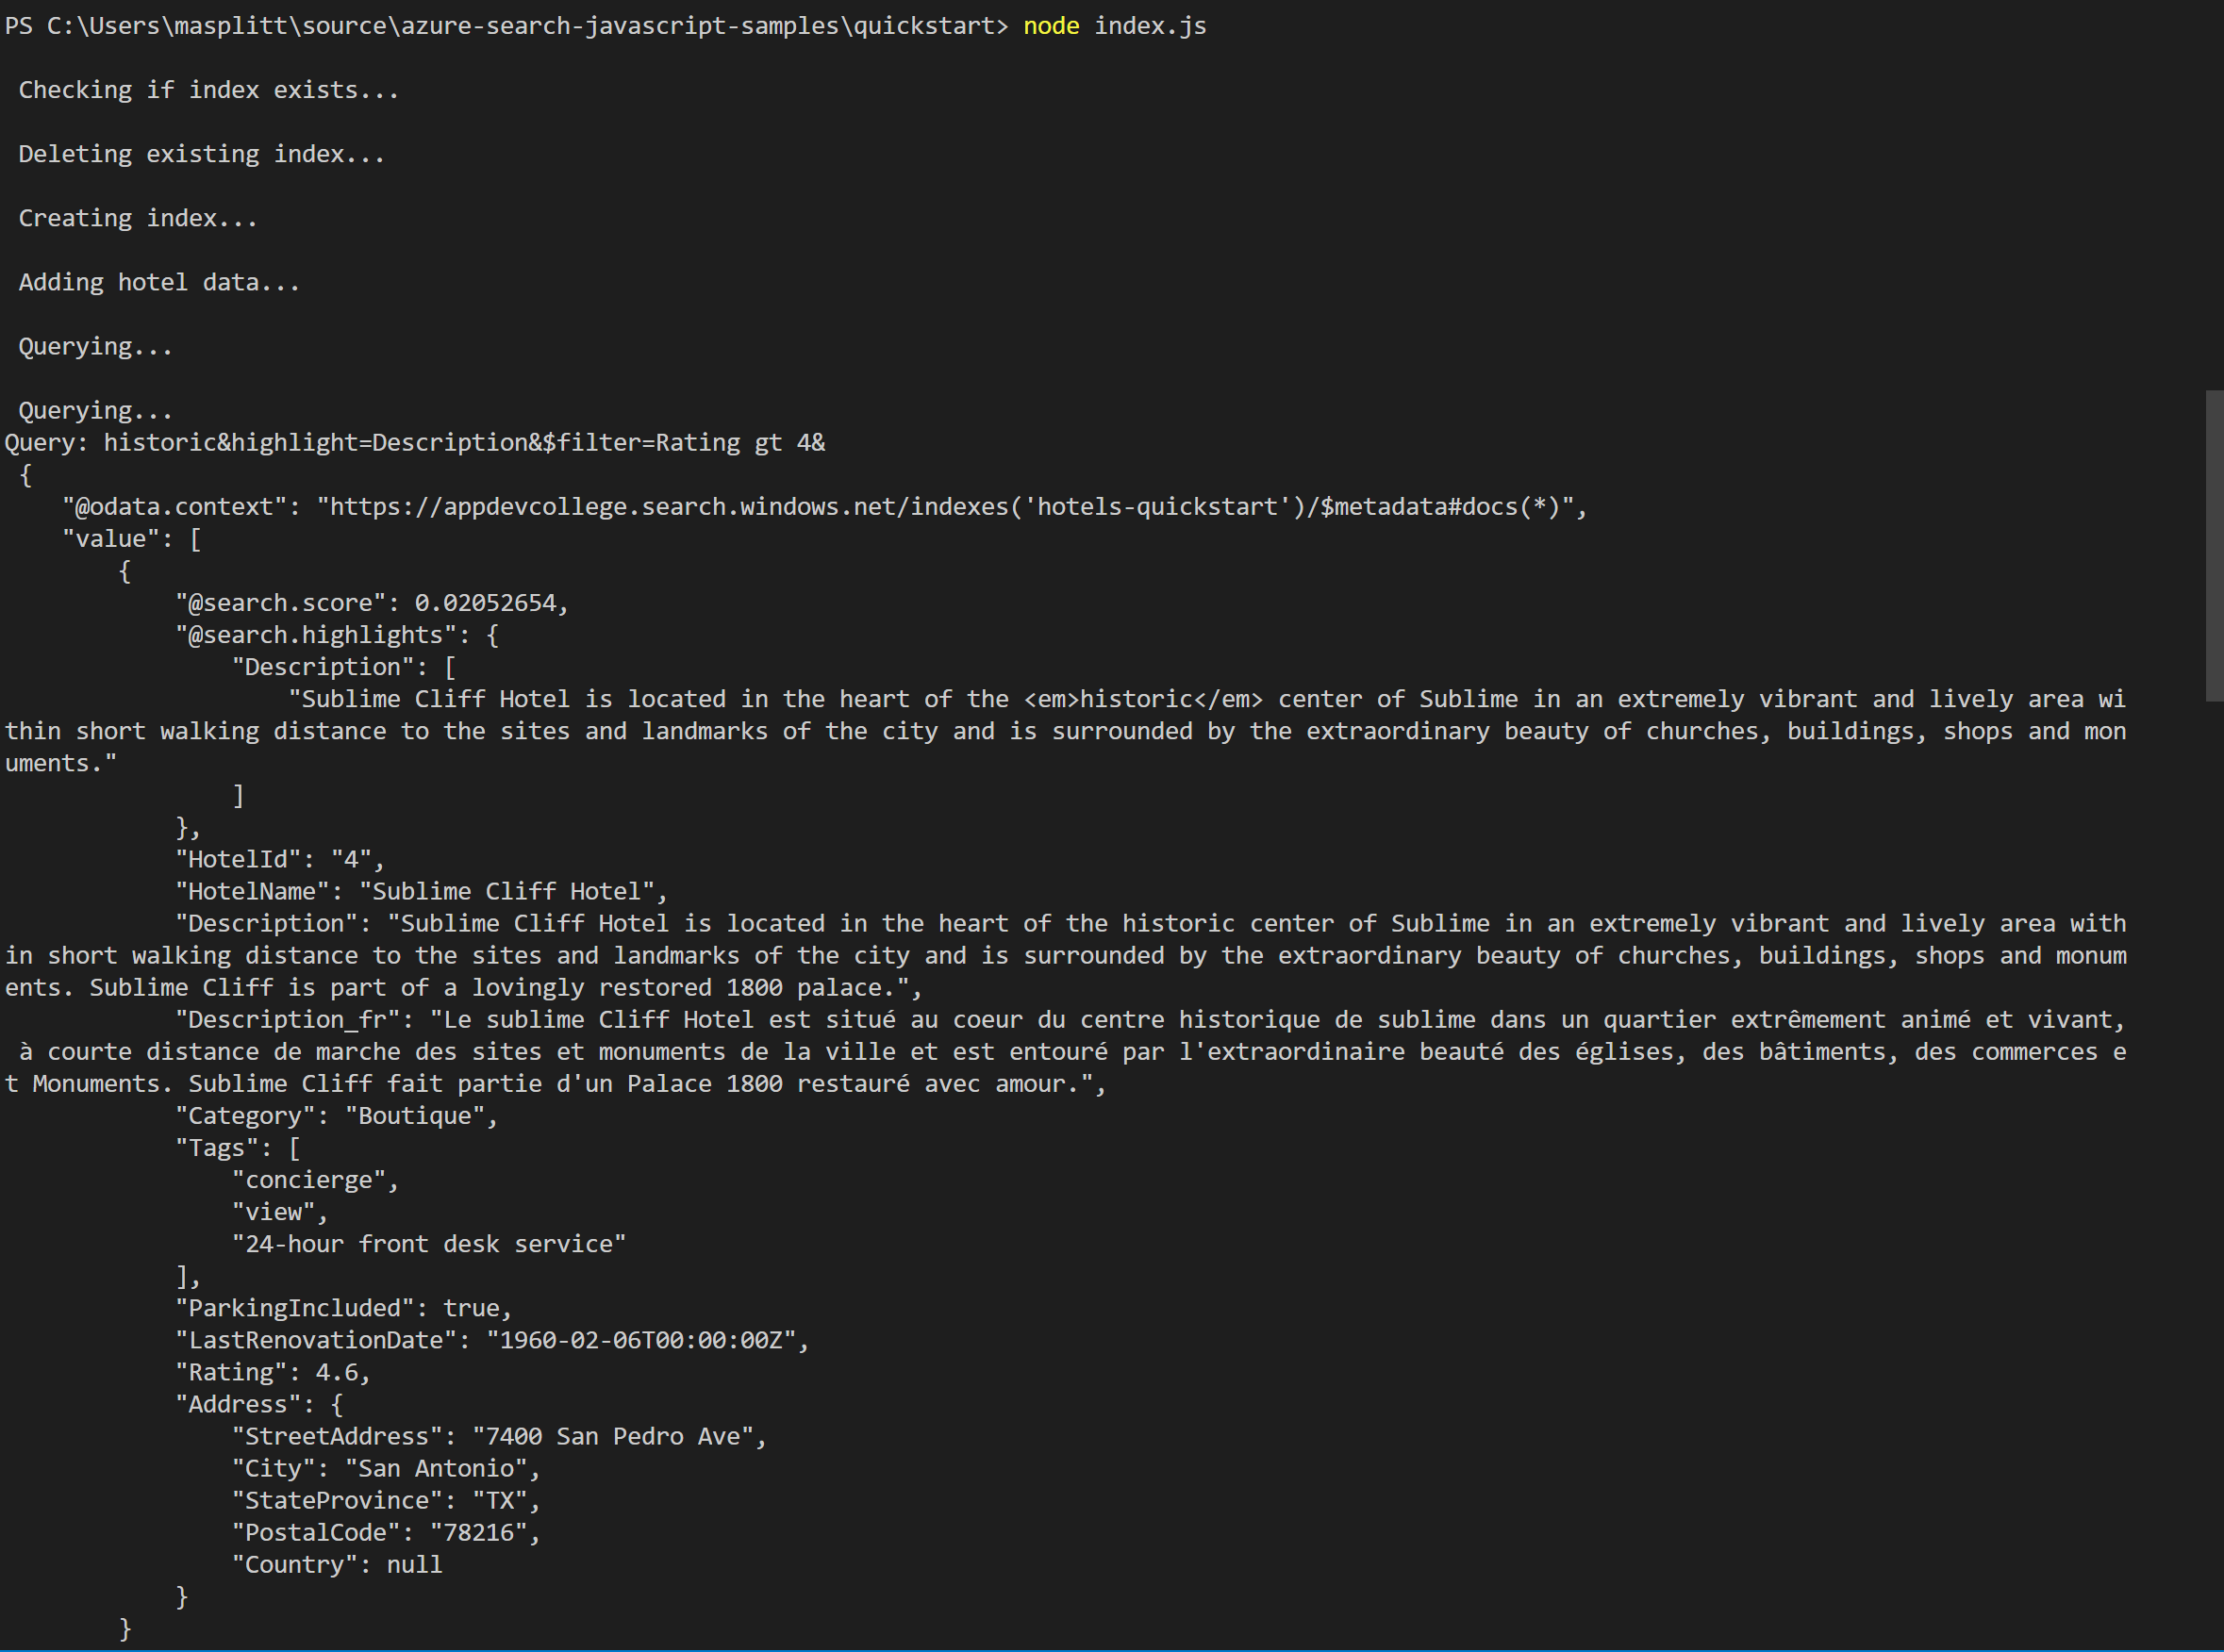
Now back in Visual Studio Code, set a breakpoint in method doQueriesAsync (in index.js - the place where queries are sent to Azure Search and the corresponding response will be readable) and hit F5 (if VS Code asks you, select Node.JS App as your environment).
You should see a series of messages describing the actions being taken by the program and after some time, your breakpoint will be hit. Have a look at the body property in the method mentioned above...there you see the OData response from Azure Search.
If you want to see more detail of the requests, you can uncomment the lines at the beginning of the AzureSearchClient.request() method (opens new window) in AzureSearchClient.js.
# Cleanup
Remove the sample resource group:
az group delete -n adc-azsearch-db-rg