# Azure Cosmos DB
# Here is what you will learn 🎯
In this challenge you will learn how to:
- create a Cosmos DB via the Portal
- use an ARM Template for automated deployment
- integrate a Cosmos DB into a Node.JS application
- add data using Azure Data Factory
- query and index data using Data Explorer
- use Cosmos DB Change Feed (optional)
# Table Of Contents
- What is Azure Cosmos DB?
- Create a Cosmos DB via Azure Portal
- Add Data to Cosmos DB
- Understand Partition Keys
- Use ARM Template for automated deployment
- Integrate Cosmos DB into a Node.js App
- Run the Sample Application
- Add Data using Azure Data Factory
- Import Lab Data Into Container
- Querying and Indexing in Azure Cosmos DB
- Indexing in Azure Cosmos DB (optional)
- Cosmos DB Change Feed (optional)
- Cleanup
# What is Azure Cosmos DB?
Azure Cosmos DB:
- is Microsoft's globally distributed, multi-model database service.
- with a click of a button, Cosmos DB enables you to elastically and independently scale throughput and storage across any number of Azure regions worldwide.
- you take advantage of fast, single-digit-millisecond data access using APIs including SQL, MongoDB, Cassandra, Azure Tables, or Gremlin.
- Cosmos DB provides comprehensive service level agreements (opens new window) (SLAs) for throughput, latency, availability and consistency guarantees, something no other database service offers.

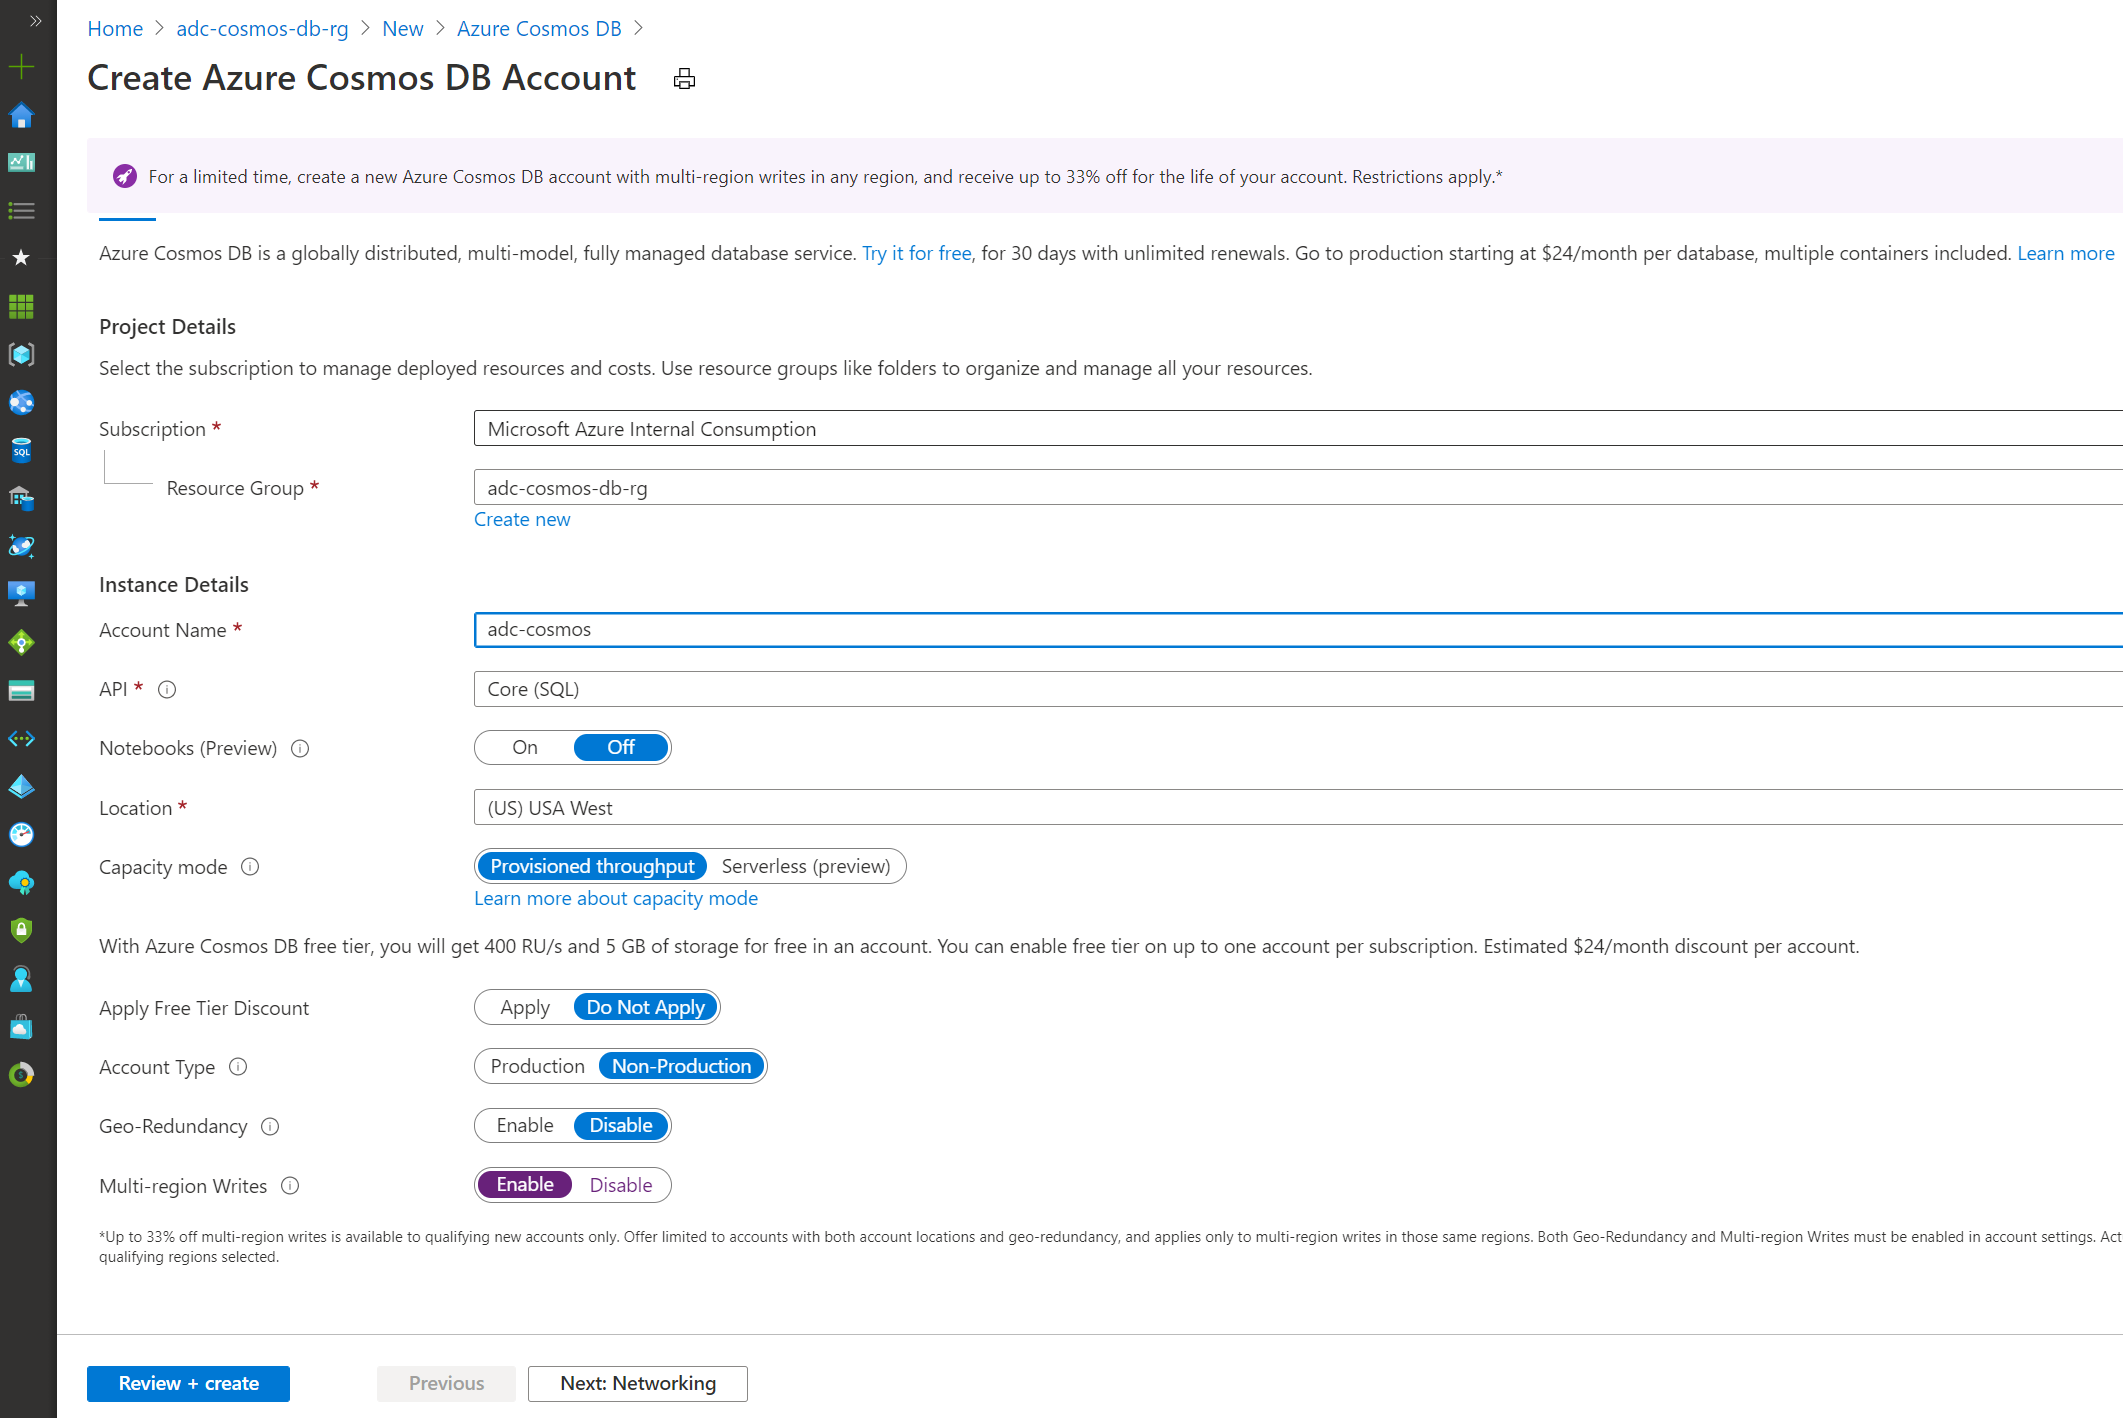
# Create a Cosmos DB via Azure Portal
First of all, create a resource group called "adc-cosmos-db-rg" and use location "West Europe" for it.
Now add a Cosmos DB account:
| Parameter | Value |
|---|---|
| Account Name | choose a unique value |
| API | Core SQL |
| Notebooks | Off |
| Location | westeurope |
| Capacity mode | Provisioned throughput |
| Apply Free Tier Account: | Do Not Apply |
| Account Type | Non-Production |
| Geo-Redundancy | Disable |
| Multi-region Writes | Enable |
| Availability Zones | Disable |
| _Hit "Create"

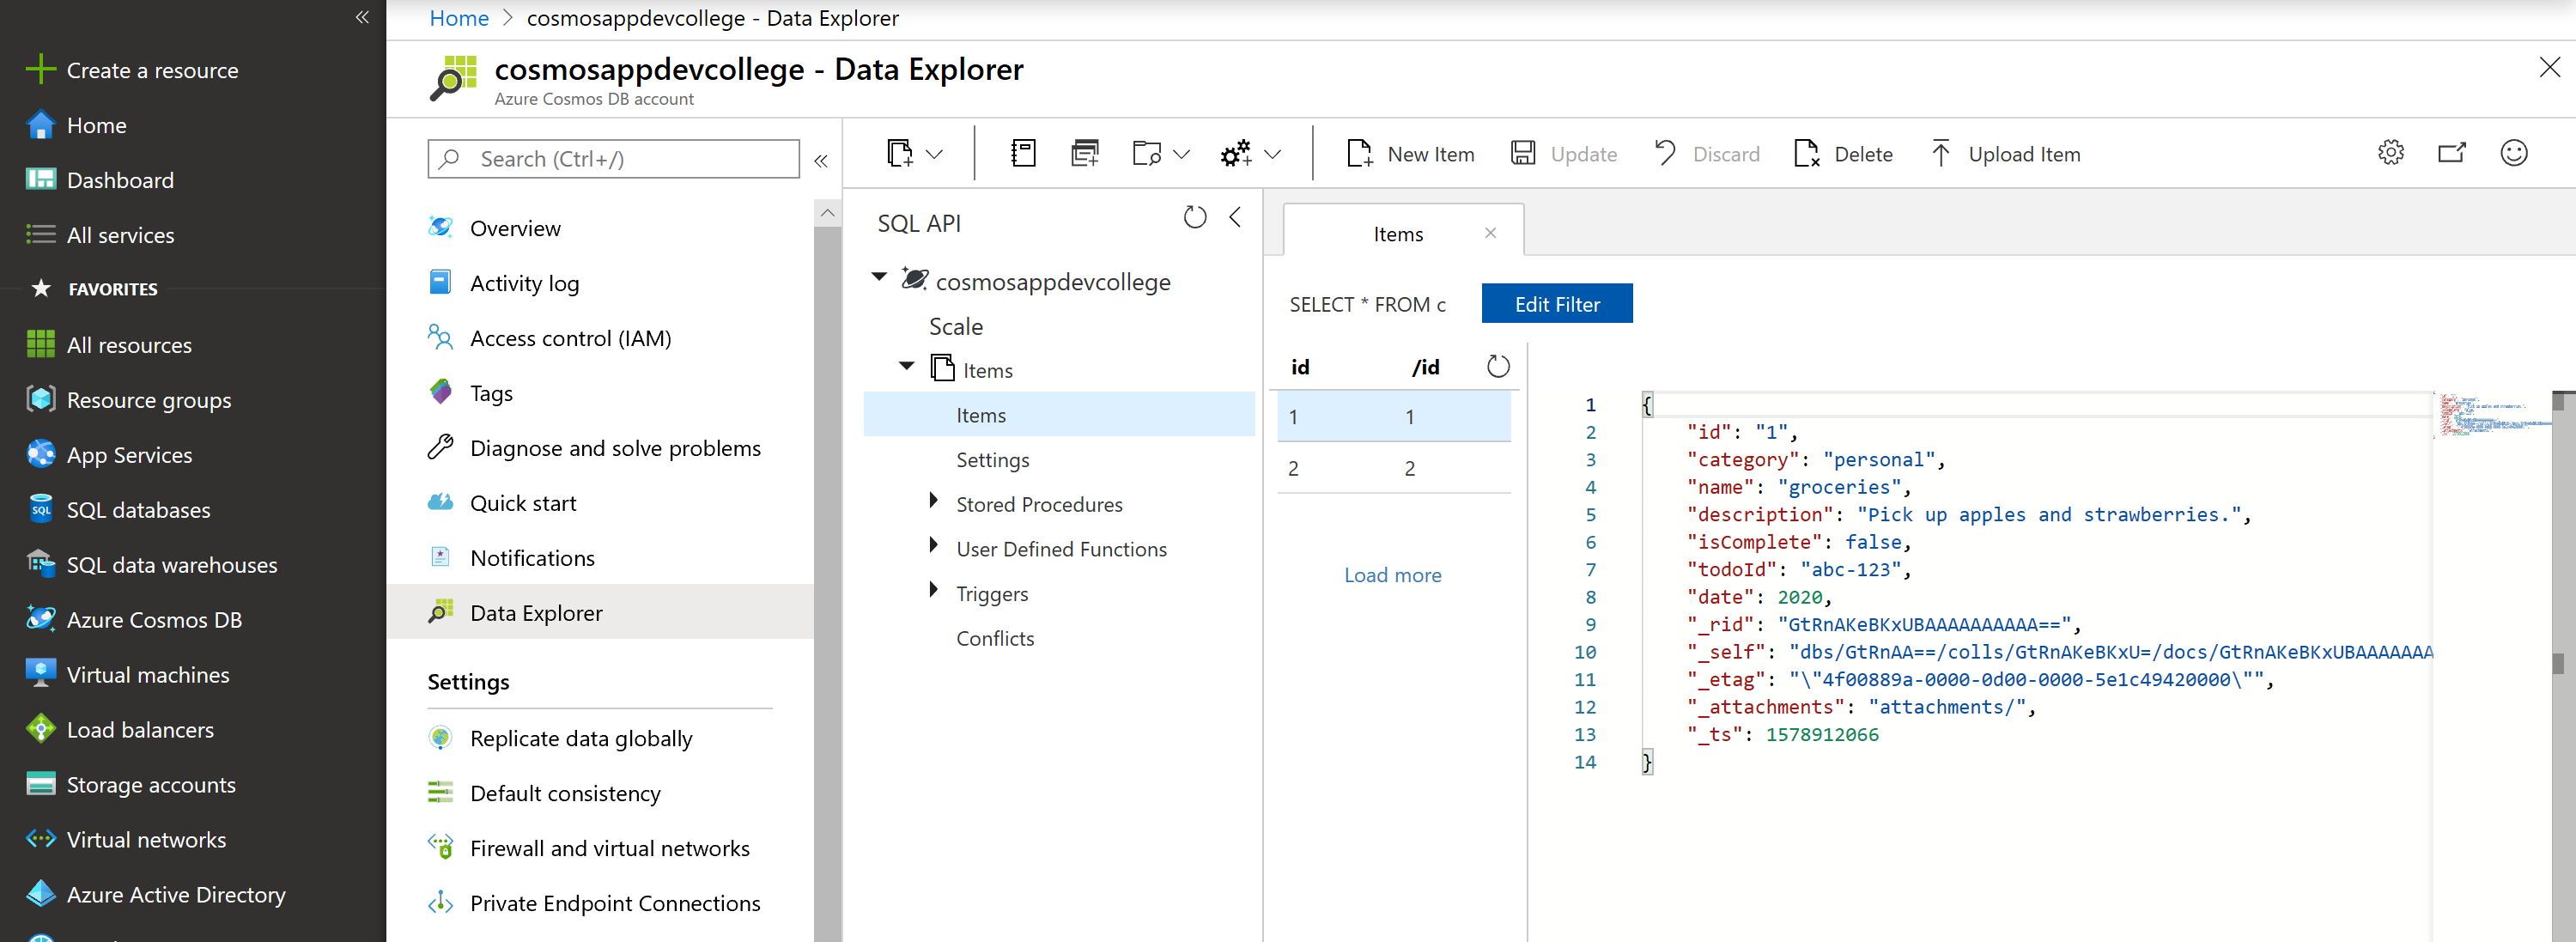
# Add Data to Cosmos DB
We need, of course, data to work with our Cosmos DB, so let's add sample documents to it.
Open the CosmosDB in the Portal and select Data Explorer from the left navigation menu on your Azure Cosmos DB account page, and then select New Container.
In the Add container pane, enter the settings for the new container:
| Parameter | Value |
|---|---|
| Database ID (Create new) | name |
| Throughput (Manual) | 400 |
| Container ID | Items |
| Partition key | /id |
Hit "Ok" and wait until it has been created.
In Data Explorer:
- expand the (name) database
- expand the Items container
- select Items entry
- then select New Item.
Add the following structure to the document on the right side of the Documents pane and hit Save:
{
  "id": "1",
  "category": "personal",
  "name": "groceries",
  "description": "Pick up apples and strawberries.",
  "isComplete": false,
  "todoId": "abc-123",
  "date": 2020
}
Select New Item again, and create and save another document with a unique id, and any other properties and values you want. Your documents can have any structure, because Azure Cosmos DB doesn't impose any schema on your data.
At the top of the Items tab in Data Explorer, review the default query SELECT * FROM c. This query retrieves and displays all documents in the collection.
To change the query, select Edit Filter, replace the default query with SELECT * FROM c WHERE (c.id = "1" AND c.todoId = "abc-123"), and then select Apply Filter.
# Understand Partition Keys
# Why do we need partitioning?
- Azure Cosmos containers have a minimum throughput of 400 request units per second (RU/s).
- When throughput is provisioned on a database level, the minimum RUs per container is 100.
- Requests to the same partition key can't exceed the throughput that's allocated to a partition.
- If requests exceed the allocated throughput, requests are rate-limited (when you talk to Azure CosmosDB directly, you will receive a 429 - Too Many Requests status code).
- It is important to pick a partition key that doesn't result in "hot spots" (a partition that is constantly requested) within your application
# How to choose a partition key?
Choose a partition key:
- that has a wide range of values and access patterns that are evenly spread across logical partitions.
- that spreads the workload evenly across all partitions and evenly over time.
- that might include properties that appear frequently as a filter in your queries. Queries can be efficiently routed by including the partition key in the filter predicate.
TIP
📝 A single logical partition has an upper limit of 20 GB of storage.
You can form a partition key by concatenating multiple property values into a single artificial partition key property. These keys are referred to as synthetic keys.
For example, consider the following example document:
{
  "todoId": "abc-123",
  "date": 2020
}
For the previous document, one option is to set /todoId or /date as the partition key. Use this option, if you want to partition your container based on either device ID or date. Another option is to concatenate these two values into a synthetic partitionKey property that's used as the partition key.
{
  "todoId": "abc-123",
  "date": 2020,
  "partitionKey": "abc-123-2020"
}
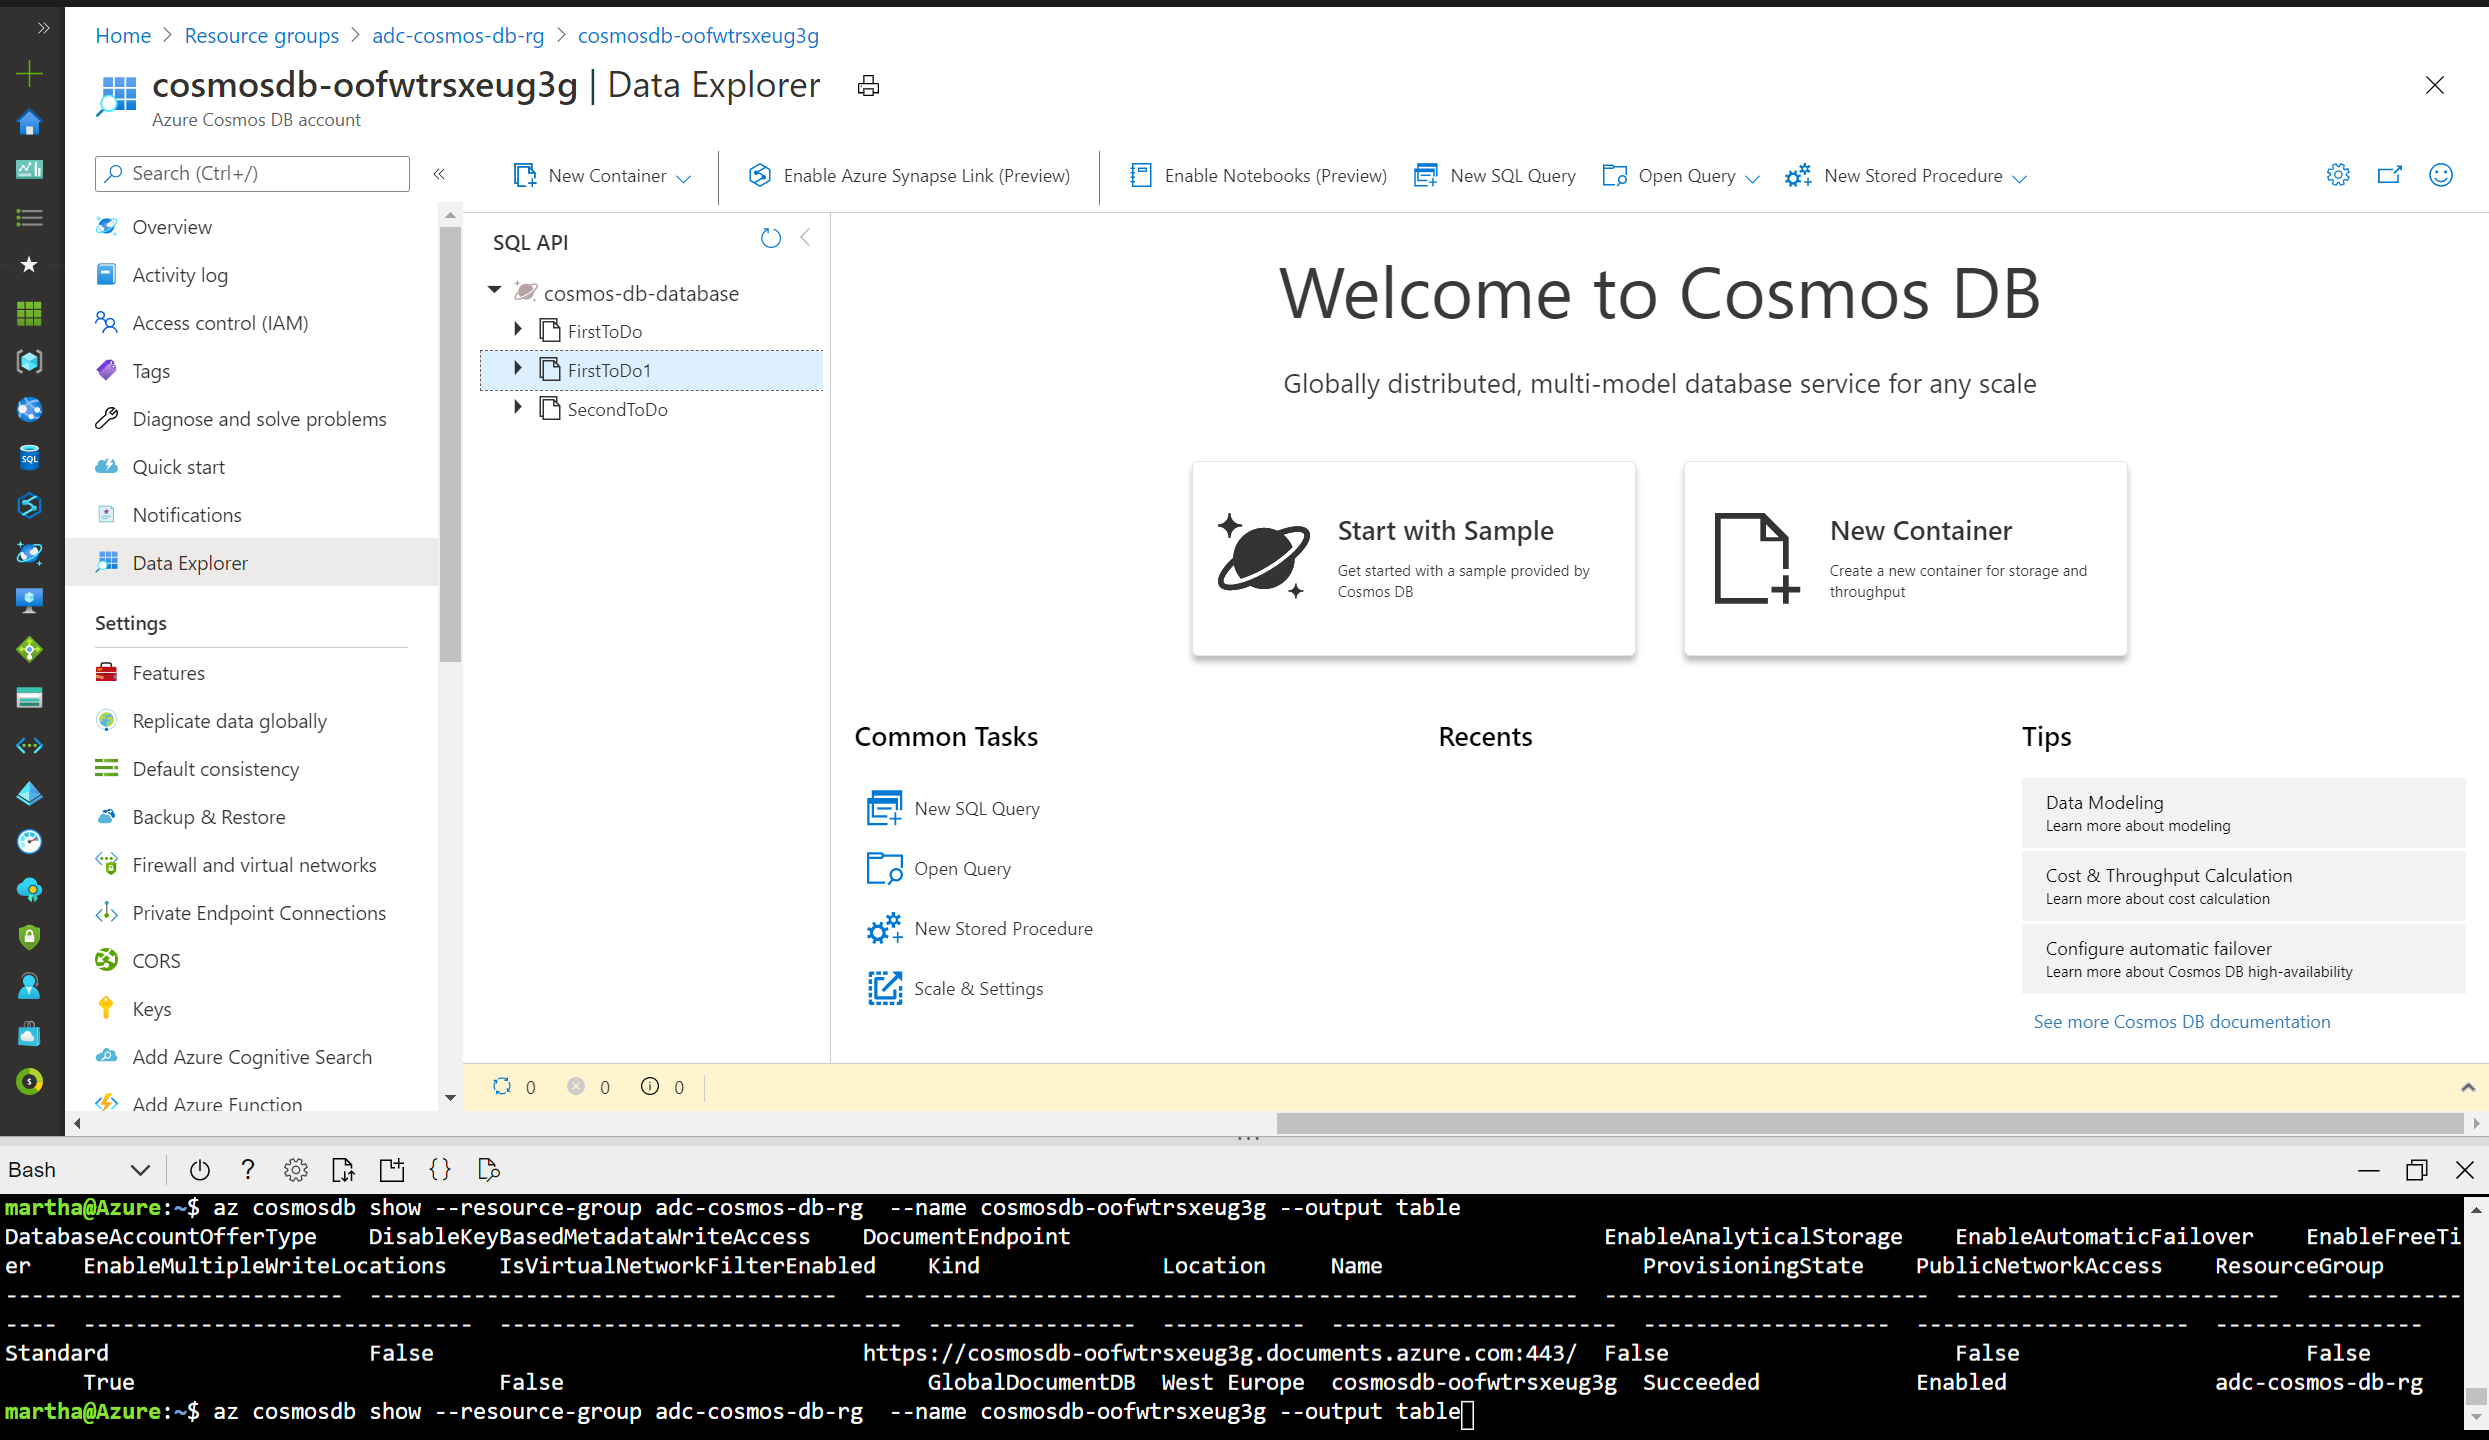
# Use ARM Template for automated deployment
The following Azure Resource Manager template creates an Azure Cosmos account with:
- Two containers that share 400 Requested Units per second (RU/s) throughput at the database level.
- One container with dedicated 400 RU/s throughput.
We will be using Azure CLI to deploy the ARM template. Navigate to the template.json in this folder (day3/apps/arm/template.json) and look at the "defaultValue" parameter where the value will be the new Cosmos DB account name including the name cosmosdb and a unique ID.
"parameters": {
        "databaseAccount": {
            "defaultValue": "[concat('cosmosdb-', uniqueString(resourceGroup().id))]",
            "type": "String"
        }
    },
Now let's use the commands below (if you chose a different name for your resource group, please adjust the command)
For the second command you will copy <YOUR_NEW_ACCOUNT_NAME> from the portal once the Cosmos DB is successfully created:
$ az deployment group create --resource-group adc-cosmos-db-rg \
--template-uri https://raw.githubusercontent.com/azuredevcollege/trainingdays/master/day3/apps/arm/template.json

$ az cosmosdb show --resource-group adc-cosmos-db-rg  --name <YOUR_NEW_ACCOUNT_NAME> --output tsv

# Integrate Cosmos DB into a Node.js App
We now want to show you, how to integrate Azure Cosmos DB with a NodeJS application. You can find SDKs for a lot of programming languages out there - as a sample, we will be using the NodeJS SDK.
There is already a predefined sample you can clone to your machine. So, please open a command line window and in a new folder, run the following command to clone the sample:
git clone https://github.com/azuredevcollege/azure-cosmos-db-sql-api-nodejs-getting-started.git
Open the folder the repo has been cloned to in Visual Studio Code.
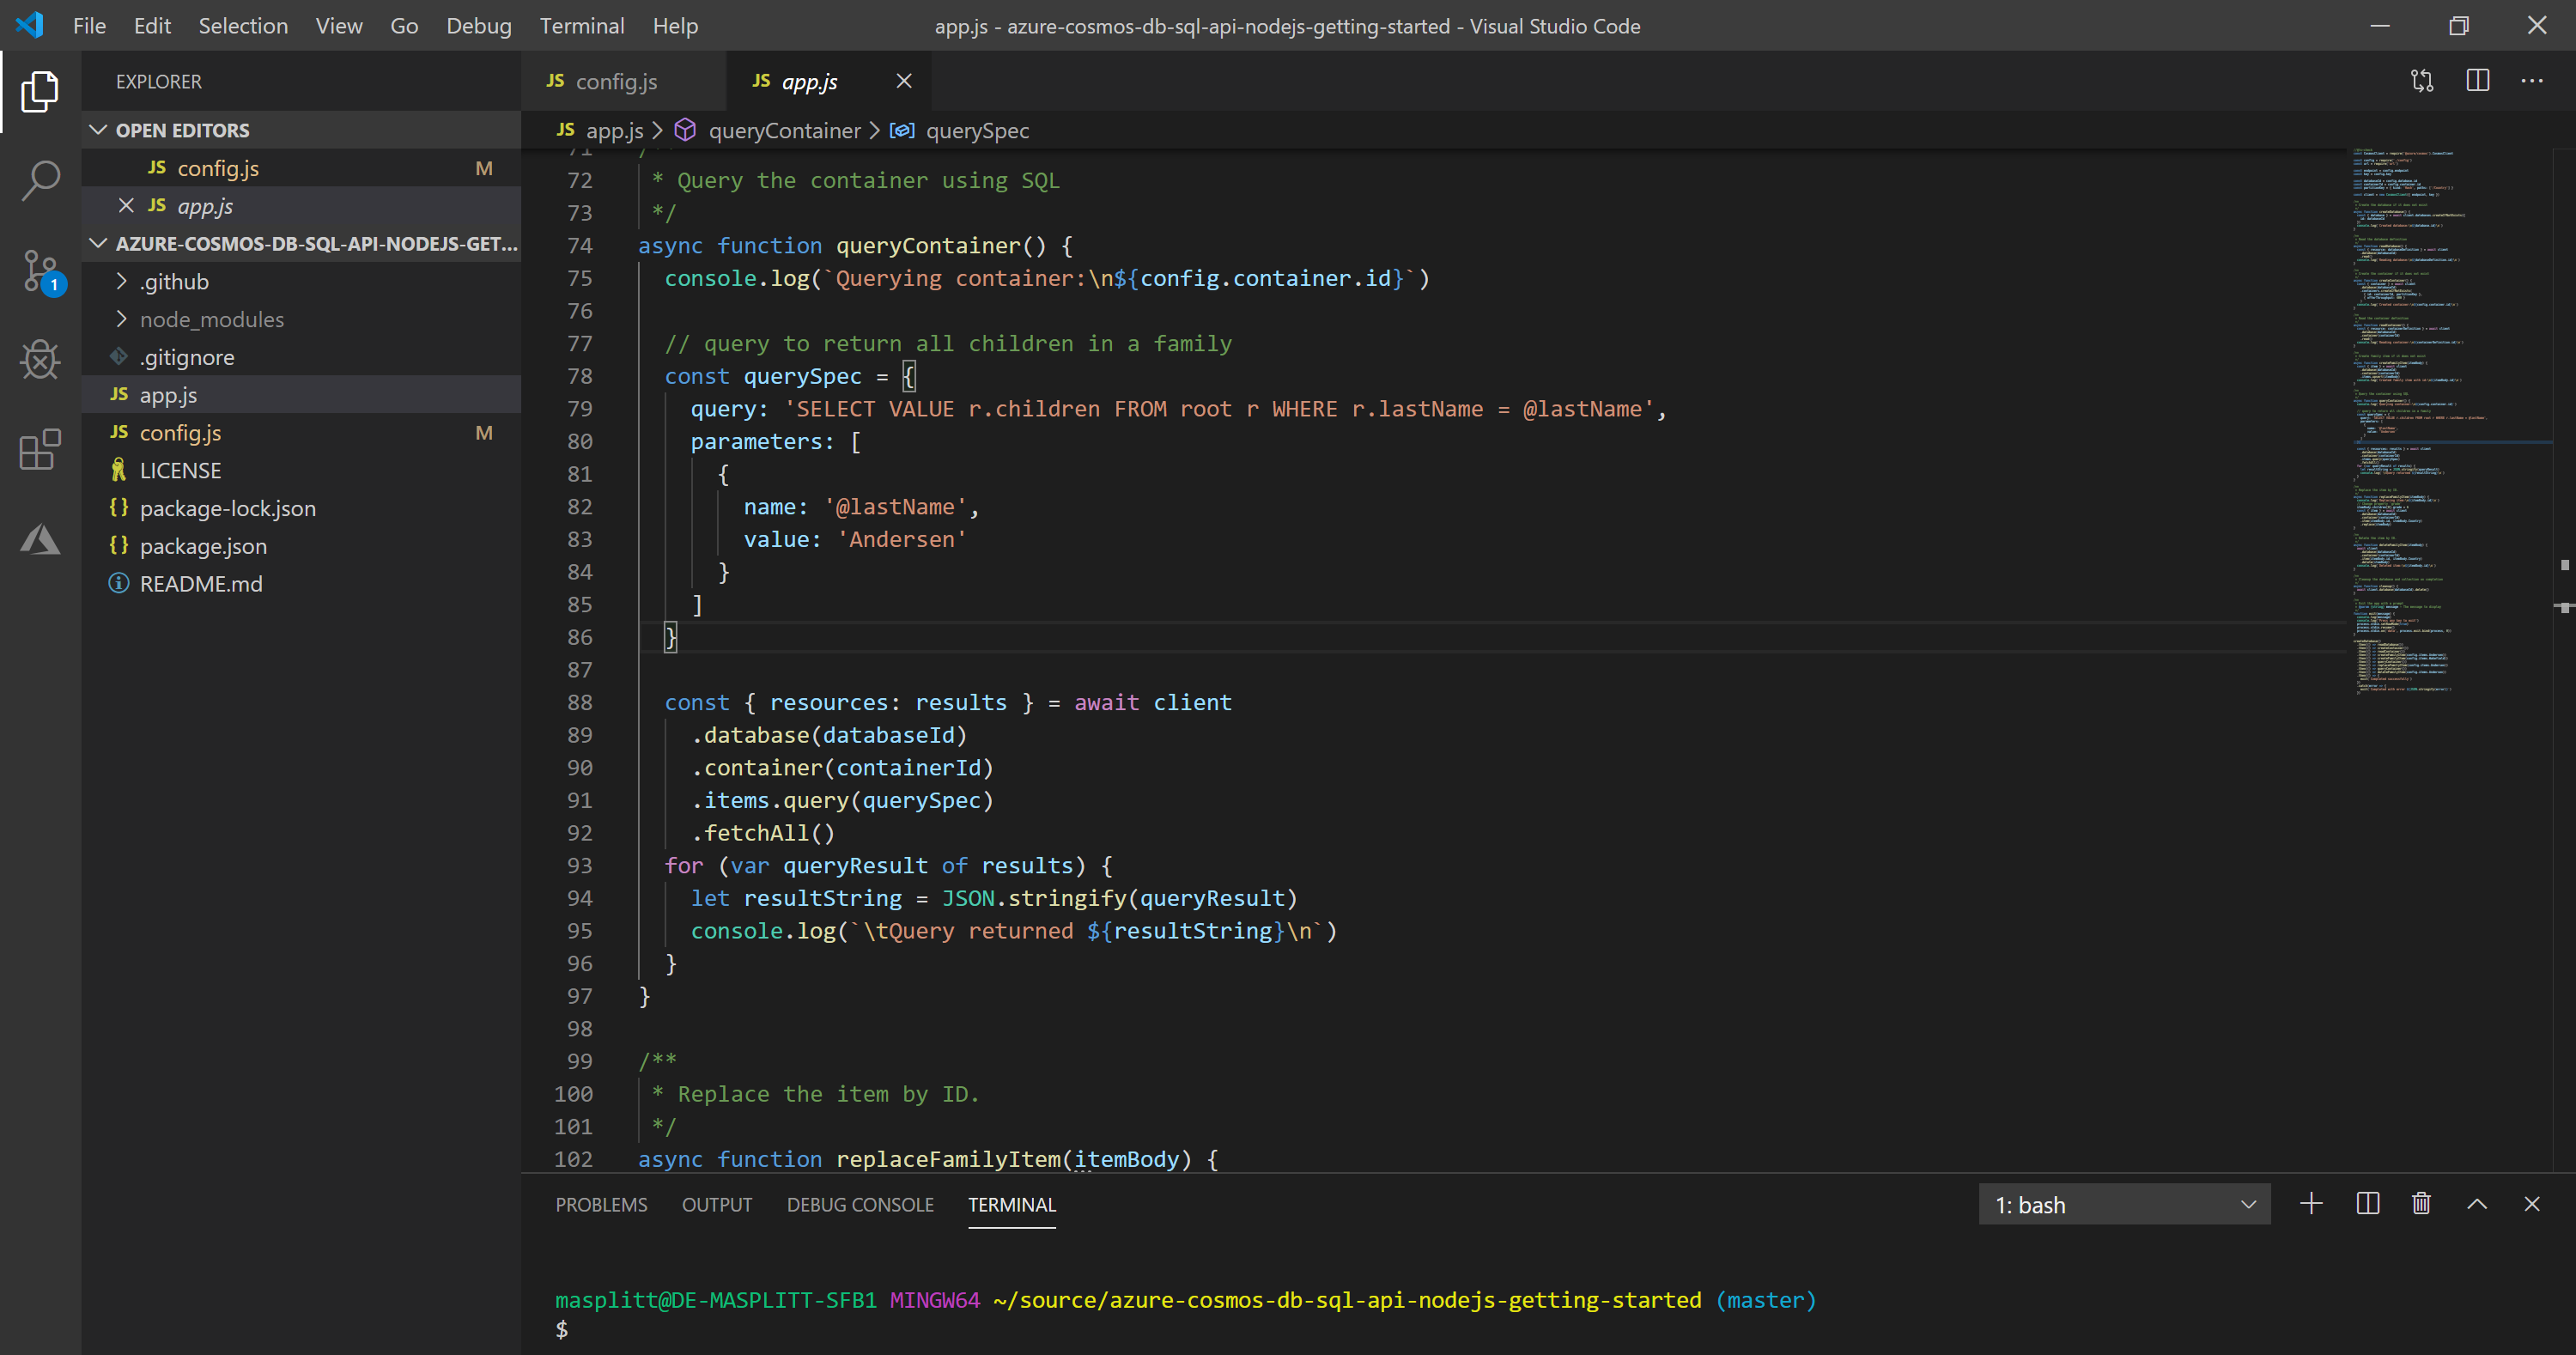
Before you run the sample, here are some hints what's happening in the app:
In app.js:
- The CosmosClient object is initialized.
const client = new CosmosClient({ endpoint, key })- A new Azure Cosmos database is created.
const { database } = await client.databases.createIfNotExists({ id: databaseId, })- A new container (collection) is created within the database.
const { container } = await client .database(databaseId) .containers.createIfNotExists({ id: containerId })- An item (document) is created
const { item } = await client
  .database(databaseId)
  .container(containerId)
  .items.create(itemBody)
These are the basic commands to interact with Azure Cosmos DB.
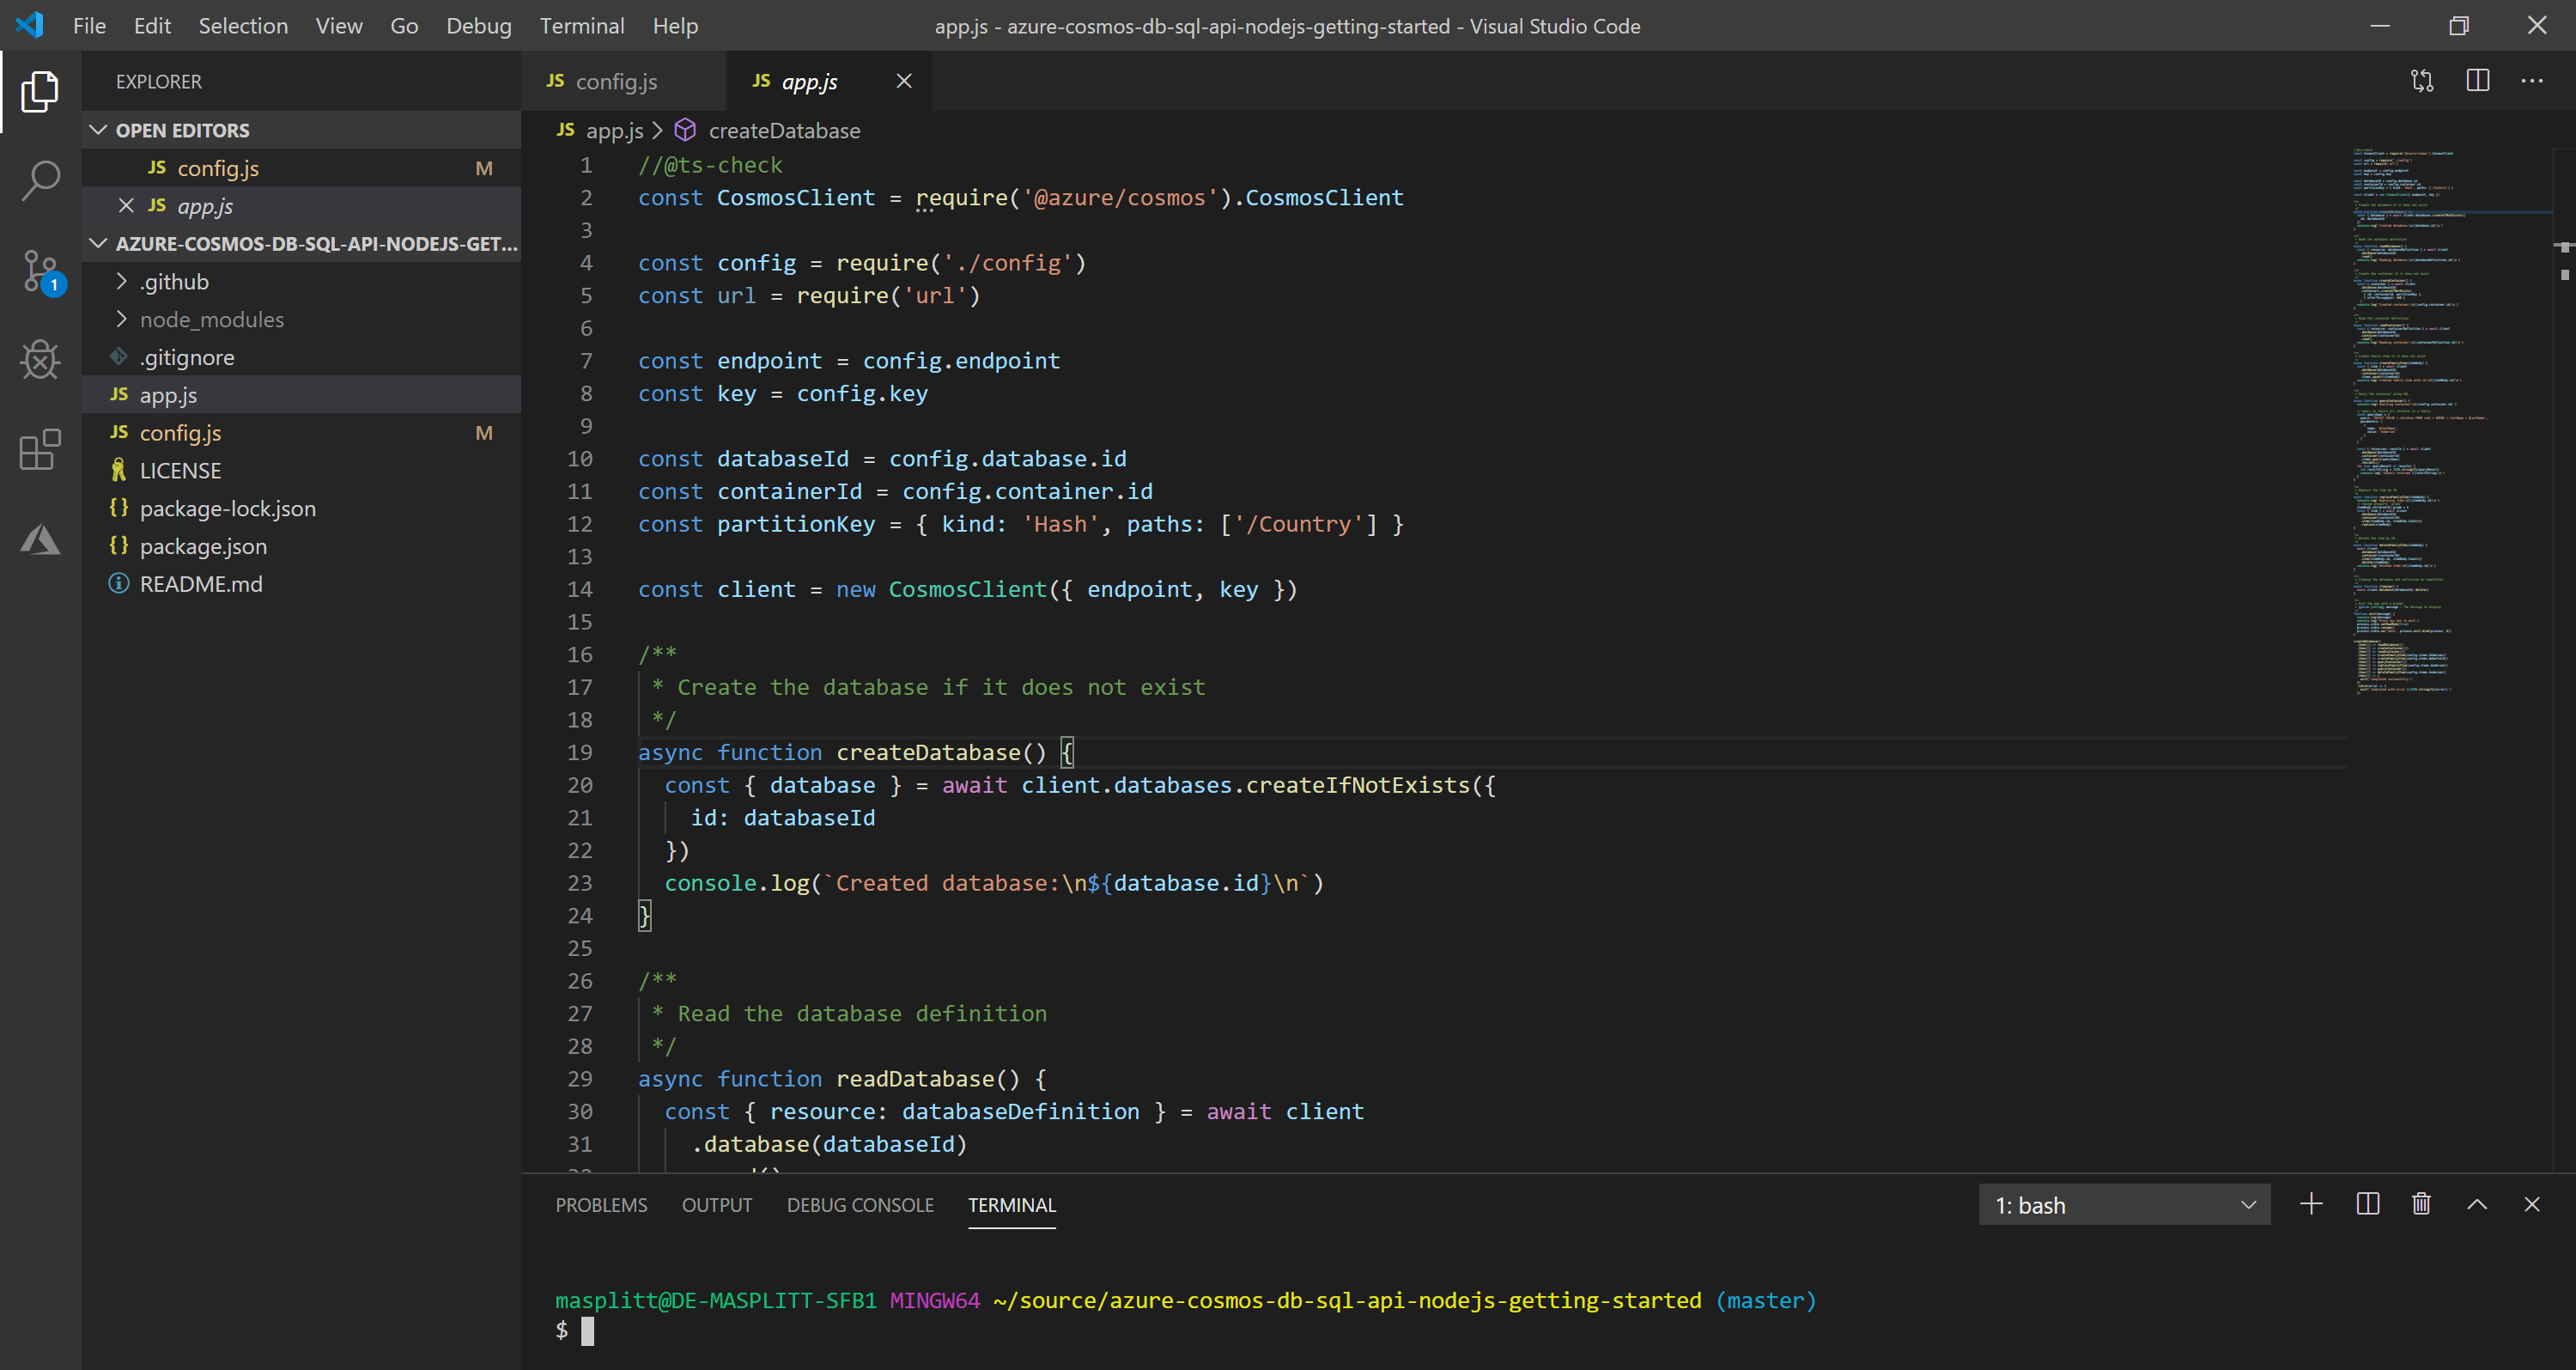
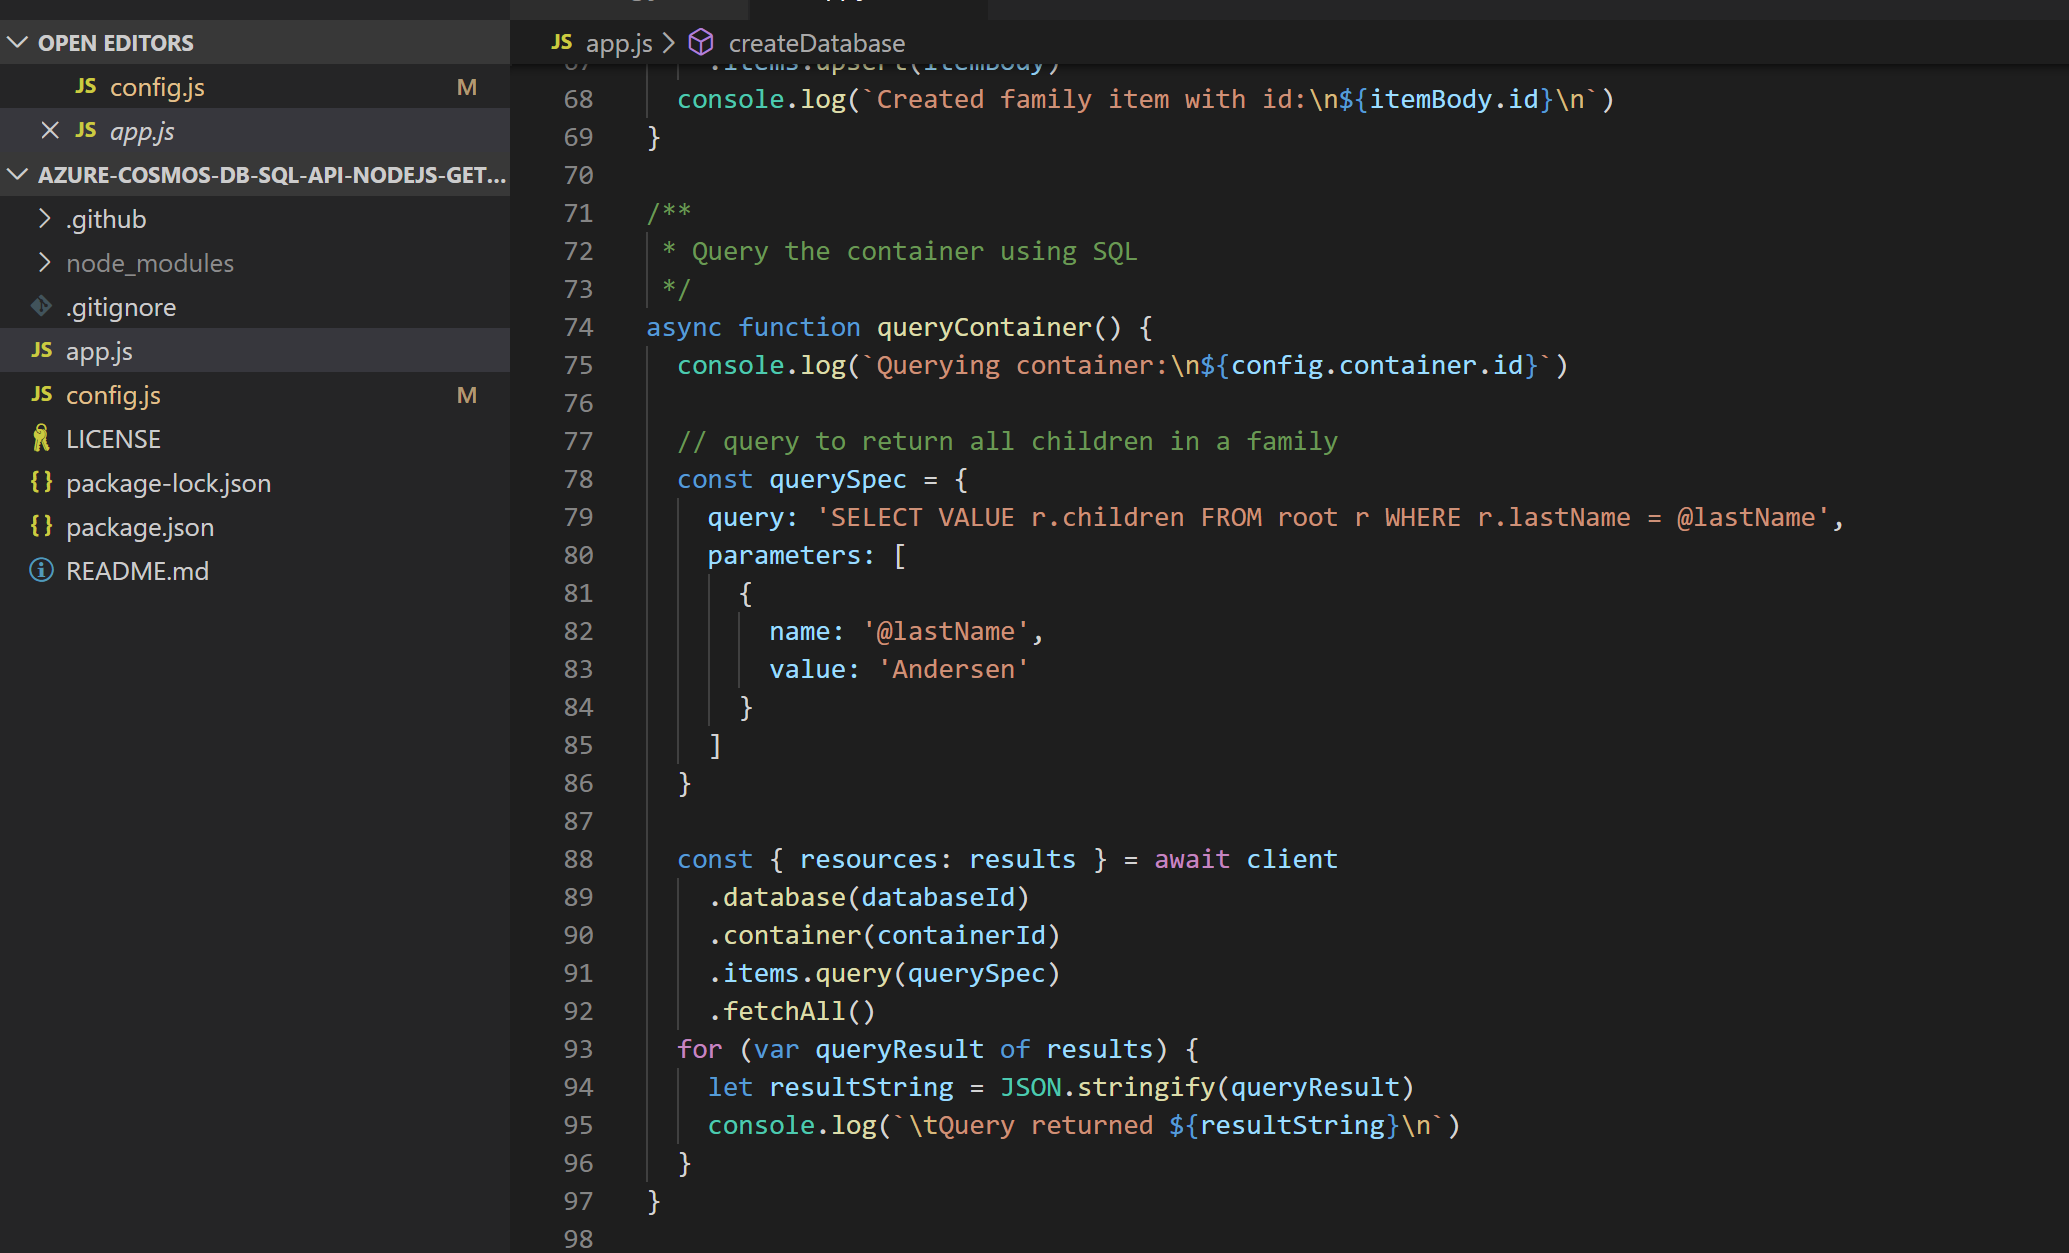
A little bit further down, you can see how to query against CosmosDB. The query returns all the children of a family. You first create a query specification which in turn is handed over to the Cosmos client, that executes the query against the database.
const querySpec = {
  query: 'SELECT VALUE r.children FROM root r WHERE r.lastName = @lastName',
  parameters: [
    {
      name: '@lastName',
      value: 'Andersen',
    },
  ],
}

const { resources: results } = await client
  .database(databaseId)
  .container(containerId)
  .items.query(querySpec)
  .fetchAll()

for (var queryResult of results) {
  let resultString = JSON.stringify(queryResult)
  console.log(`\tQuery returned ${resultString}\n`)
}
# Run the Sample Application
In order to run the sample application, we need to adjust some settings (in file config.js) that the app knows where to "find" our database.
In the Azure portal, open the Azure Cosmos account you just created, in the left navigation click Keys (under Settings), and then click Read-write Keys. Copy the URI as you will need it now in the NodeJS code.
Open the config.js file.
use the URL as the value for config.endpoint variable.
config.endpoint = 'https://<URI>.documents.azure.com:443'
- Then copy your PRIMARY KEY value from the portal and make it the value of config.key.
config.key = '<PRIMARY KEY>'
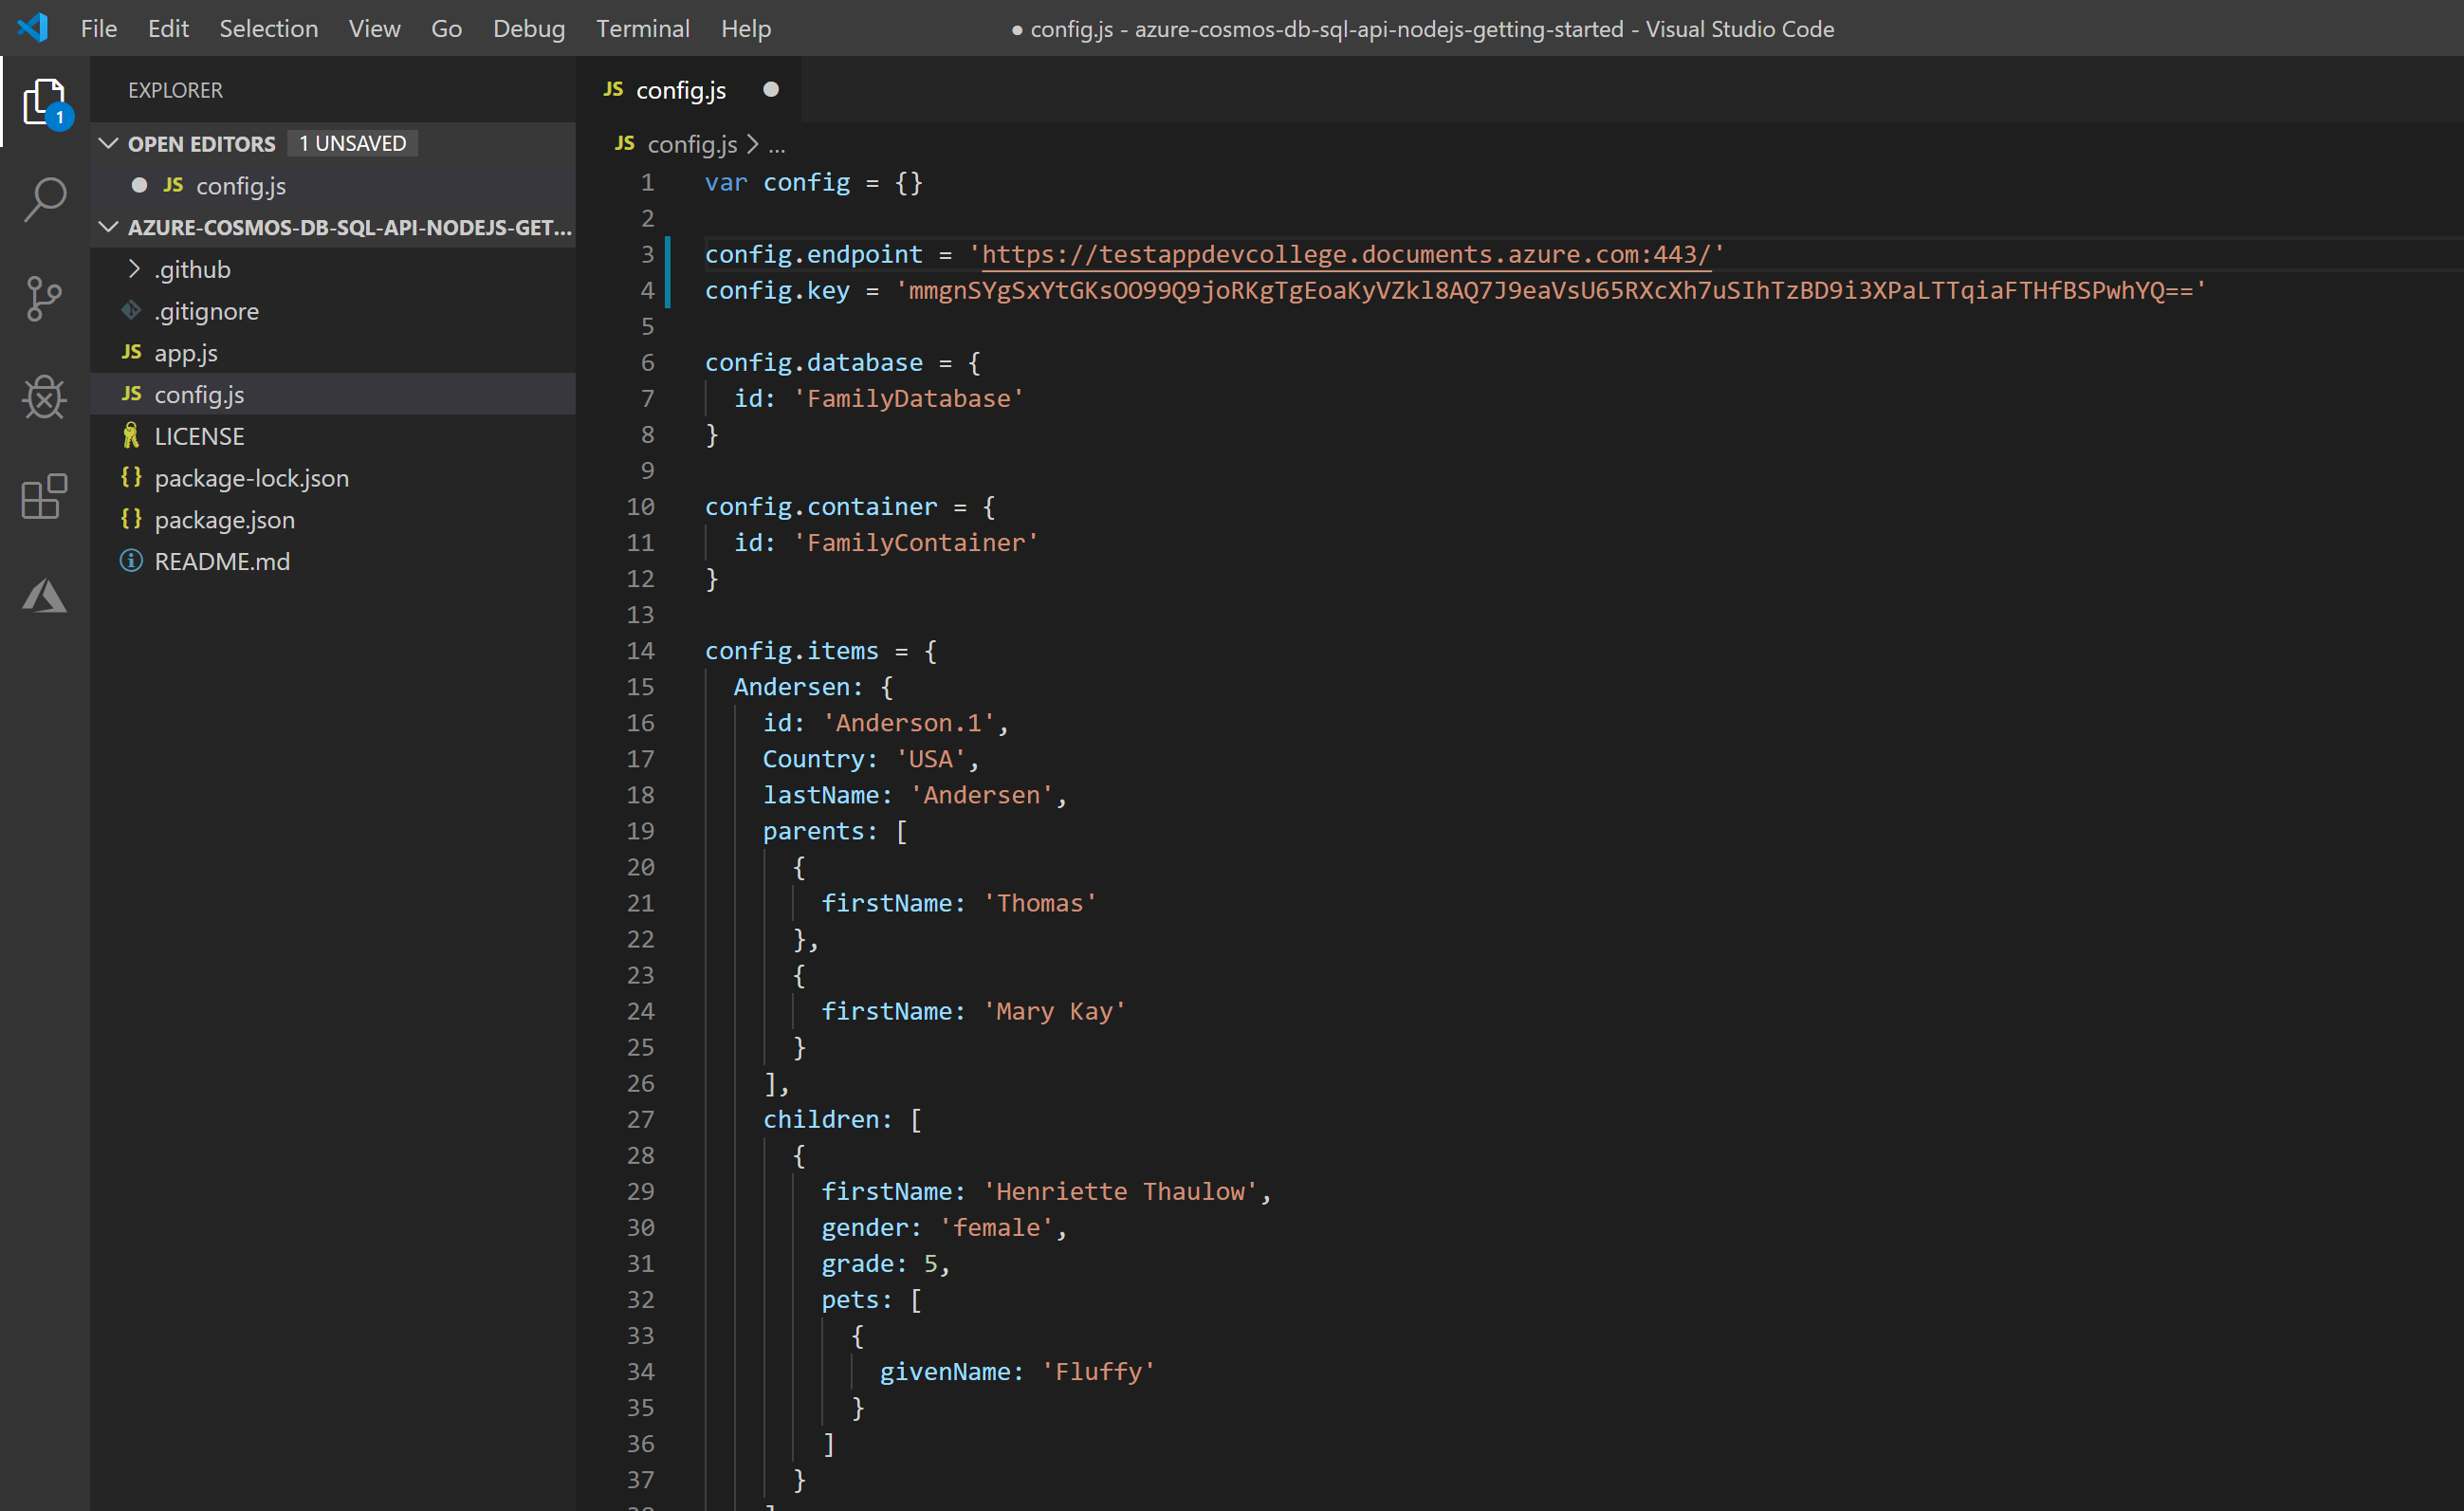
You've now updated your app with all the info it needs to communicate with Azure Cosmos DB.
Now you are all set to run the sample. In the terminal, we first need to install all the dependencies of the Node app. So please run:
npm install
After it has finished downloading the dependencies, run:
npm start
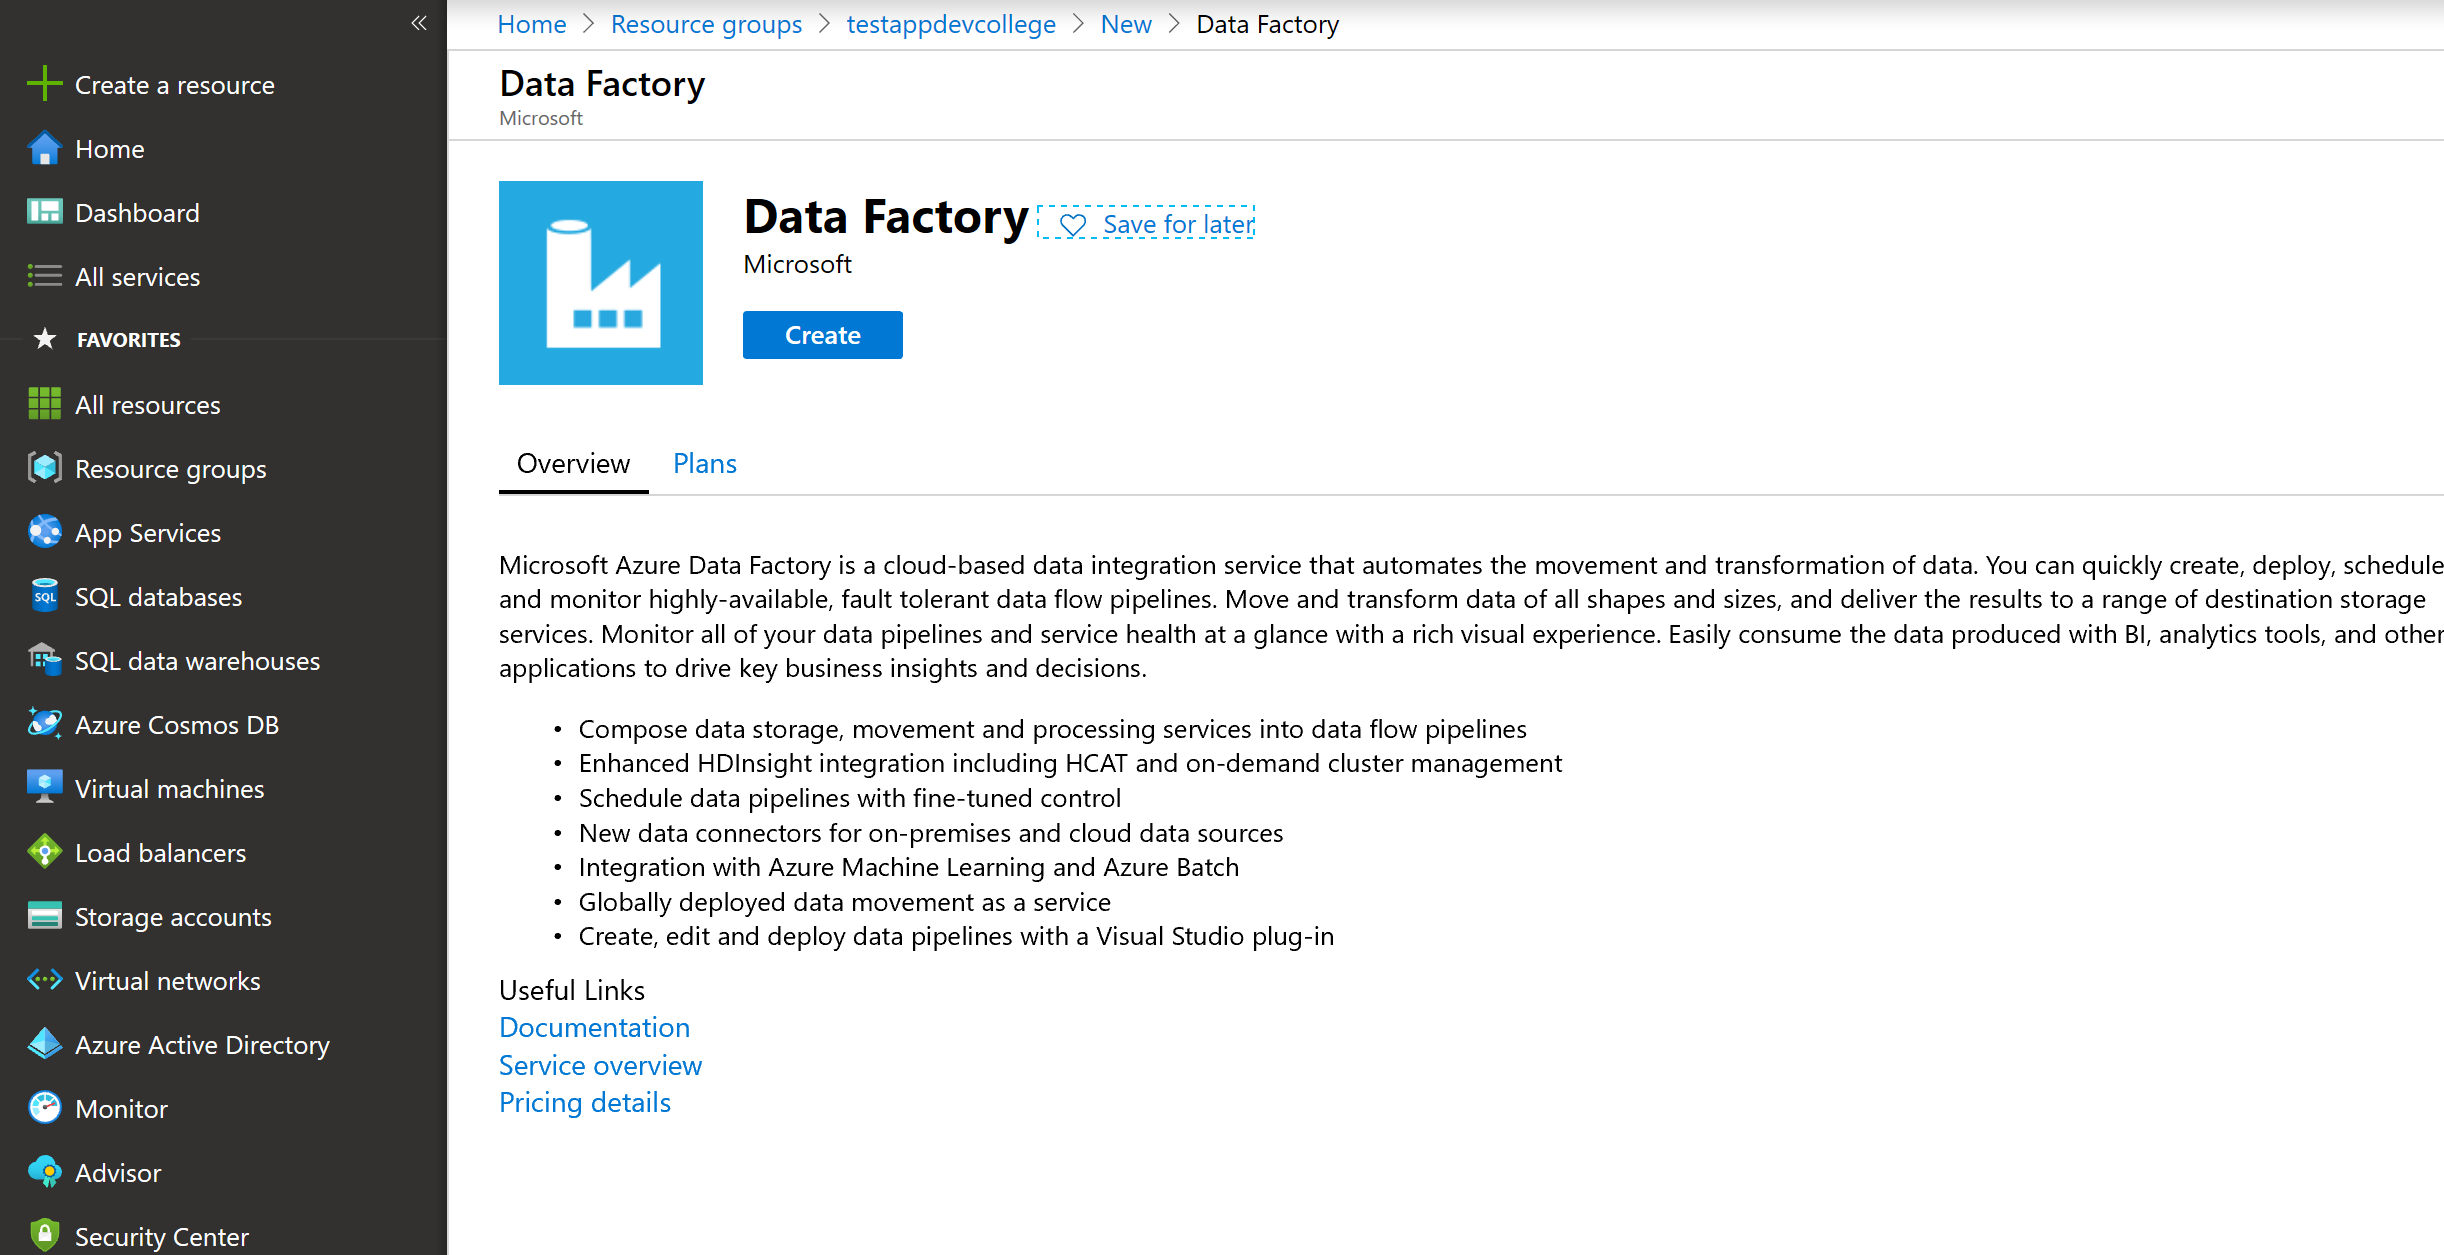
# Add Data using Azure Data Factory
Now we want to add a little bit more data to our Cosmos DB. So please follow the instructions below as we add data via Azure Data Factory. Azure Data Factory is a managed cloud service that's built to handle complex hybrid extract-transform-load (ETL), extract-load-transform (ELT), and data integration projects. It solves the problem of consolidating and loading data from various sources - either in the cloud or on-premises. If you want to know more about that service, please go to https://docs.microsoft.com/en-us/azure/data-factory/introduction (opens new window).
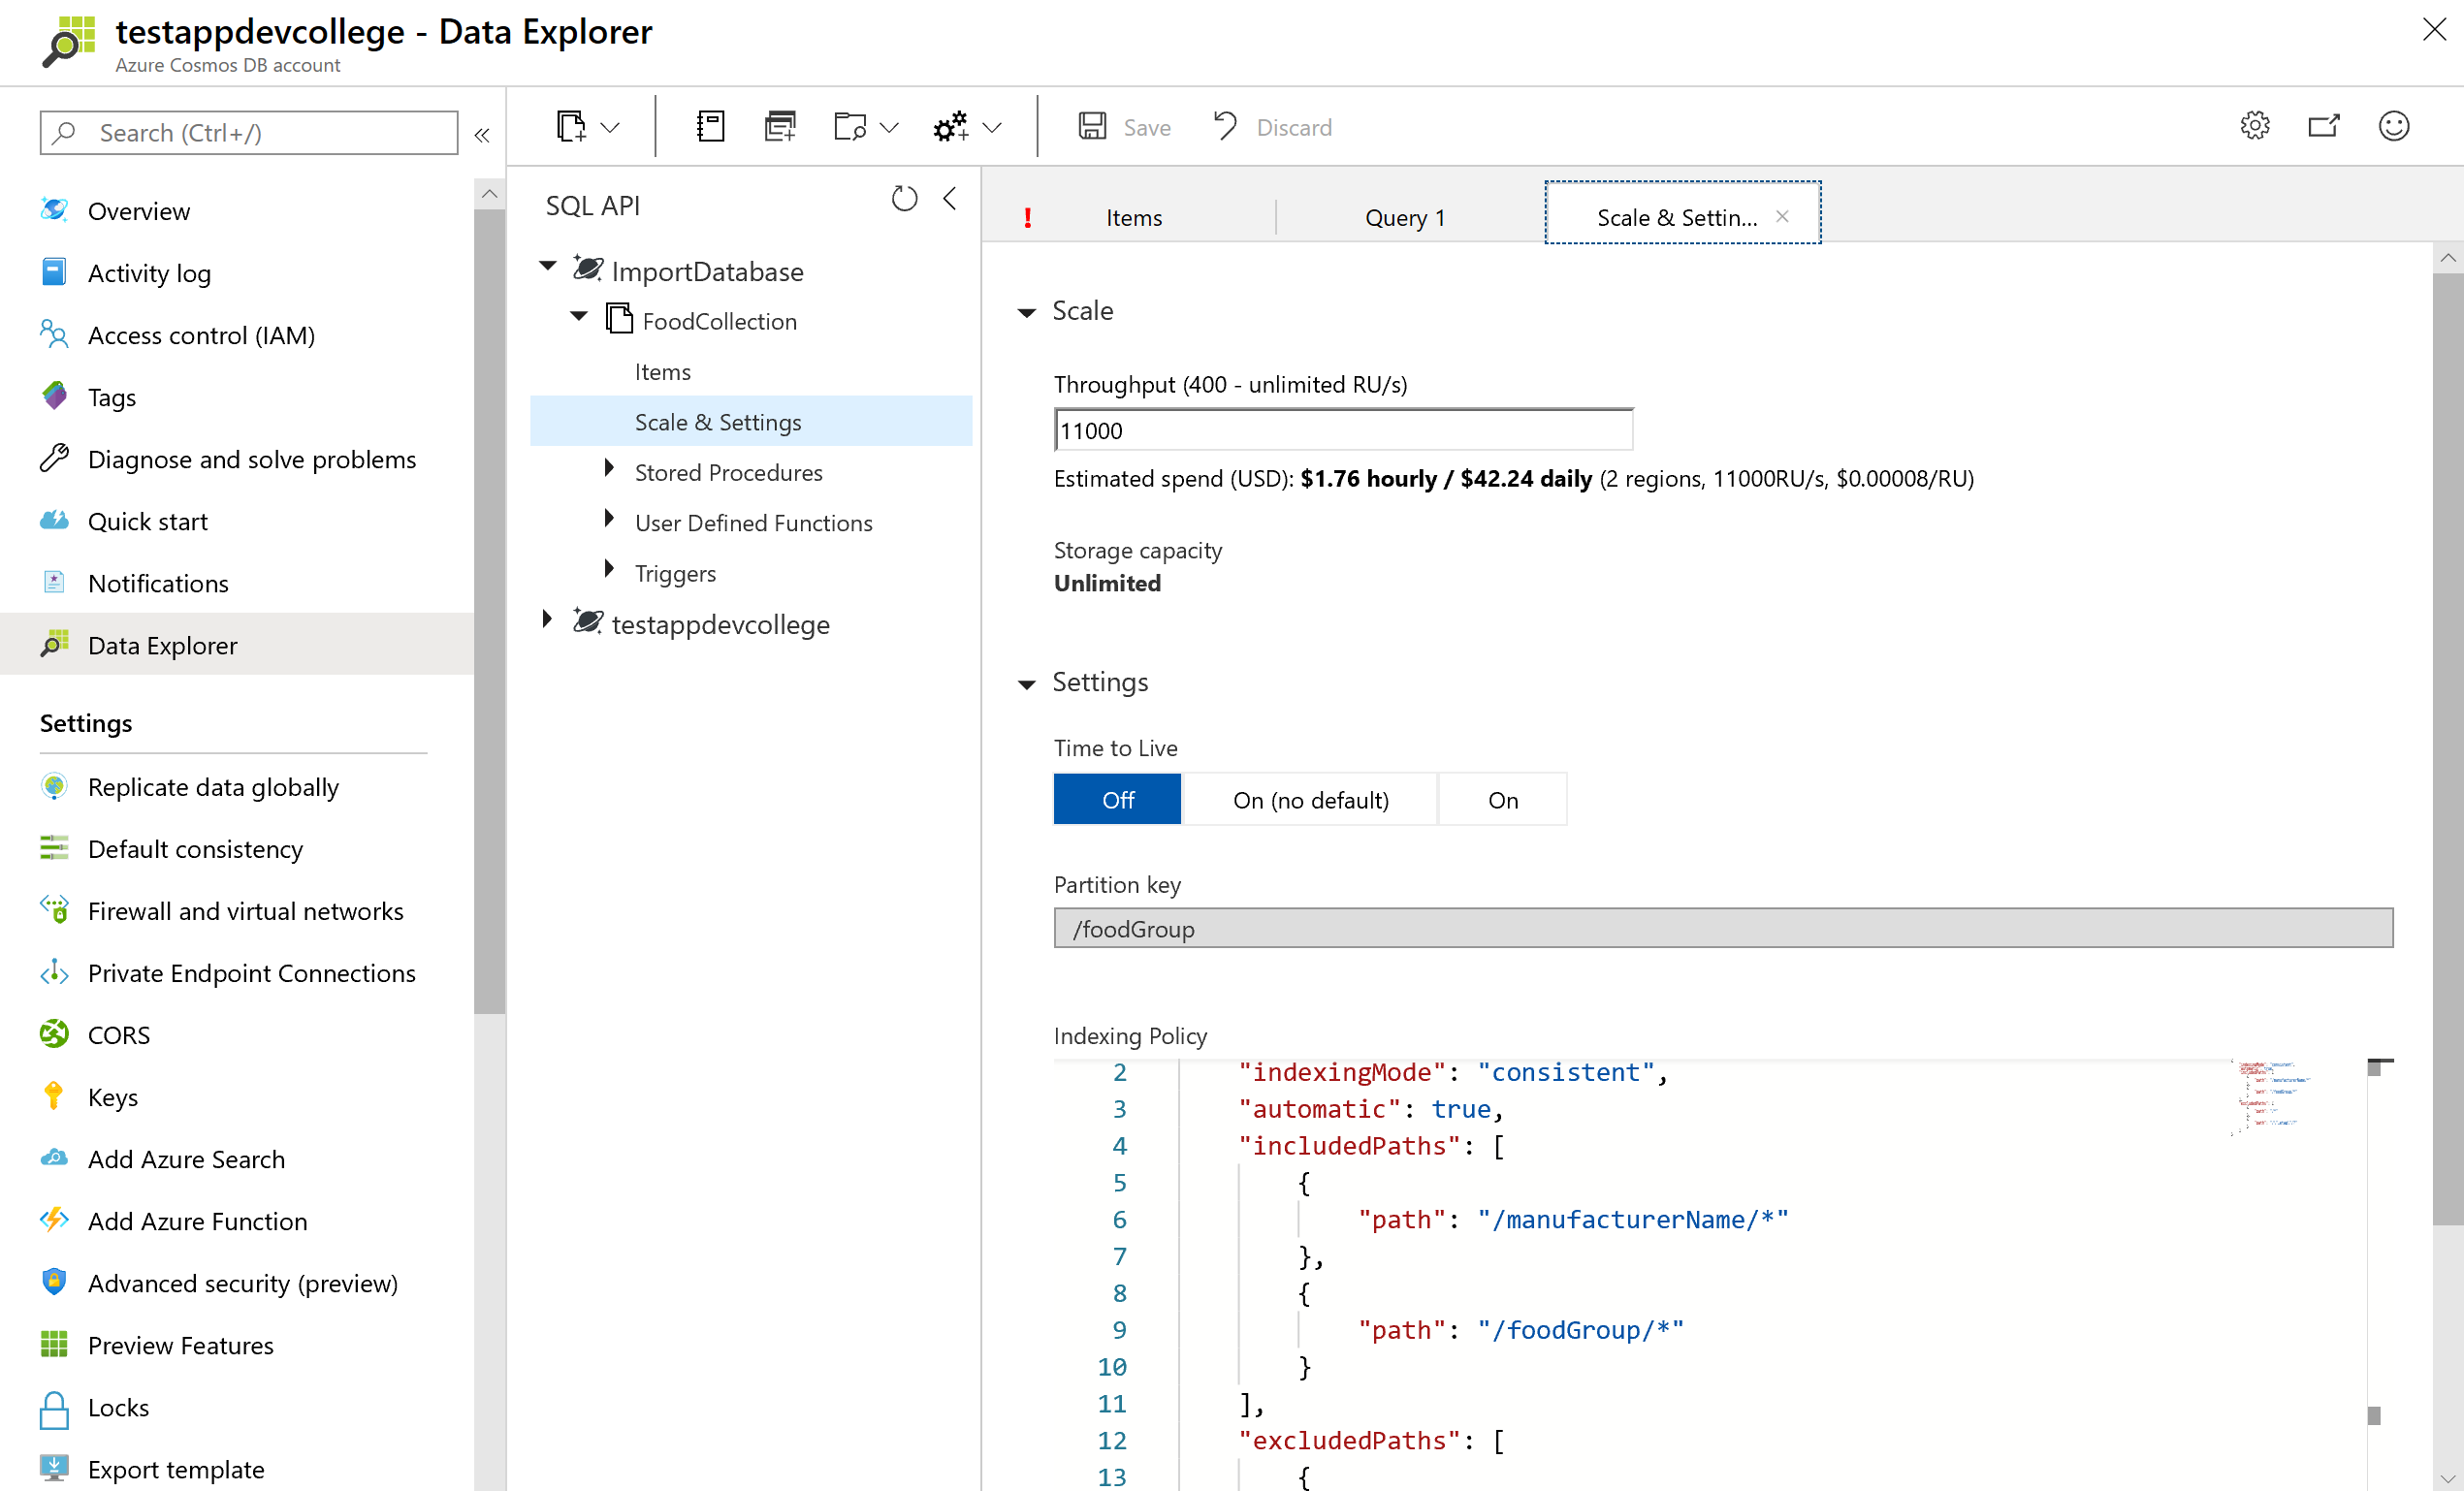
First and foremost, we will be creating an new database plus a new container. Go to your Cosmos DB account, you created previously and click on Add Container (database will be created on-the-fly).
In the Database id field, select the Create new option and enter the value "ImportDatabase".
Uncheck the Provision database throughput option (RUs will be provisioned on the collection level).
In the Container Id field, enter the value "FoodCollection".
In the Partition key field, enter the value
/foodGroup.After ticking the box Provision dedicated throughput for this container enter the value
11000in the Throughput field.Click the OK button.
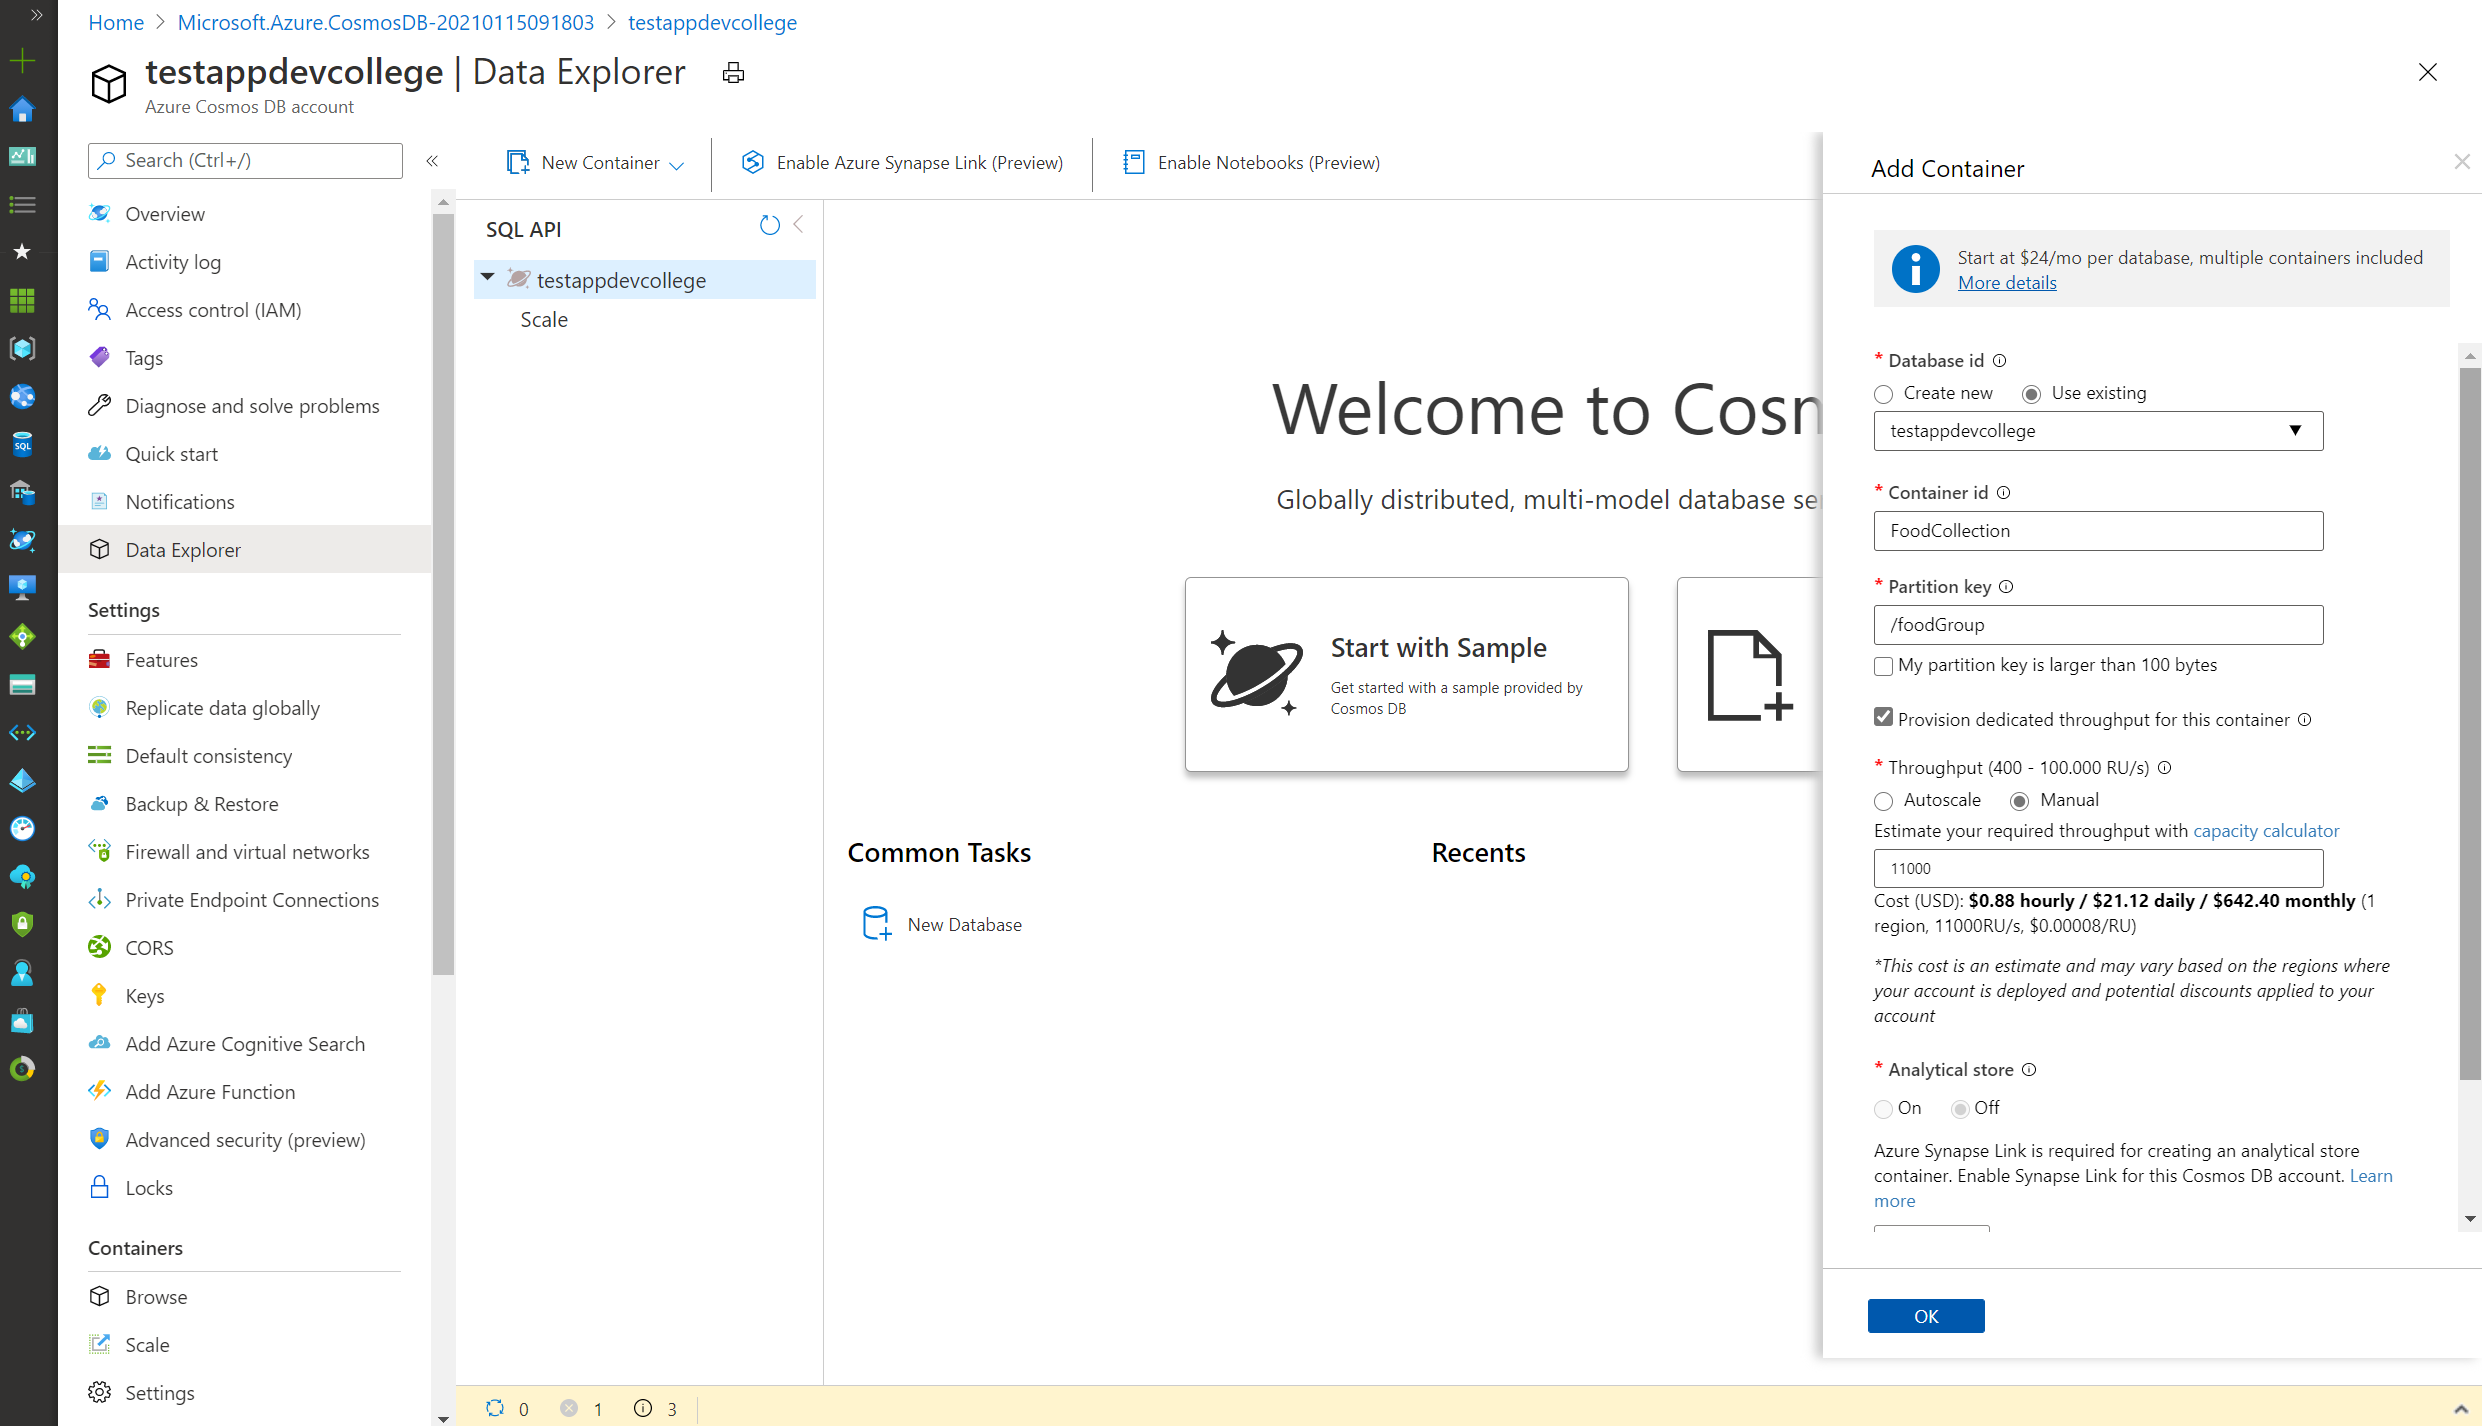
Wait for the creation of the new database and container to finish before moving on with this lab.
# Import Lab Data Into Container
You will use Azure Data Factory (ADF) to import the JSON array stored in the nutrition.json file from Azure Blob Storage.
TIP
📝 To learn more about copying data to Cosmos DB with ADF, please read ADF's documentation (opens new window).
On the left side of the portal, click the Resource groups link.
In the Resource groups blade, locate and select the resource group of your CosmosDB account.
Click Add to add a new resource. Search for Data Factory and select it.
Create a new Data Factory. You should name this data factory "ImportNutritionDataAppdevCollege(yourname)" (optionally you can append a unique number) and select the relevant Azure subscription. You should ensure that Version "V2" is selected. Select "West Europe" as the region.
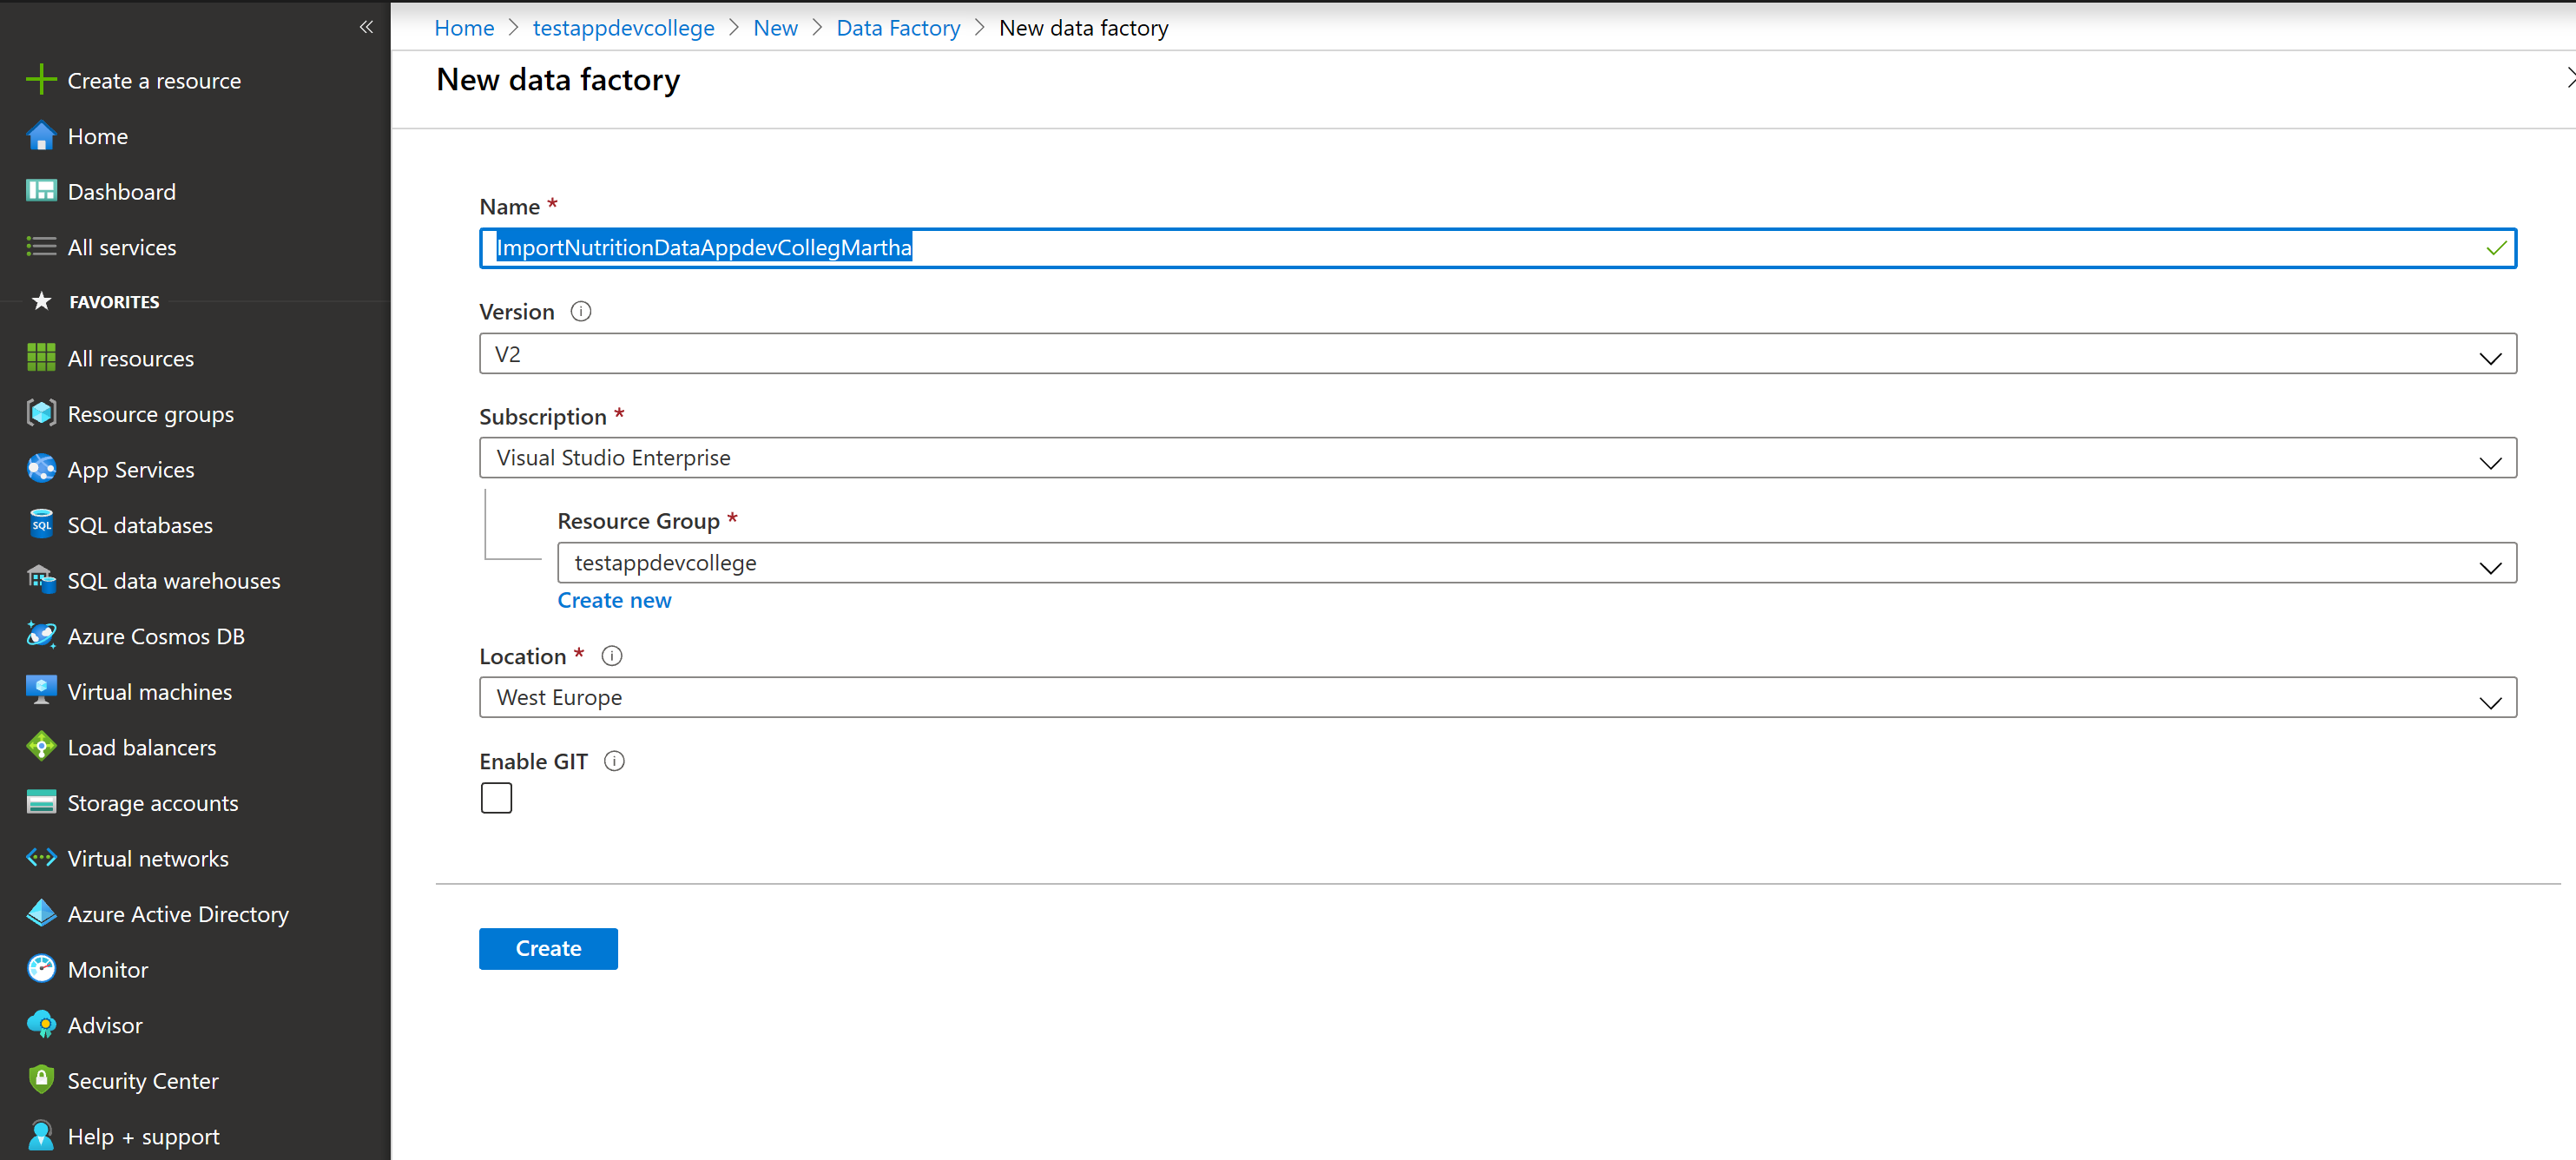
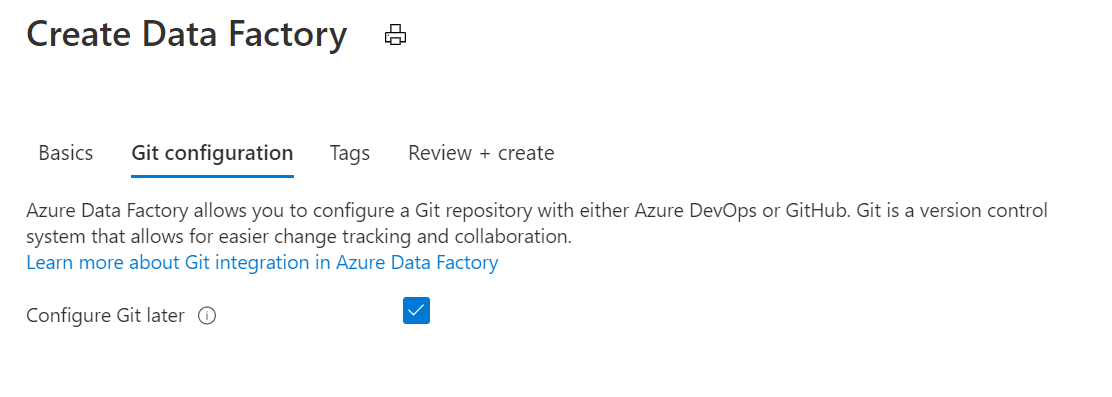
Do select Configure Git later (found on the second screen). Click through all the screens and hit create.
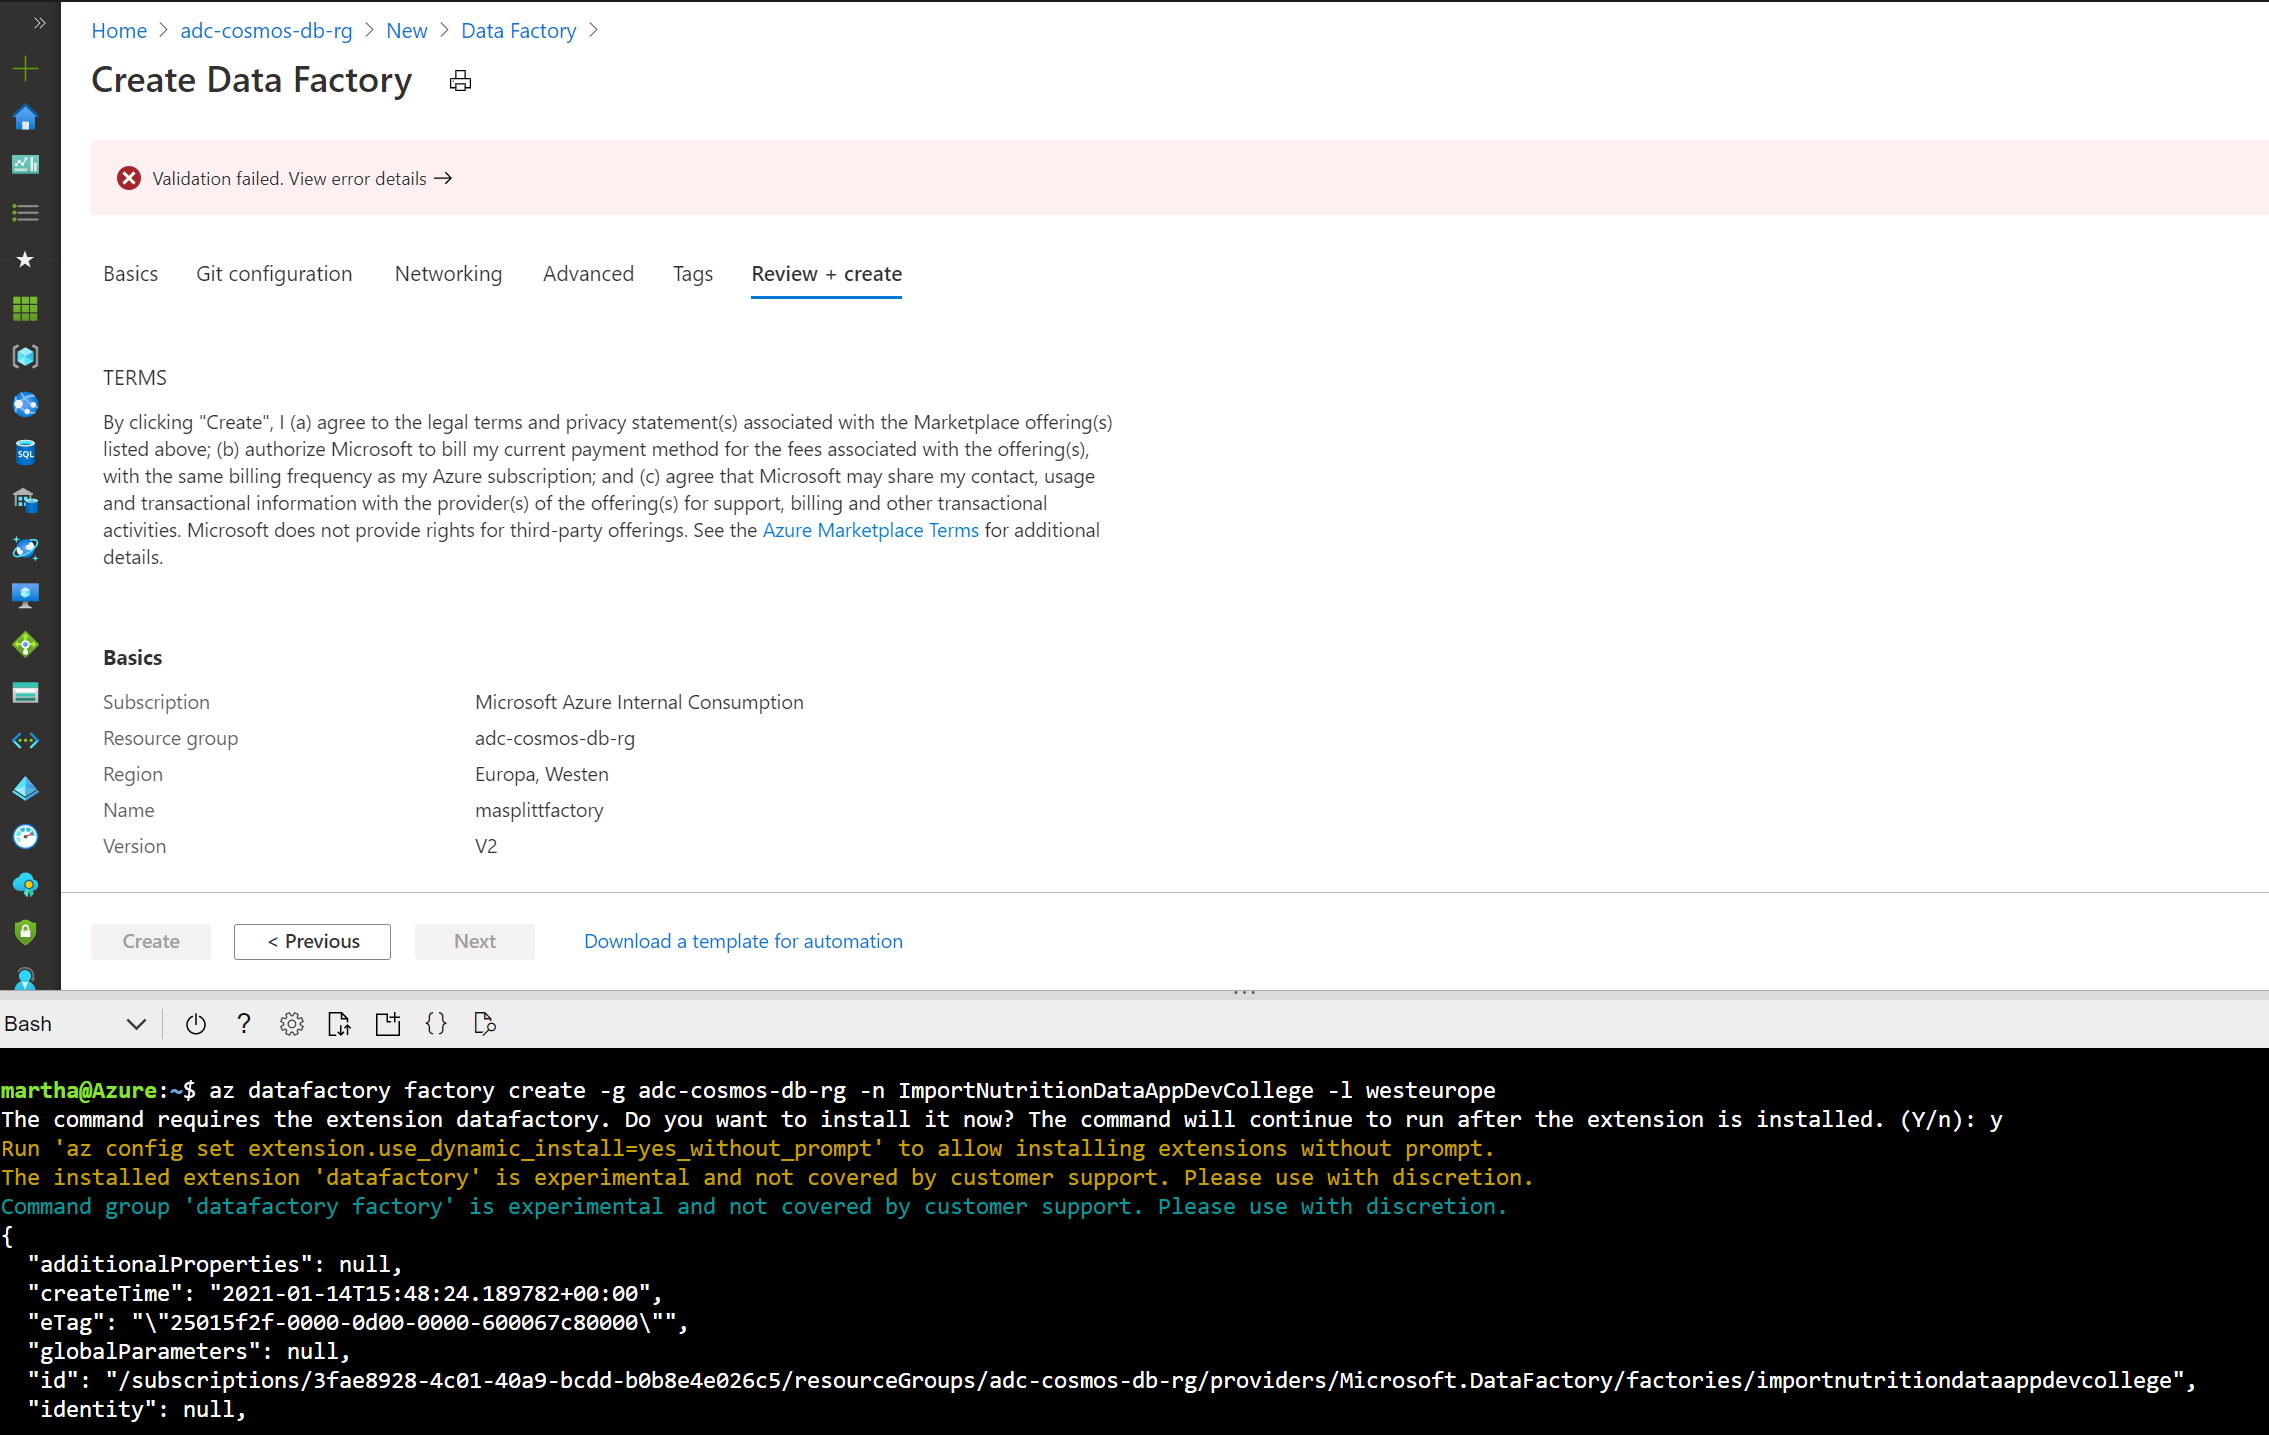
In case you get a validation error please use the Azure Cloud Shell and enter the following command
$ az datafactory factory create -g adc-cosmos-db-rg -n ImportNutritionDataAppdevCollege(yourname) -l westeurope
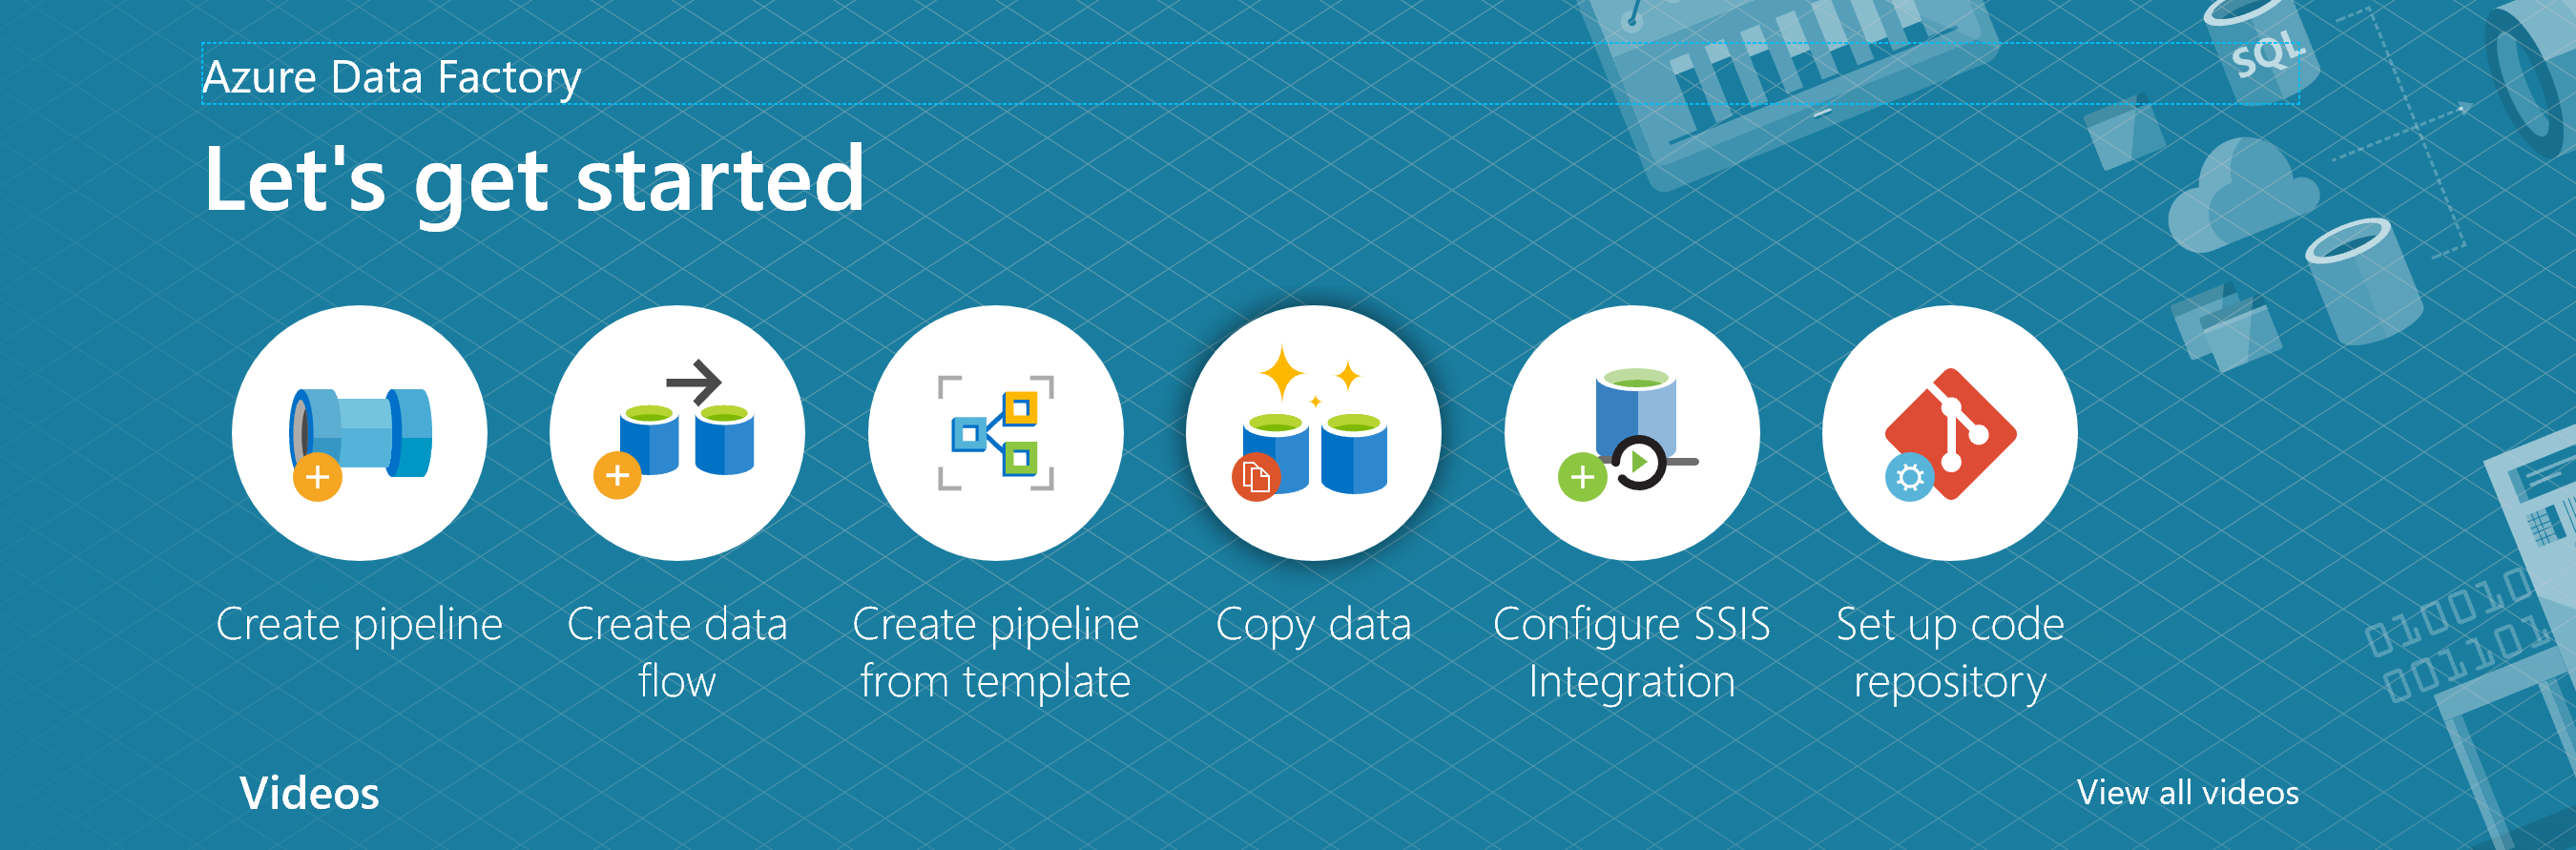
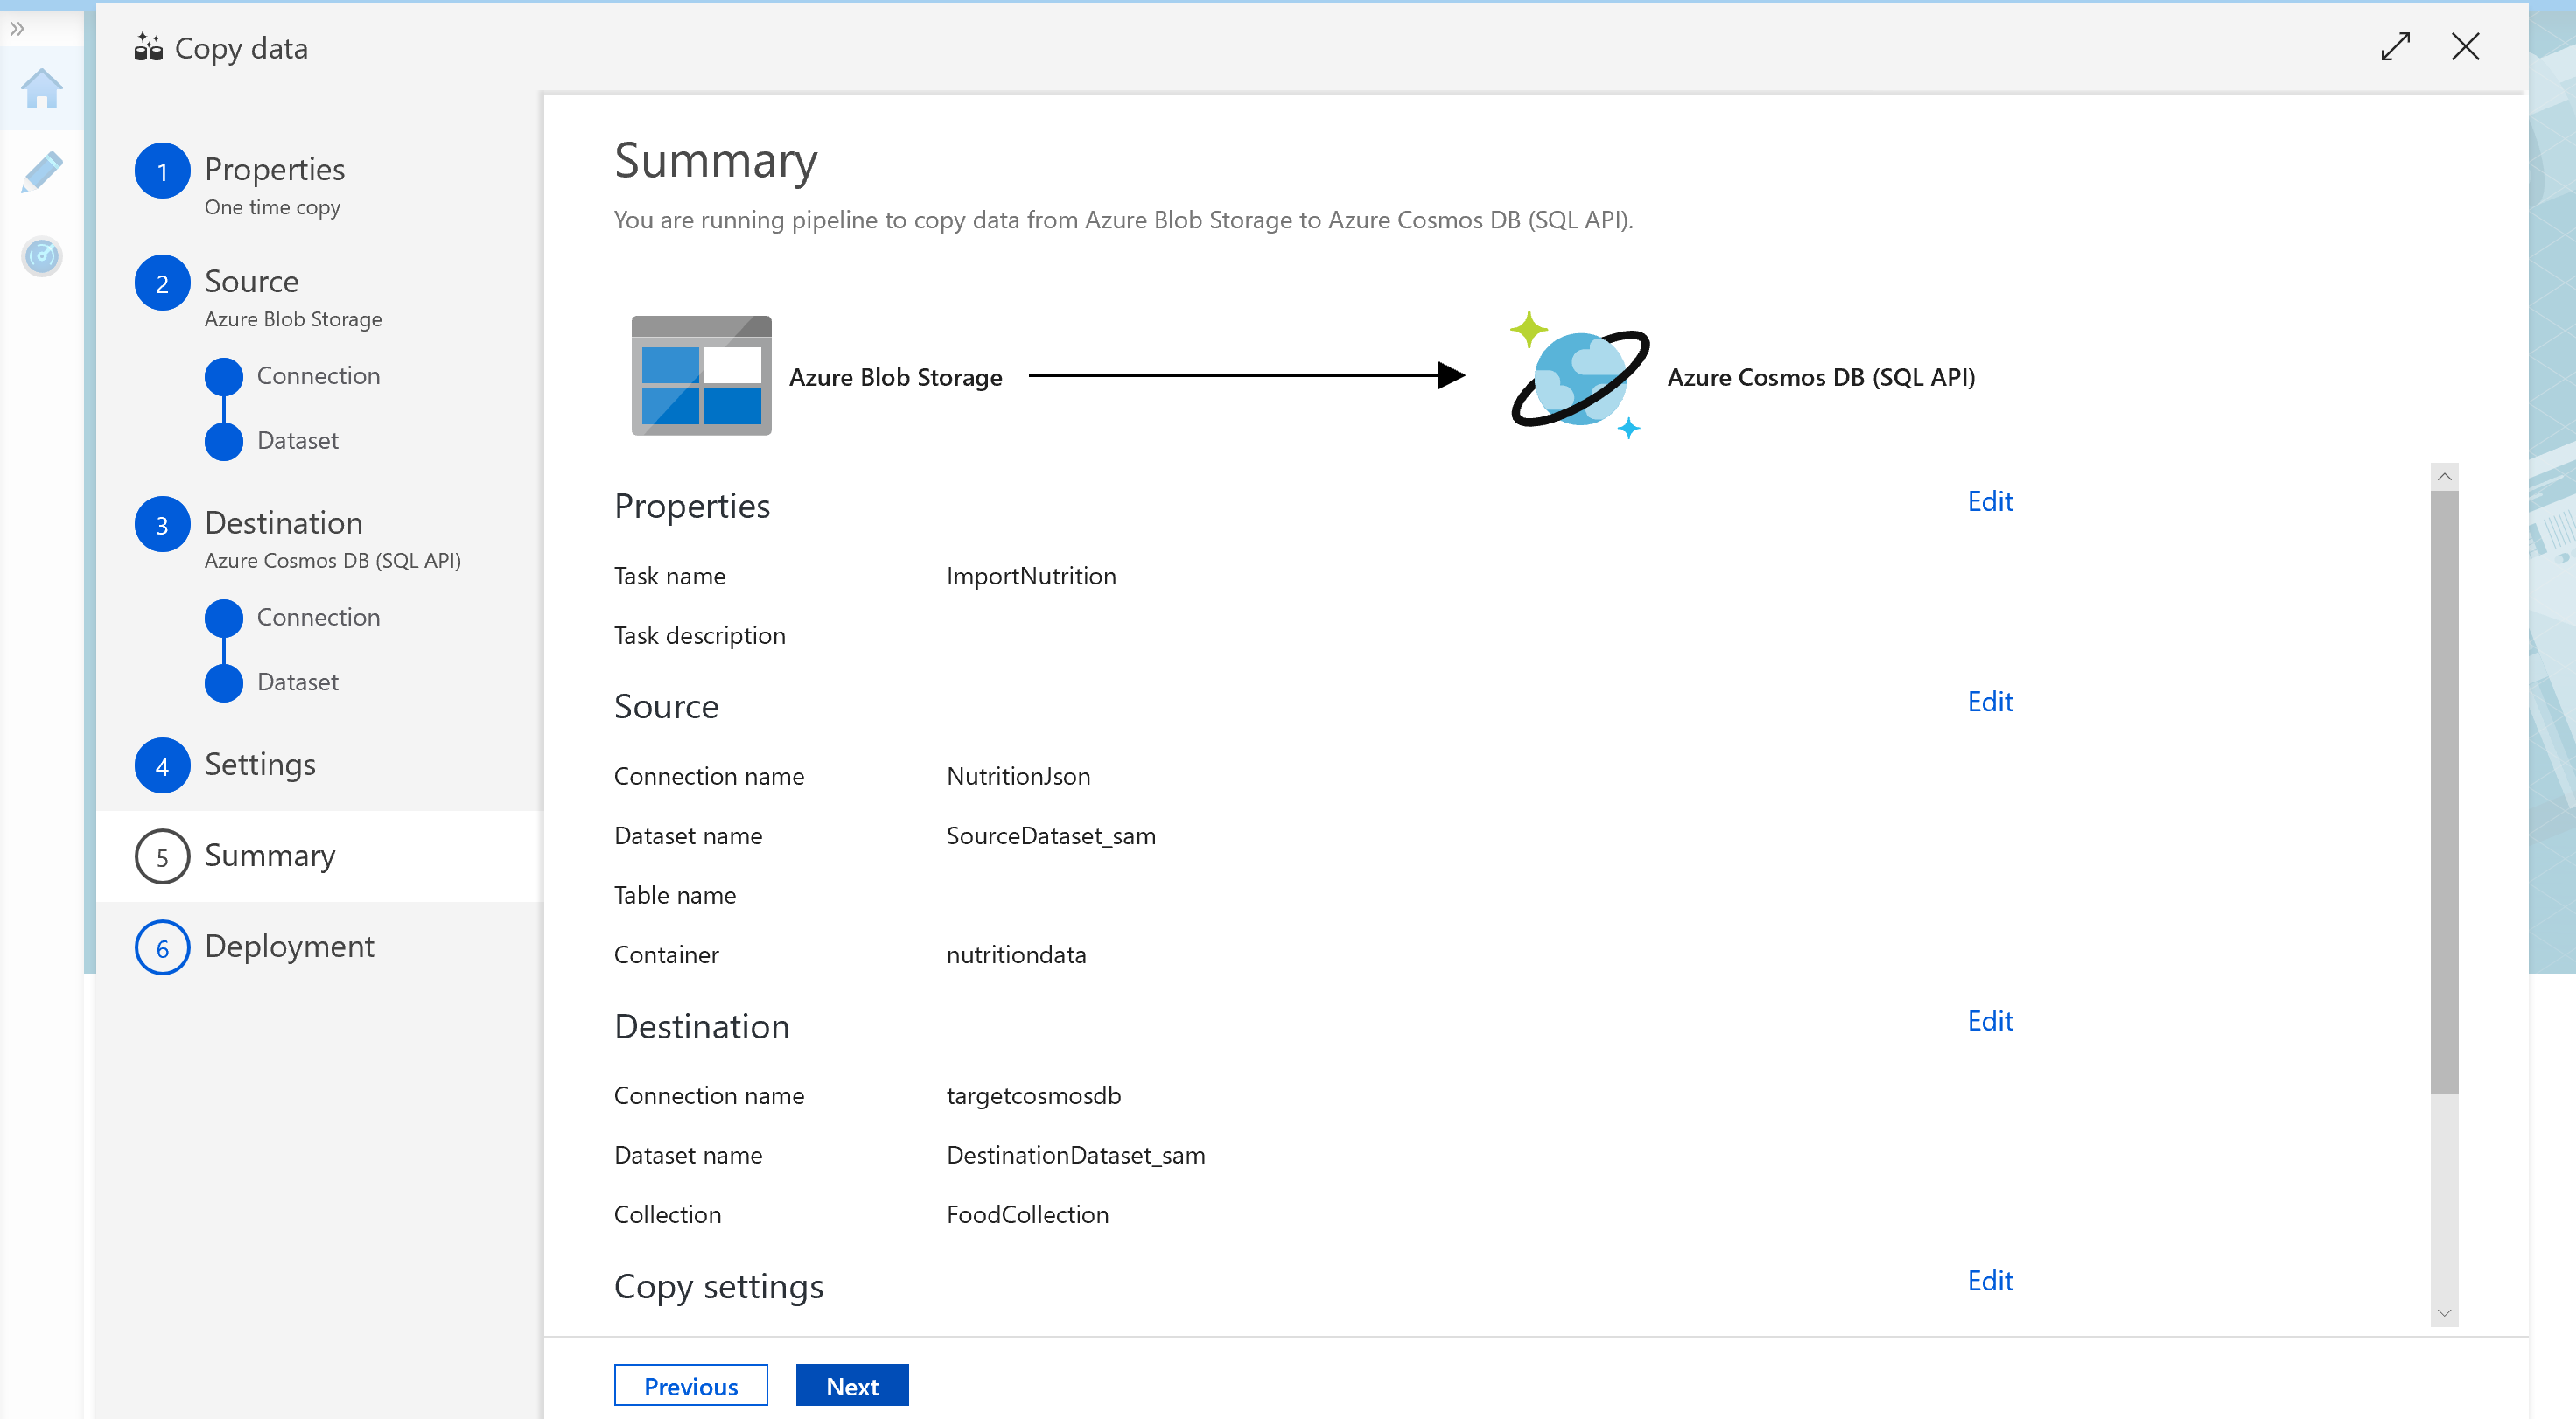
- After creation, open your newly created Data Factory. Select Author & Monitor and you will launch ADF. You should see a screen similar to the screenshot below. (We will be using ADF for a one-time copy of data from a source JSON file on Azure Blob Storage to a database in Cosmos DB’s SQL API. ADF can also be used for more frequent data transfers from Cosmos DB to other data stores.)
Select "Copy Data". Edit basic properties for this data copy. You should name the task "ImportNutrition" and select to "Run once now". Click Next.
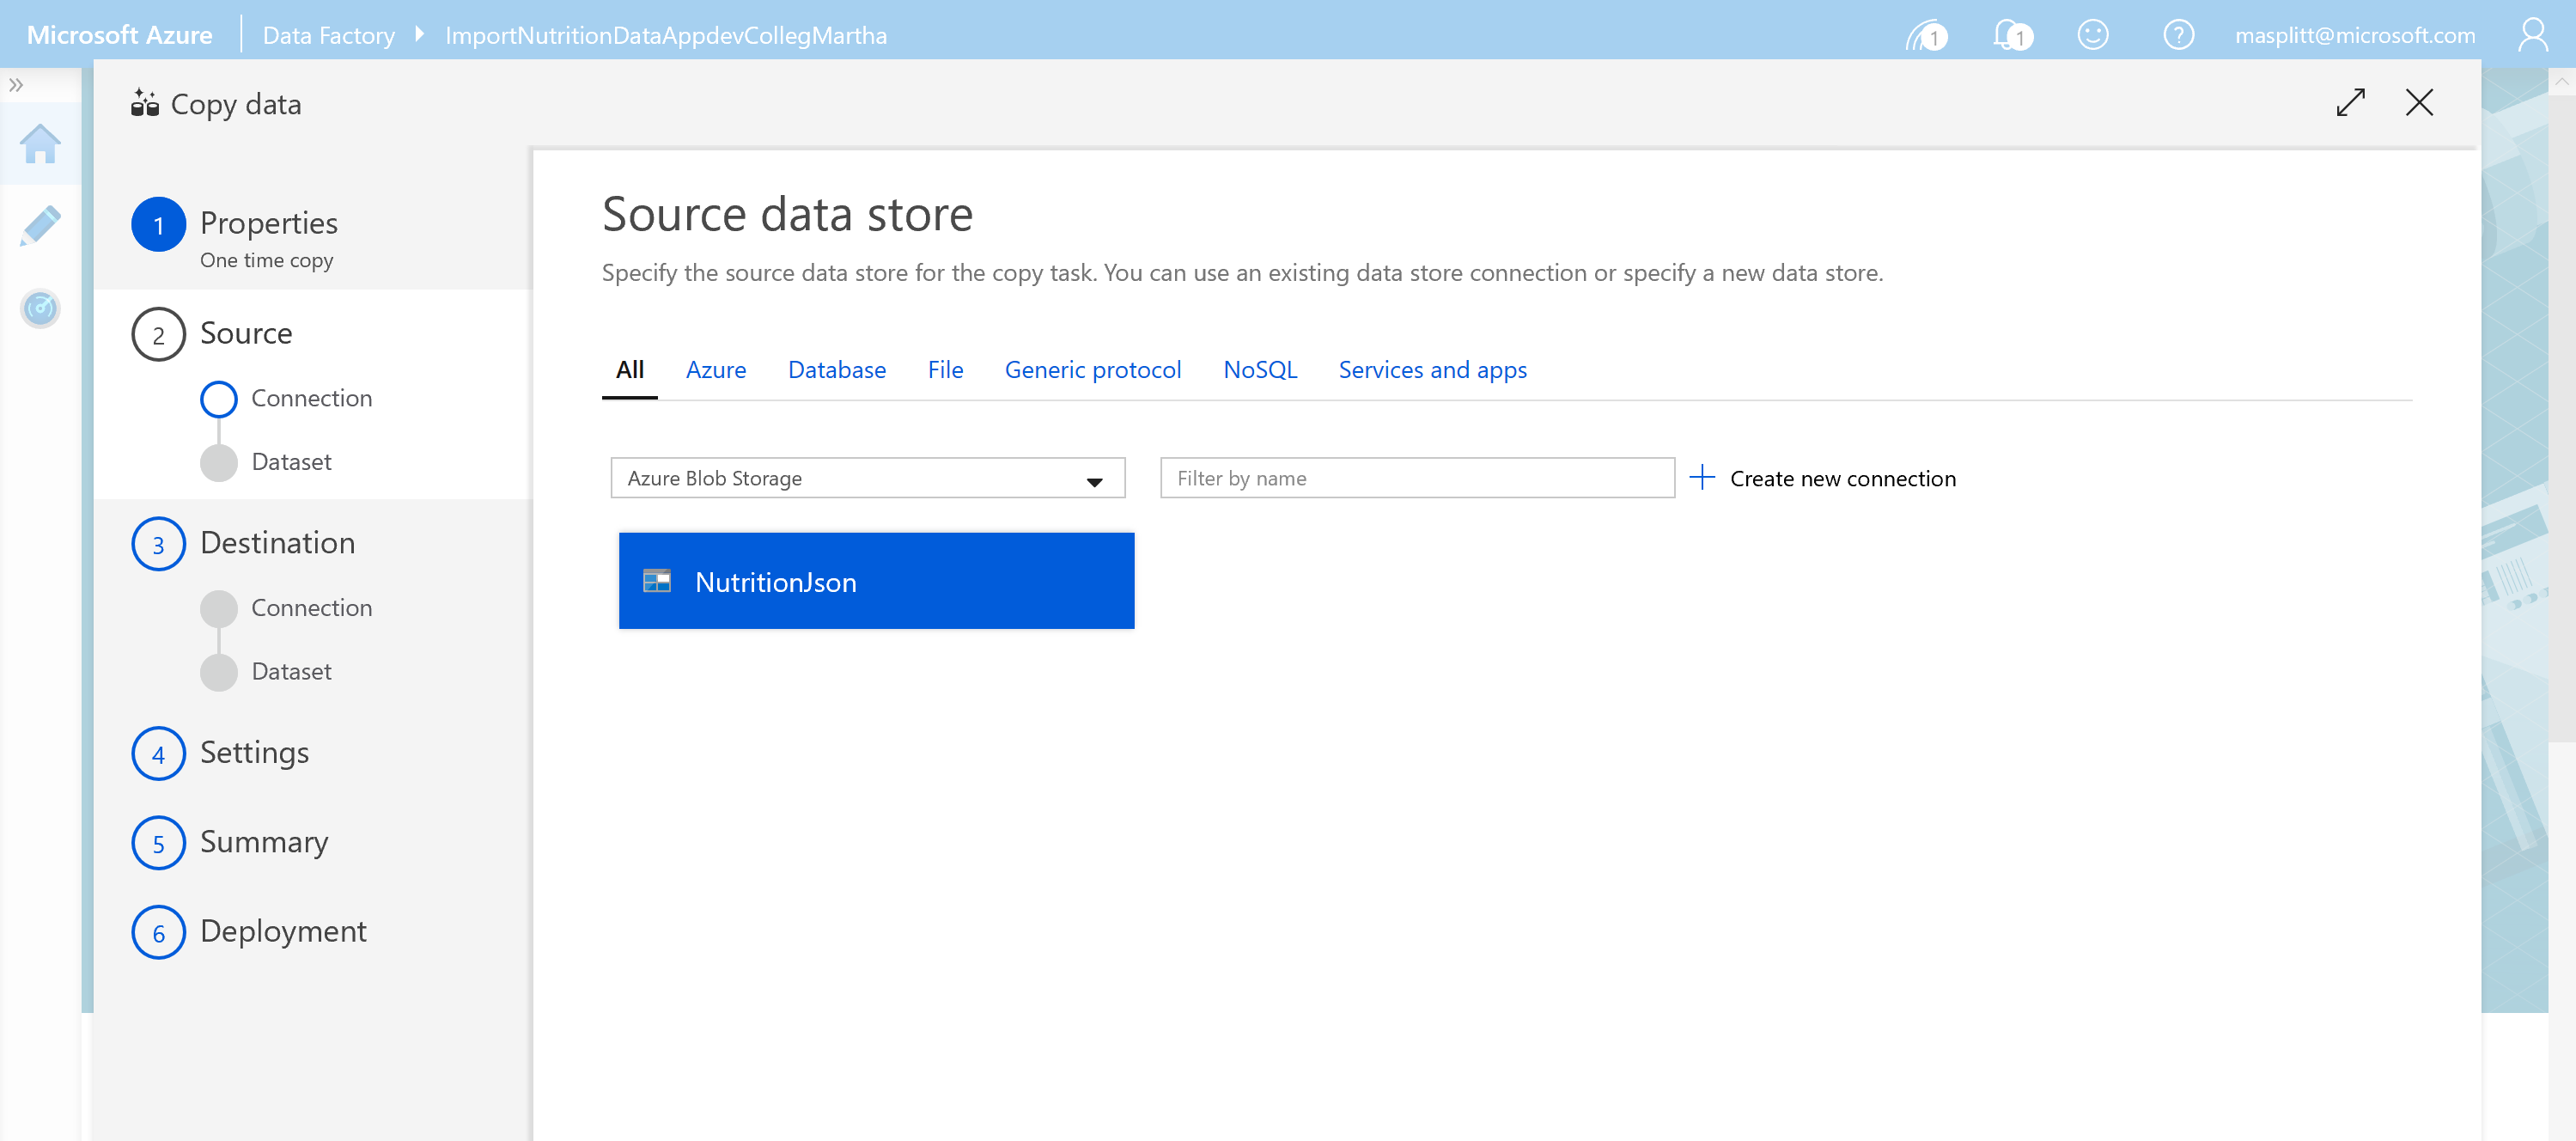
Create a new connection and select Azure Blob Storage. We will import data from a json file on Azure Blob Storage. In addition to Blob Storage, you can use ADF to migrate from a wide variety of sources. We will not cover migration from these sources in this tutorial.
Name the source "NutritionJson" and select SAS URI as the Authentication method. Please use the following SAS URI for read-only access to this Blob Storage container:
https://cosmosdblabsv3.blob.core.windows.net/?sv=2018-03-28&ss=bfqt&srt=sco&sp=rlp&se=2022-01-01T04:55:28Z&st=2019-08-05T20:02:28Z&spr=https&sig=%2FVbismlTQ7INplqo6WfU8o266le72o2bFdZt1Y51PZo%3D

Click Create and in the wizard view Next then Browse to select the nutritiondata folder. Then select "NutritionData.json".
Uncheck Copy file recursively and Binary Copy. Also ensure that other fields are empty. Select Next.
Select the file format as JSON format. Then select Next.
 You have now successfully connected the Blob Storage container with the nutrition.json file as the source.
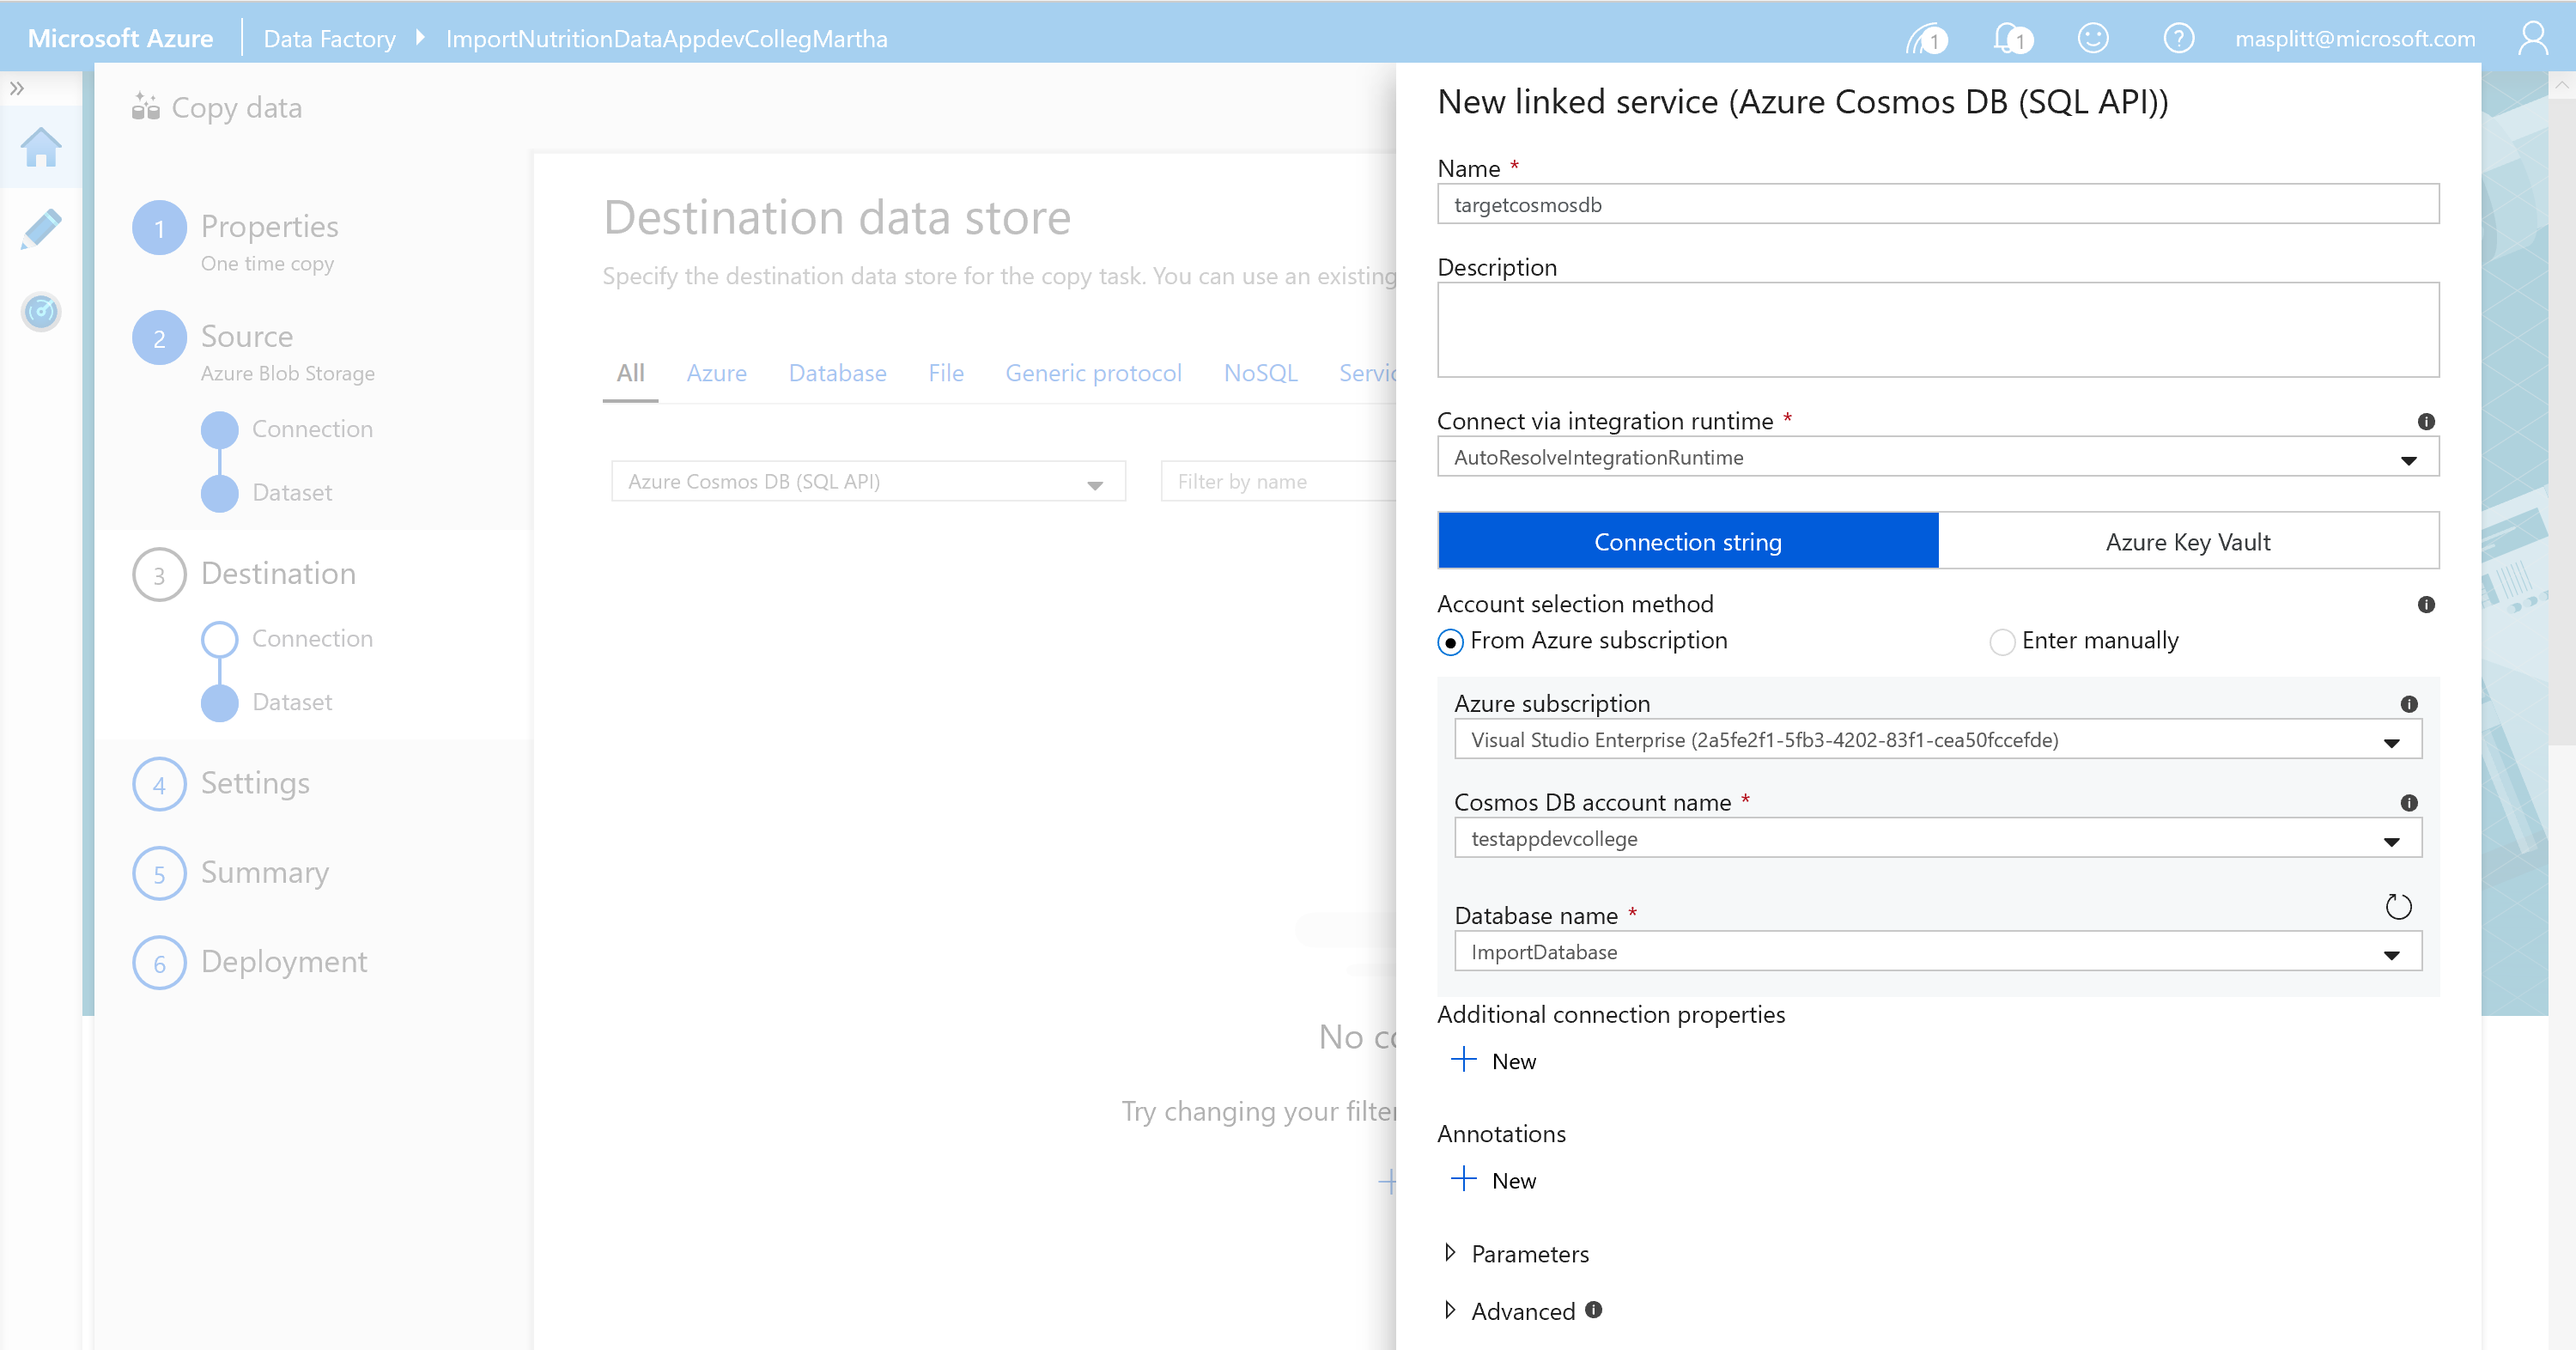
For the Destination data store add the Cosmos DB target data store by selecting Create new connection and selecting Azure Cosmos DB (SQL API).
Name the linked service "targetcosmosdb" and select your Azure subscription and Cosmos DB account. You should also select the Cosmos DB ImportDatabase that you created earlier. Click Create.
- Select your newly created targetcosmosdb connection as the Destination date store.
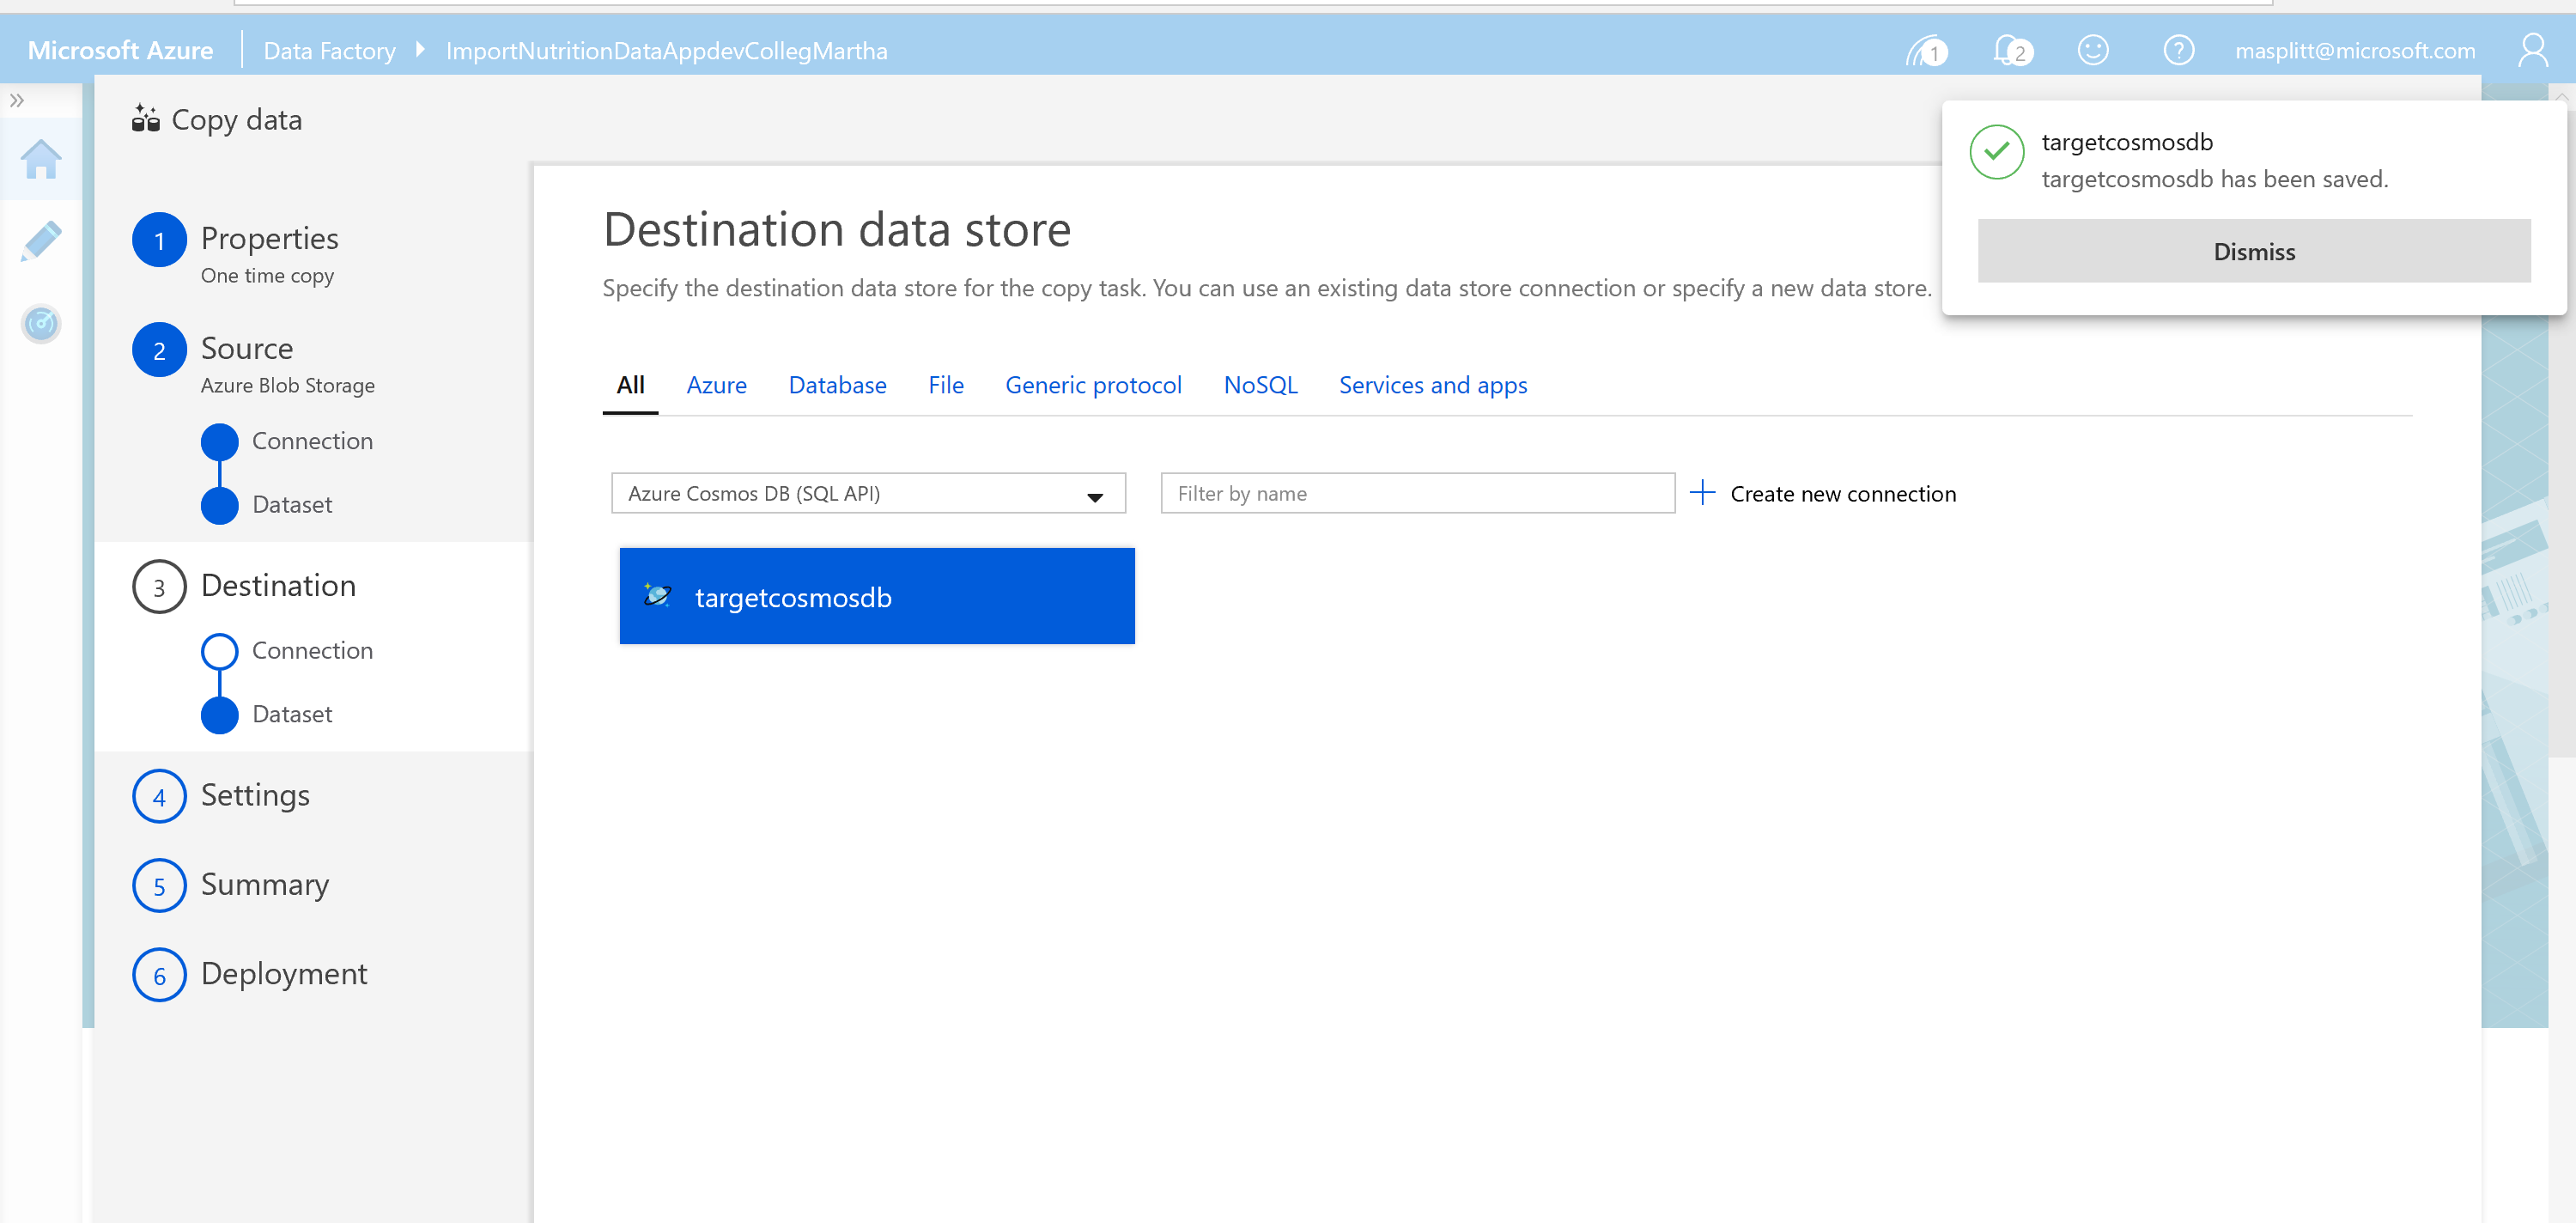
Select your FoodCollection container from the drop-down menu. You will map your Blob storage file to the correct Cosmos DB container. Click Next to continue.
There is no need to change any settings, so click Next.
You are now on the Summary Screen. It should now look similar to this screenshot. If everything is setup correctly, click Next to begin deployment. After deployment is complete, select Monitor.
After a few minutes, refresh the page and the status for the ImportNutrition pipeline should be listed as Succeeded.
Once the import process has completed, close the ADF. You will now proceed to validate your imported data.
# Validate Imported Data
The Azure Cosmos DB Data Explorer allows you to view documents and run queries directly within the Azure Portal. In this exercise, you will use the Data Explorer to view the data stored in our container.
You will validate that the data was successfully imported into your container using the Items view in the Data Explorer.
So, open the Cosmos DB Account you just imported the nutrition data to.
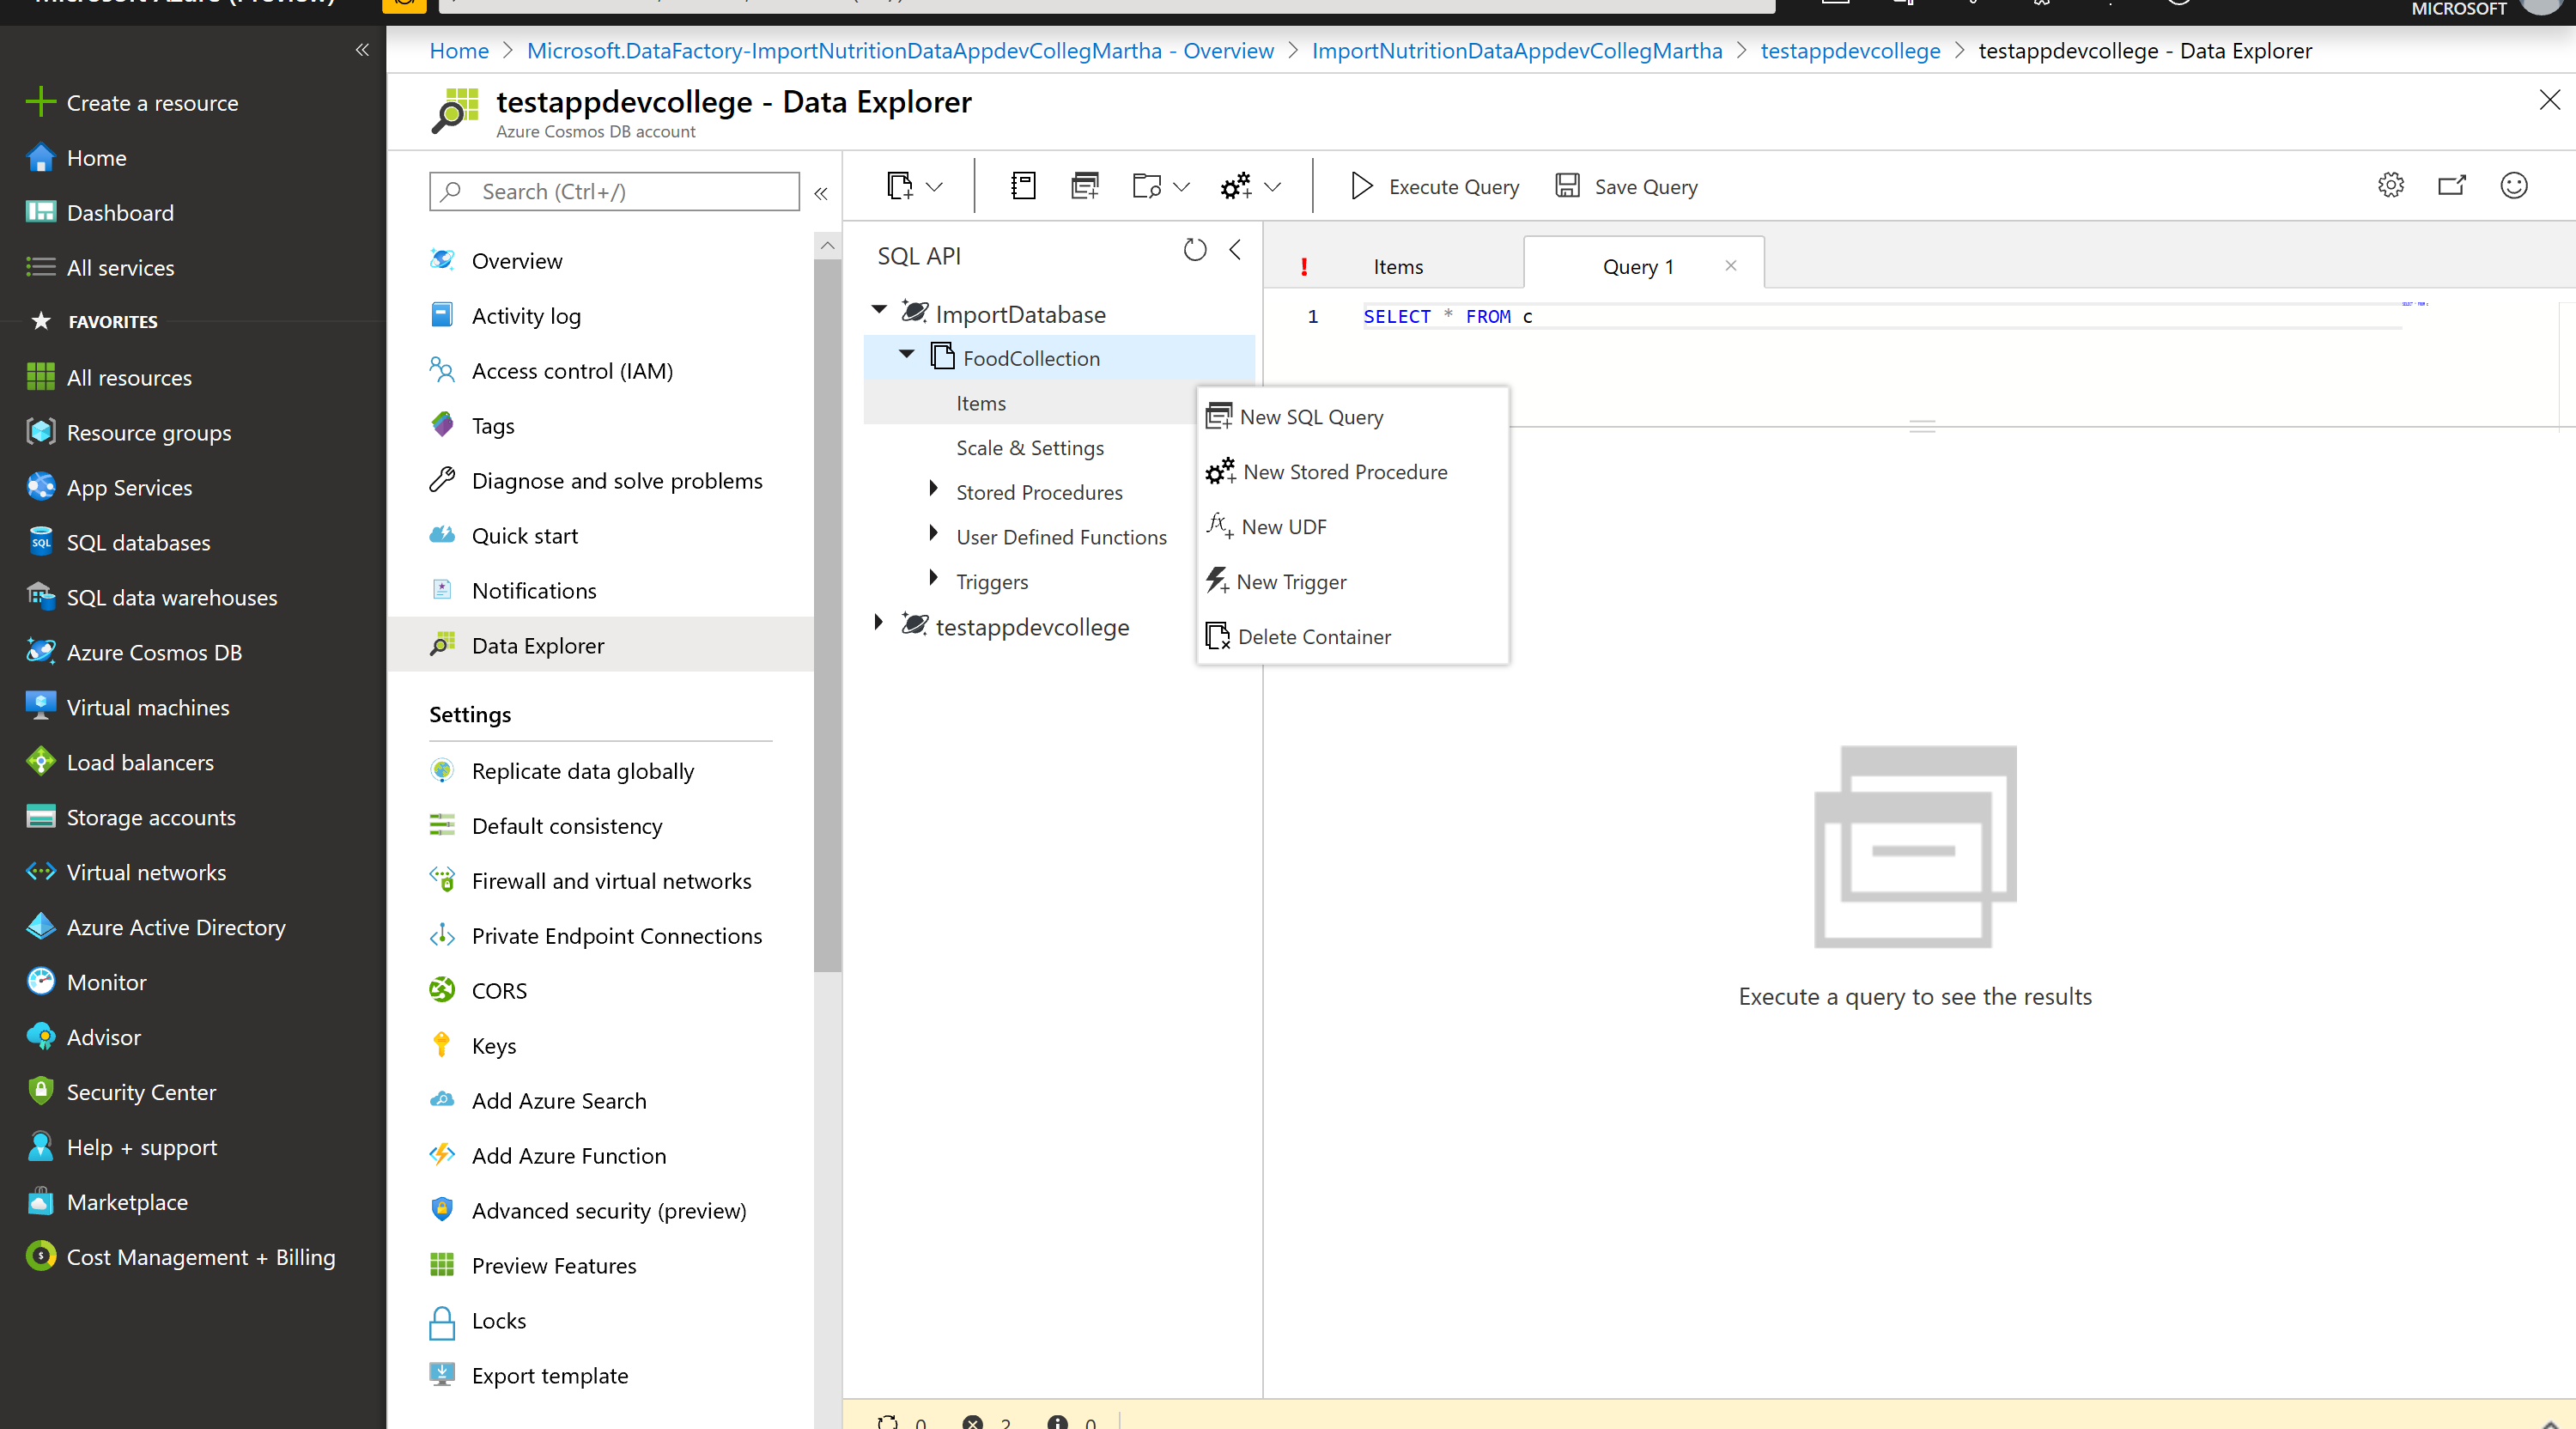
In the Azure Cosmos DB blade, locate and click the Data Explorer link on the left side of the blade.
In the Data Explorer section, expand the ImportDatabase database node and then expand the FoodCollection container node.
Within the FoodCollection node, click the Items link to view a subset of the various documents in the container. Select a few of the documents and observe the properties and structure of the documents.
# Querying and Indexing in Azure Cosmos DB
Azure Cosmos DB SQL API accounts provide support for querying items using the Structured Query Language (SQL), one of the most familiar and popular query languages, as a JSON query language. In this lab, you will explore how to use these rich query capabilities directly through the Azure Portal. No separate tools or client side code are required.
# Query Overview
Querying JSON with SQL allows Azure Cosmos DB to combine the advantages of a legacy relational databases with a NoSQL database. You can use many rich query capabilities such as subqueries or aggregation functions but still retain the many advantages of modeling data in a NoSQL database.
Azure Cosmos DB supports strict JSON items only. The type system and expressions are restricted to deal only with JSON types.
TIP
📝 For more information, see the JSON specification (opens new window).
# Running your first query
You will begin by running basic queries with SELECT, WHERE, and FROM clauses. Open the Data Explorer.
- In the Azure Cosmos DB blade, locate and click the Data Explorer link on the left side of the blade.
- In the Data Explorer section, expand the ImportDatabase database node and then expand the FoodCollection container node.
- Within the FoodCollection node, click the Items link.
- View the items within the container. Observe how these documents have many properties, including arrays.
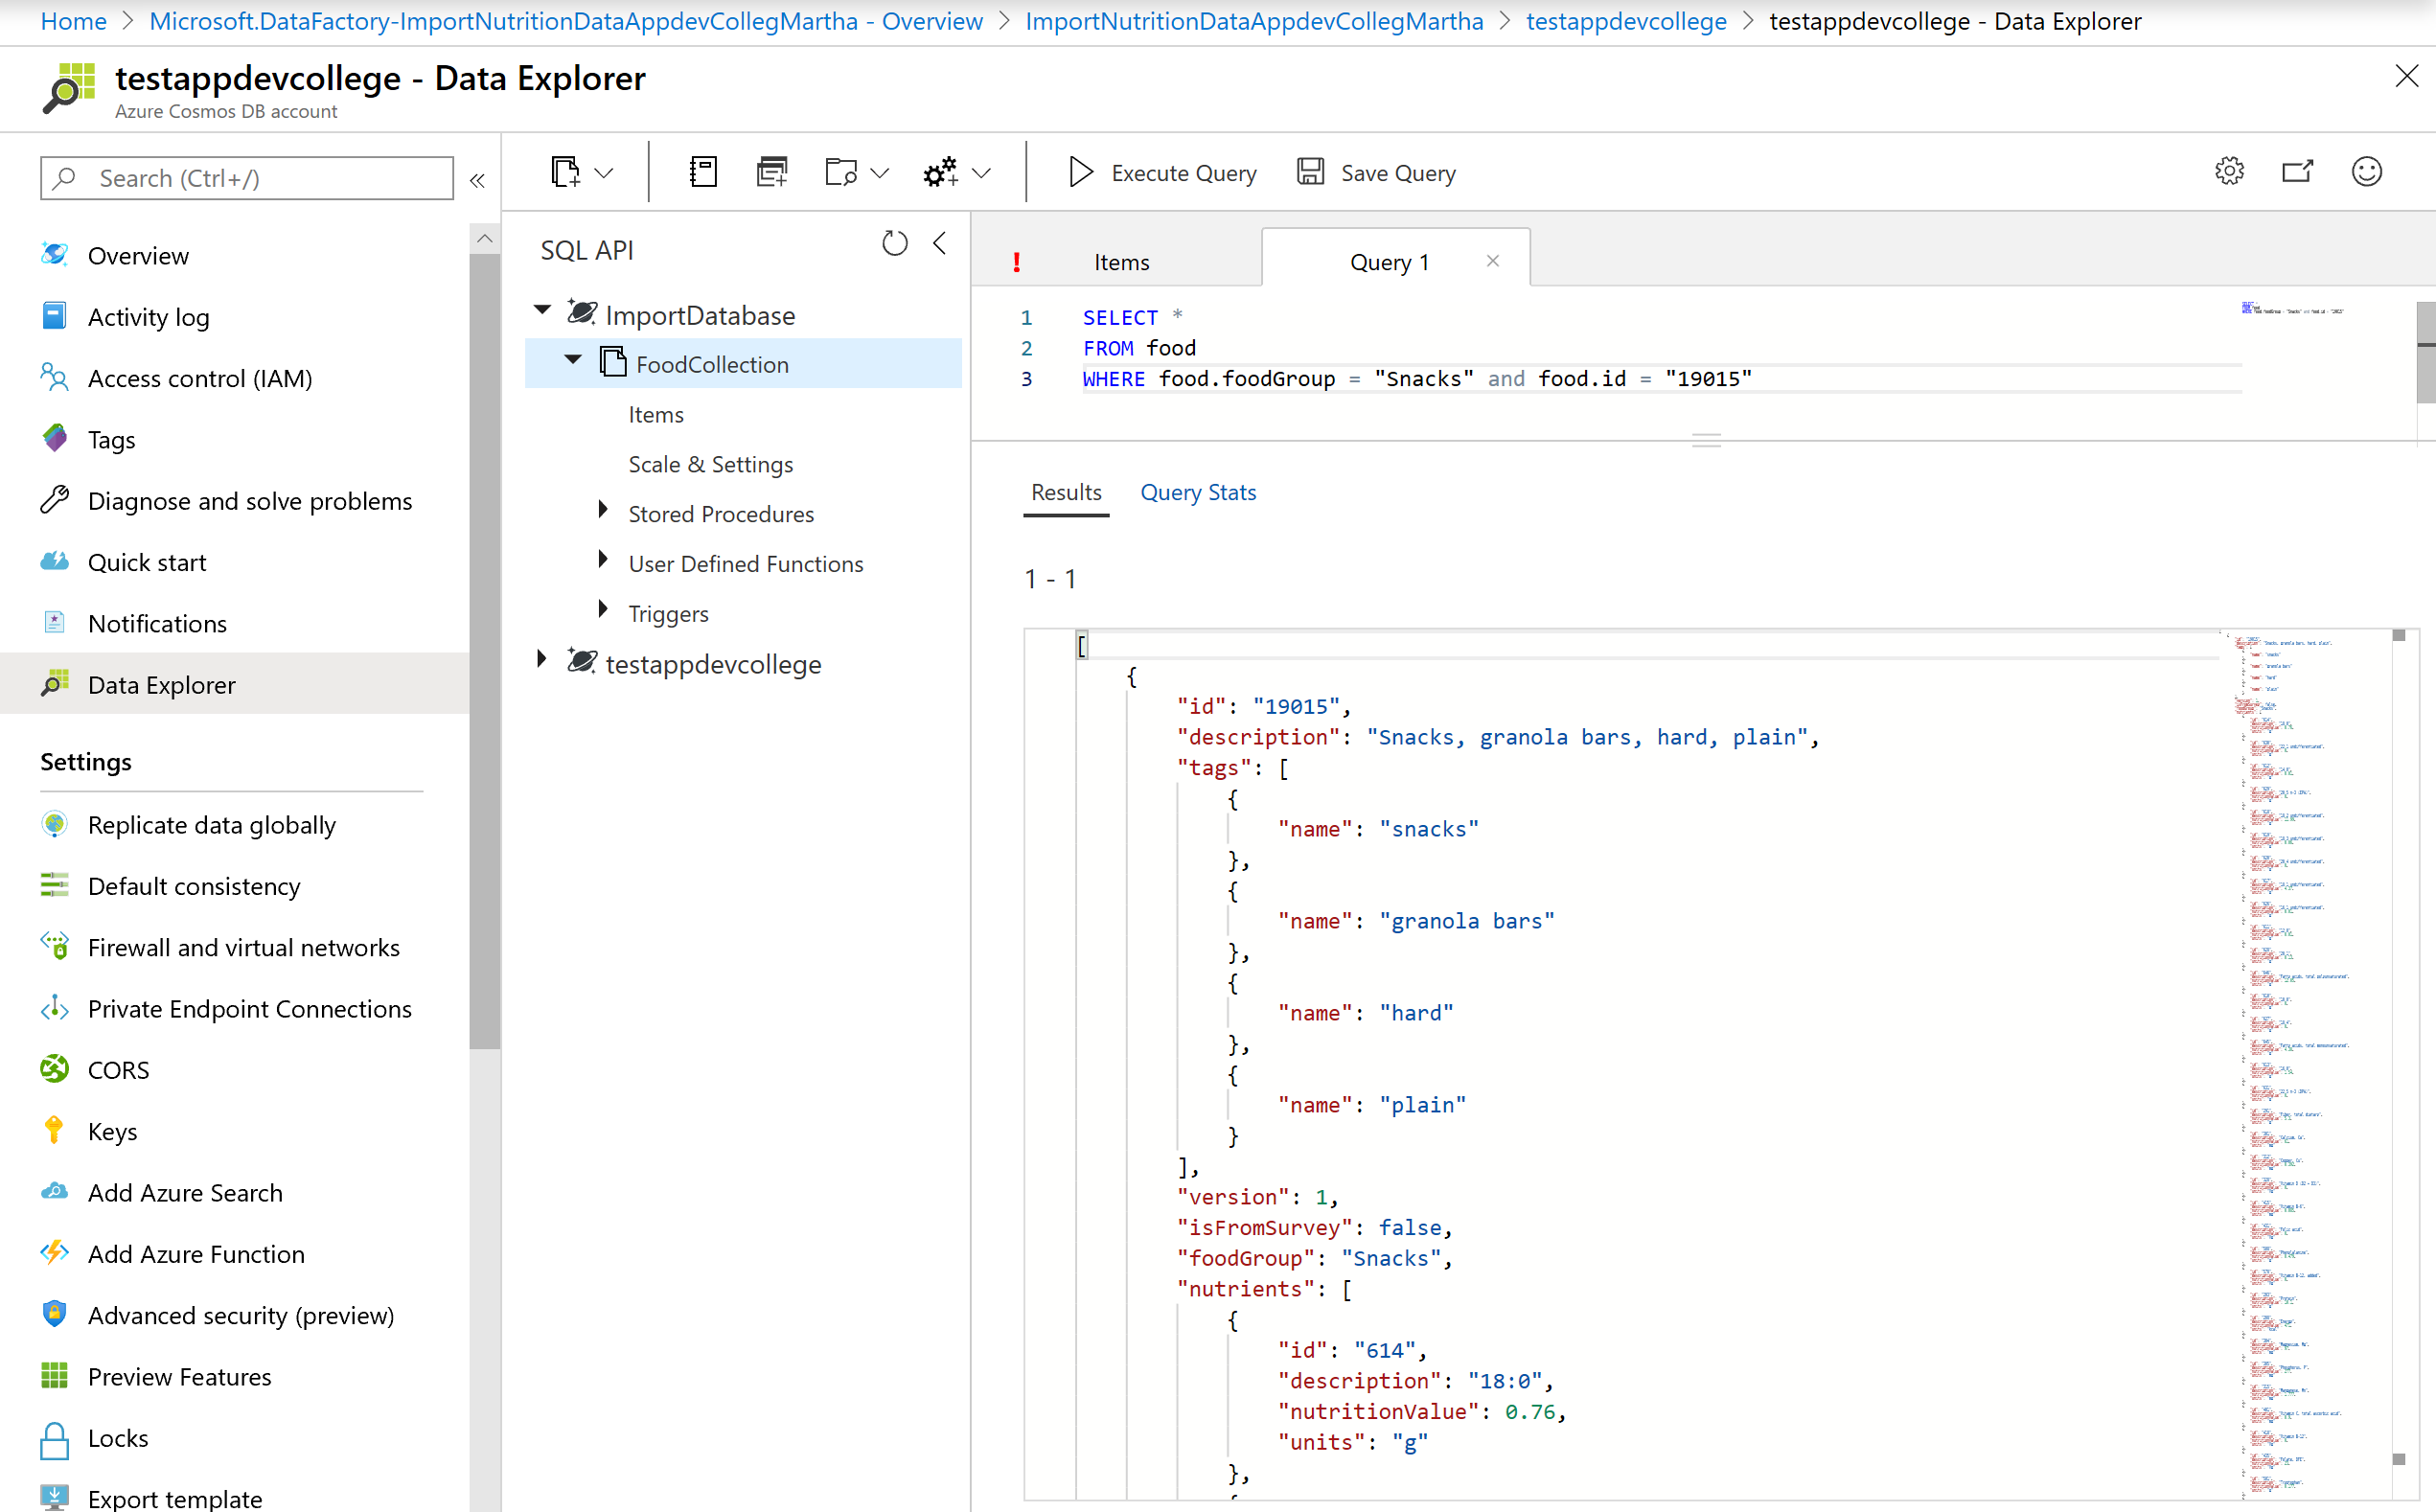
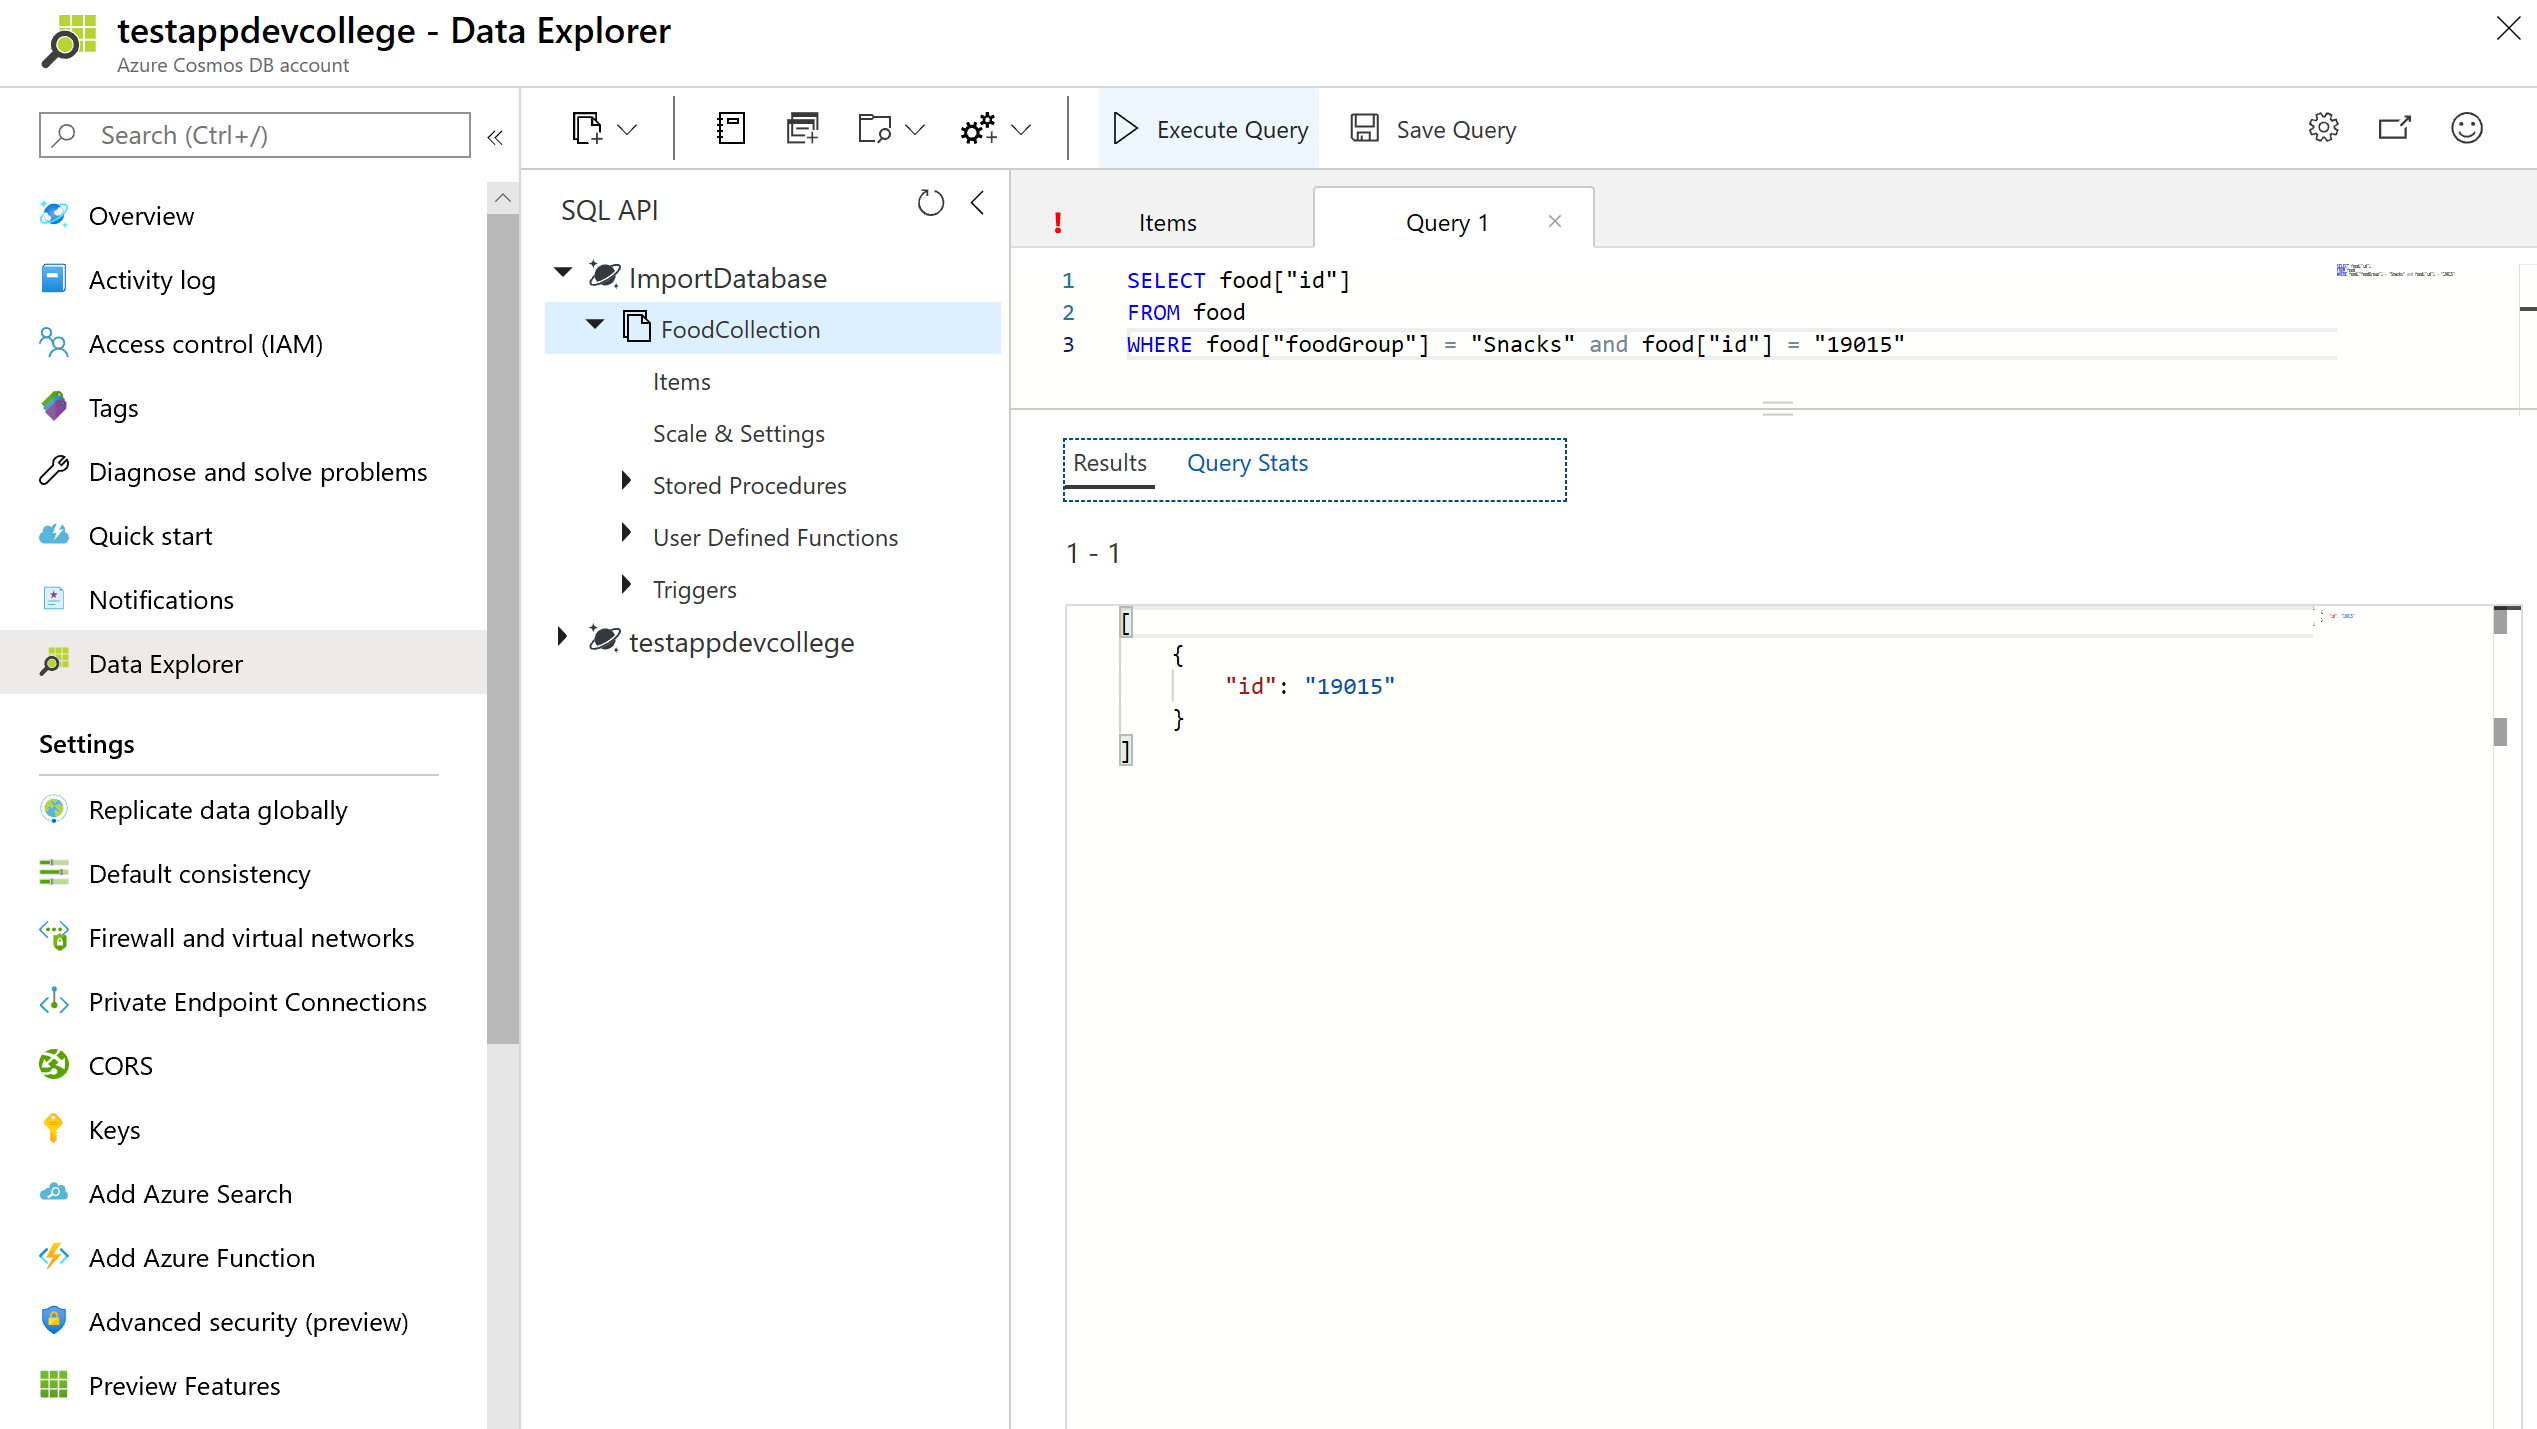
- Click New SQL Query. Paste the following SQL query and select Execute Query.
SELECT *
FROM food
WHERE food.foodGroup = "Snacks" and food.id = "19015"
- Explore the structure of this item as it is representative of the items within the FoodCollection container that we will be working with for the remainder of this section.
# Dot and quoted property projection accessors
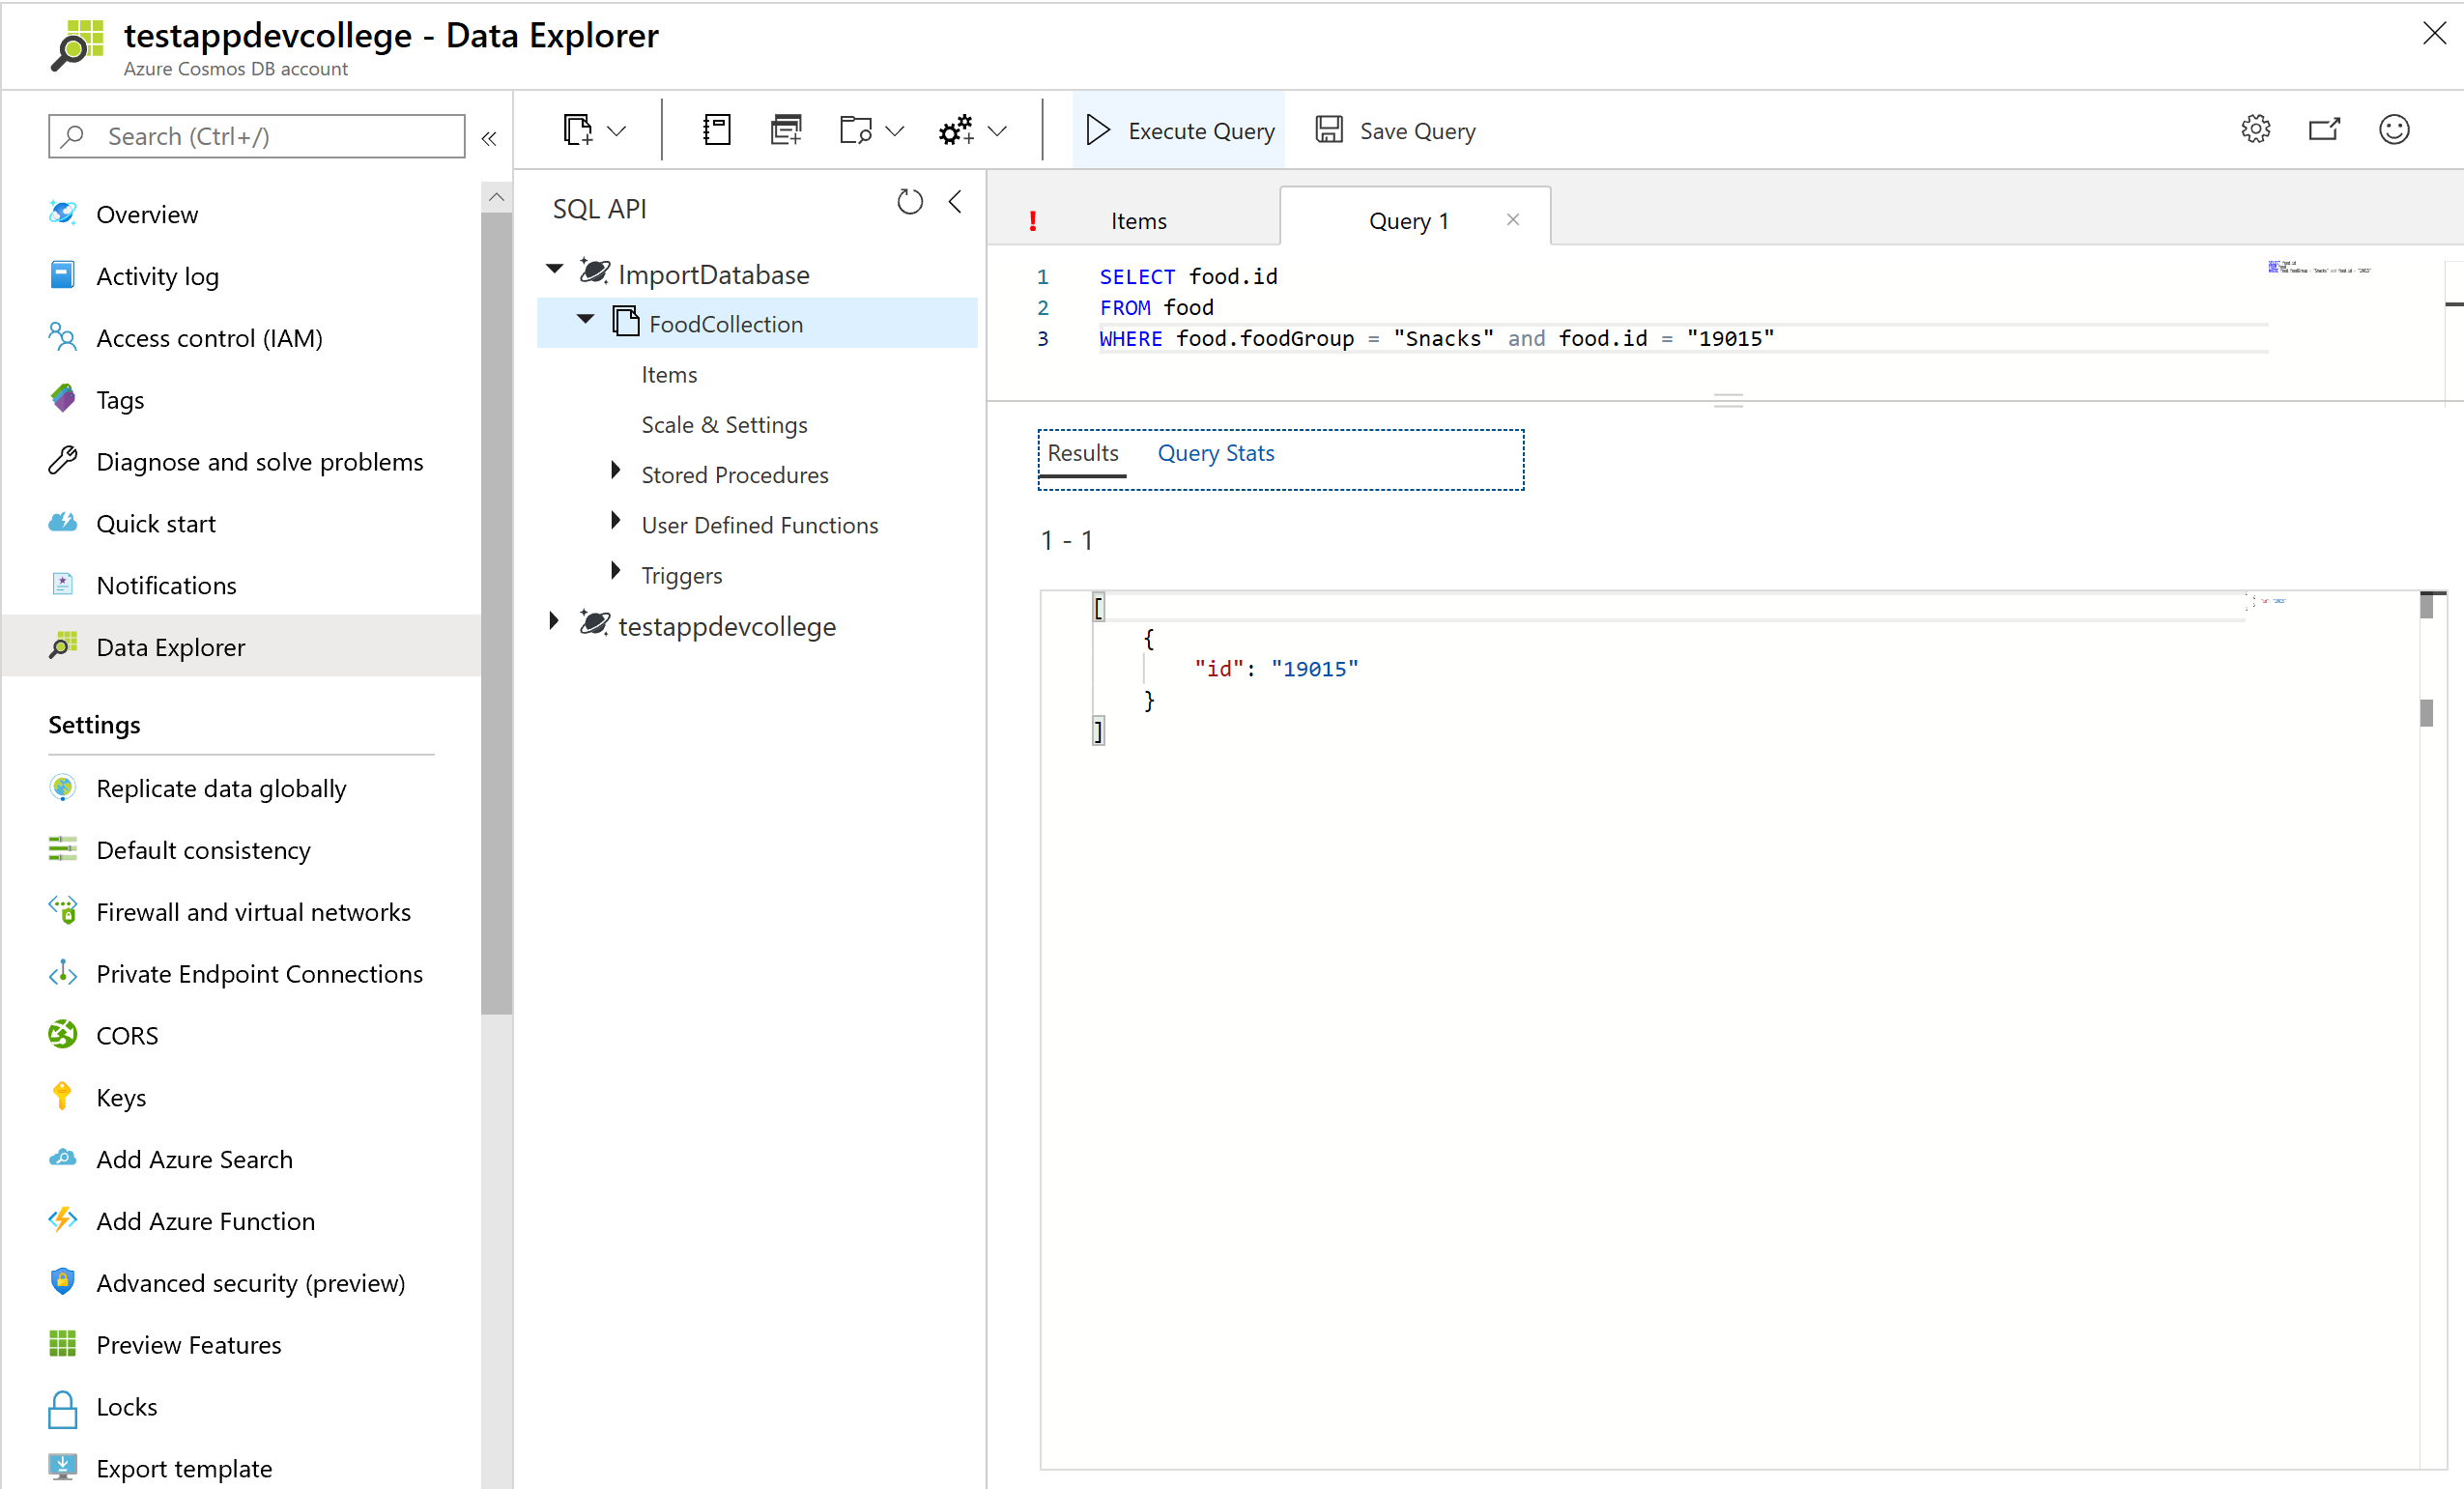
You can choose which properties of the document to project into the result using the dot notation. If you wanted to return only the item's id you could run the query below: by clicking the New SQL Query. Paste the following SQL query and selecting Execute Query.
SELECT food.id
FROM food
WHERE food.foodGroup = "Snacks" and food.id = "19015"
Though less common, you can also access properties using the quoted property operator [""]. For example, SELECT food.id and SELECT food["id"] are equivalent. This syntax is useful to escape a property that contains spaces, special characters, or has the same name as a SQL keyword or reserved word.
SELECT food["id"]
FROM food
WHERE food["foodGroup"] = "Snacks" and food["id"] = "19015"
# WHERE clauses
Let’s explore WHERE clauses. You can add complex scalar expressions including arithmetic, comparison and logical operators in the WHERE clause.
- Run the below query by clicking the New SQL Query. Paste the following SQL query and then click Execute Query.
SELECT food.id,
food.description,
food.tags,
food.foodGroup,
food.version
FROM food
WHERE (food.manufacturerName = "The Coca-Cola Company" AND food.version > 0)
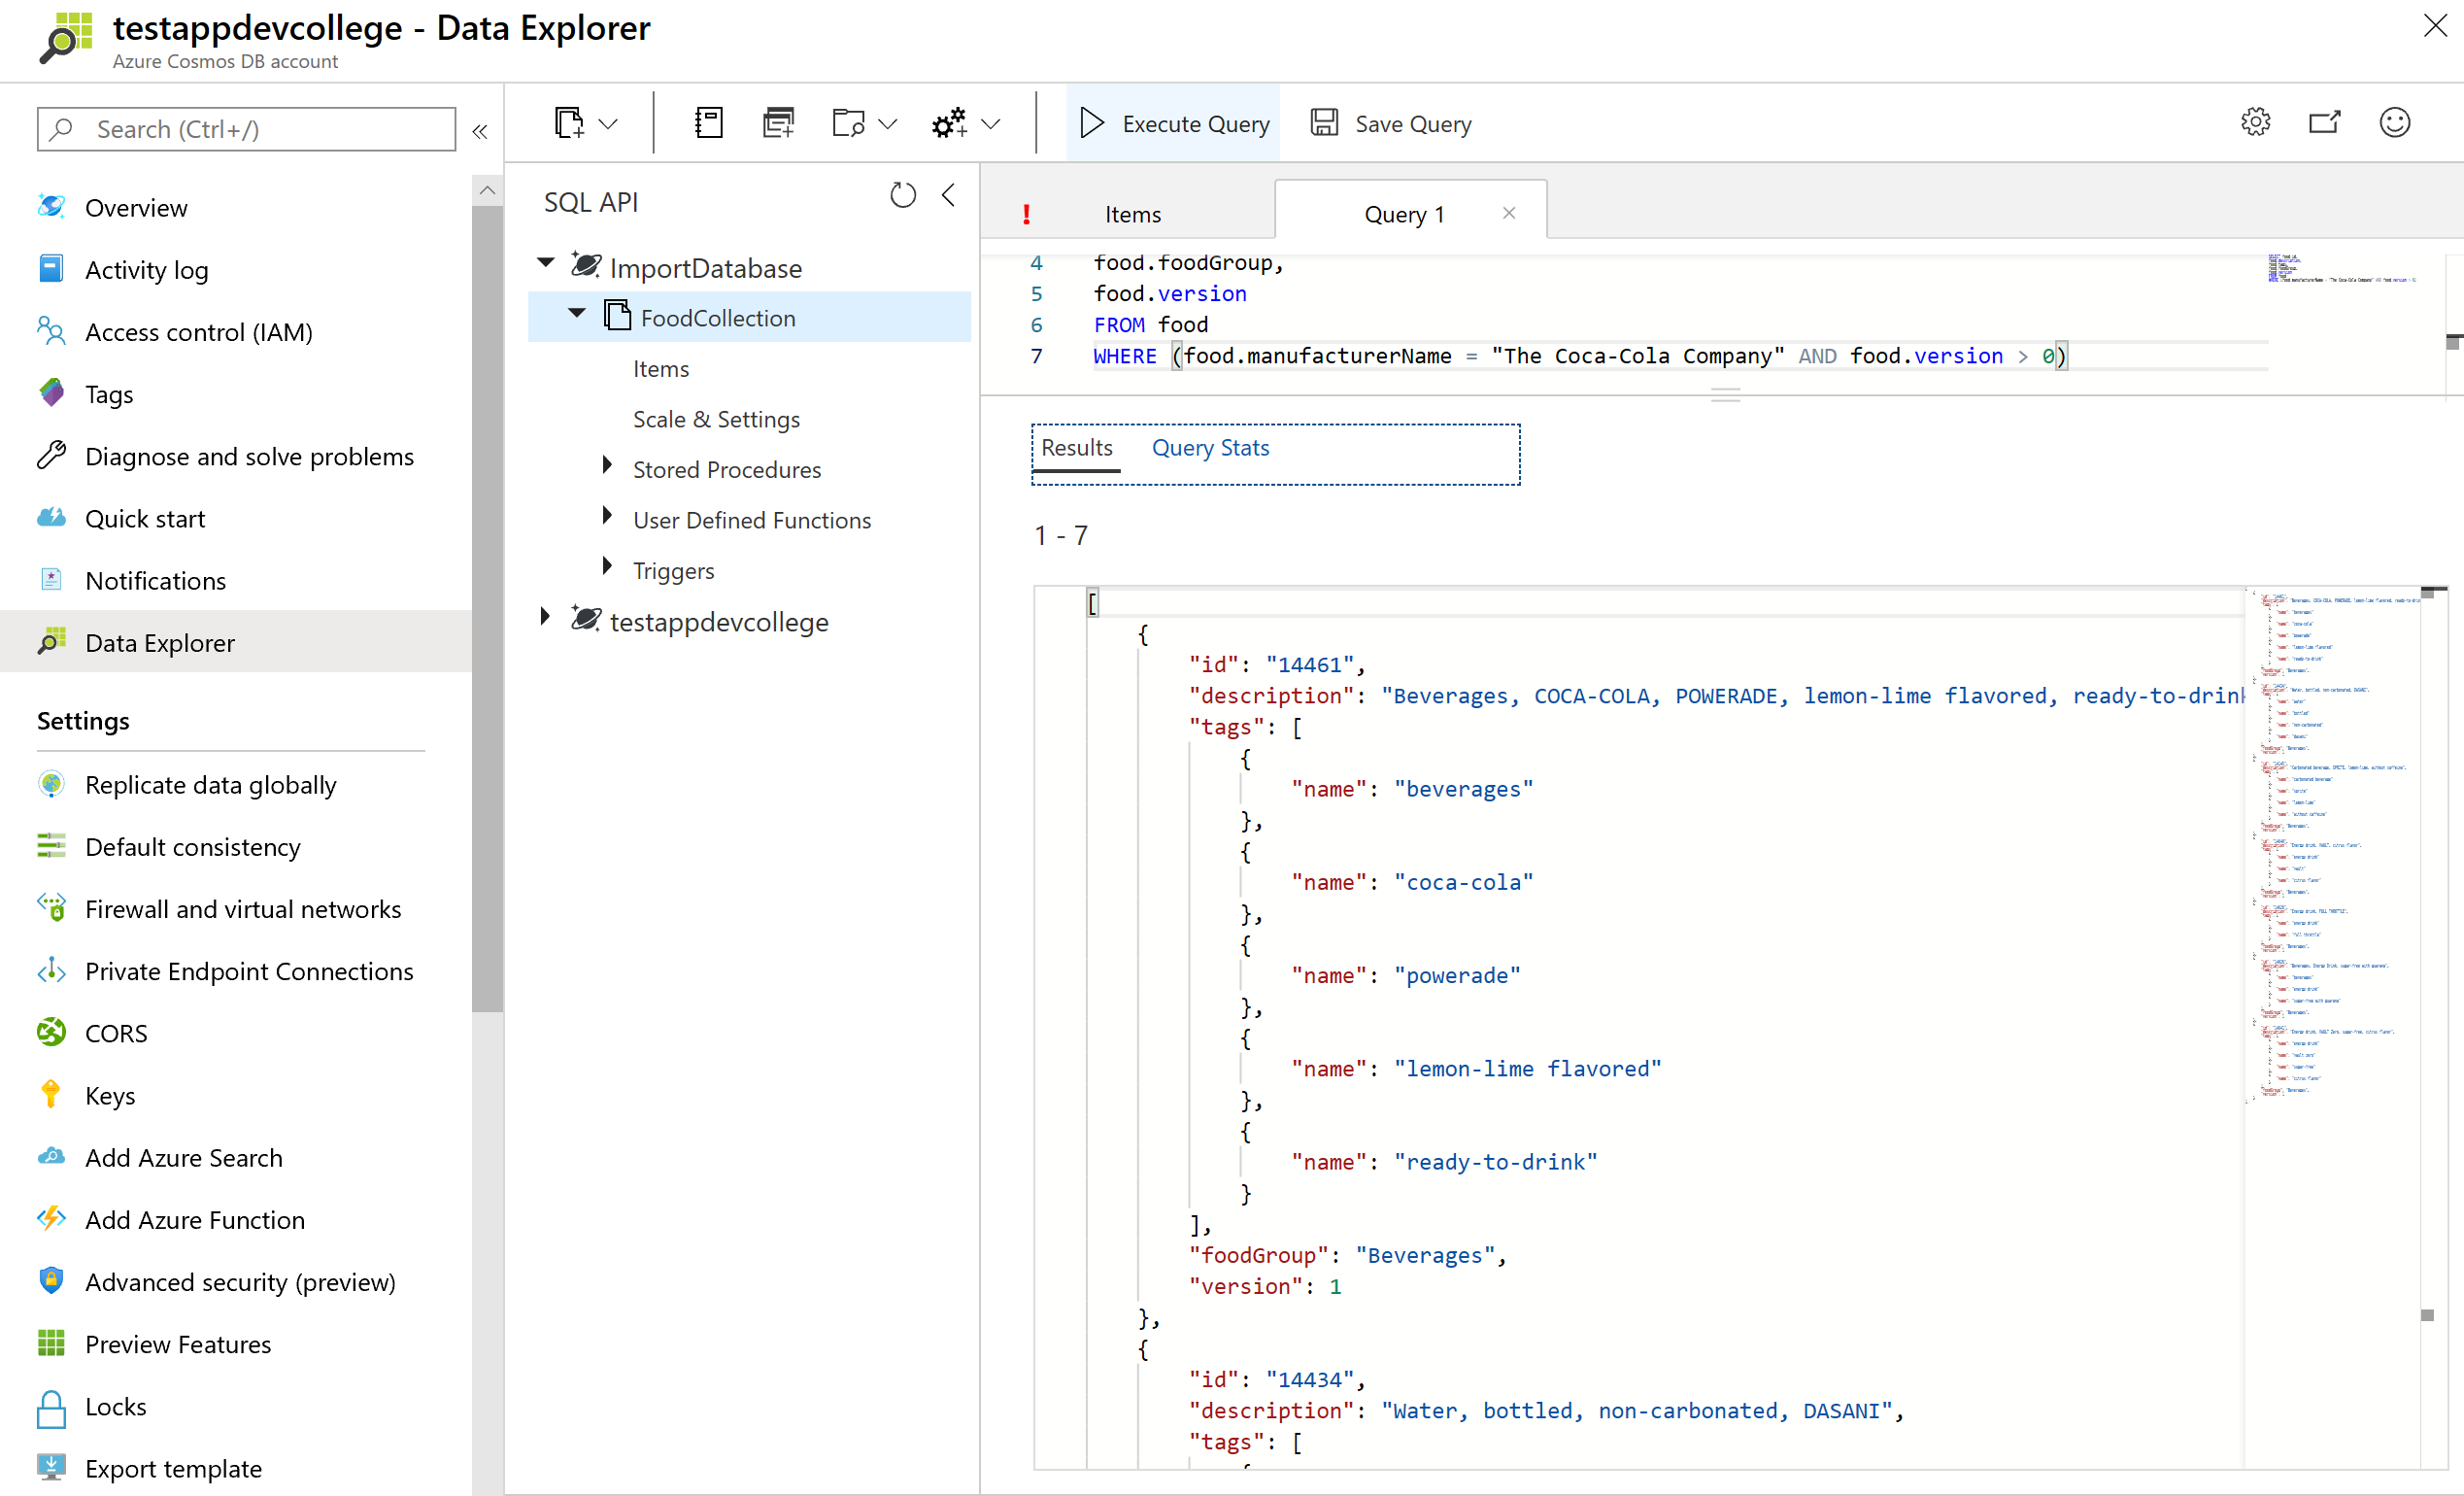
This query will return the id, description, servings, tags, foodGroup, manufacturerName and version for items with "The Coca-Cola Company" for manufacturerName and a version greater than 0.
Your first result document should be:
 {
        "id": "14461",
        "description": "Beverages, COCA-COLA, POWERADE, lemon-lime flavored, ready-to-drink",
        "tags": [
            {
                "name": "beverages"
            },
            {
                "name": "coca-cola"
            },
            {
                "name": "powerade"
            },
            {
                "name": "lemon-lime flavored"
            },
            {
                "name": "ready-to-drink"
            }
        ],
        "foodGroup": "Beverages",
        "version": 1
    },
You should note that where the query returned the results of tags node it projected the entire contents of the property which in this case is an array.
# Advanced projection
Azure Cosmos DB supports several forms of transformation on the resultant JSON. One of the simplest is to alias your JSON elements using the AS aliasing keyword as you project your results.
By running the query below you will see that the element names are transformed. In addition, the projection is accessing only the first element in the servings array for all items specified by the WHERE clause.
SELECT food.description,
food.foodGroup,
food.servings[0].description AS servingDescription,
food.servings[0].weightInGrams AS servingWeight
FROM food
WHERE food.foodGroup = "Fruits and Fruit Juices"
AND food.servings[0].description = "cup"

# ORDER BY clause
Azure Cosmos DB supports adding an ORDER BY clause to sort results based on one or more properties
SELECT food.description,
food.foodGroup,
food.servings[0].description AS servingDescription,
food.servings[0].weightInGrams AS servingWeight
FROM food
WHERE food.foodGroup = "Fruits and Fruit Juices" AND food.servings[0].description = "cup"
ORDER BY food.servings[0].weightInGrams DESC
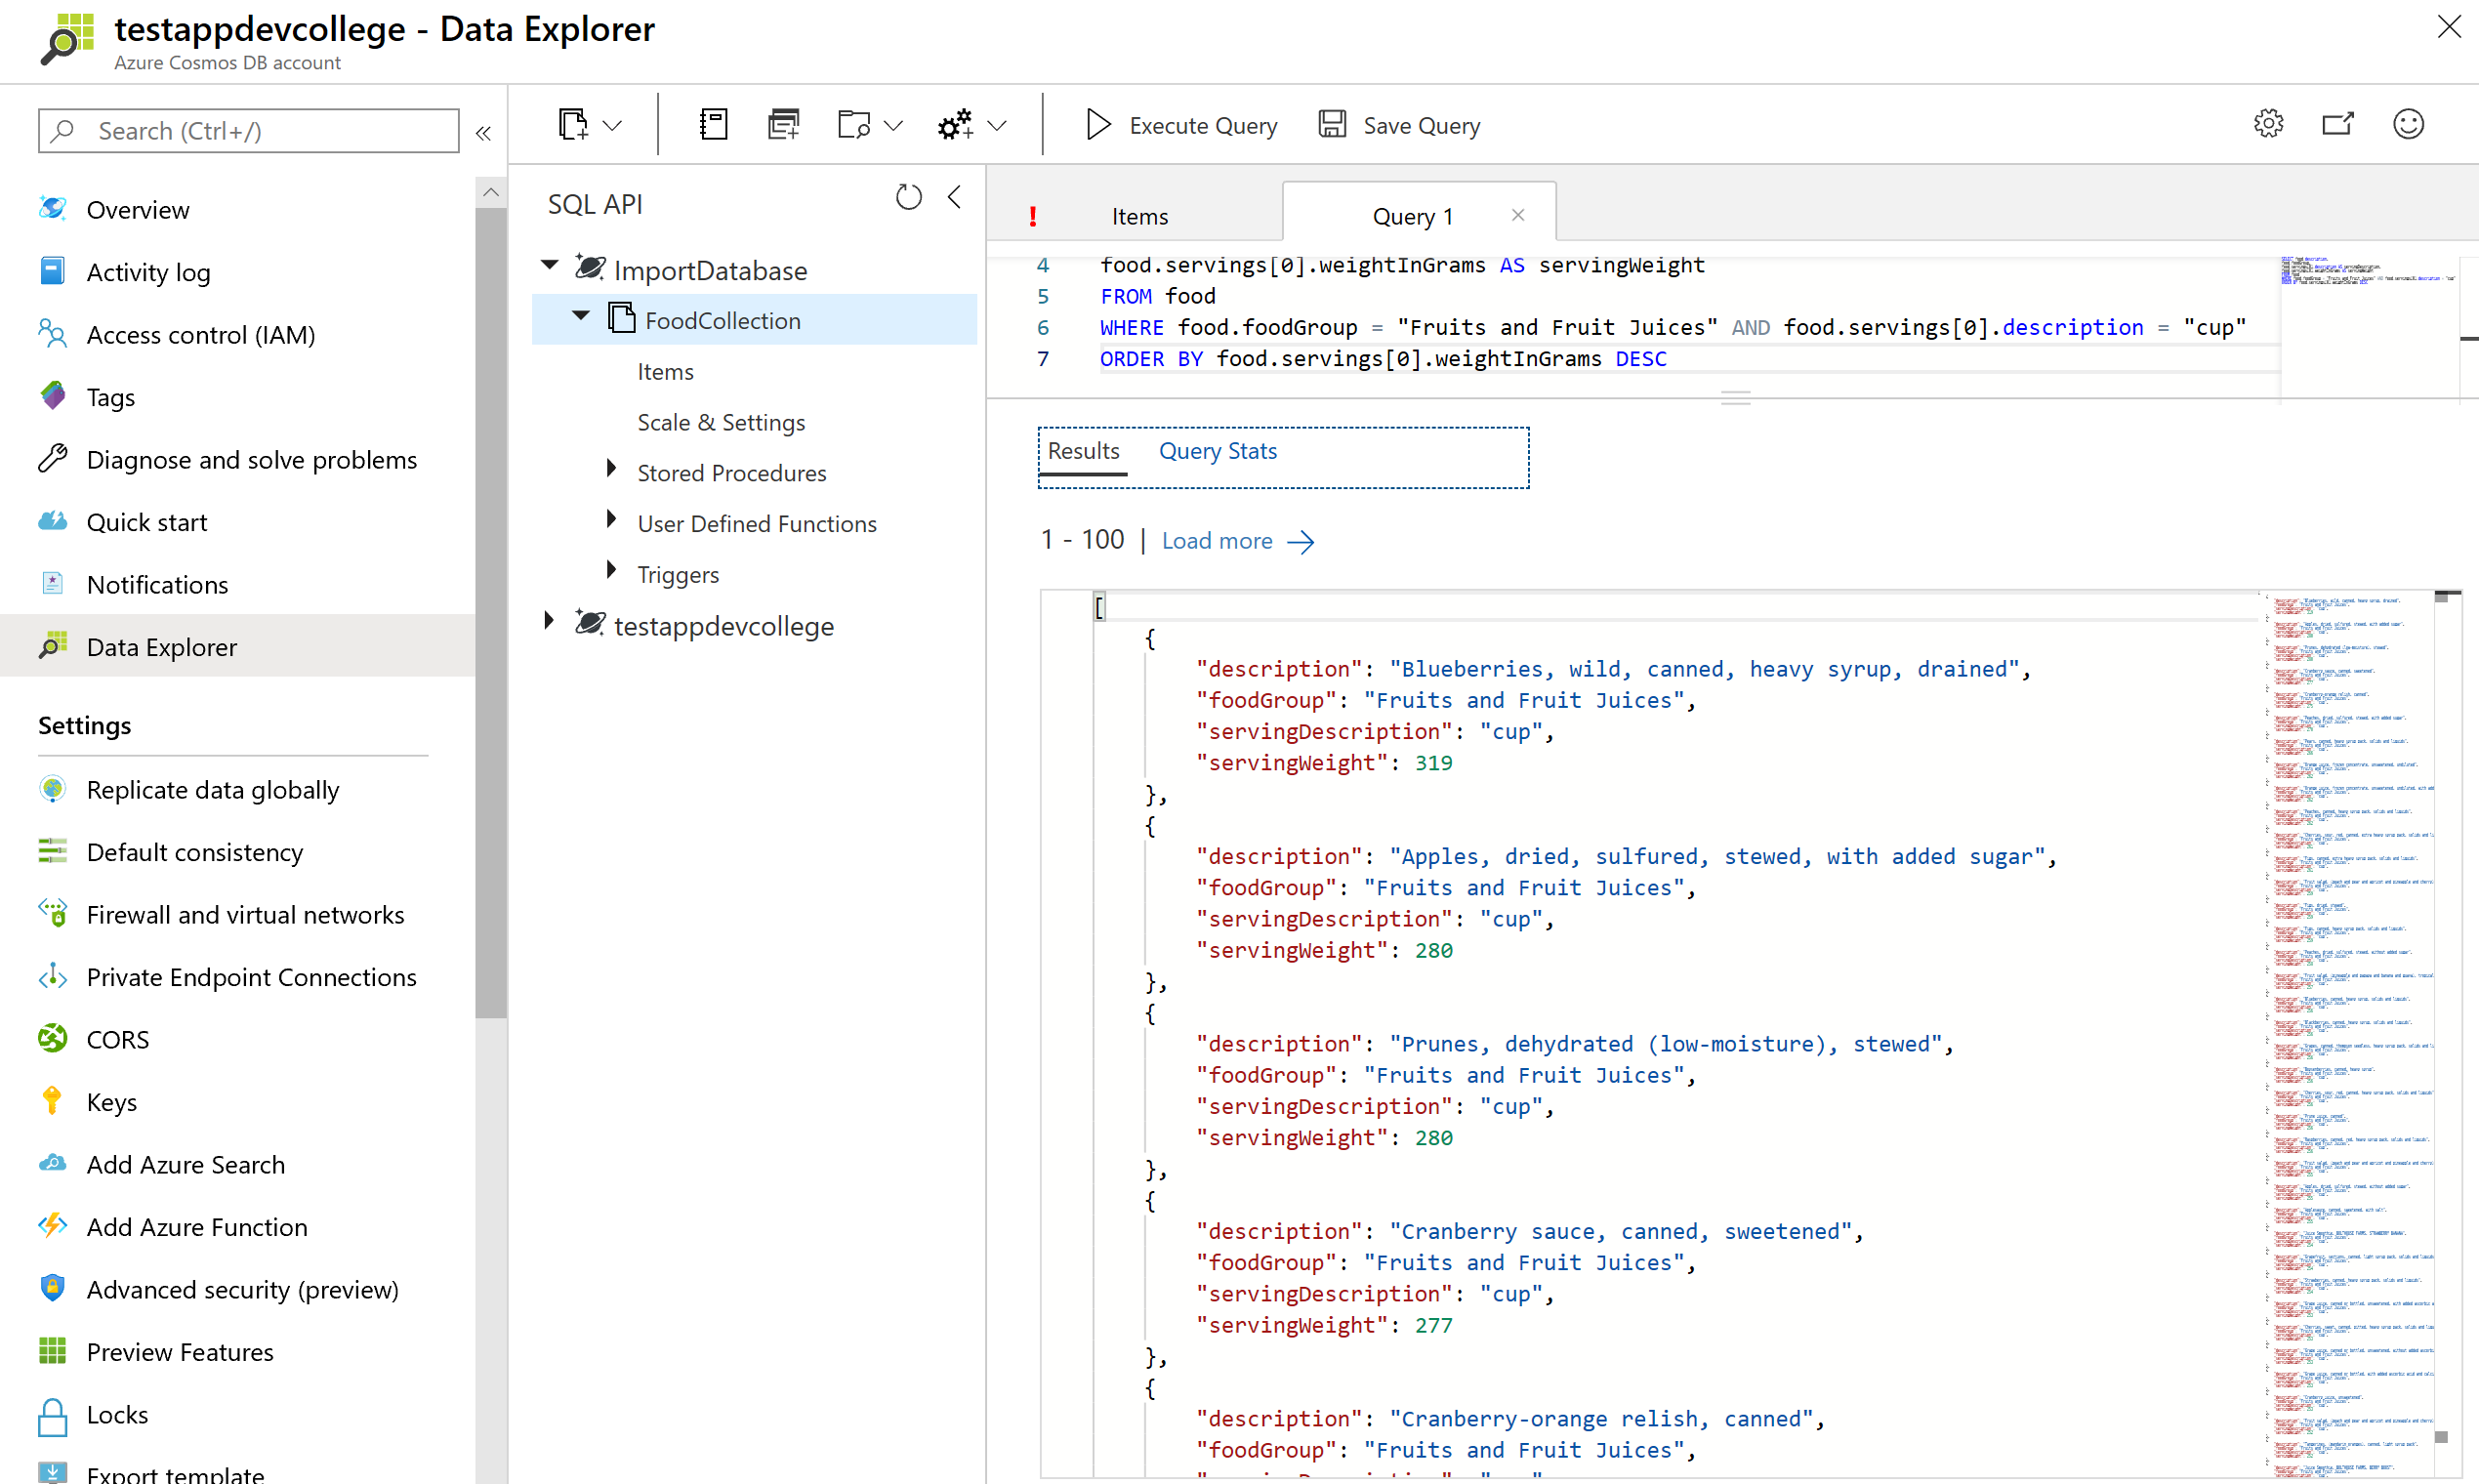
You can learn more about configuring the required indexes for an Order By clause in the later Indexing Lab or by reading the docs (opens new window).
# Limiting query result size
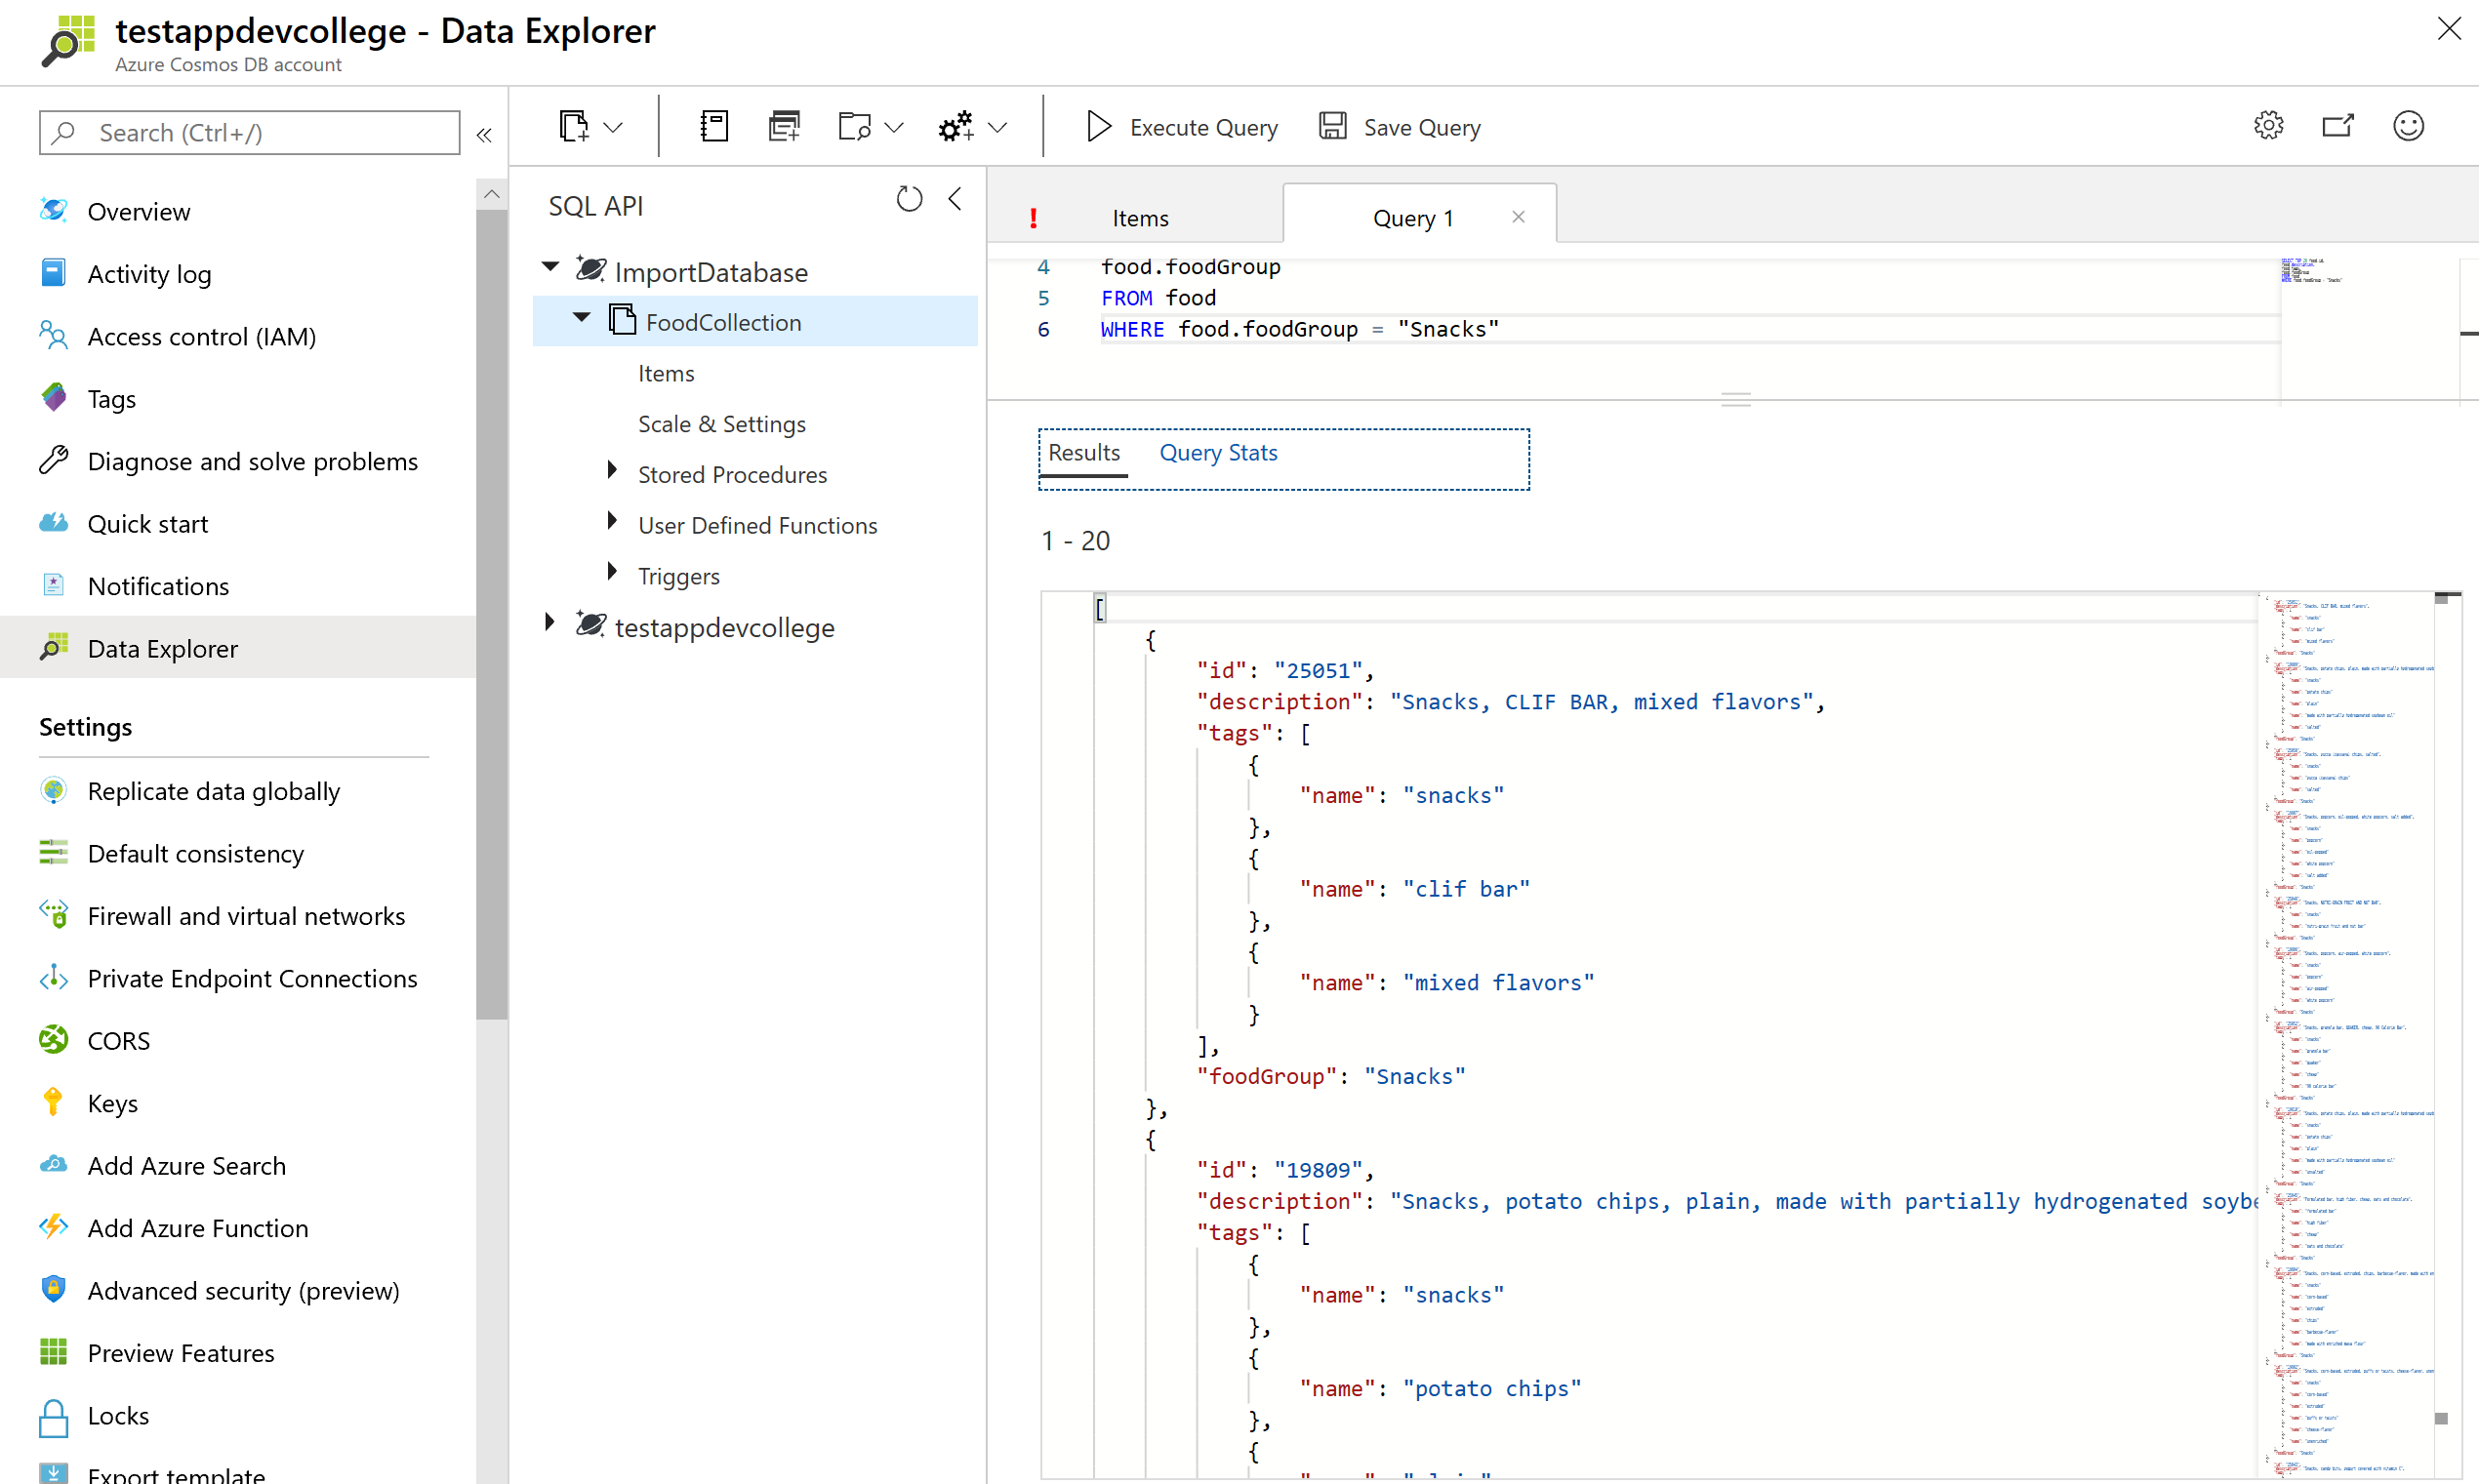
Azure Cosmos DB supports the TOP keyword. TOP can be used to limit the number of returning values from a query.
Run the query below to see the top 20 results.
SELECT TOP 20 food.id,
food.description,
food.tags,
food.foodGroup
FROM food
WHERE food.foodGroup = "Snacks"
The OFFSET LIMIT clause is an optional clause to skip then take some number of values from the query. The OFFSET count and the LIMIT count are required in the OFFSET LIMIT clause.
SELECT food.id,
food.description,
food.tags,
food.foodGroup
FROM food
WHERE food.foodGroup = "Snacks"
ORDER BY food.id
OFFSET 10 LIMIT 10
When OFFSET LIMIT is used in conjunction with an ORDER BY clause, the result set is produced by doing skip and take on the ordered values. If no ORDER BY clause is used, it will result in a deterministic order of values.
With the features shown here, it's quite simple to implement Paging and Sorting in your applications.
# More advanced filtering
Let’s add the IN and BETWEEN keywords into our queries. IN can be used to check whether a specified value matches any element in a given list and BETWEEN can be used to run queries against a range of values. Run some sample queries below:
SELECT food.id,
       food.description,
       food.tags,
       food.foodGroup,
       food.version
FROM food
WHERE food.foodGroup IN ("Poultry Products", "Sausages and Luncheon Meats")
    AND (food.id BETWEEN "05740" AND "07050")

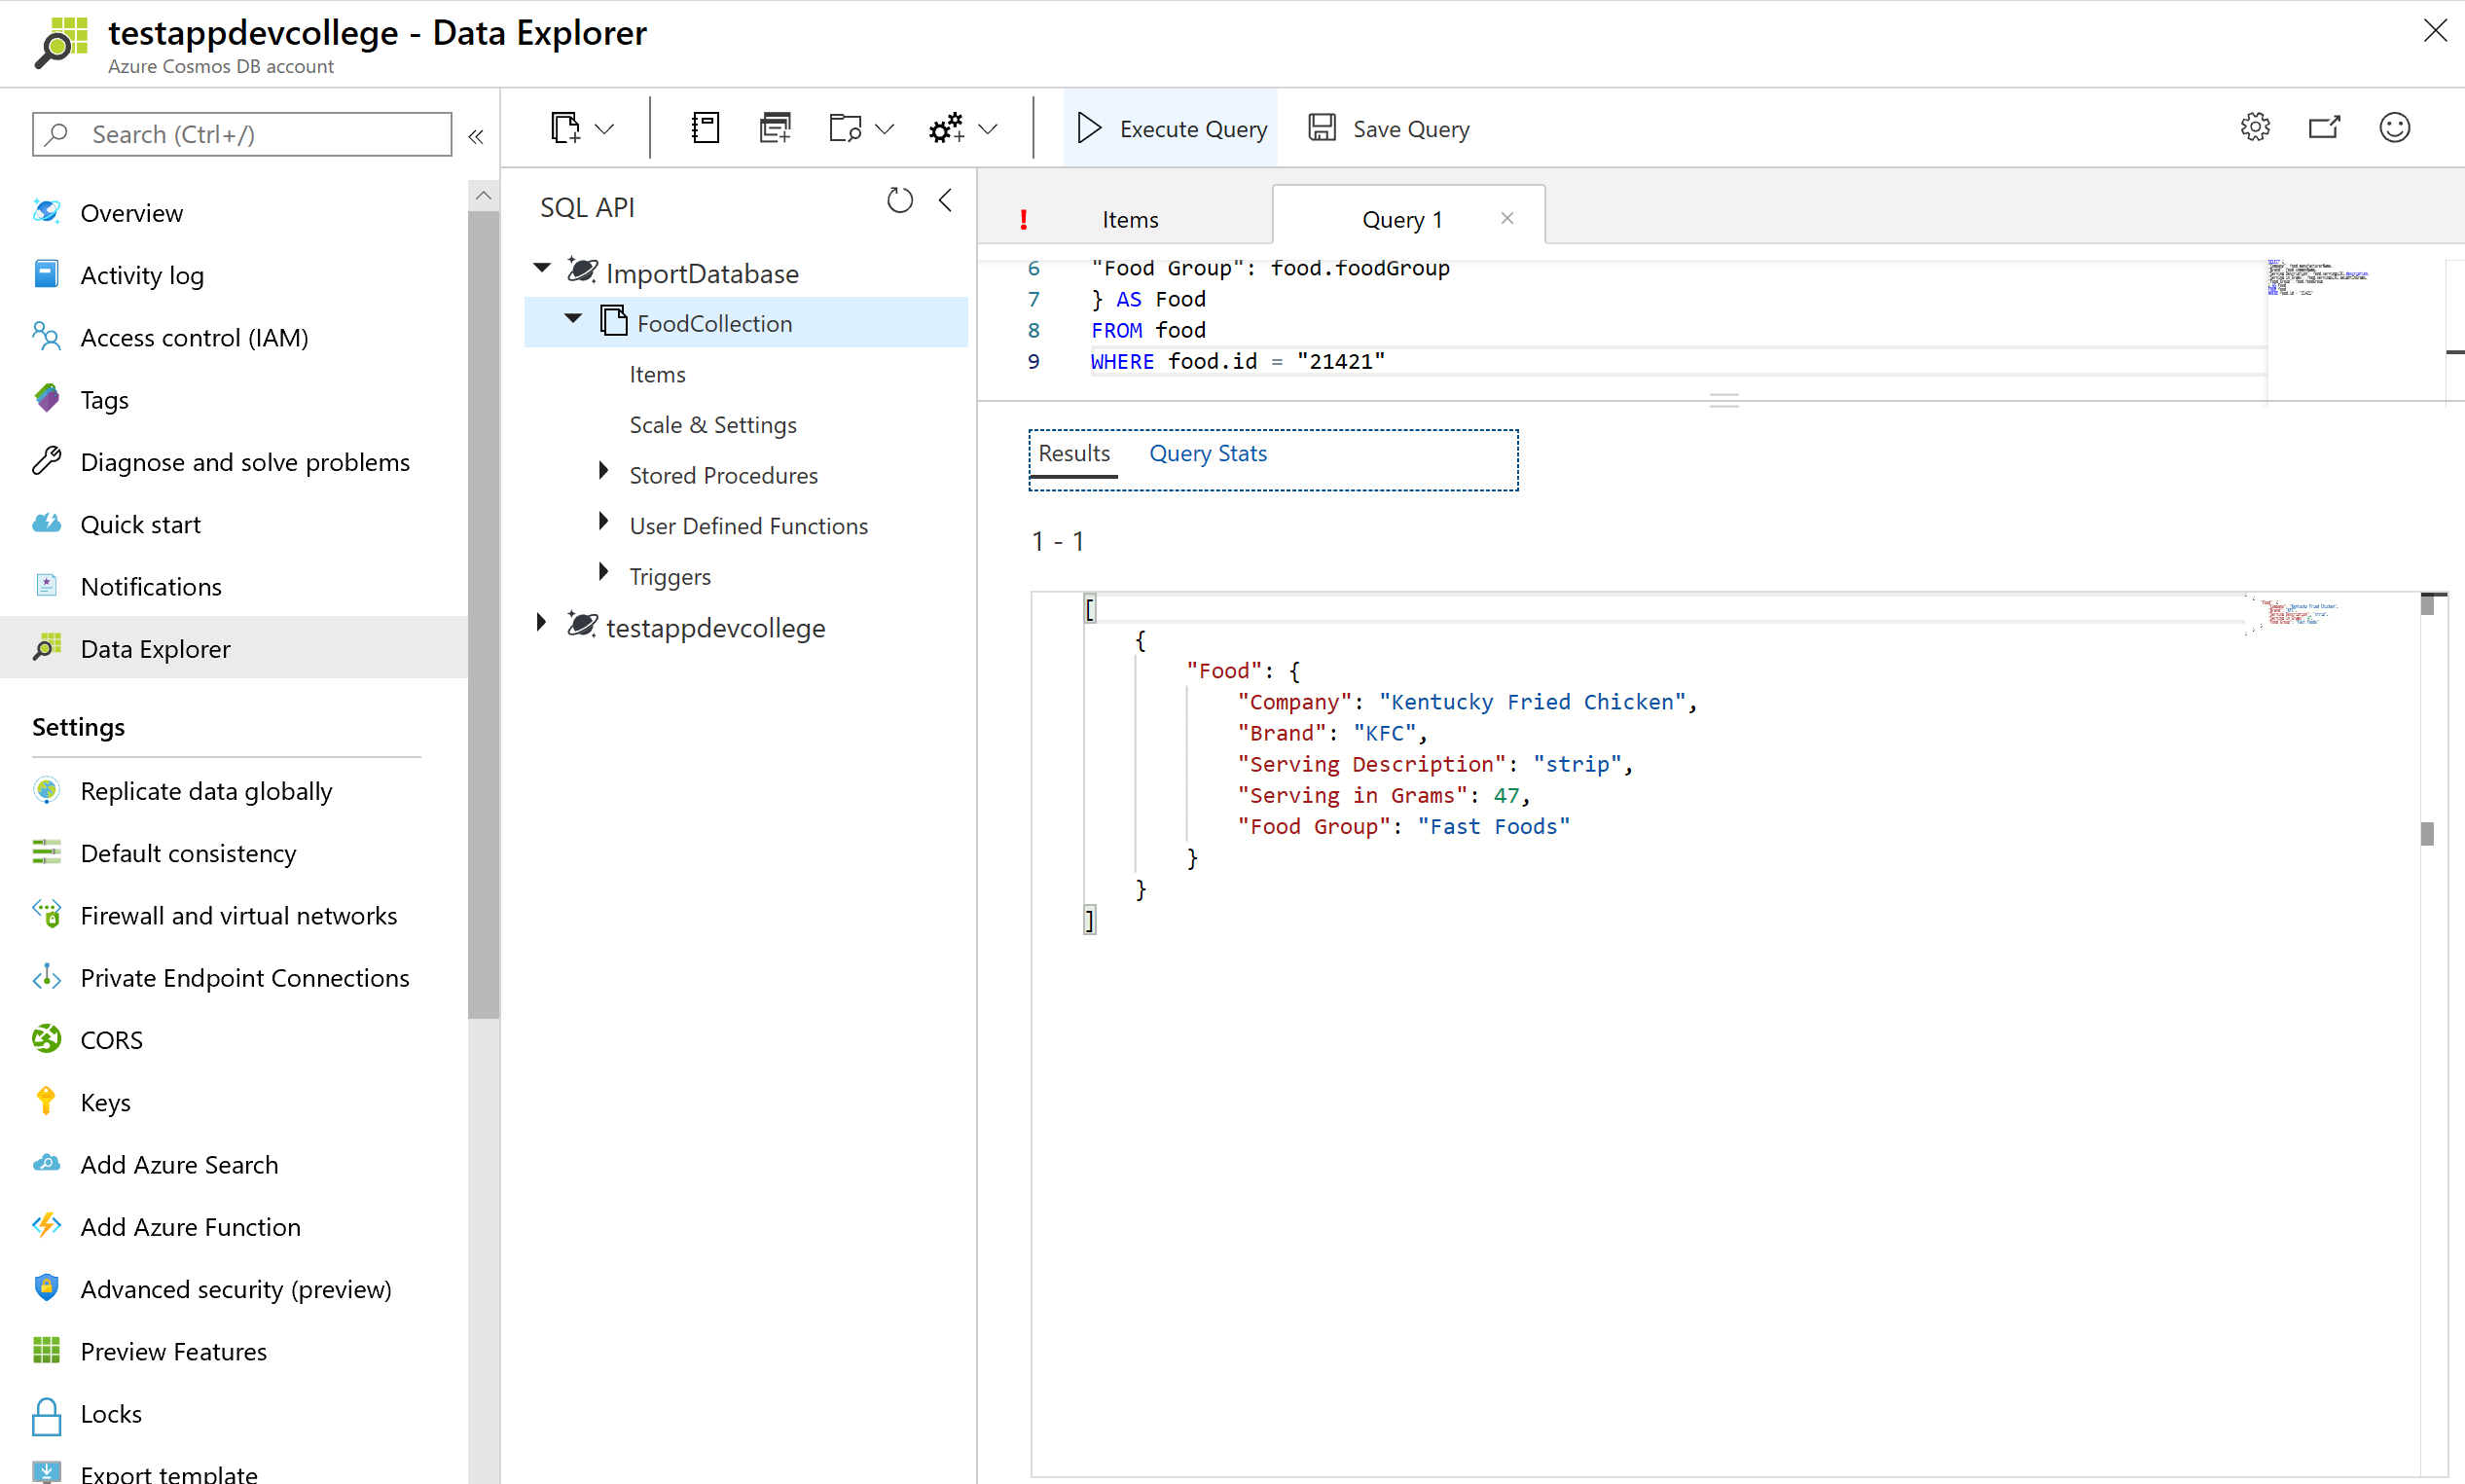
# More advanced projection
Azure Cosmos DB supports JSON projection within its queries. Let’s project a new JSON Object with modified property names. Run the query below to see the results.
SELECT {
"Company": food.manufacturerName,
"Brand": food.commonName,
"Serving Description": food.servings[0].description,
"Serving in Grams": food.servings[0].weightInGrams,
"Food Group": food.foodGroup
} AS Food
FROM food
WHERE food.id = "21421"
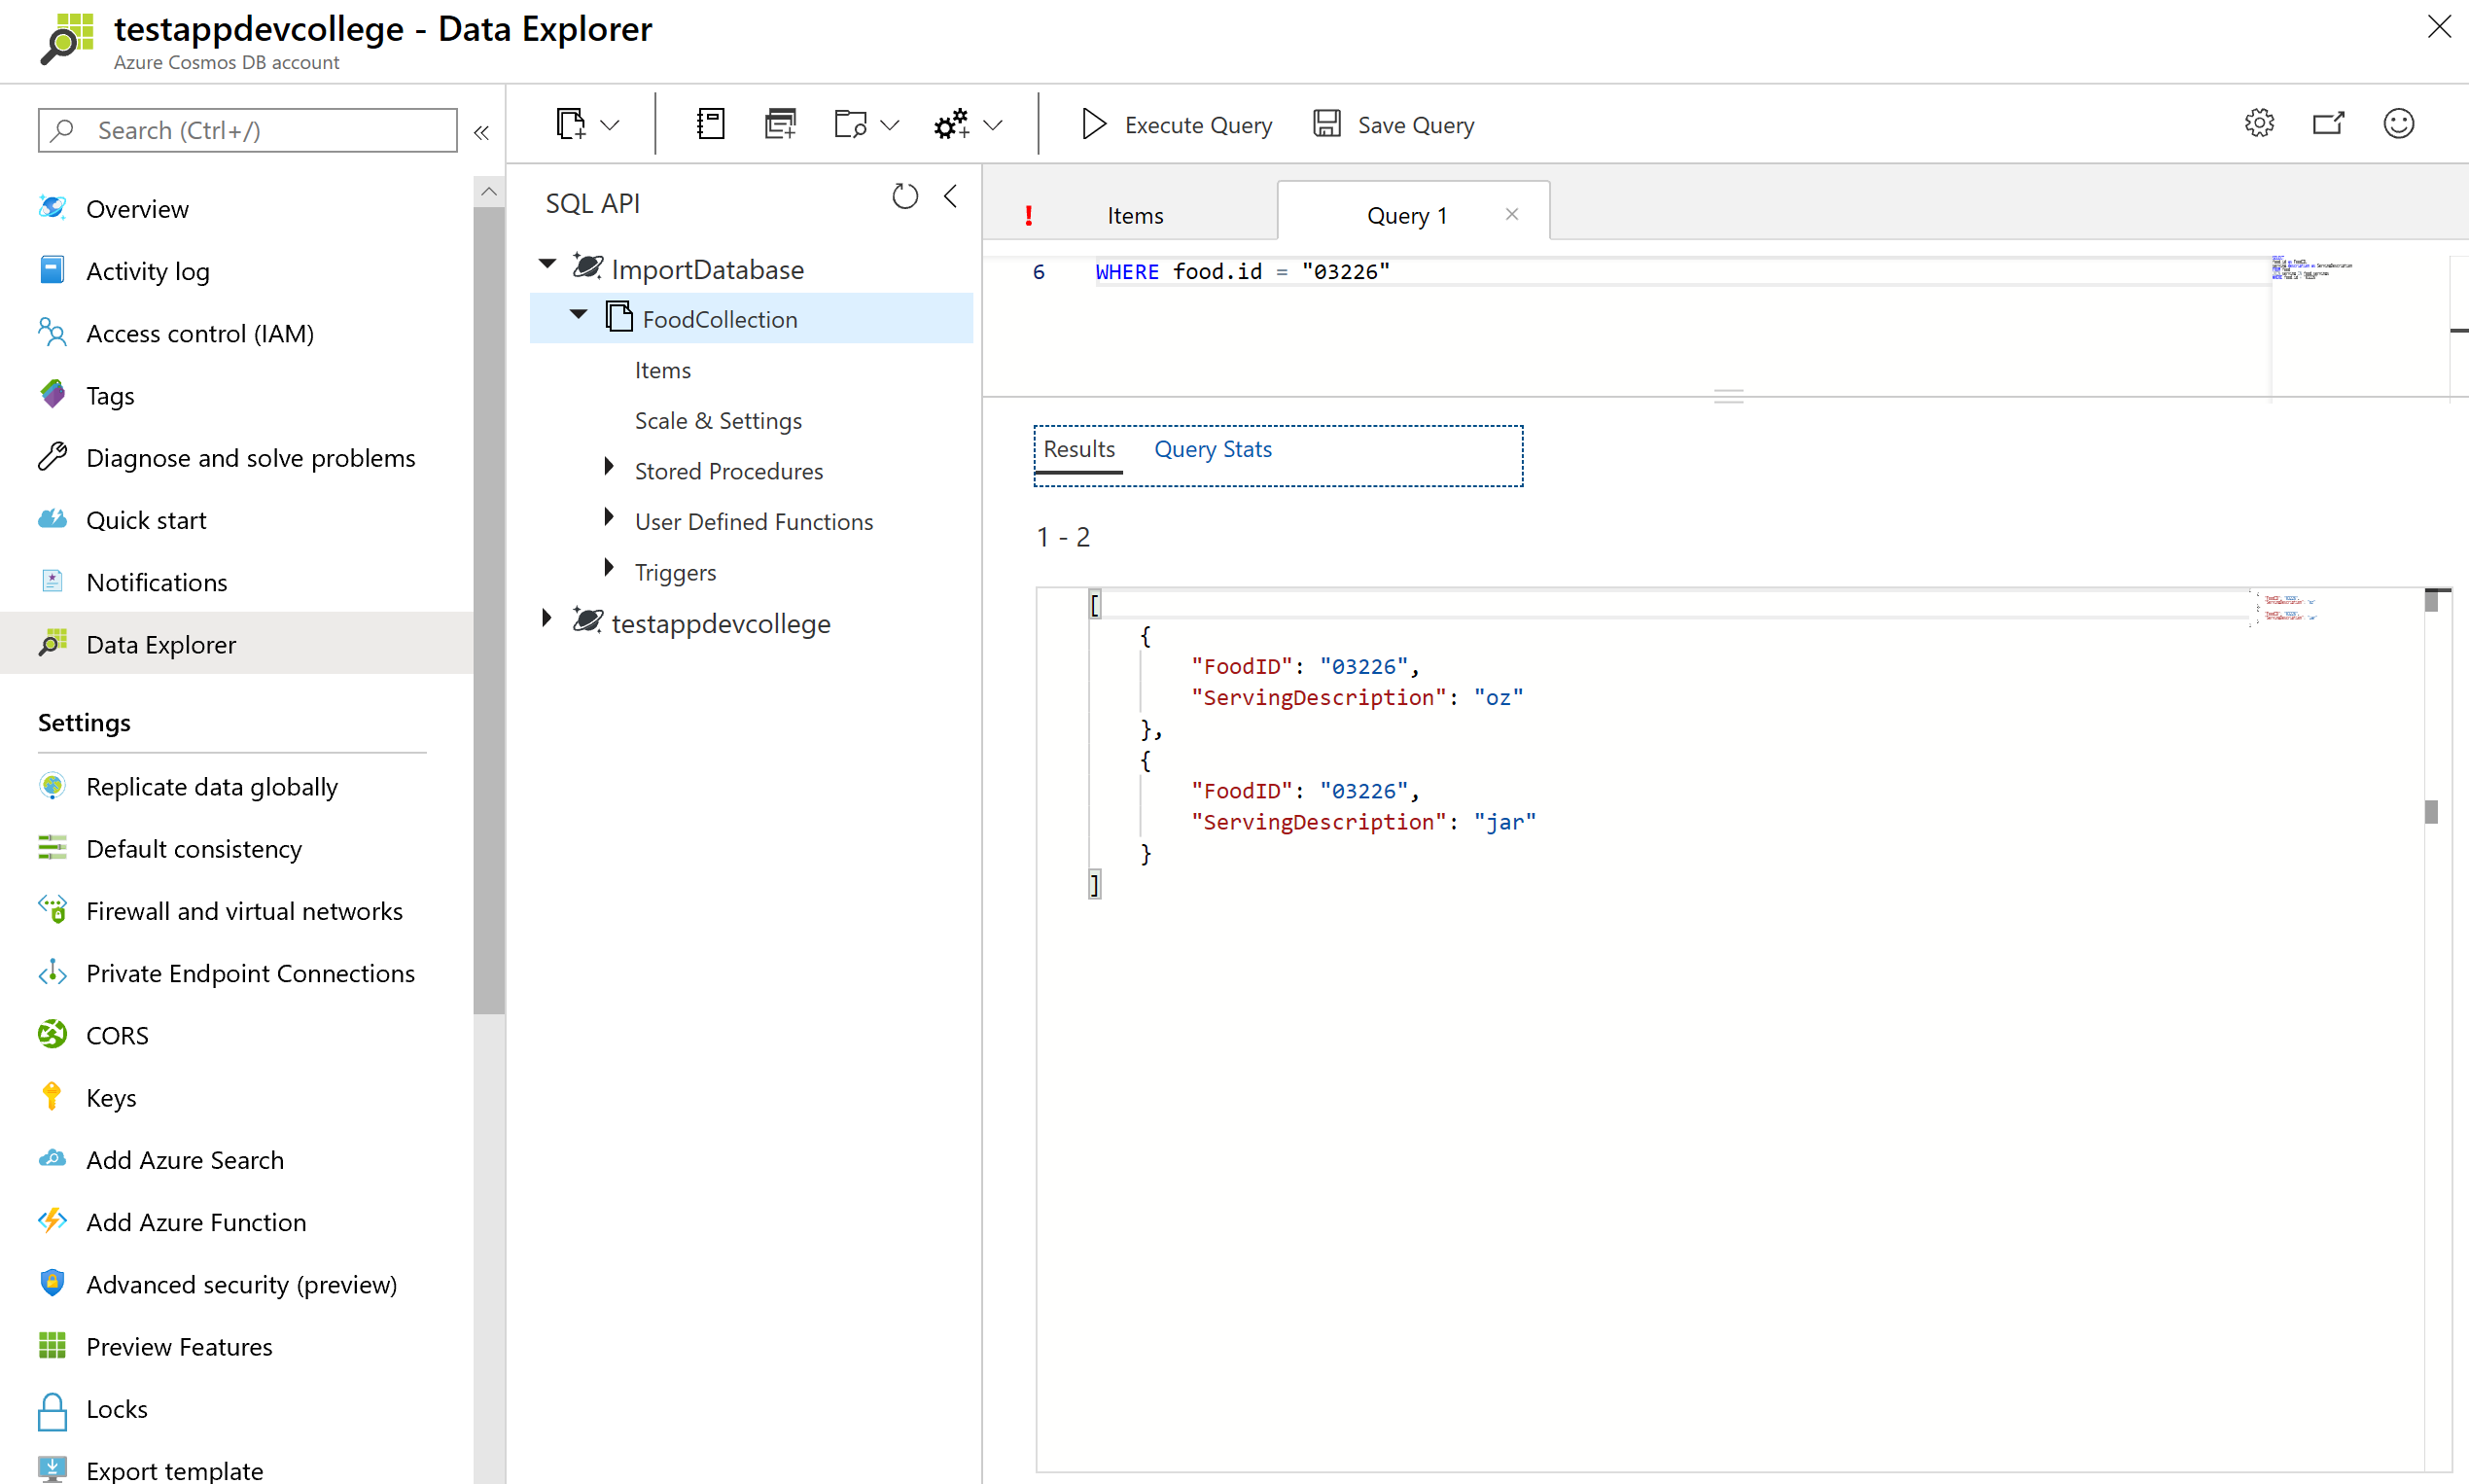
# JOIN within your documents
Azure Cosmos DB’s JOIN supports intra-document and self-joins. Azure Cosmos DB does not support JOINs across documents or containers.
In an earlier query example we returned a result with attributes of just the first serving of the food.servings array. By using the join syntax below, we can now return an item in the result for every item within the serving array while still being able to project the attributes from elsewhere into the item.
Run the query below to iterate on the food document’s servings.
SELECT
food.id as FoodID,
serving.description as ServingDescription
FROM food
JOIN serving IN food.servings
WHERE food.id = "03226"
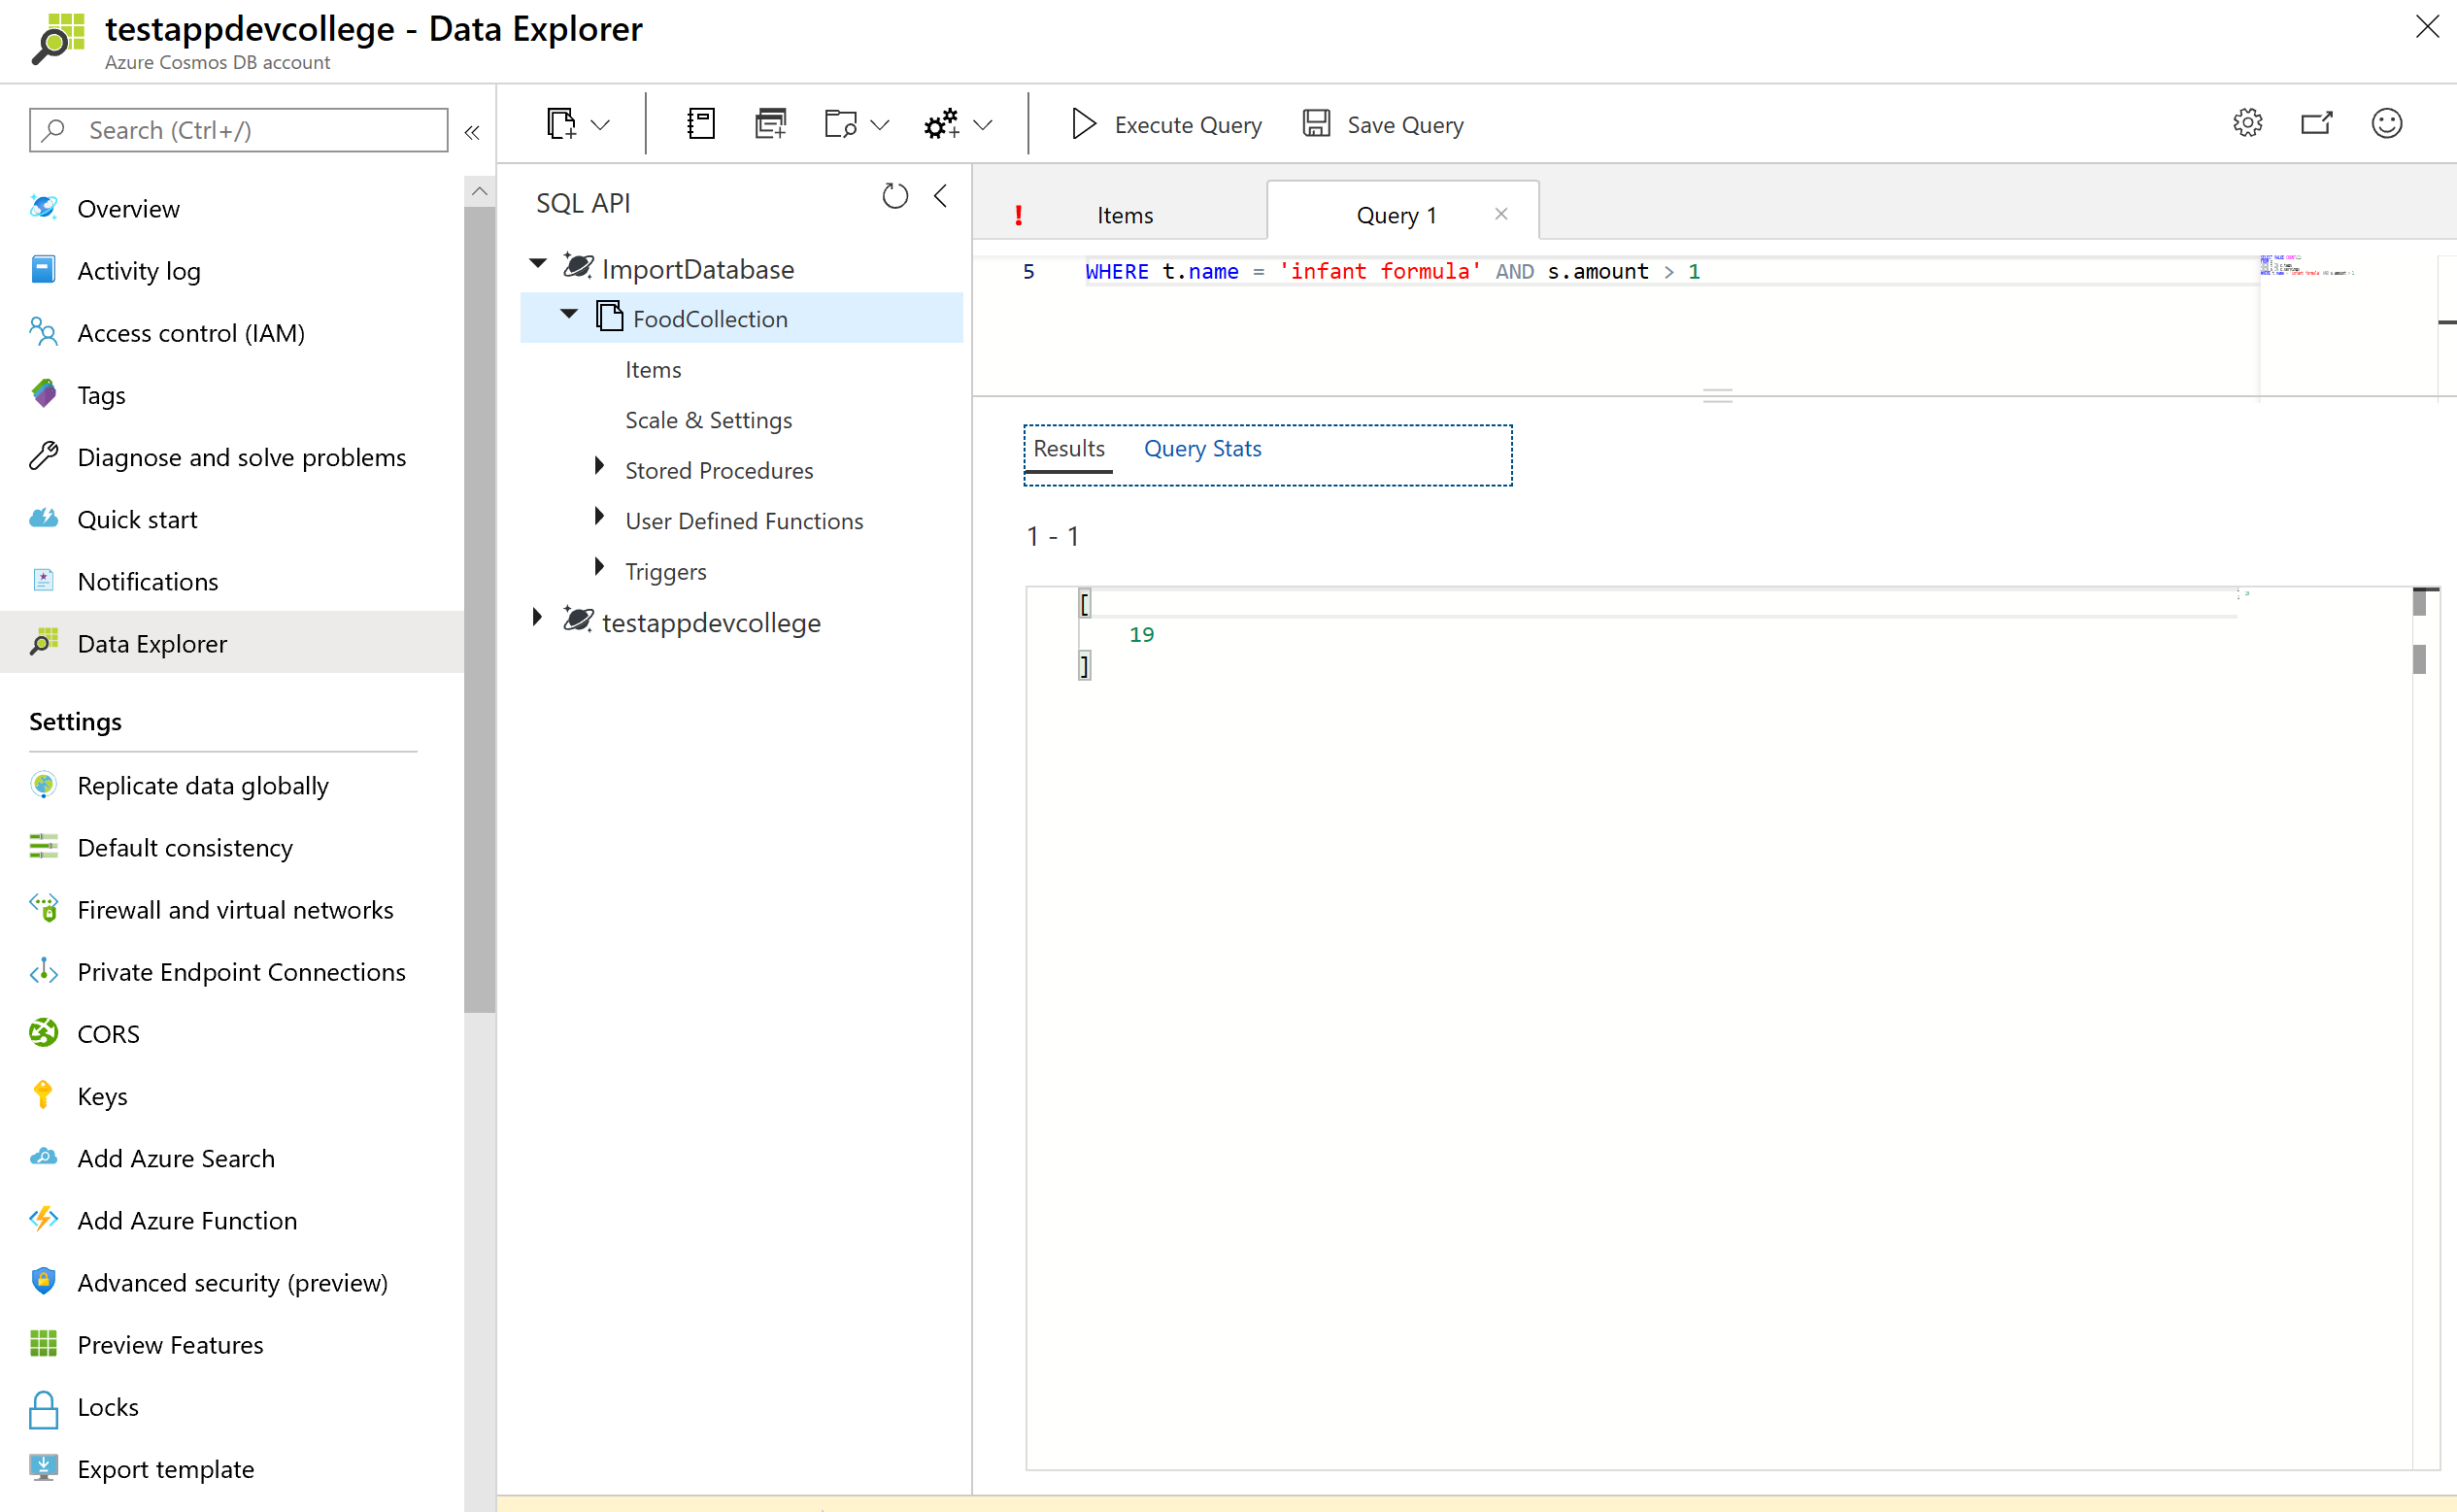
JOINs are useful if you need to filter on properties within an array. Run the below example that has filter after the intra-document JOIN.
SELECT VALUE COUNT(1)
FROM c
JOIN t IN c.tags
JOIN s IN c.servings
WHERE t.name = 'infant formula' AND s.amount > 1
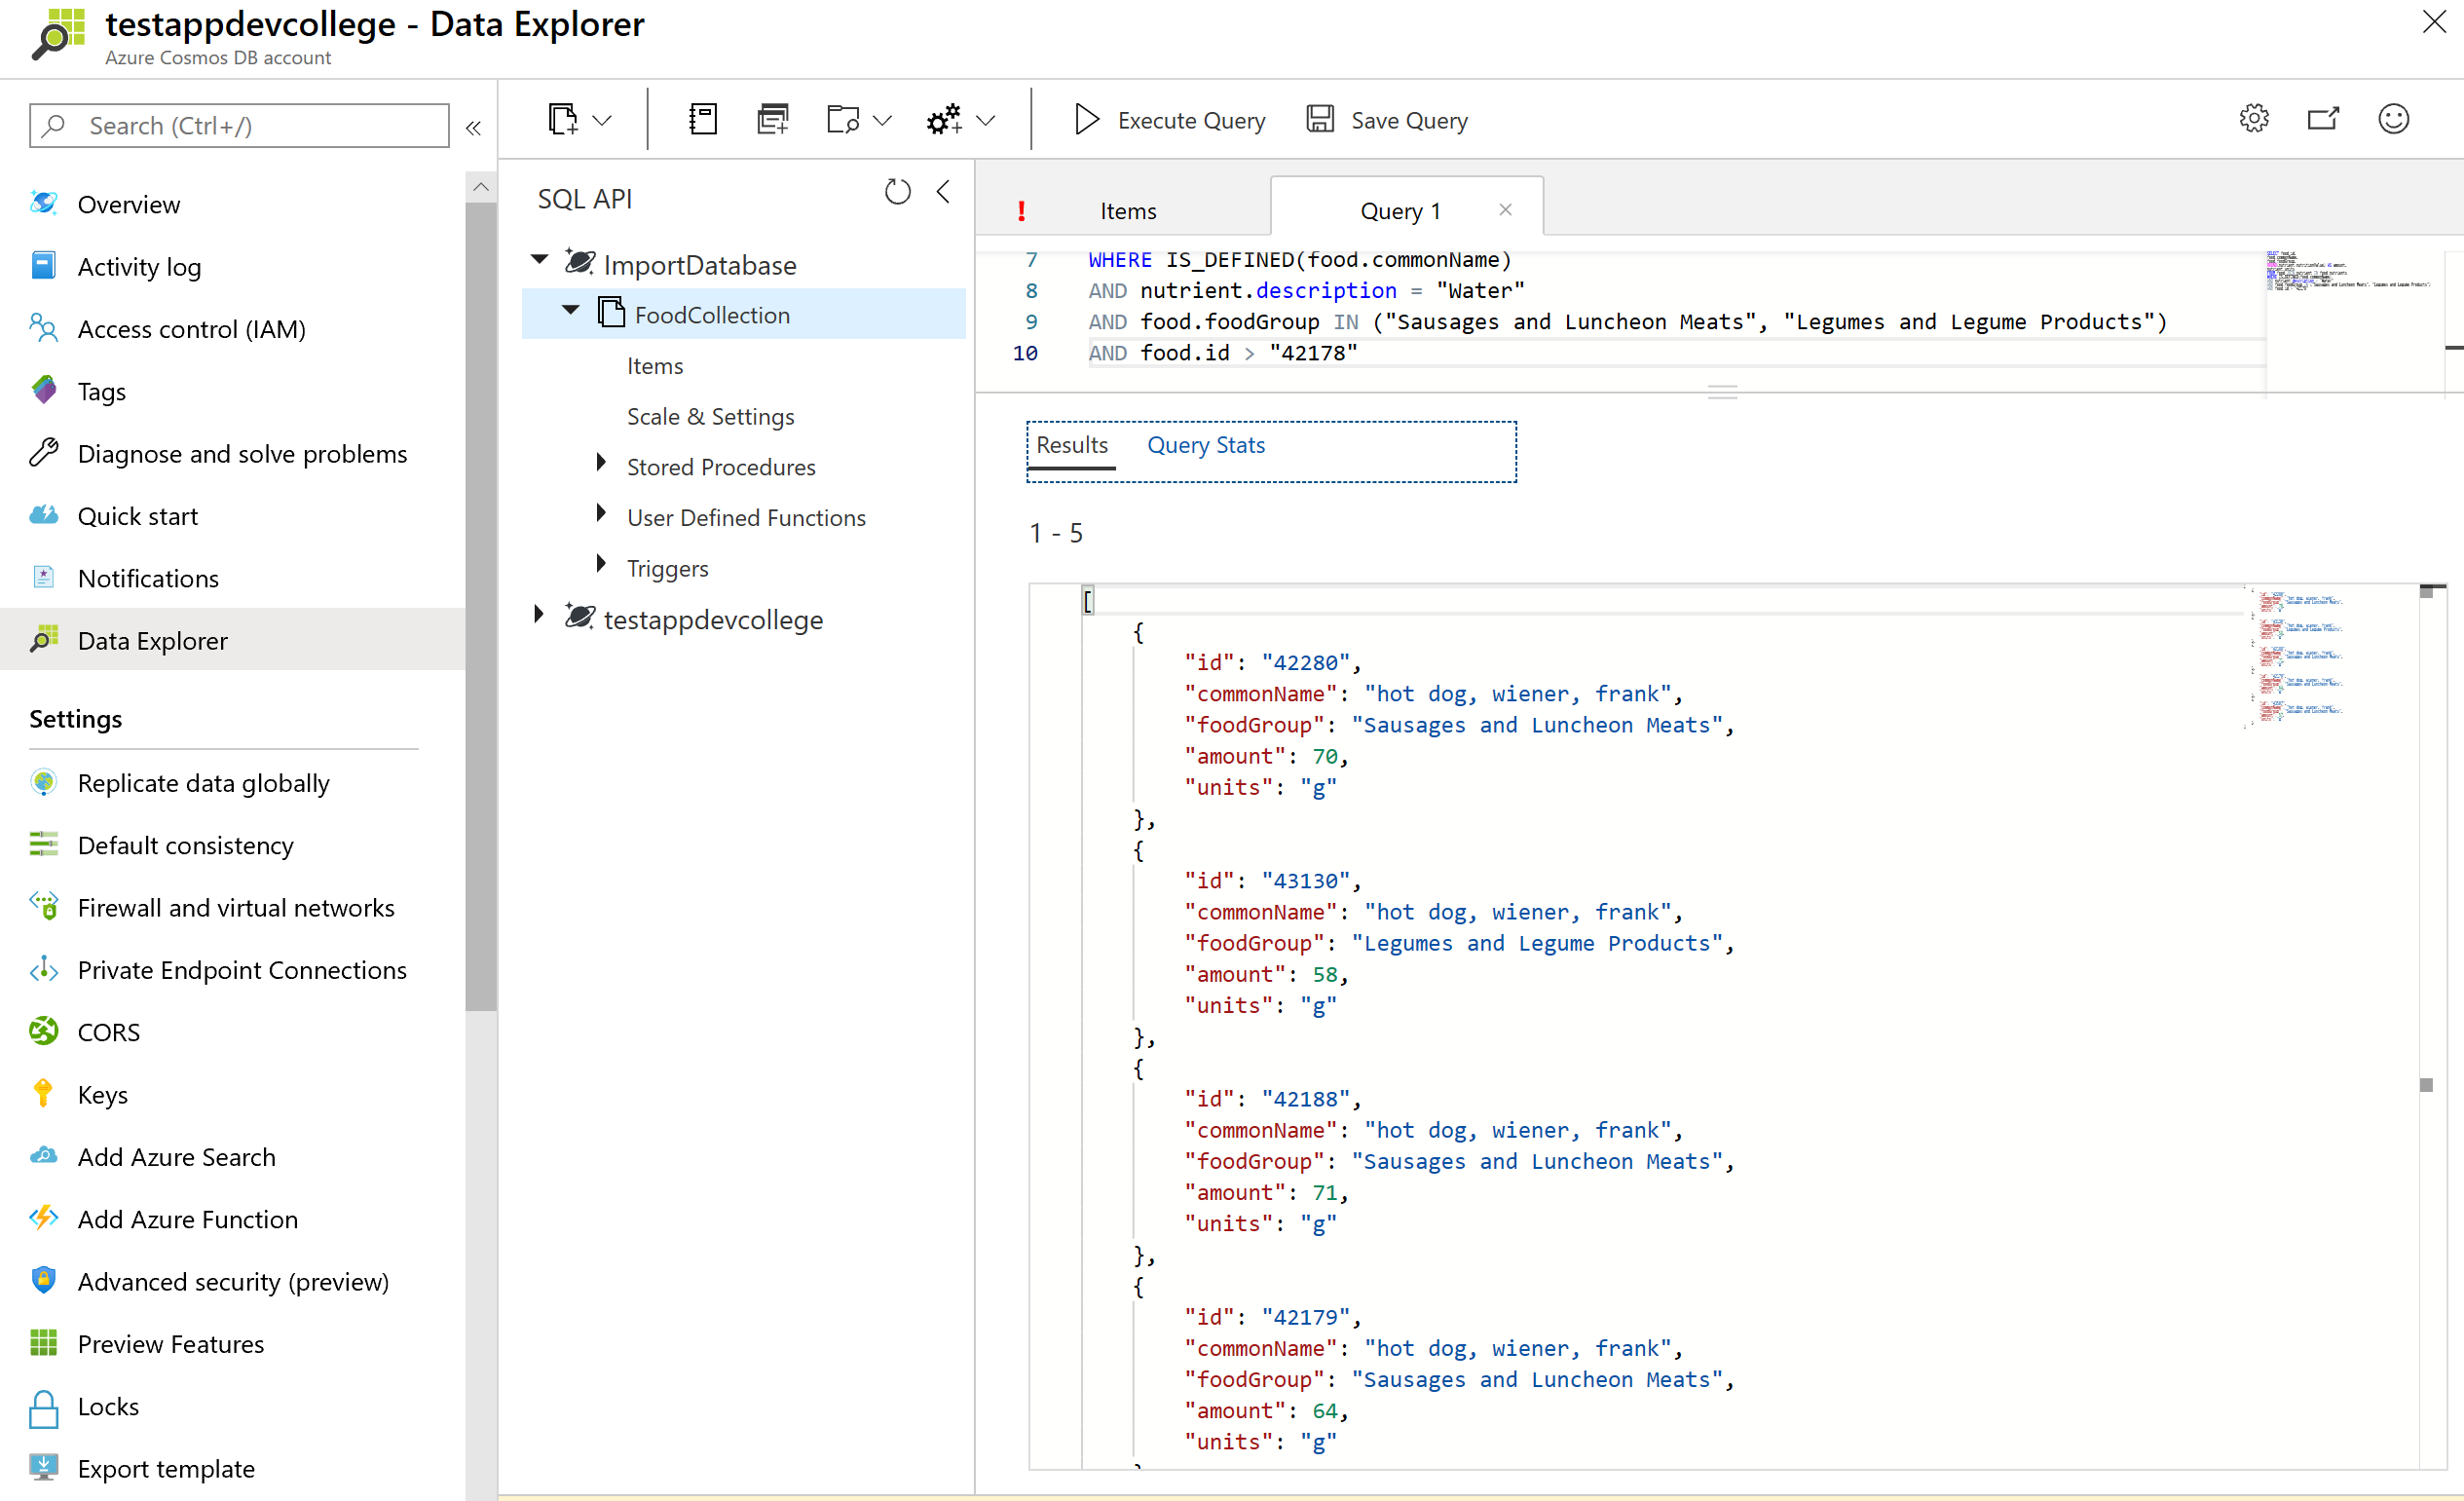
# System functions
Azure Cosmos DB supports a number of built-in functions for common operations. They cover mathematical functions like ABS, FLOOR and ROUND and type checking functions like IS_ARRAY, IS_BOOL and IS_DEFINED. Learn more about supported system functions (opens new window).
Run the query below to see example use of some system functions:
SELECT food.id,
food.commonName,
food.foodGroup,
ROUND(nutrient.nutritionValue) AS amount,
nutrient.units
FROM food JOIN nutrient IN food.nutrients
WHERE IS_DEFINED(food.commonName)
AND nutrient.description = "Water"
AND food.foodGroup IN ("Sausages and Luncheon Meats", "Legumes and Legume Products")
AND food.id > "42178"
# Correlated subqueries
In many scenarios, a subquery may be effective. A correlated subquery is a query that references values from an outer query.
We will walk through some of the most useful examples here. You can learn more about subqueries (opens new window).
There are two types of subqueries:Multi-value subqueries and scalar subqueries.Multi-value subqueries return a set of documents and are always used within the FROM clause. A scalar subquery expression is a subquery that evaluates to a single value.
# Multi-value subqueries
You can optimize JOIN expressions with a subquery.
Consider the following query which performs a self-join and then applies a filter on name, nutritionValue, and amount. We can use a subquery to filter out the joined array items before joining with the next expression.
SELECT VALUE COUNT(1)
FROM c
JOIN t IN c.tags
JOIN n IN c.nutrients
JOIN s IN c.servings
WHERE t.name = 'infant formula' AND (n.nutritionValue > 0
AND n.nutritionValue < 10) AND s.amount > 1
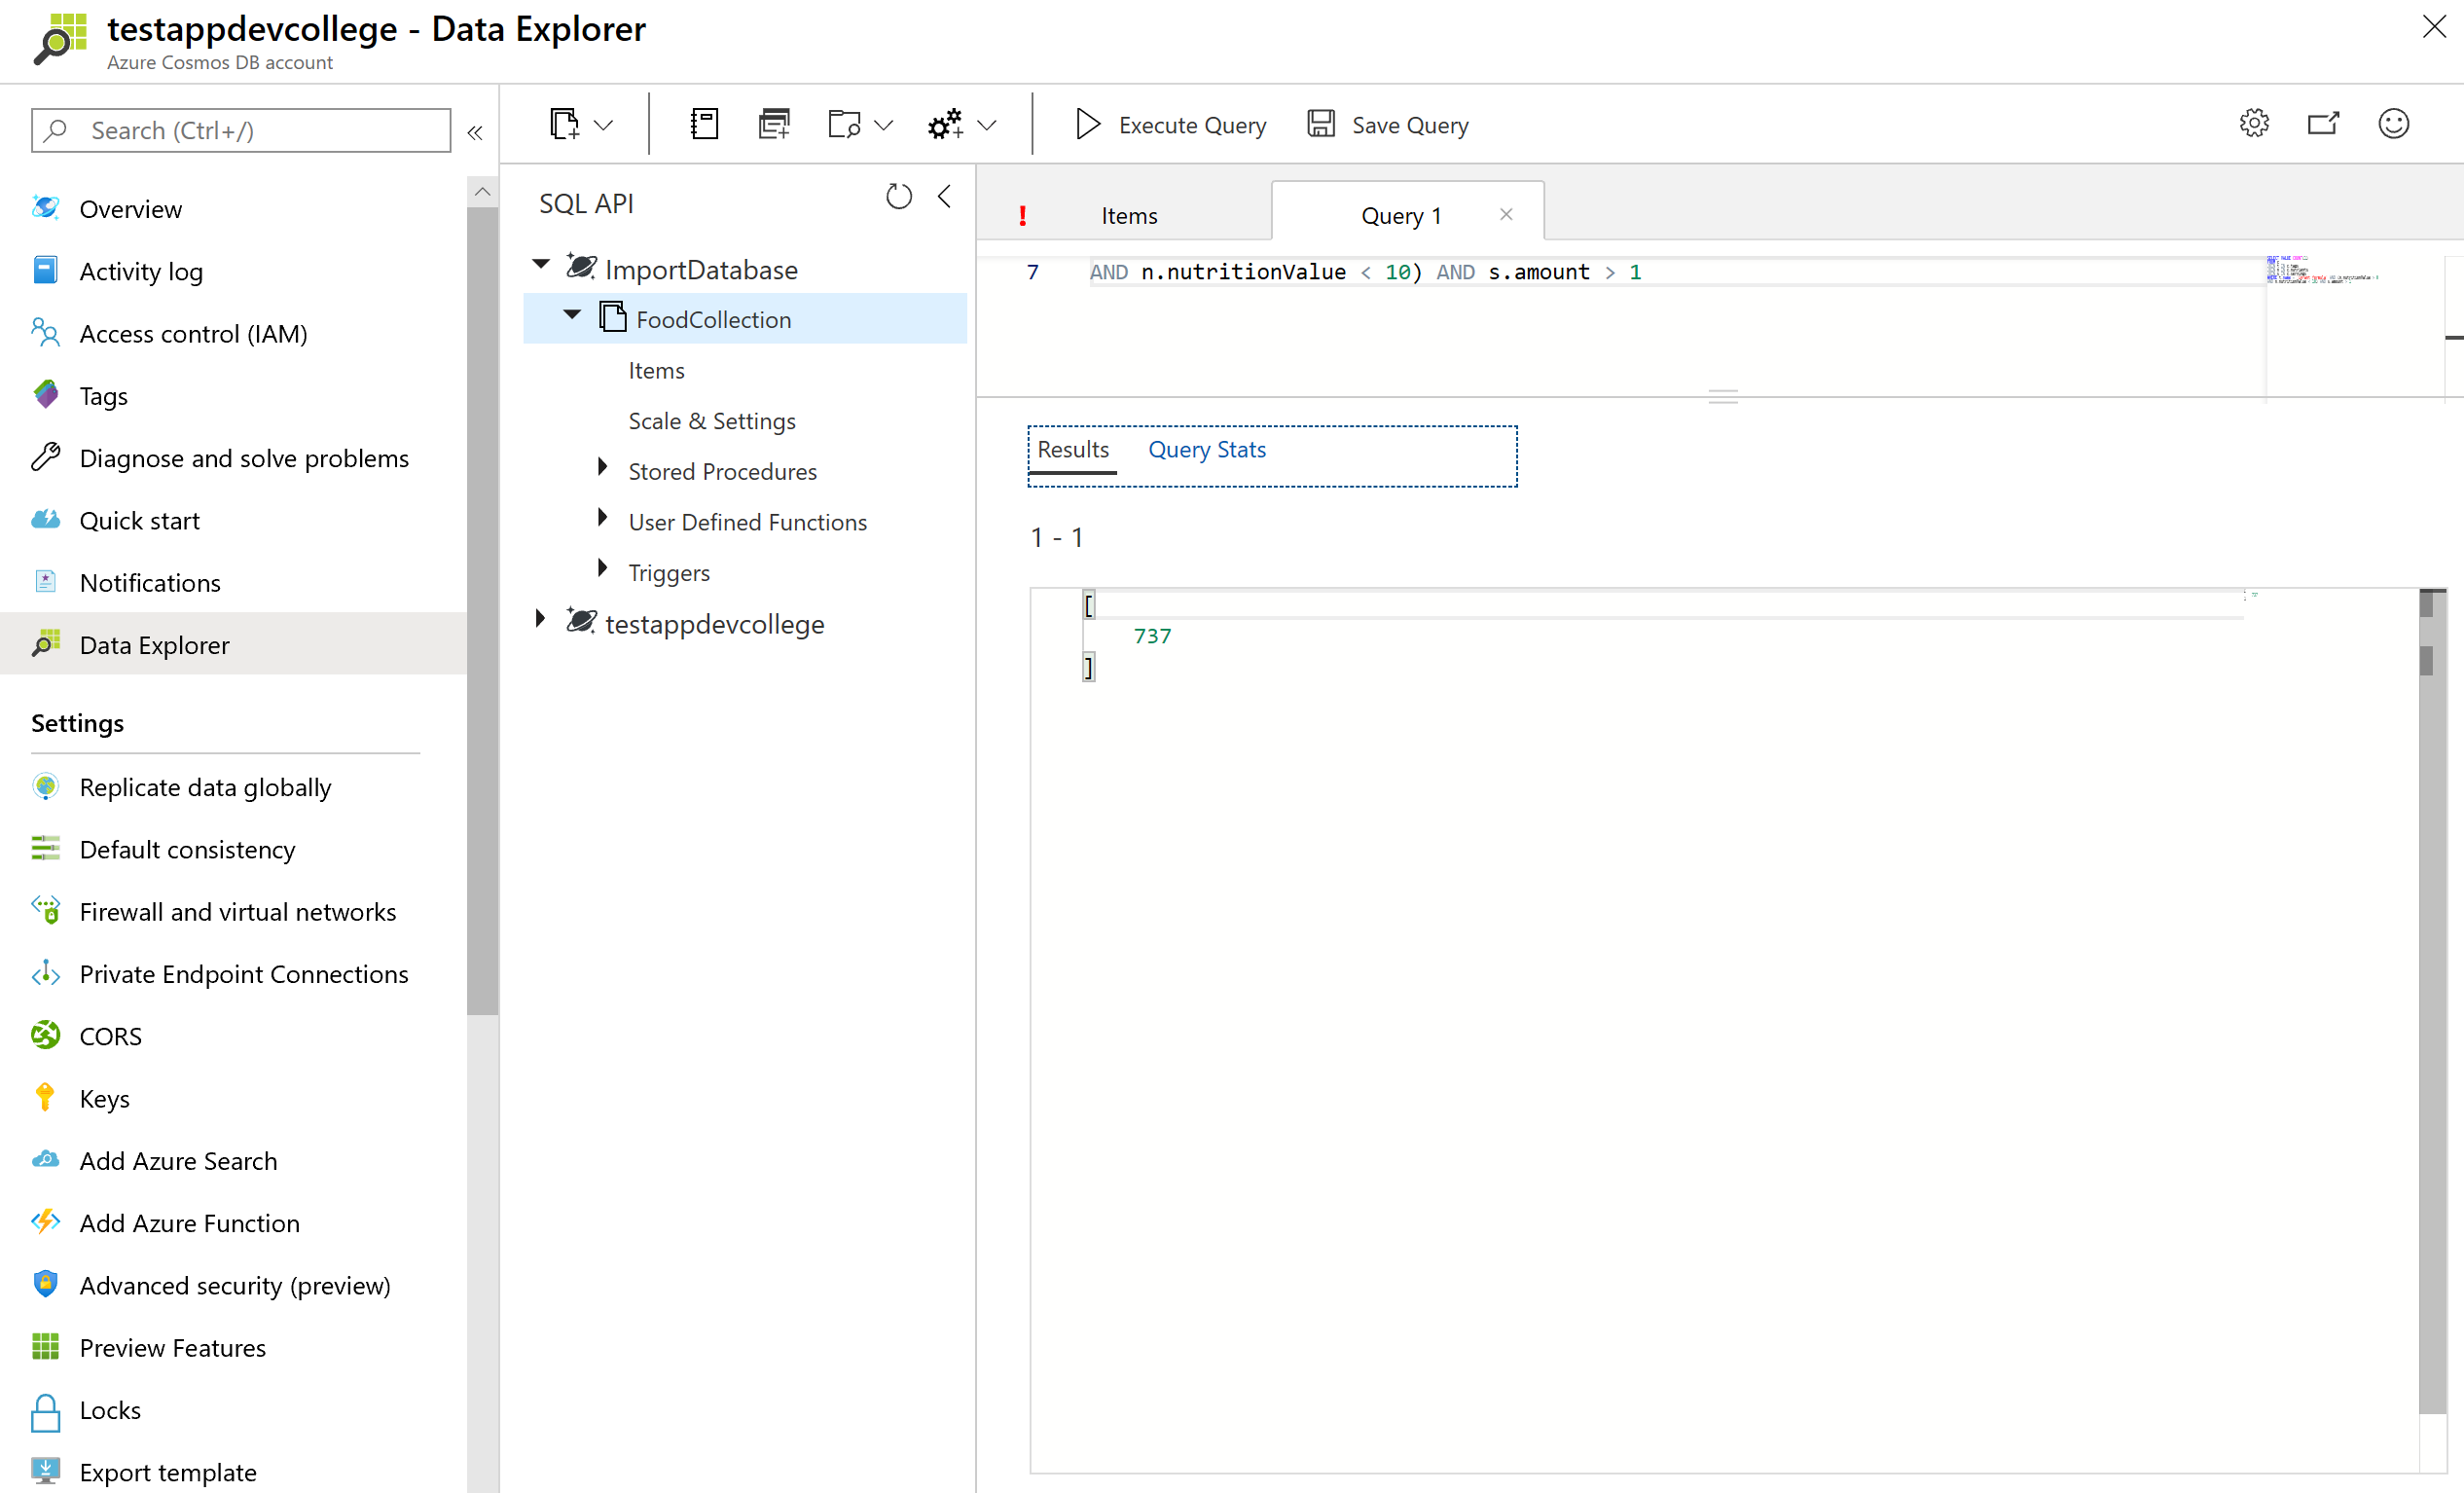
Let's look at the Request Unit Statistics:
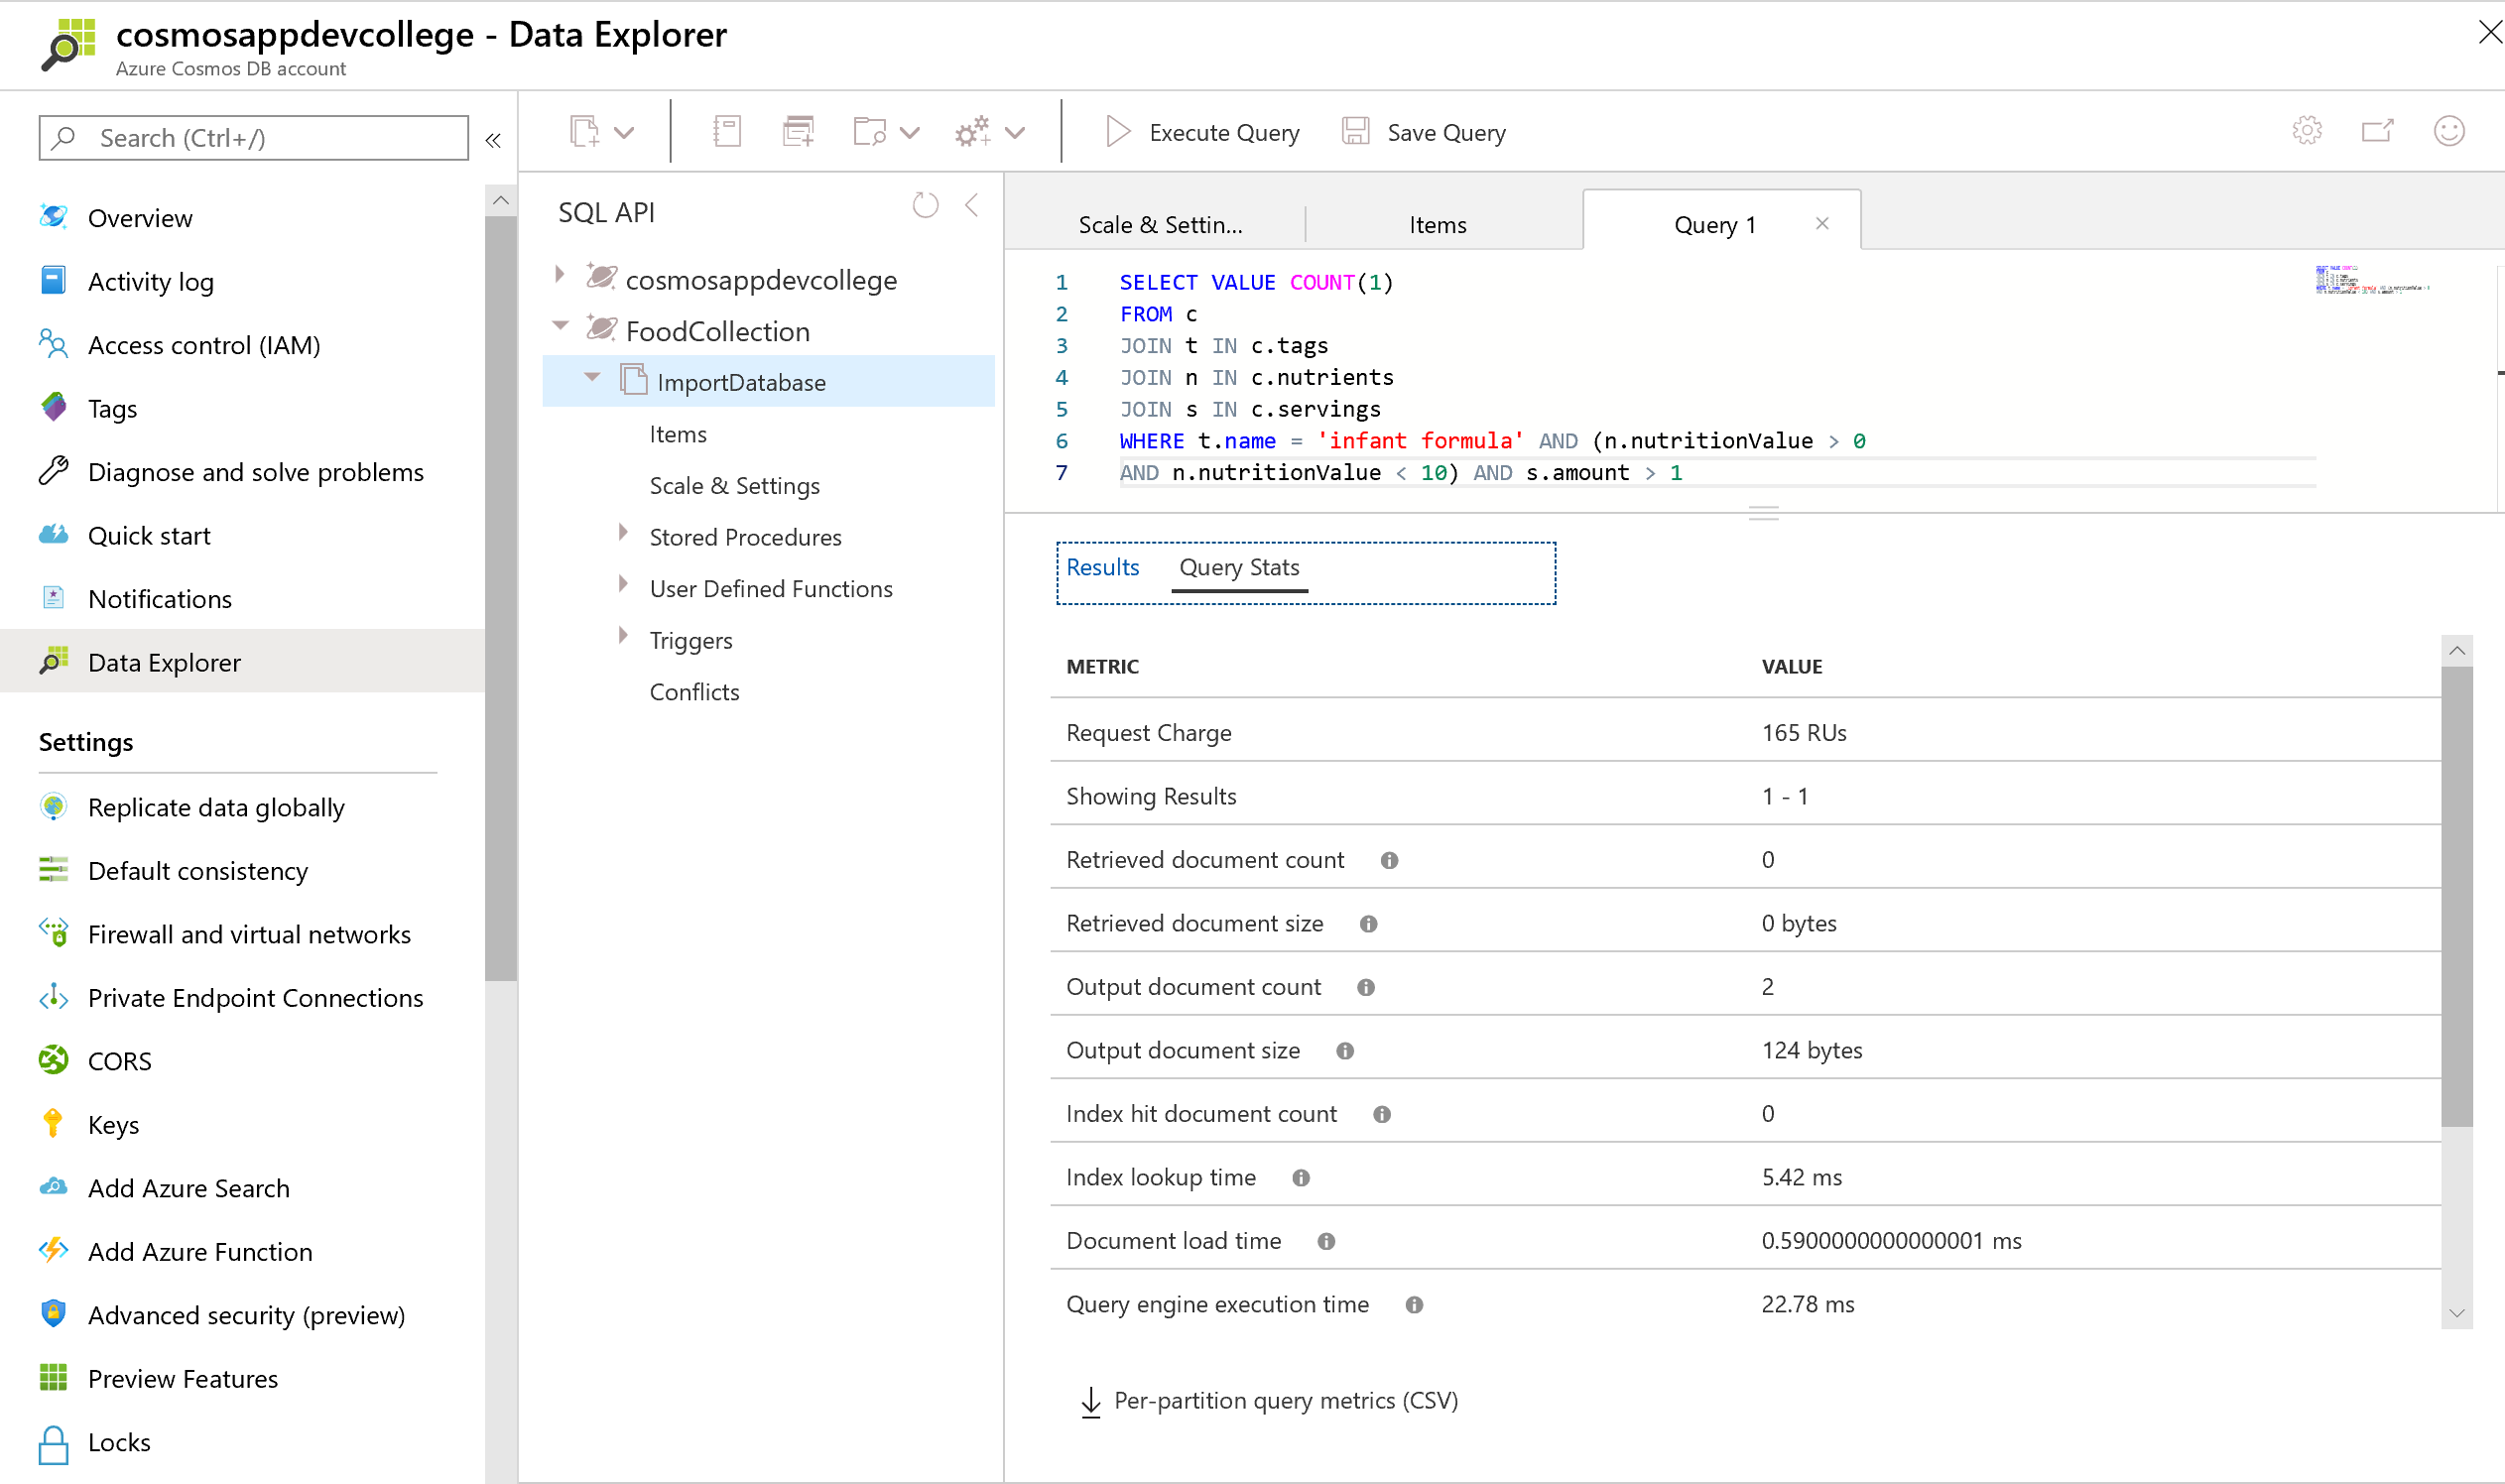
We could rewrite this query using three subqueries to optimize and reduce the Request Unit (RU) charge. Observe that the multi-value subquery always appears in the FROM clause of the outer query.
SELECT VALUE COUNT(1)
FROM c
JOIN (SELECT VALUE t FROM t IN c.tags WHERE t.name = 'infant formula')
JOIN (SELECT VALUE n FROM n IN c.nutrients WHERE n.nutritionValue > 0 AND n.nutritionValue < 10)
JOIN (SELECT VALUE s FROM s IN c.servings WHERE s.amount > 1)
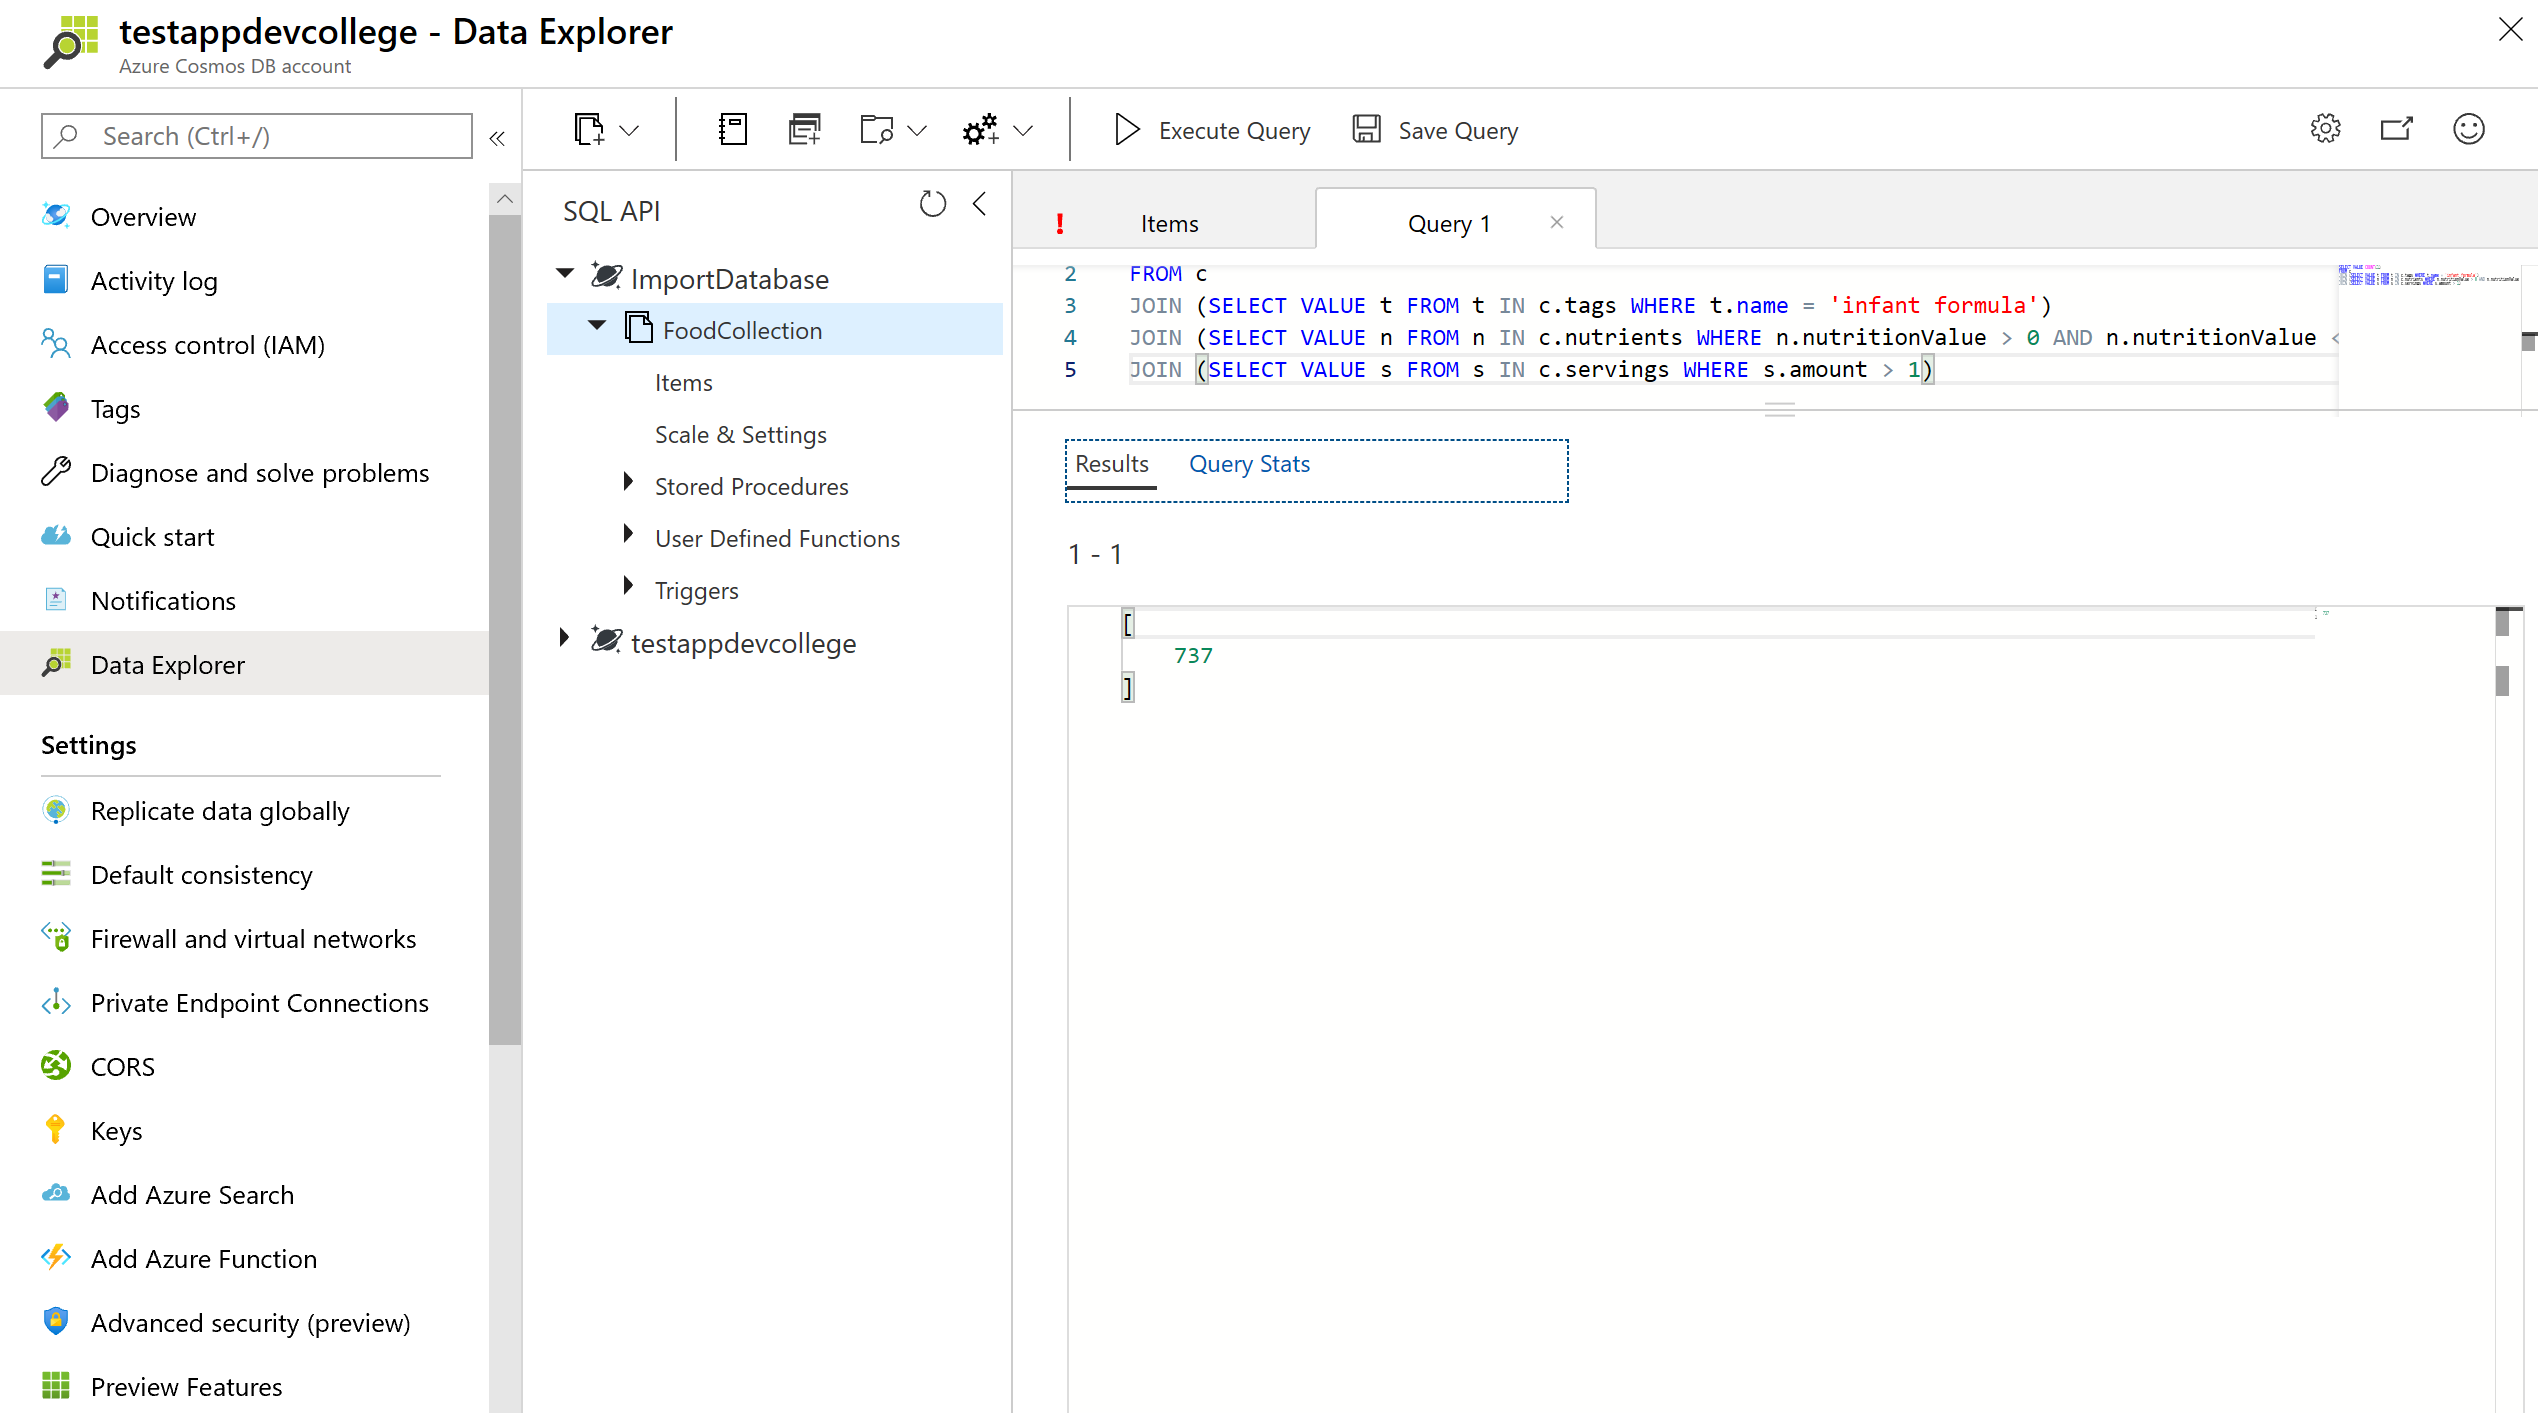
Let's compare the Request Unit Statistics:

You should observe a lower Request Unit charge.
# Indexing in Azure Cosmos DB (optional)
In this lab, you will modify the indexing policy of an Azure Cosmos DB container. You will explore how you can optimize indexing policy for write or read heavy workloads as well as understand the indexing requirements for different SQL API query features.
# Indexing Overview
Azure Cosmos DB is a schema-agnostic database that allows you to iterate on your application without having to deal with schema or index management. By default, Azure Cosmos DB automatically indexes every property for all items in your container without the need to define any schema or configure secondary indexes. If you chose to leave indexing policy at the default settings, you can run most queries with optimal performance and never have to explicitly consider indexing. However, if you want control over adding or removing properties from the index, modification is possible through the Azure Portal or any SQL API SDK.
Azure Cosmos DB uses an inverted index, representing your data in a tree form. For a brief introduction on how this works, read our indexing overview (opens new window) before continuing with the lab.
# Customizing the indexing policy
In this lab section, you will view and modify the indexing policy for your FoodCollection.
Open Data Explorer:
In the Azure Cosmos DB blade, locate and click the Data Explorer link on the left side of the blade.
In the Data Explorer section, expand the ImportDatabase database node and then expand the FoodCollection container node.
Within the FoodCollection node, click the Items link.
View the items within the container. Observe how these documents have many properties, including arrays. If we do not use a particular property in the WHERE clause, ORDER BY clause, or a JOIN, indexing the property does not provide any performance benefit.
Still within the FoodCollection node, click the Scale & Settings link. In the Indexing Policy section, you can edit the JSON file that defines your container's index. Indexing policy can also be modified through any Azure Cosmos DB SDK, but during this lab we will modify the indexing policy through the Azure Portal.
# Including and excluding Range Indexes
Instead of including a range index on every property by default, you can chose to either include or exclude specific paths from the index. Let's go through some simple examples (no need to enter these into the Azure Portal, we can just review them here).
Within the FoodCollection, documents have this schema (some properties were removed for simplicity):
{
  "id": "36000",
  "_rid": "LYwNAKzLG9ADAAAAAAAAAA==",
  "_self": "dbs/LYwNAA==/colls/LYwNAKzLG9A=/docs/LYwNAKzLG9ADAAAAAAAAAA==/",
  "_etag": "\"0b008d85-0000-0700-0000-5d1a47e60000\"",
  "description": "APPLEBEE'S, 9 oz house sirloin steak",
  "tags": [
    {
      "name": "applebee's"
    },
    {
      "name": "9 oz house sirloin steak"
    }
  ],

  "manufacturerName": "Applebee's",
  "foodGroup": "Restaurant Foods",
  "nutrients": [
    {
      "id": "301",
      "description": "Calcium, Ca",
      "nutritionValue": 16,
      "units": "mg"
    },
    {
      "id": "312",
      "description": "Copper, Cu",
      "nutritionValue": 0.076,
      "units": "mg"
    }
  ]
}
If you wanted to only index the manufacturerName, foodGroup, and nutrients array with a range index, you should define the following index policy:
{
  "indexingMode": "consistent",
  "includedPaths": [
    {
      "path": "/manufacturerName/*"
    },
    {
      "path": "/foodGroup/*"
    },
    {
      "path": "/nutrients/[]/*"
    }
  ],
  "excludedPaths": [
    {
      "path": "/*"
    }
  ]
}
In this example, we use the wildcard character '*' to indicate that we would like to index all paths within the nutrients array. However, it's possible we may just want to index the nutritionValue of each array element.
In this next example, the indexing policy would explicitly specify that the nutritionValue path in the nutrition array should be indexed. Since we don't use the wildcard character '*', no additional paths in the array are indexed.
{
  "indexingMode": "consistent",
  "includedPaths": [
    {
      "path": "/manufacturerName/*"
    },
    {
      "path": "/foodGroup/*"
    },
    {
      "path": "/nutrients/[]/nutritionValue/*"
    }
  ],
  "excludedPaths": [
    {
      "path": "/*"
    }
  ]
}
Finally, it's important to understand the difference between the * and ? characters. The * character indicates that Azure Cosmos DB should index every path beyond that specific node. The ? character indicates that Azure Cosmos DB should index no further paths beyond this node. In the above example, there are no additional paths under nutritionValue. If we were to modify the document and add a path here, having the wildcard character '*' in the above example would ensure that the property is indexed without explicitly mentioning the name.
# Understand query requirements
Before modifying indexing policy, it's important to understand how the data is used in the collection. If your workload is write-heavy or your documents are large, you should only index necessary paths. This will significantly decrease the amount of RU's required for inserts, updates, and deletes.
Let's imagine that the following queries are the only read operations that are executed on the FoodCollection container.
Query #1
SELECT * FROM c WHERE c.manufacturerName = <manufacturerName>
Query #2
SELECT * FROM c WHERE c.foodGroup = <foodGroup>
These queries only require that a range index be defined on manufacturerName and foodGroup, respectively. We can modify the indexing policy to index only these properties.
# Edit the indexing policy by including paths
- Navigate back to the FoodCollection in the Azure Portal and click the Scale & Settings link. In the Indexing Policy section, replace the existing json file with the following:
{
  "indexingMode": "consistent",
  "includedPaths": [
    {
      "path": "/manufacturerName/*"
    },
    {
      "path": "/foodGroup/*"
    }
  ],
  "excludedPaths": [
    {
      "path": "/*"
    }
  ]
}
This new indexing policy will create a range index on only the manufacturerName and foodGroup properties. It will remove range indexes on all other properties. Click Save. Azure Cosmos DB will update the index in the container, using your excess provisioned throughput to make the updates.
During the container re-indexing, write performance is unaffected. However, queries may return incomplete results.
- After defining the new indexing policy, navigate to your FoodCollection and select the Add New SQL Query icon. Paste the following SQL query and select Execute Query:
SELECT * FROM c WHERE c.manufacturerName = "Kellogg, Co."
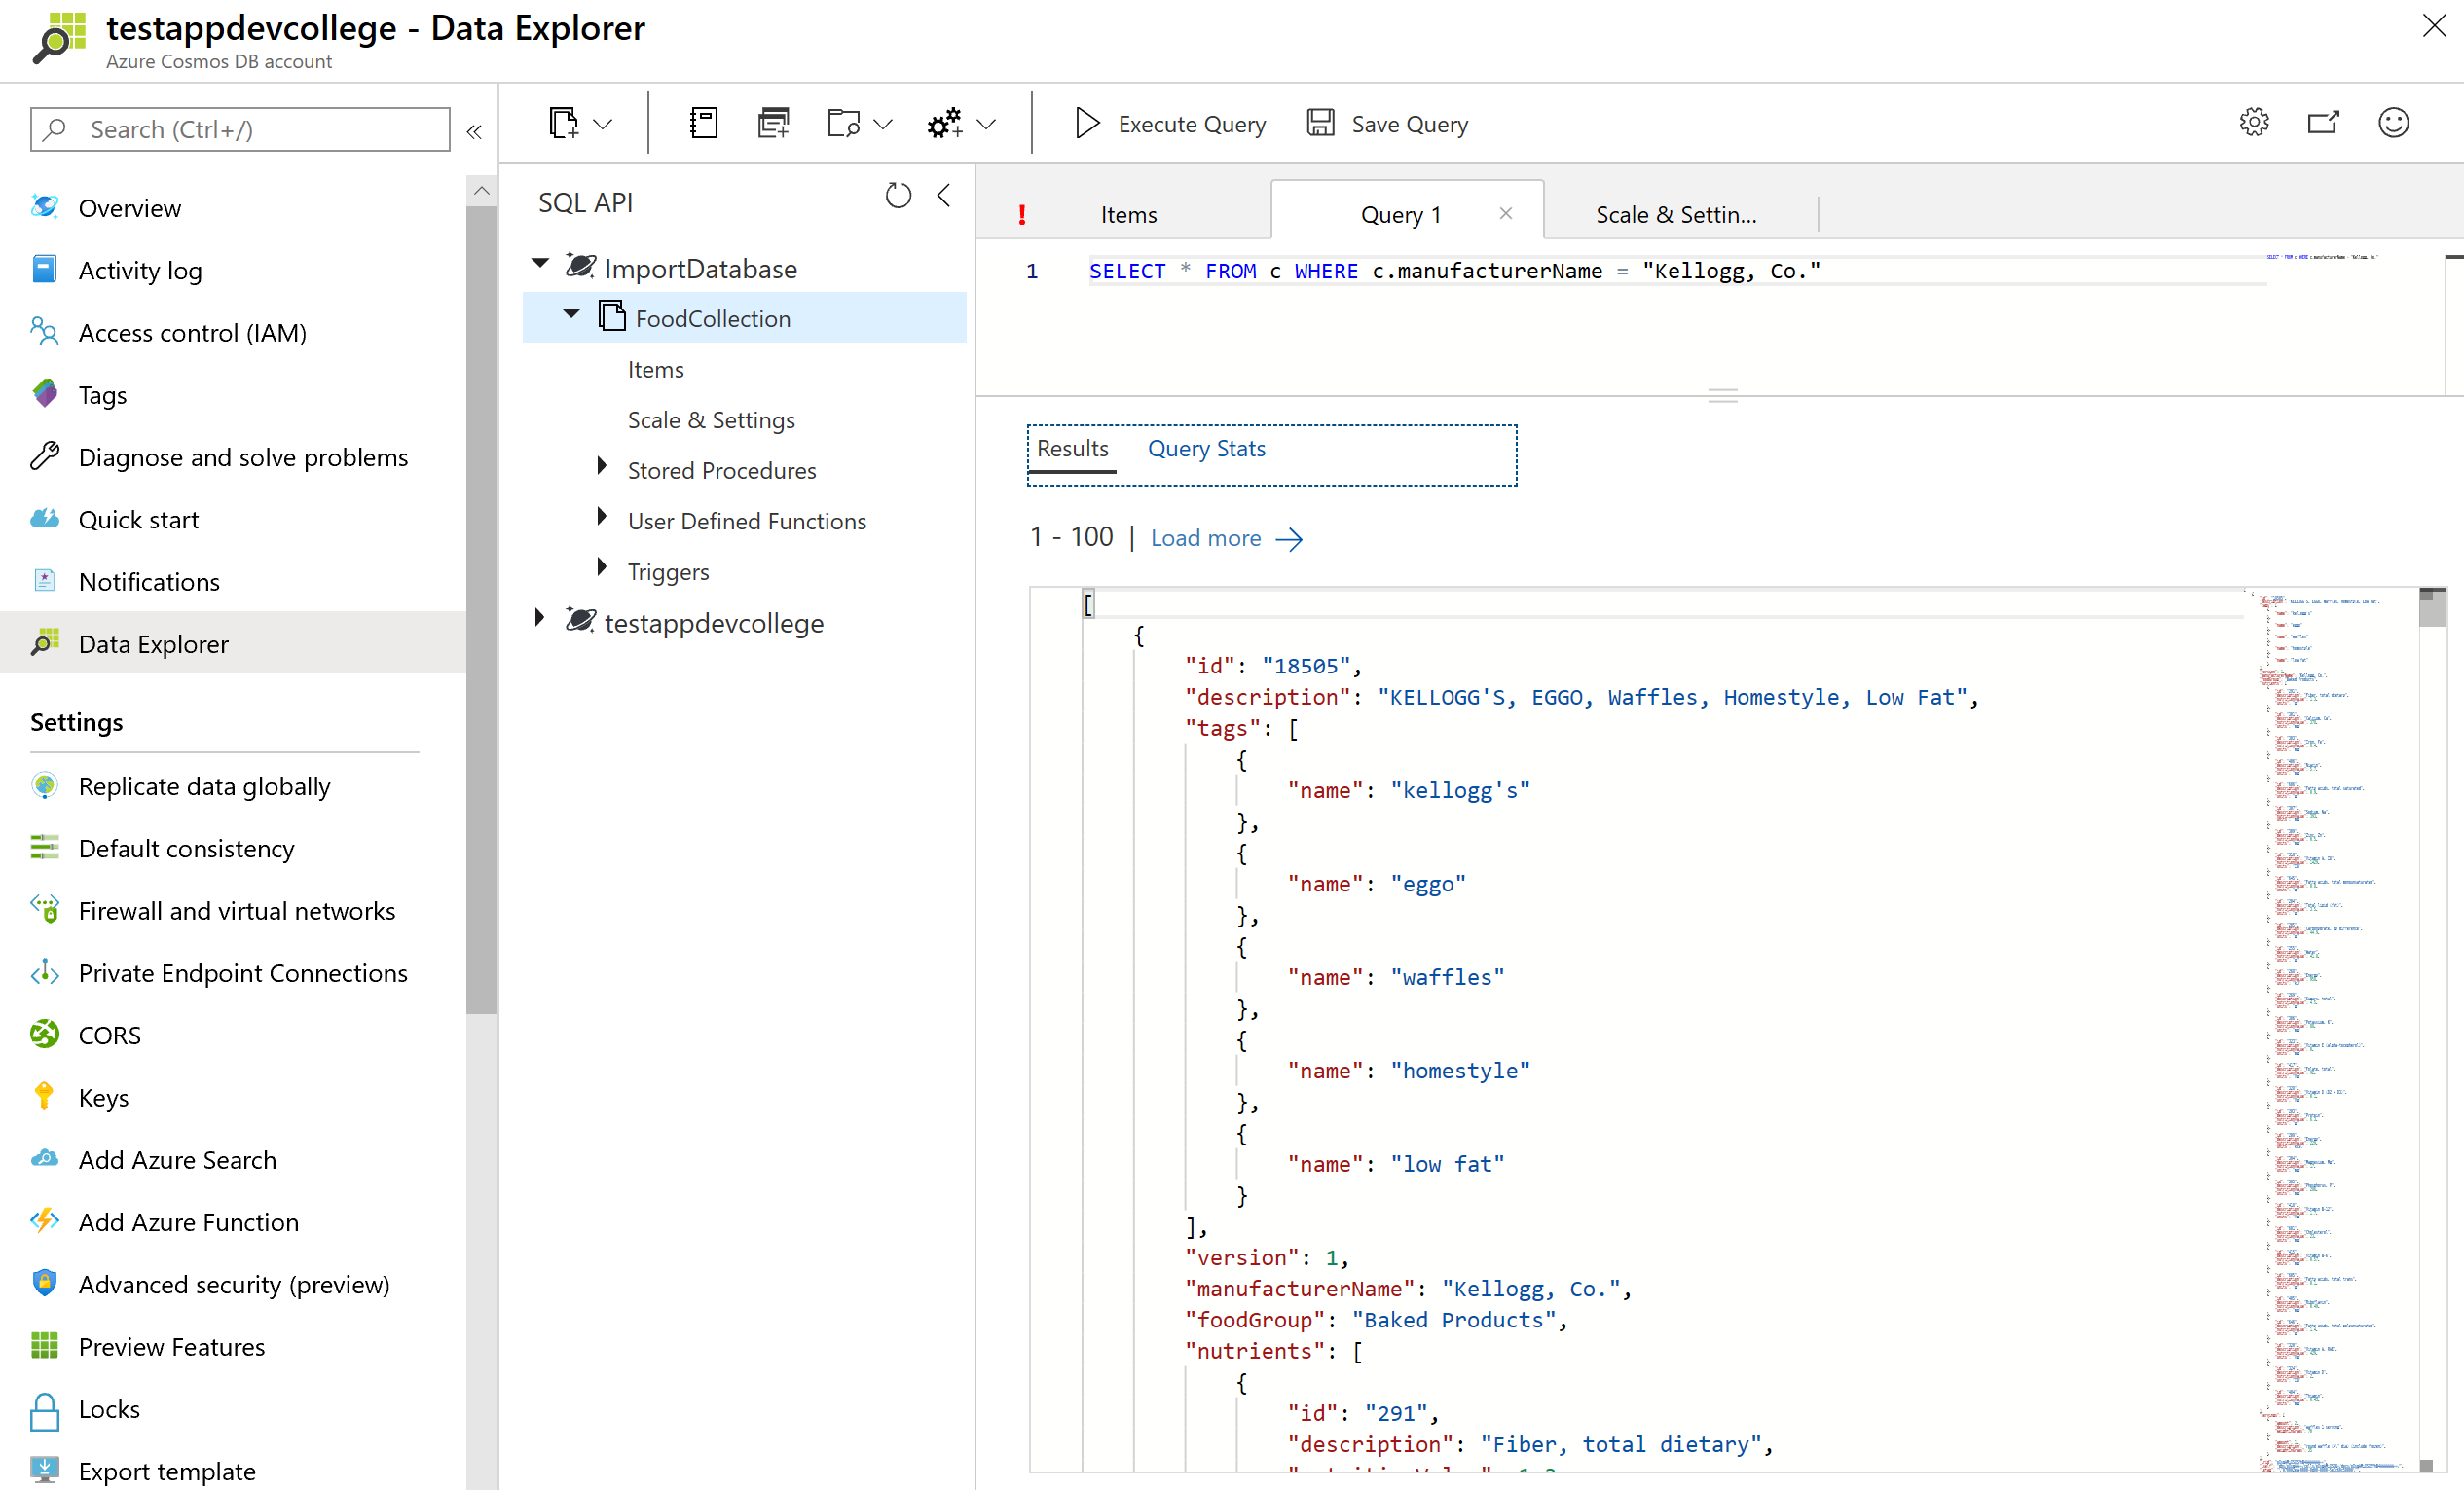
Let's look at the Request Unit Statistics:
Navigate to the Query Stats tab. You should observe that this query still has a low RU charge, even after removing some properties from the index. Because the manufacturerName was the only property used as a filter in the query, it was the only index that was required.
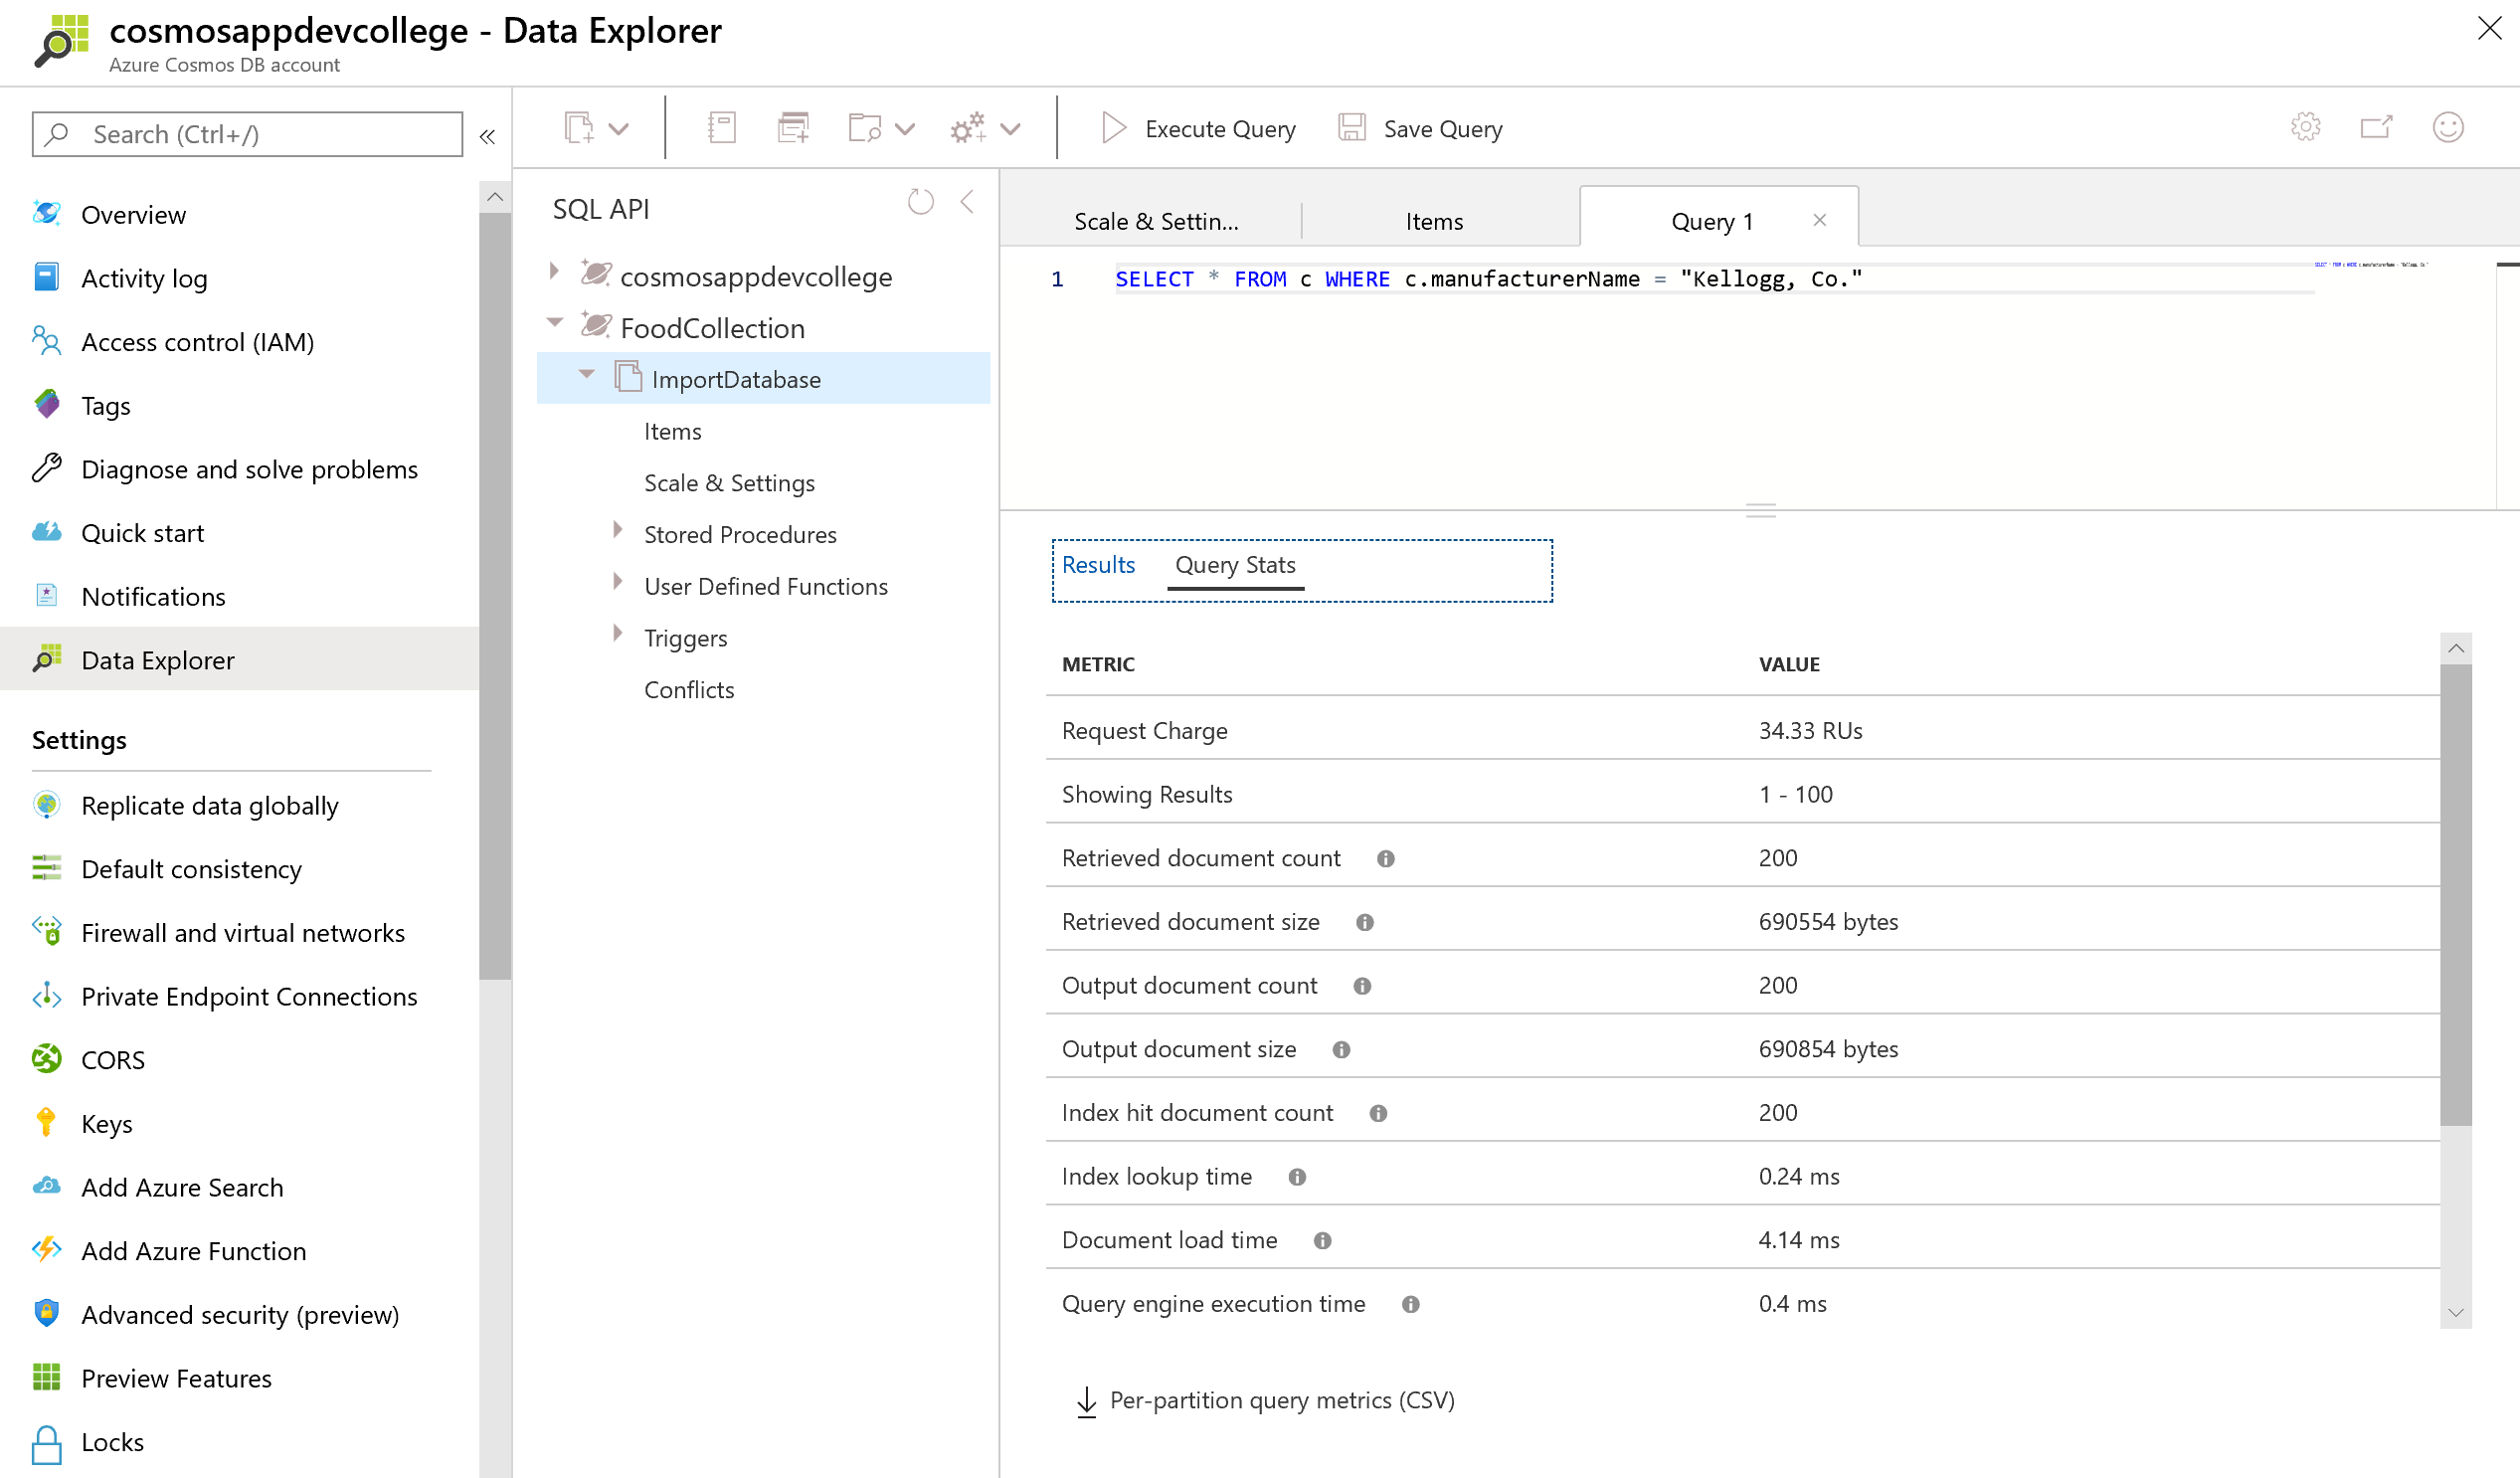
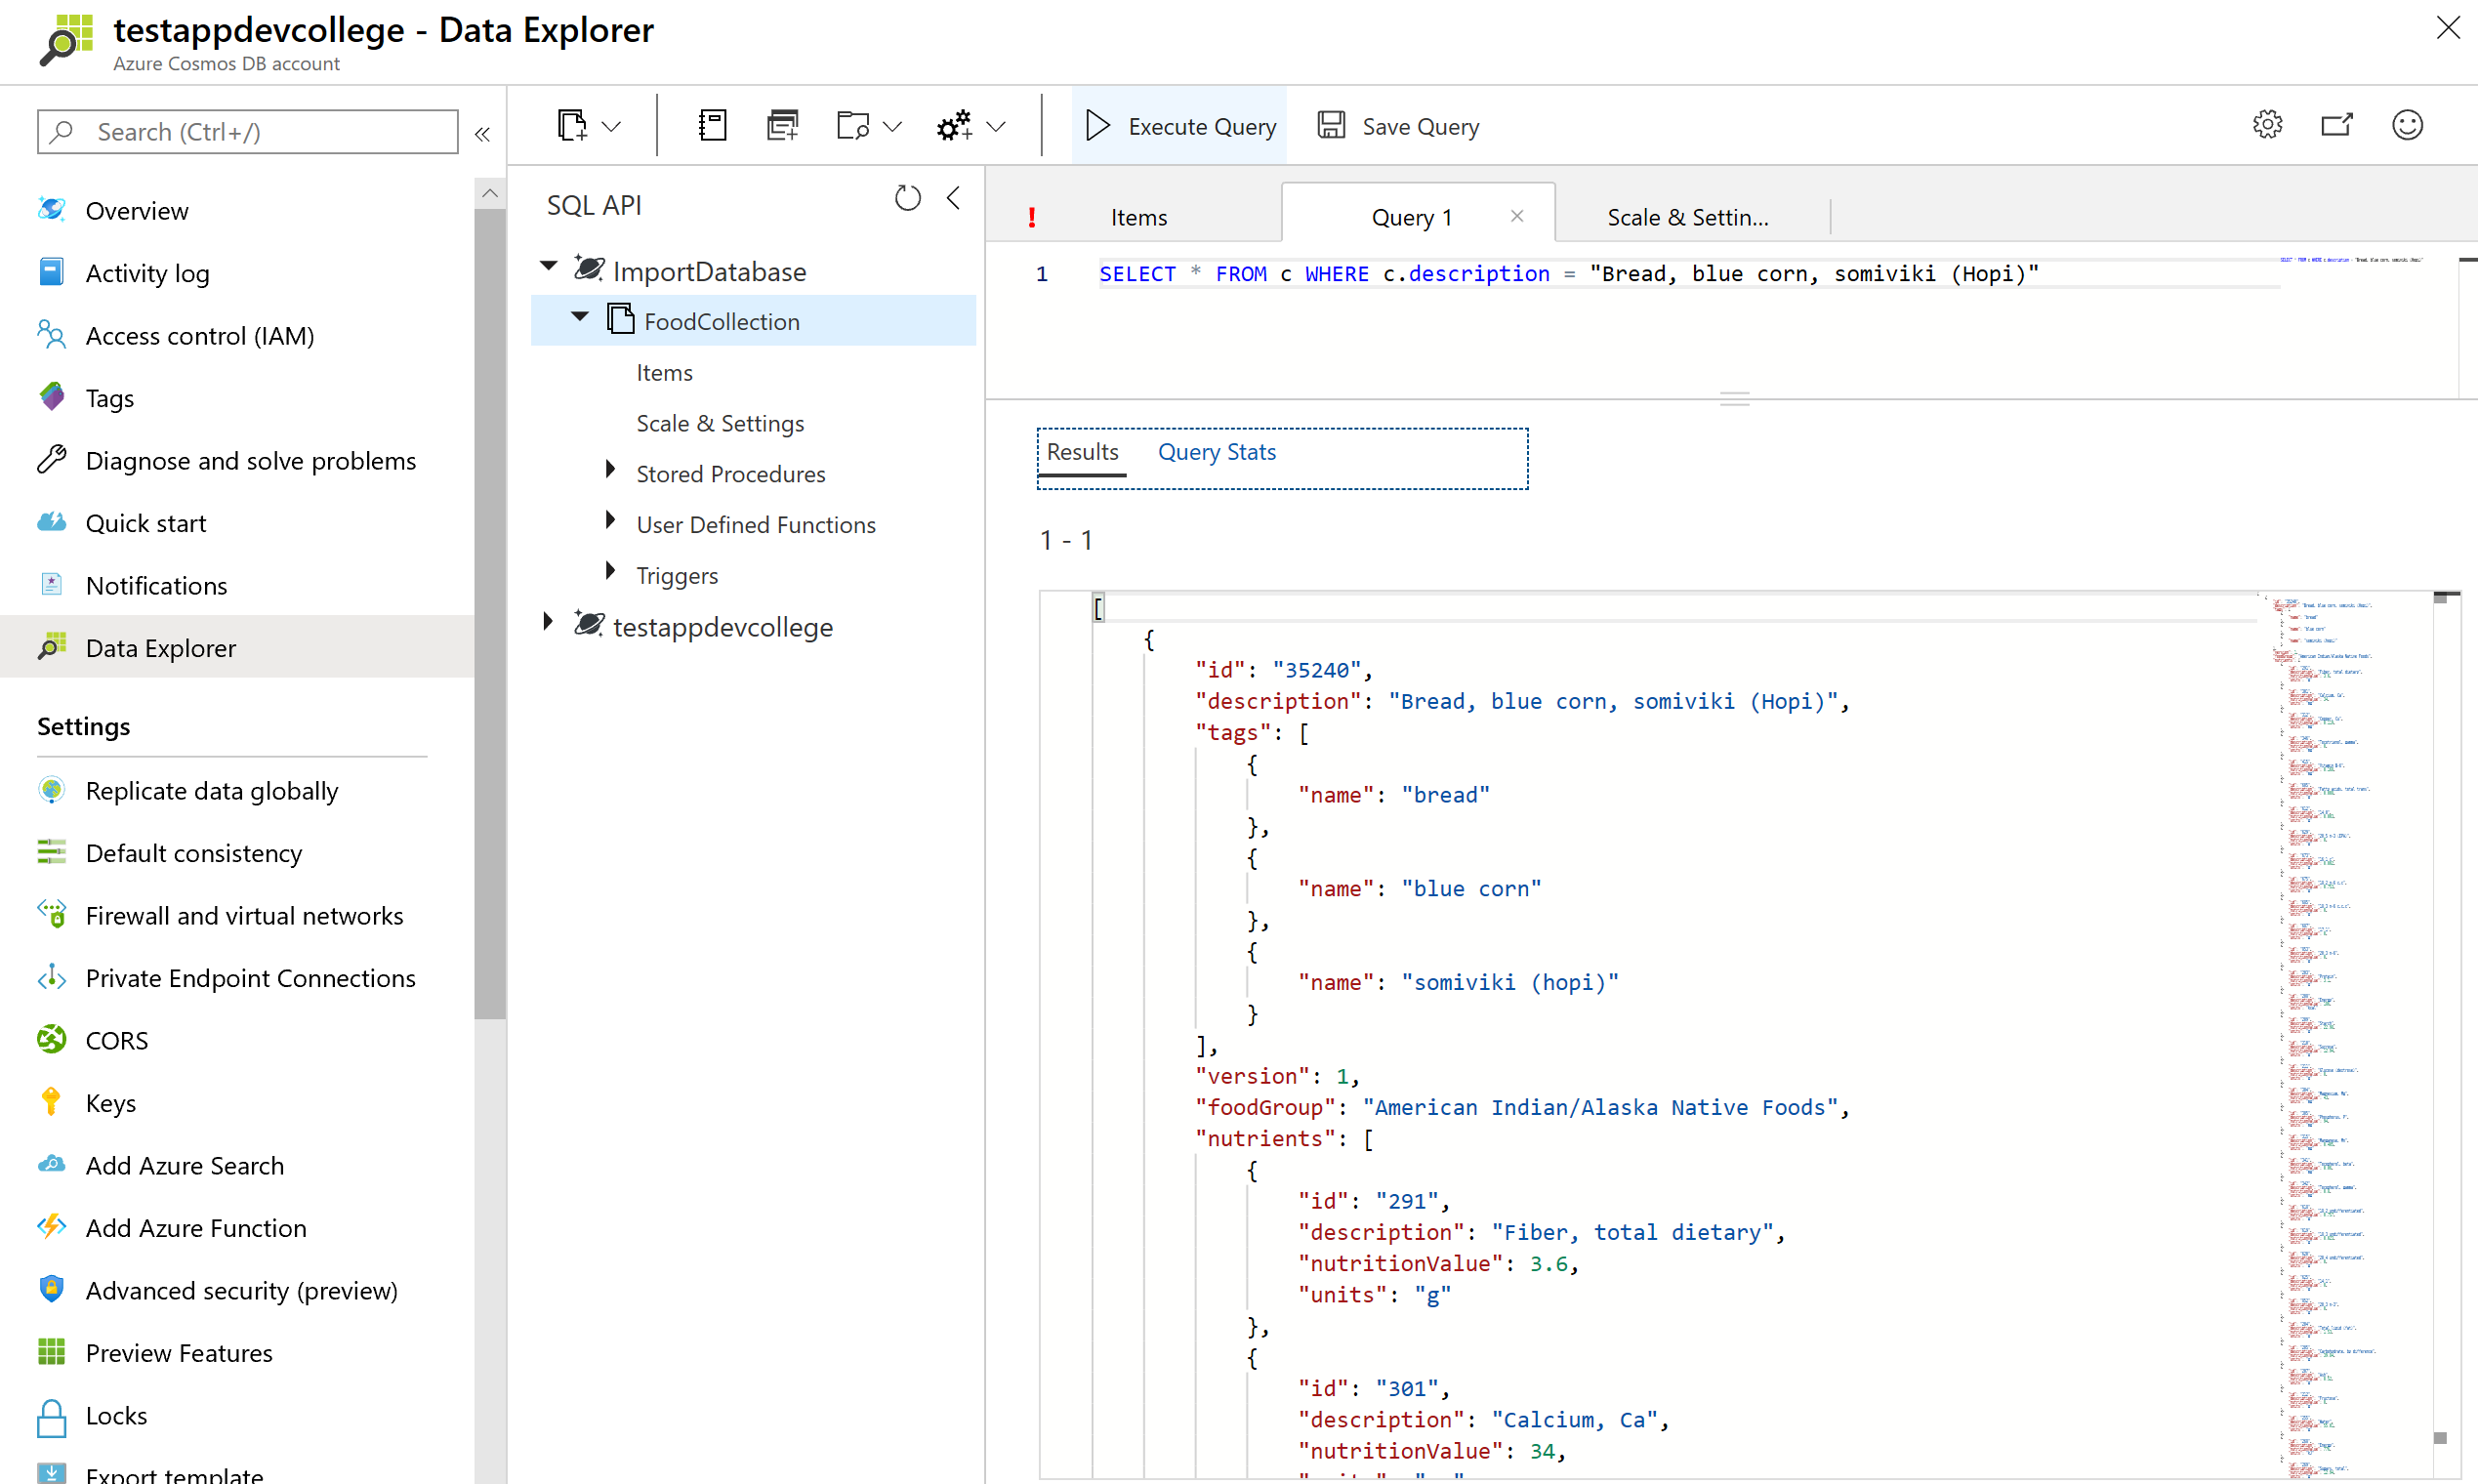
Now, replace the query text with the following and select Execute Query:
SELECT * FROM c WHERE c.description = "Bread, blue corn, somiviki (Hopi)"
Let's compare the Request Unit Statistics:
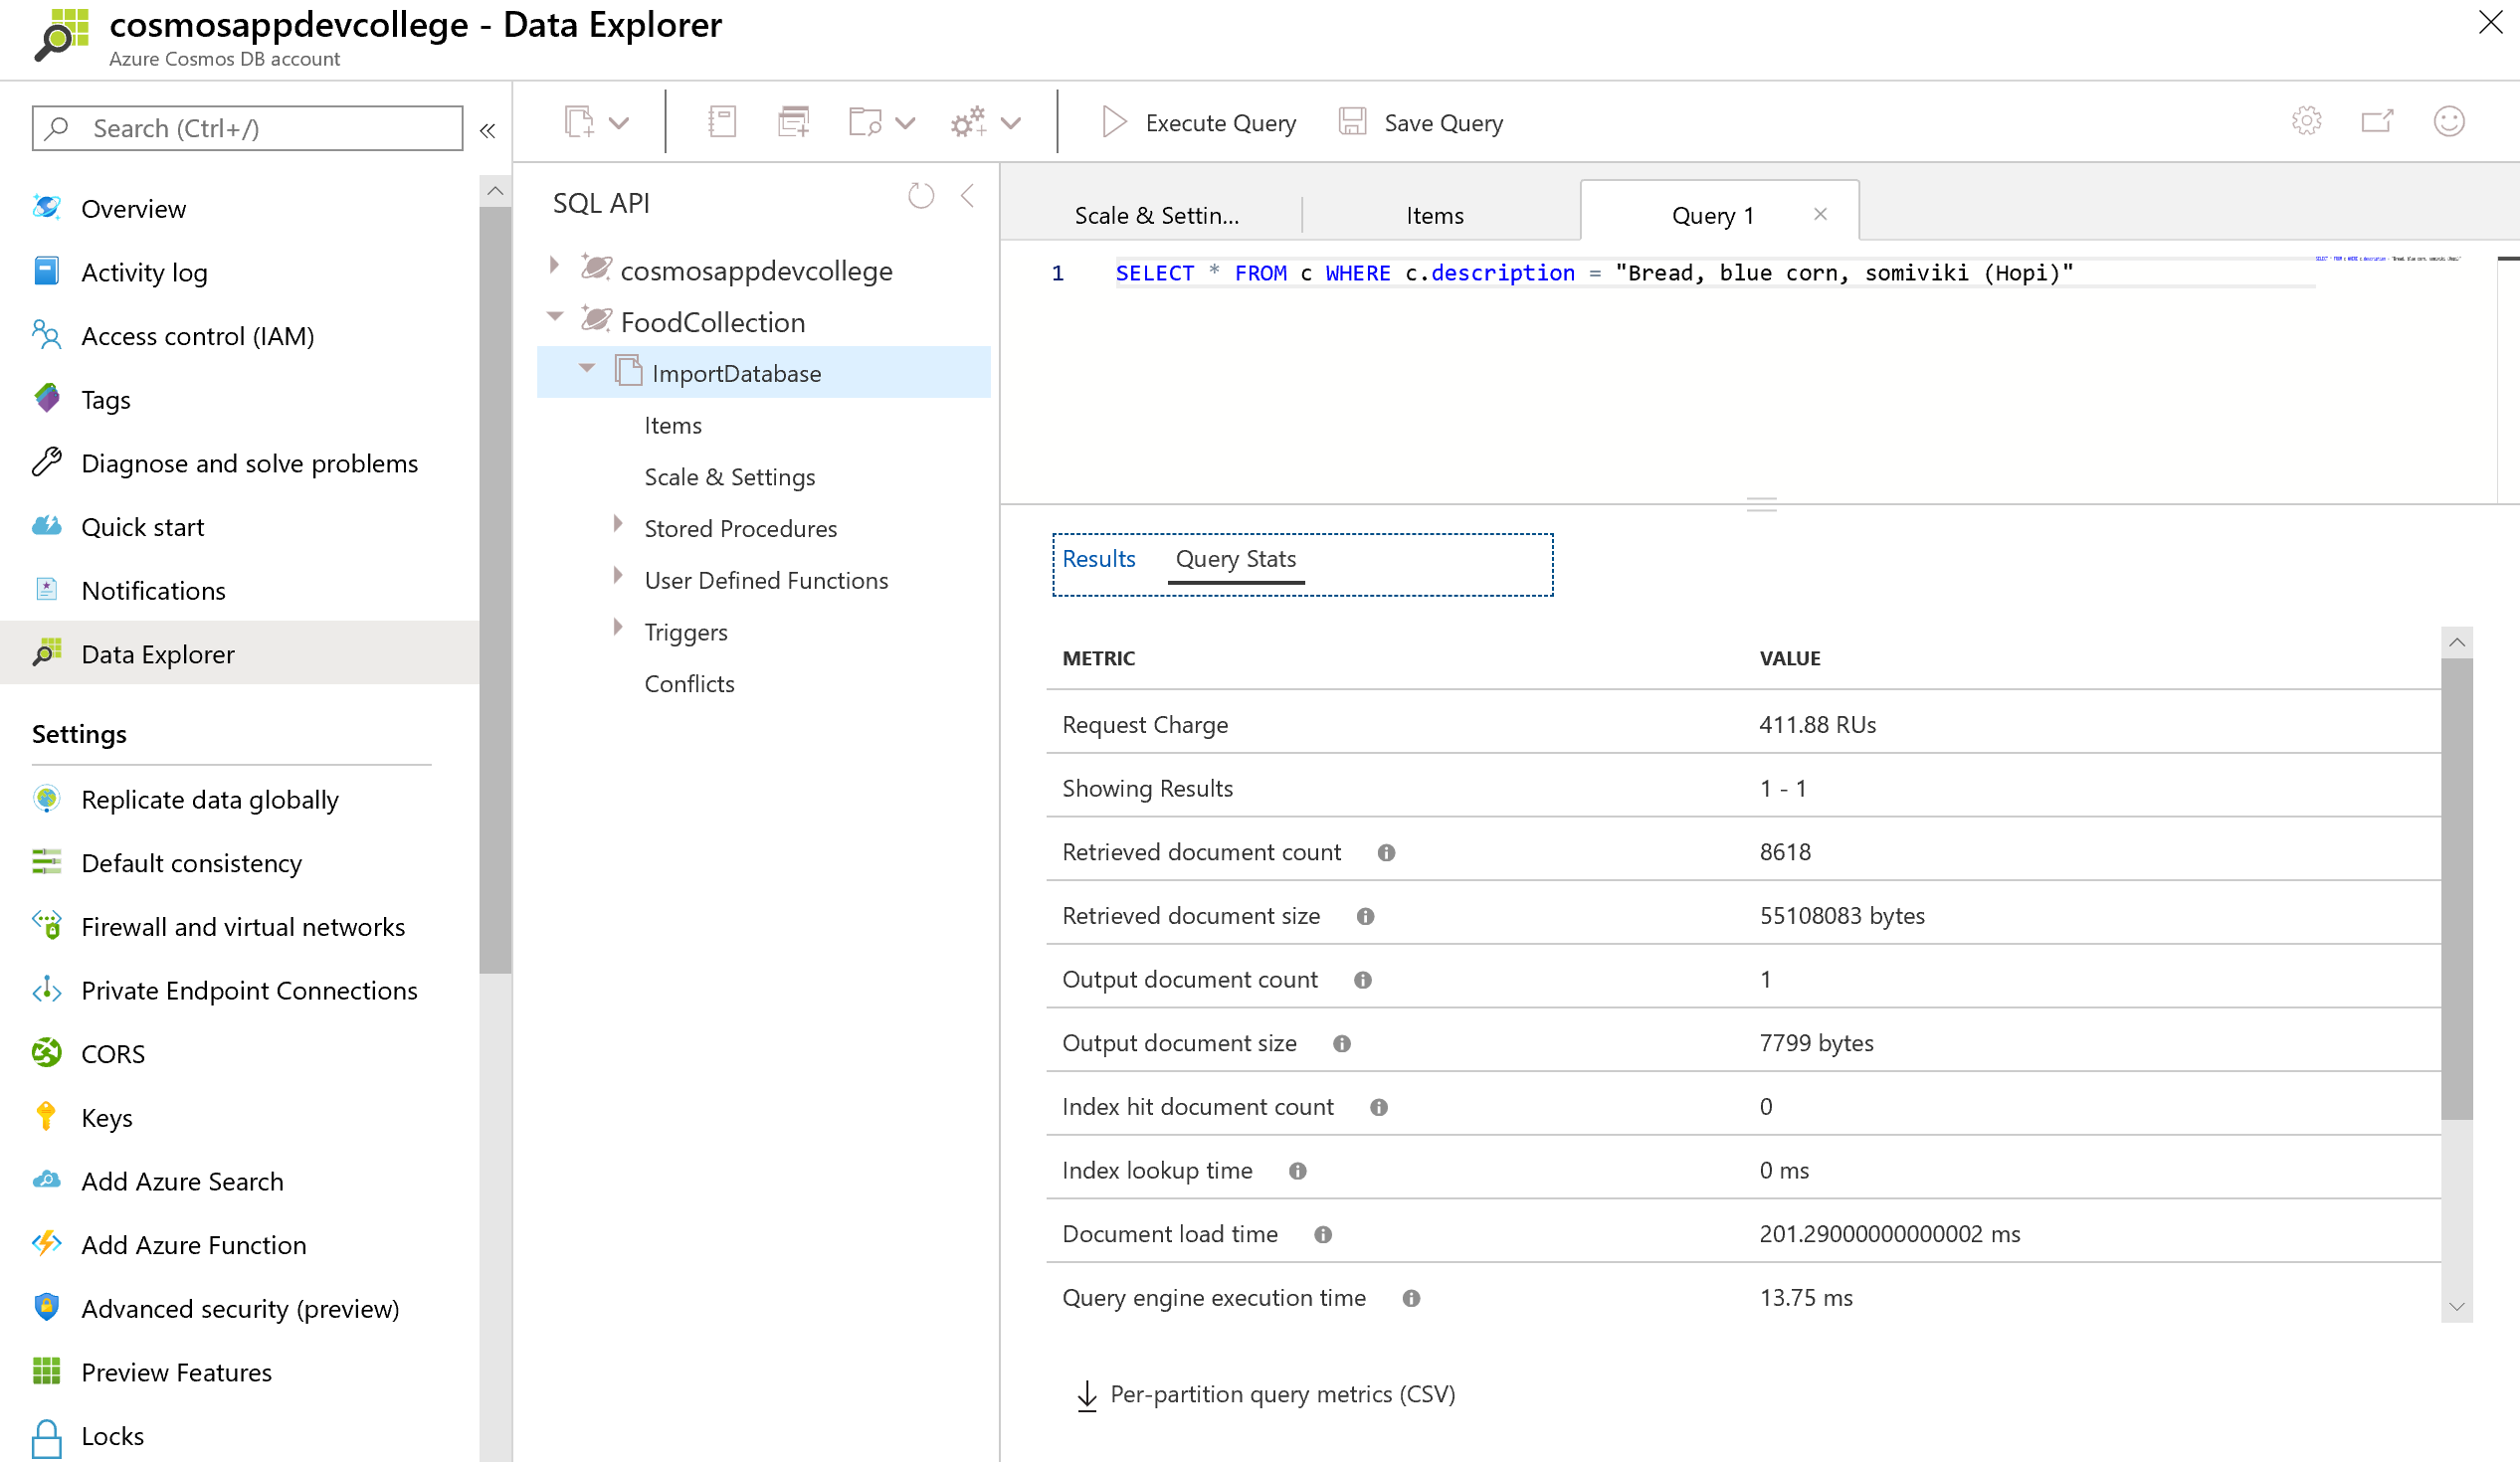
You should observe that this query has a very high RU charge even though only a single document is returned. This is because no range index is currently defined for the description property.
If a query does not use the index, the Index hit document count will be 0. We can see above that the query needed to retrieve 5,187 documents and ultimately ended up only returning 1 document.
# Edit the indexing policy by excluding paths
In addition to manually including certain paths to be indexed, you can exclude specific paths. In many cases, this approach can be simpler since it will allow all new properties in your document to be indexed by default. If there is a property that you are certain you will never use in your queries, you should explicitly exclude this path.
# Cosmos DB Change Feed (optional)
Azure Cosmos DB Change Feed (opens new window)
# Cleanup
Remove the sample resource group:
az group delete -n adc-cosmos-db-rg