# Bonus (optional): Secure Endpoints with SSL Certificates
# Here is what you will learn 🎯
In this optional challenge, you will learn to secure your ingress traffic using TLS (HTTPS). To facilitate the issuance and management of certificates, we will introduce a tool called cert-manager.
The cert-manager is a Kubernetes add-on to automate the management and issuance of TLS certificates from various issuing sources.
It will ensure certificates are valid and up to date periodically, and attempt to renew certificates at an appropriate time before expiry.
# Table Of Contents
- Create a new separate Namespace for the Cert-Manager
- Add the Jetstack Helm Repository
- Install the Cert-Manager Helm Chart
- Add a LetsEncrypt Cluster Issuer
- Update your Frontend Ingress Configuration
- Update your API Ingress Configurations
- Check
# Create a new separate Namespace for the Cert-Manager
To separate the cert-manager from the rest of our resources, let's create a new namespace:
kubectl create namespace cert-manager
# Add the Jetstack Helm Repository
cert-manager comes with a set of different pods and custom resources so we will use helm to install all of it's components in one go.
First, we have to add the official repository from jetstack which contains the cert-manager helm chart via:
helm repo add jetstack https://charts.jetstack.io
helm repo update
We will prepare a small configuration for the helm chart.
Basically we want the Kubernetes Custom Resource Definitions to be installed together with the chart and set some default values in terms of how TLS certificates are issued for our Ingress resources:
# cert-manager-values.yaml
installCRDs: true # install custom resource definitions
ingressShim:
  defaultIssuerKind: ClusterIssuer
  defaultIssuerName: letsencrypt-prod
# Install the Cert-Manager Helm Chart
Now that we have prepared the configuration we can install (or upgrade) cert-manager using a single command:
$ helm upgrade -i -f cert-manager-values.yaml --namespace cert-manager cert-manager jetstack/cert-manager

Release "cert-manager" does not exist. Installing it now.
NAME: cert-manager
LAST DEPLOYED: Tue Nov  3 15:50:17 2020
NAMESPACE: cert-manager
STATUS: deployed
REVISION: 1
TEST SUITE: None
NOTES:
cert-manager has been deployed successfully!

In order to begin issuing certificates, you will need to set up a ClusterIssuer
or Issuer resource (for example, by creating a 'letsencrypt-staging' issuer).

More information on the different types of issuers and how to configure them
can be found in our documentation:

https://cert-manager.io/docs/configuration/

For information on how to configure cert-manager to automatically provision
Certificates for Ingress resources, take a look at the `ingress-shim`
documentation:

https://cert-manager.io/docs/usage/ingress/
If you take a look at the Kubernetes dashboard under the cert-manager namespace you should see a few green deployments showing up after a few seconds:

# Add a LetsEncrypt Cluster Issuer
To make cert-manager fully functional, we'll need to create a so called Issuer. Issuers, as their name suggests, issue TLS certificates for us.
For our sample application, we'll rely on the free service of letsencrypt.org (opens new window).
TIP
📝 Let’s Encrypt is a free, automated and open certificate authority (CA), run for the public’s benefit. It is a service provided by the Internet Security Research Group (ISRG).
To configure Issuers (and manage the state of certificates) cert-manager comes with a set of Custom Resource Definitions (CRDs). CRDs are used to extend the set of existing resources in Kubernetes with custom ones. They are one of the main extension mechanisms of Kubernetes.
cert-manager knows two kinds of Issuers:
Issuer: this is a namespaced resource that is only available for the namespace it is stored in.ClusterIssuer: this is a cluster wide resource that is available for all namespaces.
For our example, we will create a ClusterIssuer since we trust all resources in our cluster.
To define our ClusterIssuer we again use a YAML file that we will apply to our cluster. Let's take a look:
# letsencrypt-prod-cluster-issuer.yaml
apiVersion: cert-manager.io/v1alpha2
kind: ClusterIssuer
metadata:
  name: letsencrypt-prod
spec:
  acme:
    server: https://acme-v02.api.letsencrypt.org/directory
    email: update.your@email.com
    privateKeySecretRef:
      name: letsencrypt-prod
    solvers:
      - http01:
          ingress:
            class: nginx
Don't forget to update your email-address! The email address you provide will be used by Let's Encrypt to notify you of expiring certificates.
Hopefully you will never receive such notification because cert-manager should take care of the certificate renewal process for you.
Let's apply our configuration:
kubectl apply -f letsencrypt-prod-cluster-issuer.yaml
# Update your Frontend Ingress Configuration
Only two things are missing to complete our super secure TLS setup. We need to upgrade our ingress configurations for the frontend and the API(s).
We'll want to add two things each:
- A
kubernetes.io/tls-acme: trueannotation to enable the management of the TLS certificate through cert manager. - A
tlssection in our Ingressspecto define the hostname for the certificate and the name of the Kubernetes secret to store the certificate safely.
Additionally, we also tell NGINX to always redirect unencrypted traffic to use SSL (nginx.ingress.kubernetes.io/ssl-redirect: 'true')
The following shows how your Ingress section for the frontend deployment should look like. Make sure you don't forget to update your domain names. Usually you'll want your TLS host to match the hostname for the ingress rule you have configured:
apiVersion: networking.k8s.io/v1beta1
kind: Ingress
metadata:
  name: ing-frontend
  annotations:
    kubernetes.io/ingress.class: 'nginx'
    nginx.ingress.kubernetes.io/enable-cors: 'true'
    nginx.ingress.kubernetes.io/cors-allow-headers: 'Keep-Alive,User-Agent,X-Requested-With,If-Modified-Since,Cache-Control,Content-Type,Authorization,Accept-Language'
    nginx.ingress.kubernetes.io/cors-max-age: '600'
    nginx.ingress.kubernetes.io/proxy-body-size: '12m'
    kubernetes.io/tls-acme: 'true'
    nginx.ingress.kubernetes.io/ssl-redirect: 'true'
spec:
  tls:
    - hosts:
        - 20-67-122-249.nip.io # this should be replaced with YOUR OWN DOMAIN
      secretName: tls-secret
  rules:
    - host: 20-67-122-249.nip.io # this should be replaced with YOUR OWN DOMAIN
      http:
        paths:
          - path: /
            backend:
              serviceName: frontend
              servicePort: 8080
If you access you website again you'll notice that after a few moments it's already being served through https and that your browser is redirected to the safe endpoint automatically.
# Update your API Ingress Configurations
It's important not to forget to update our Ingress definitions for the other APIs as well. We would not want to deliver the static website client on a secure channel while leaving sensitive information from our APIs in the open.
Just like we did for the frontend, we also add the kubernetes.io/tls-acme: 'true' and nginx.ingress.kubernetes.io/ssl-redirect: 'true' annotations and the tls configuration to the spec section of our other ingress configurations.
Here is the example from the contacts API:
apiVersion: networking.k8s.io/v1beta1
kind: Ingress
metadata:
  name: ing-contacts
  annotations:
    kubernetes.io/ingress.class: 'nginx'
    nginx.ingress.kubernetes.io/enable-cors: 'true'
    nginx.ingress.kubernetes.io/cors-allow-headers: 'Keep-Alive,User-Agent,X-Requested-With,If-Modified-Since,Cache-Control,Content-Type,Authorization,Accept-Language'
    nginx.ingress.kubernetes.io/cors-max-age: '600'
    nginx.ingress.kubernetes.io/proxy-body-size: '12m'
    nginx.ingress.kubernetes.io/rewrite-target: '/contacts/$2'
    nginx.ingress.kubernetes.io/use-regex: 'true'
    kubernetes.io/tls-acme: 'true'
    nginx.ingress.kubernetes.io/ssl-redirect: 'true'
spec:
  tls:
    - hosts:
        - 20-67-122-249.nip.io # this should be replaced with YOUR OWN DOMAIN
      secretName: tls-secret
  rules:
    - host: 20-67-122-249.nip.io # this should be replaced with YOUR OWN DOMAIN
      http:
        paths:
          - path: /api/contacts(\/|$)(.*)
            backend:
              serviceName: contactsapi
              servicePort: 8080
You also need to adjust (and apply) all other ingress definitions, for:
- Search Service
- Visit Reports Service
- Resources Service
# Check
Now let's check if everything connects as expected.
Navigate to you contacts website and use your browsers developer tools to make sure both the initial request to the website, as well as any subsequent request to the contacts API use secure HTTPS endpoints:
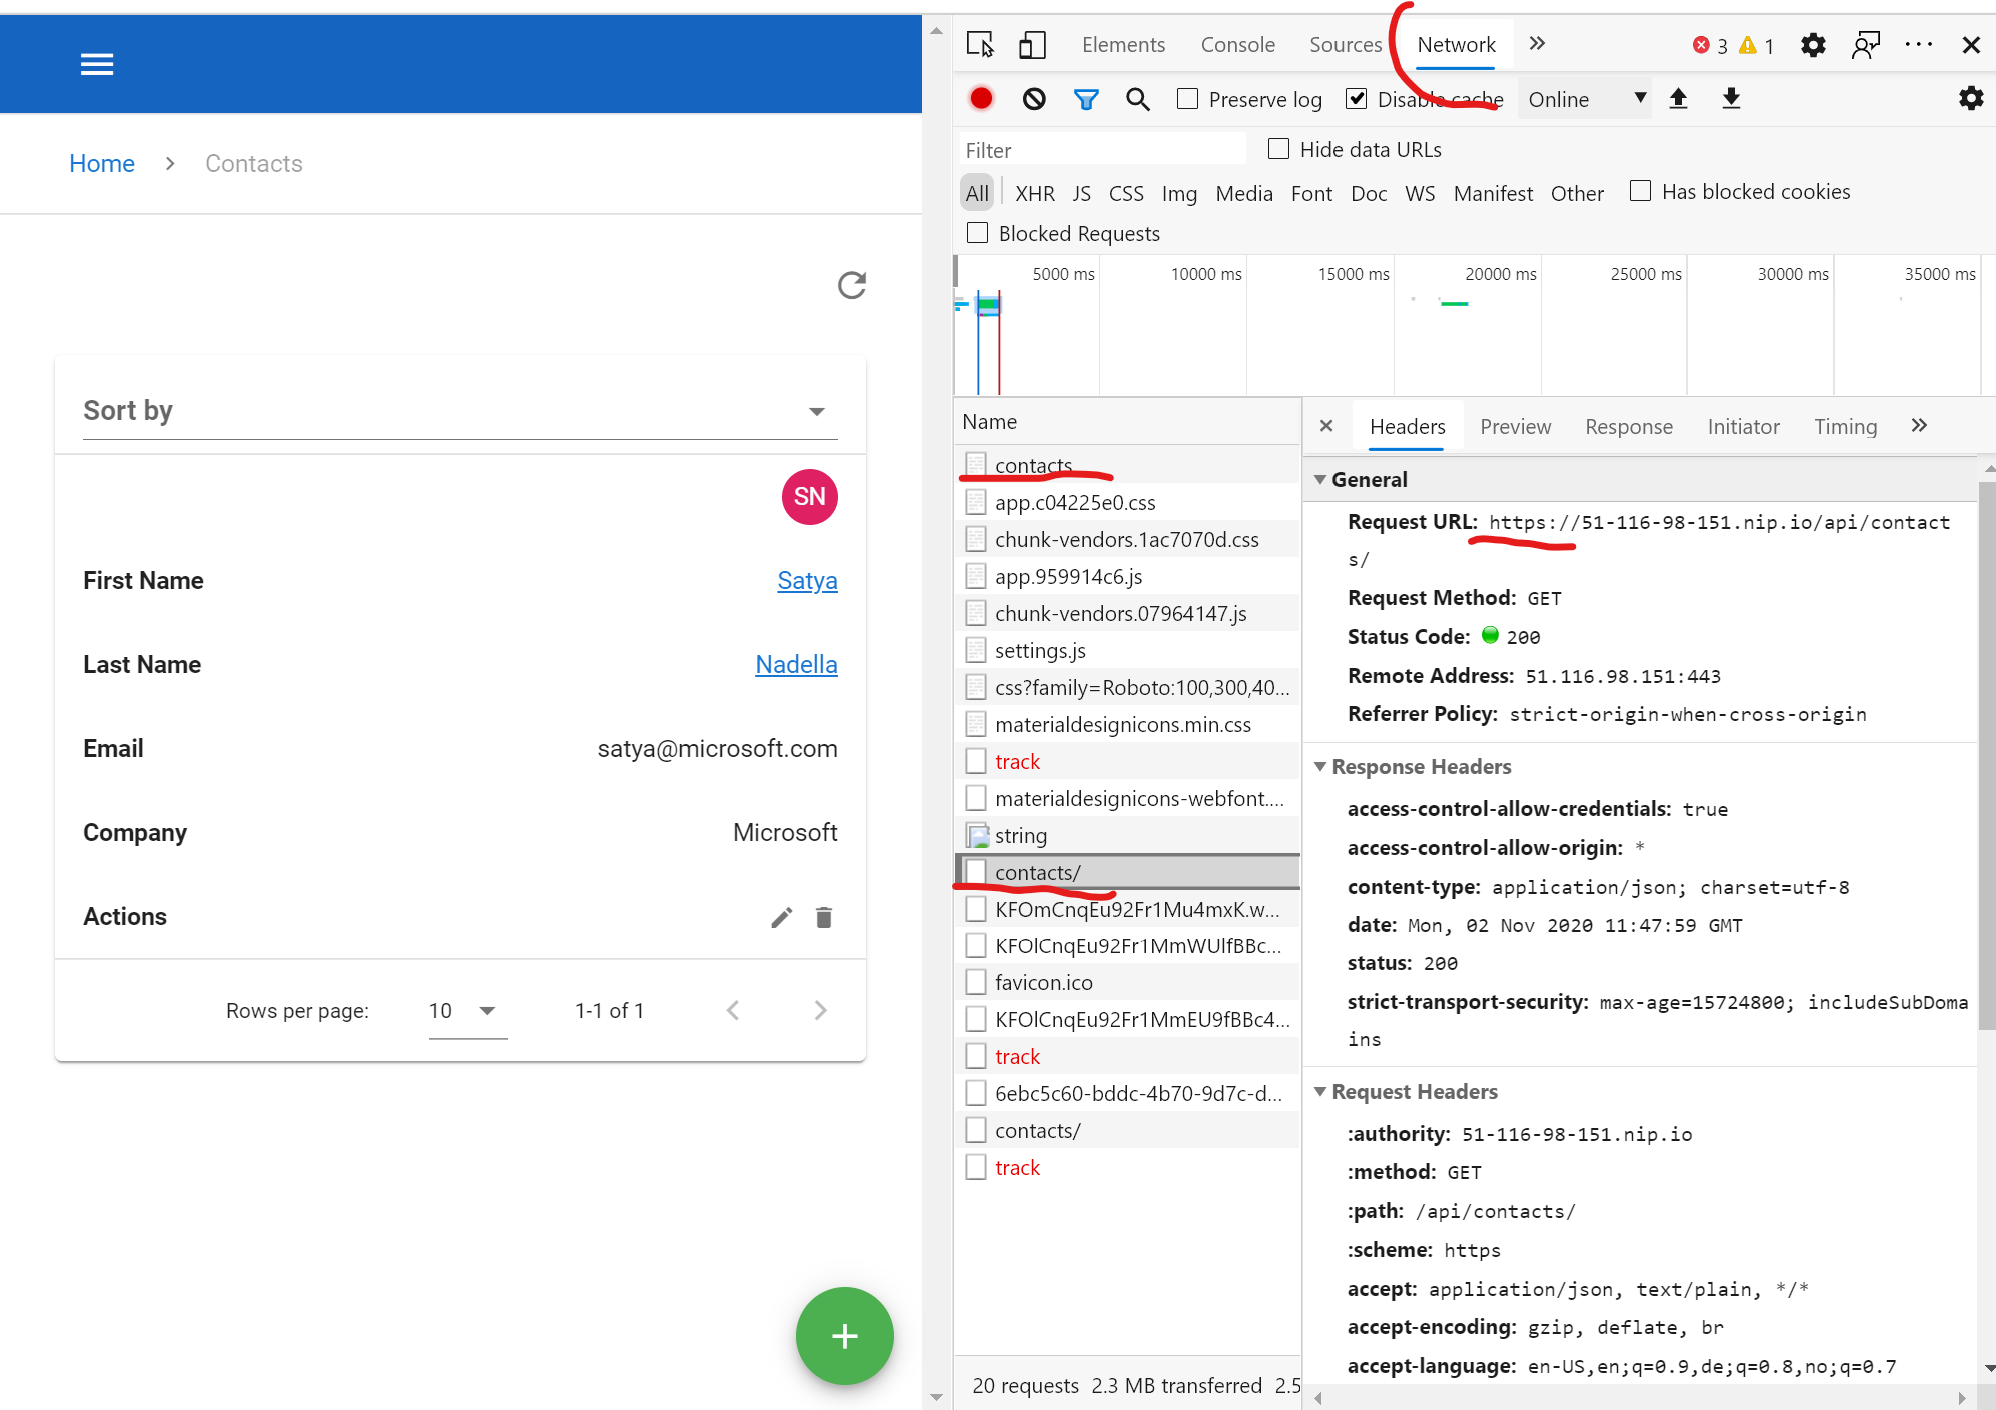
If both requests are being served over HTTPS were good to go!