# Challenge 2: OAuth 2 Implicit Flow
# Here is what you'll learn 🎯
- How to register an Azure AD application and allow the OAuth2 Implicit Grant Flow
- How to register an Azure AD application and expose an API with OAuth2 permissions
- How to authenticate an user and start an OAuth2 implicit flow to acquire an access token for the API
WARNING
The Implicit Grant Flow is less secure than the Code Grant Flow. This is because the generation of the access_token for accessing the user's data on a resource server (e.g., the Graph API), is completely happening on the front channel. However, as the flow completely happens in the browser, it is suited for applications that do not have a server backend (e.g., 100% JS-based SPA).
# Table Of Contents
- Create an Azure AD Application and enable Implicit Grant Flow
- Create an Azure AD Application and expose an API with OAuth2 Permissions
- Run the Token Echo Server
- Create the Request to directly acquire an
access_tokenfor the Microsoft Graph API - Wrap-Up
- Cleanup
# Create an Azure AD Application and enable Implicit Grant Flow
Before you can authenticate an user and acquire an access token for the API you must register an application in your Azure AD tenant. By default the Implicit Grant Flow for issuing access tokens is disabled.
# Azure CLI
First, create a new Azure AD Application, this time with oauth2-allow-implicit-flow enabled:
az ad app create --display-name challengeimplicitgrant --reply-urls http://localhost:5001/api/tokenechofragment --identifier-uris https://challengeimplicitgrantflow --oauth2-allow-implicit-flow true
As before, note down the appId. Next, retrieve and note the ID of your current Azure AD tenant via:
az account show
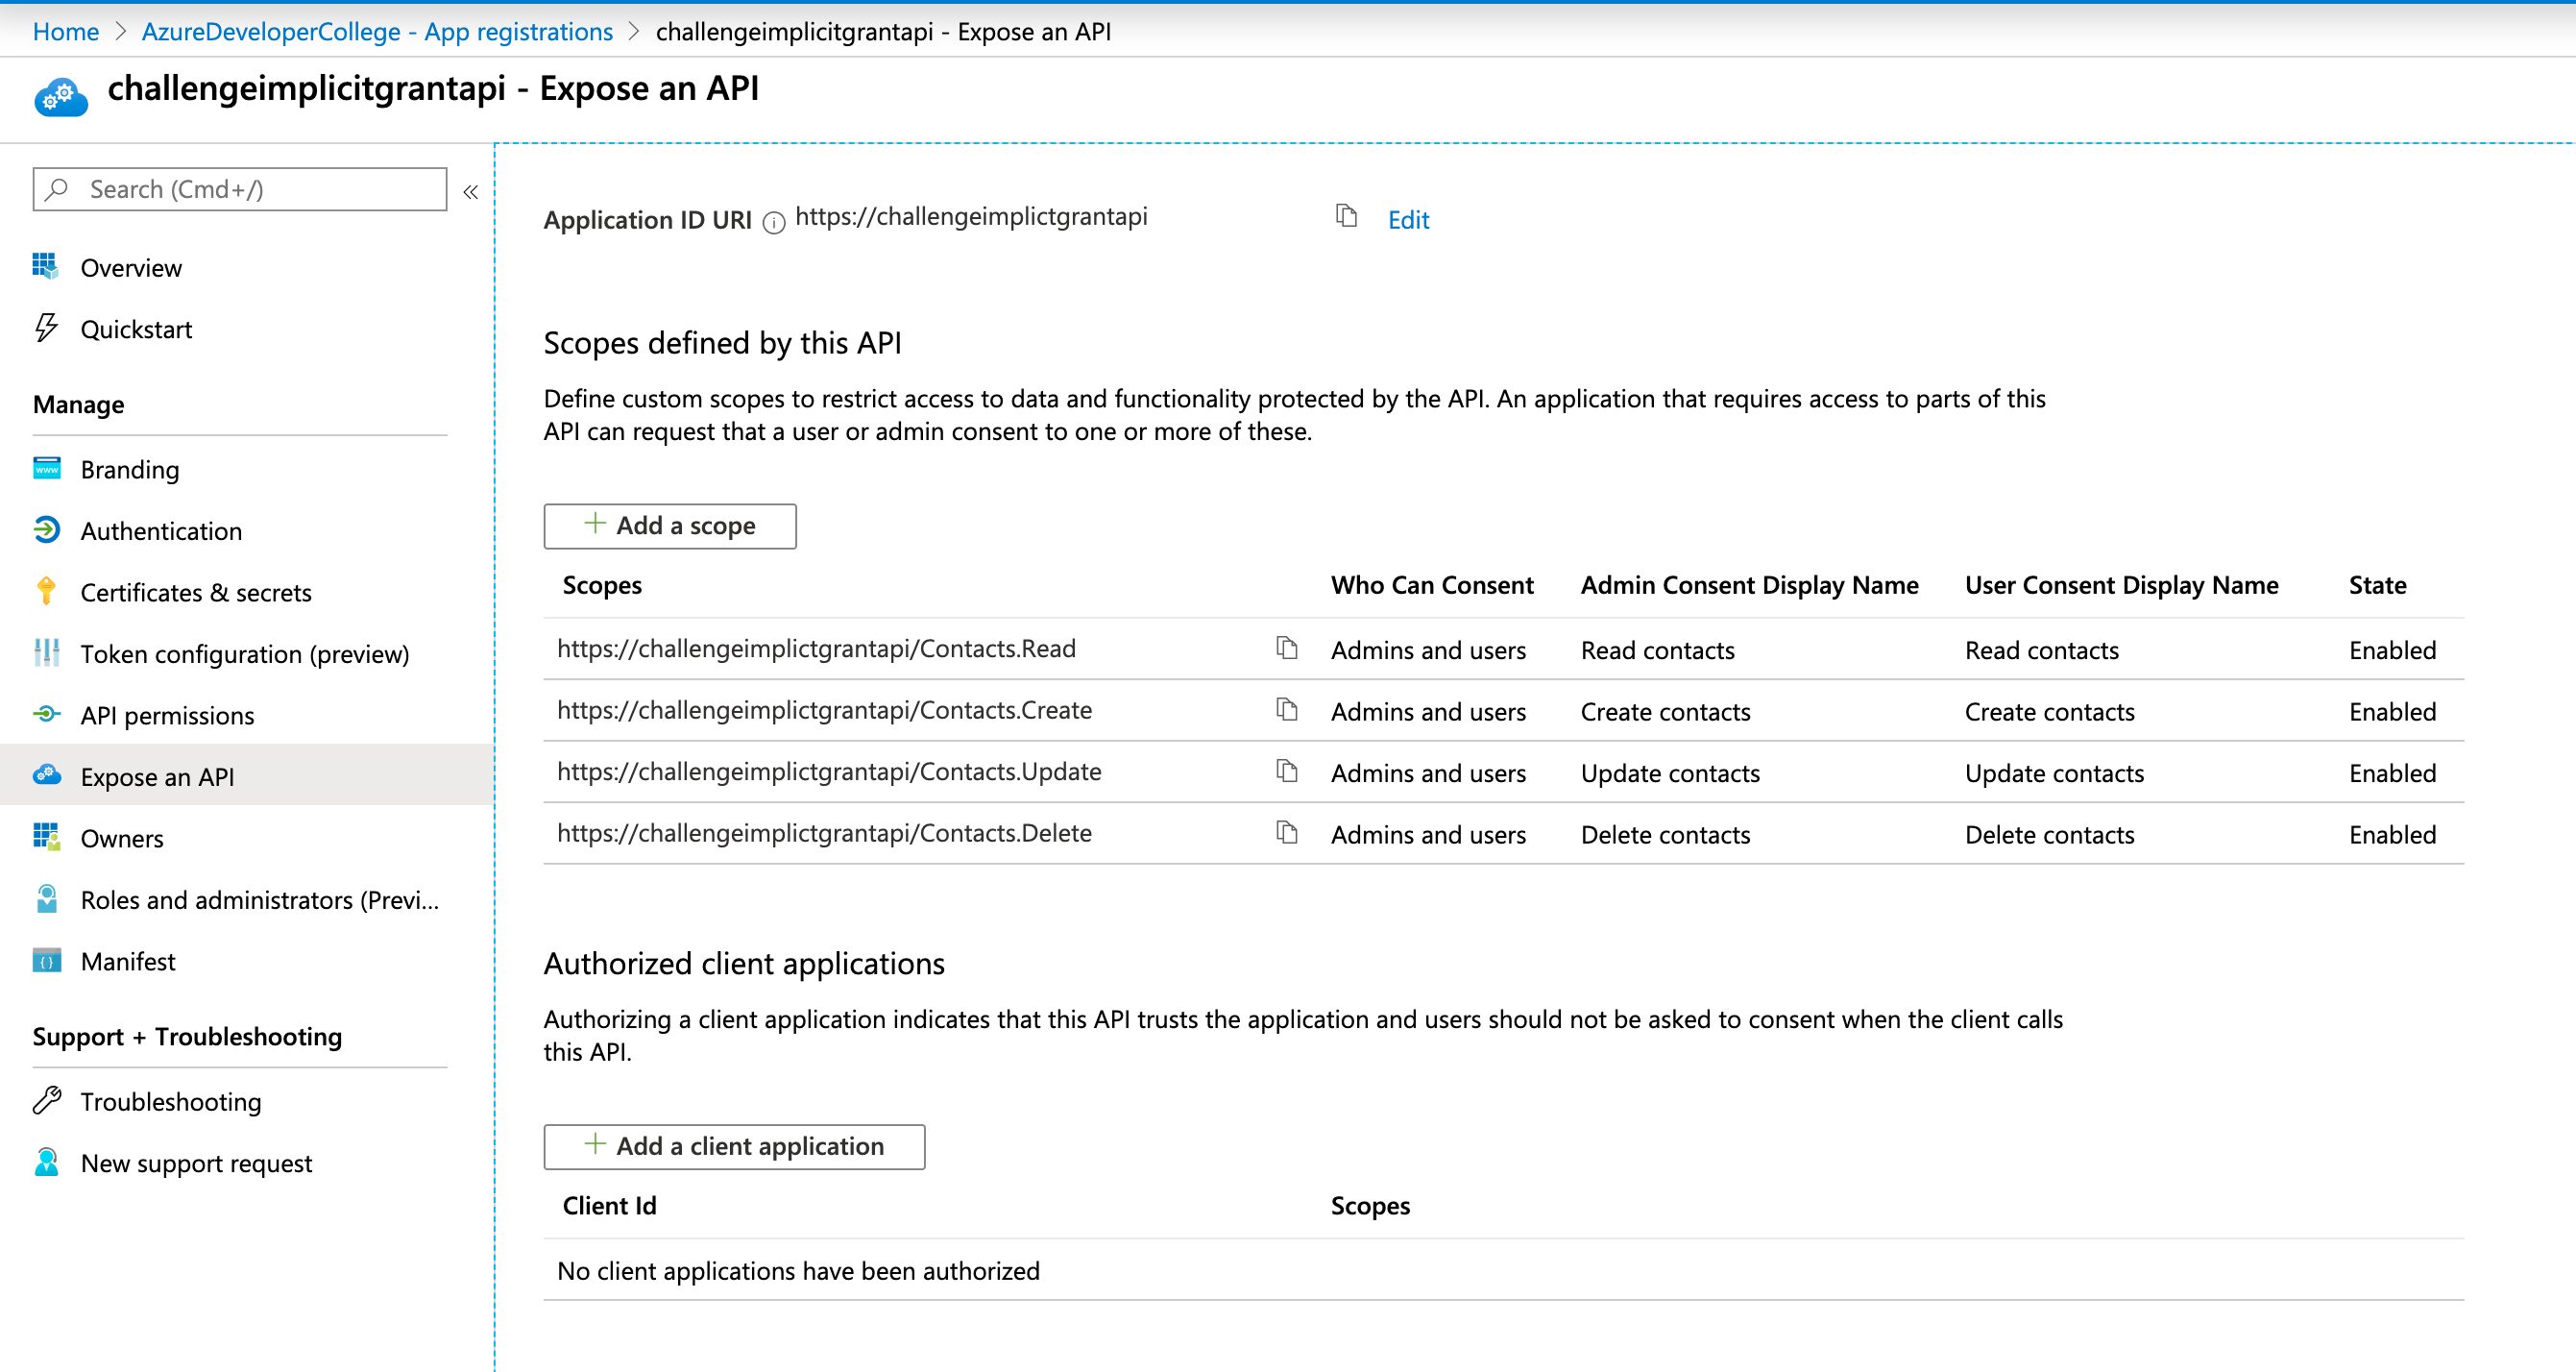
# Create an Azure AD Application and expose an API with OAuth2 Permissions
In this sample we create an API that exposes four OAuth2 permissions:
- Contacts.Read
- Contacts.Create
- Contacts.Update
- Contacts.Delete
# Azure CLI
First, create a new Azure AD application and write the output to a variable:
API_APP=$(az ad app create --display-name challengeimplicitgrantapi --identifier-uris https://challengeimplicitgrantapi)
TIP
📝The example here describes how to execute the commands in a bash. If you don't have a bash on your system, you can use the Azure Cloud Shell
After that we have created an Azure AD application that contains one default OAuth2 permission which was created by Azure AD. To make your own OAuth2 permission, the default permission must be disabled first:
# get the app id
API_APP_ID=$(echo $API_APP | jq -r '.appId')
# disable default exposed scope
DEFAULT_SCOPE=$(az ad app show --id $API_APP_ID | jq '.oauth2Permissions[0].isEnabled = false' | jq -r '.oauth2Permissions')
az ad app update --id $API_APP_ID --set oauth2Permissions="$DEFAULT_SCOPE"
Now your own OAuth2 permissions can be added:
# set needed scopes from file 'ouath2-permissions (day5/challenges/oauth2-permissions)'
az ad app update --id $API_APP_ID --set oauth2Permissions=@oauth2-permissions.json
To keep it simple, the needed OAuth2 permissions are defined in a .json file.
In Azure AD an Application is something like a template with all necessary settings like ReplyUrl, required permissions, OAuth2 Permissions etc. When a user logs in for the first time and grants consent, an instance of the application is created. The instance is called a Service Principal. All created Service principals can be found in your Azure AD under Enterprise Applications. As no user ever logs on to an API we must create the Service Principal for the API.
az ad sp create --id $API_APP_ID
Go to your Azure AD and have a look at the registered application. The permissions look as follow:
# Run the Token Echo Server
Open another shell and run the Token Echo Server from day5/apps/token-echo-server in this repository. This helper ASP.NET Core tool is used to echo the token issued by your AAD. The tool is listening on port 5001 on your local machine. Tokens are accepted on the route http://localhost:5001/api/tokenechofragment. That's the reason why we initially registered an AAD application with a reply url pointing to http://localhost:5001/api/tokenechofragment.
Run the application via:
dotnet run
# Create the Request to directly acquire an access_token for the Microsoft Graph API
We can directly request an access_token by specifying token in the response_type field. Adding token will allow our app to receive an access_token immediately from the authorize endpoint without having to make a second request to the token endpoint. If you use the token in response_type, the scope parameter must contain a scope indicating which resource to issue the token for.
Replace TENANT_ID with your AAD Tenant Id and APPLICATION_ID with your Application Id (this is the id that you received when you created the first application). Open a browser and paste the request:
https://login.microsoftonline.com/TENANT_ID/oauth2/v2.0/authorize?
client_id=APPLICATION_ID
&response_type=id_token+token
&redirect_uri=http%3A%2F%2Flocalhost%3A5001%2Fapi%2Ftokenechofragment
&response_mode=fragment
&scope=openid%20profile%20https%3A%2F%2Fchallengeimplicitgrantapi%2FContacts.Read%20https%3A%2F%2Fchallengeimplicitgrantapi%2FContacts.Create%20https%3A%2F%2Fchallengeimplicitgrantapi%2FContacts.Update%20https%3A%2F%2Fchallengeimplicitgrantapi%2FContacts.Delete
&nonce=1234
After executing the request and you have signed in, Azure AD shows you a consent page and you have to grant access for the requested API permissions.
After giving consent, have a look at your browser's address bar. The access_token is in the fragment of the url and should look something like this:
http://localhost:5001/api/tokenechofragment#access_token=eyJ0eX...&token_type=Bearer&expires_in=3599&scope=openid+profile+User.Read+email&id_token=eyJ0eXAiOi...&session_state=0f76c823-eac5-4ec0-9d4a-edf40b783583
Make sure to only copy the access_token, not the full remainder of the string!
Go to https://jwt.ms (opens new window), paste the token and have a look at the decoded token. You will see that there is issued an additional claim scp. This claim contains all OAuth2Permissions the user gave consent to.
More details on how the OAuth2 Implicit Grant Flow request can be used is documented here (opens new window).
# Wrap-Up
This challenge showed how to create a new application in AAD and use the OAuth 2.0 Implicit Grant Flow to request an access token for accessing the Graph API. The full process is described here (opens new window).
# Cleanup
Remove the created resources via the Azure CLI:
az ad app delete --id <applicationid>
az ad app delete --id $API_APP_ID