# Challenge 0: Prerequisites
To be able to follow all the challenges provided in this workshop, you need a few prerequisites on your machine. This challenge is for setting up your system before the workshop day.
# Docker
It's obvious that it's expected you to have Docker installed on your computer. But installation process is not as seamless as it has to be. Docker publishes different packages for different operating systems. Please follow the section of your operating system below and install related Docker package published for your operating system.
If you can't install any software on your computer due to company policies or other reasons, please spin up an Ubuntu VM on Azure and follow the Linux section below
# Mac Os
Docker Desktop for Mac is available for macOS 10.13 or newer: i.e. High Sierra (10.13), Mojave (10.14) or Catalina (10.15). Mac hardware must be a 2010 or a newer model.
Installation
- Visit "Docker Desktop for Mac" section of the Docker Hub --> https://hub.docker.com/editions/community/docker-ce-desktop-mac/ (opens new window)
- Click Get Docker link on the right side of the page and download Docker.dmg file
- Double-click Docker.dmg to start the install process.
- When the installation completes and Docker starts, the whale in the top status bar shows that Docker is running, and accessible from a terminal.

- After the installation, check if everything works as expected. Open your favourite terminal application and execute the docker version and docker run hello-world commands. If you get the similar outputs as below, it means that your docker installation has been successfully completed.
$ docker version
Client: Docker Engine - Community
 Version:           19.03.8
 API version:       1.40
 Go version:        go1.12.17
 Git commit:        afacb8b7f0
 Built:             Wed Mar 11 01:25:46 2020
 OS/Arch:           linux/amd64
 Experimental:      false

Server: Docker Engine - Community
 Engine:
  Version:          19.03.8
  API version:      1.40 (minimum version 1.12)
  Go version:       go1.12.17
  Git commit:       afacb8b
  Built:            Wed Mar 11 01:29:16 2020
  OS/Arch:          linux/amd64
  Experimental:     false
 containerd:
  Version:          v1.2.13
  GitCommit:        7ad184331fa3e55e52b890ea95e65ba581ae3429
 runc:
  Version:          1.0.0-rc10
  GitCommit:        dc9208a3303feef5b3839f4323d9beb36df0a9dd
 docker-init:
  Version:          0.18.0
  GitCommit:        fec3683
$ docker run hello-world

Hello from Docker!
This message shows that your installation appears to be working correctly.

To generate this message, Docker took the following steps:
 1. The Docker client contacted the Docker daemon.
 2. The Docker daemon pulled the "hello-world" image from the Docker Hub.
    (amd64)
 3. The Docker daemon created a new container from that image which runs the
    executable that produces the output you are currently reading.
 4. The Docker daemon streamed that output to the Docker client, which sent it
    to your terminal.

To try something more ambitious, you can run an Ubuntu container with:
 $ docker run -it ubuntu bash

Share images, automate workflows, and more with a free Docker ID:
 https://hub.docker.com/

For more examples and ideas, visit:
 https://docs.docker.com/get-started/
# Windows 10 Professional & Enterprise
Docker Desktop for Windows is available for Windows 10 Professional & Enterprise editions. Docker Desktop for Windows uses Windows-native Hyper-V virtualization and networking and is the fastest and most reliable way to develop Docker apps on Windows. For all the other versions of Windows please follow the next section below.
Installation
- Visit "Docker Desktop for Windows" section of the Docker Hub --> https://hub.docker.com/editions/community/docker-ce-desktop-windows (opens new window)
- Click Get Docker link on the right side of the page and download Docker for Windows Installer file
- Double-click Docker for Windows Installer to run the installer.
- When the installation finishes, Docker starts automatically. The whale
 in the notification area indicates that Docker is running, and accessible from a terminal.
 - After the installation, check if everything works as expected. Open your Windows Powershell terminal application and execute the docker version and docker run hello-world commands. If you get the similar outputs as below, it means that your docker installation has been successfully completed.
> docker version
Client: Docker Engine - Community
 Version:           19.03.8
 API version:       1.40
 Go version:        go1.12.17
 Git commit:        afacb8b7f0
 Built:             Wed Mar 11 01:25:46 2020
 OS/Arch:           linux/amd64
 Experimental:      false

Server: Docker Engine - Community
 Engine:
  Version:          19.03.8
  API version:      1.40 (minimum version 1.12)
  Go version:       go1.12.17
  Git commit:       afacb8b
  Built:            Wed Mar 11 01:29:16 2020
  OS/Arch:          linux/amd64
  Experimental:     false
 containerd:
  Version:          v1.2.13
  GitCommit:        7ad184331fa3e55e52b890ea95e65ba581ae3429
 runc:
  Version:          1.0.0-rc10
  GitCommit:        dc9208a3303feef5b3839f4323d9beb36df0a9dd
 docker-init:
  Version:          0.18.0
  GitCommit:        fec3683
> docker run hello-world

Hello from Docker!
This message shows that your installation appears to be working correctly.

To generate this message, Docker took the following steps:
 1. The Docker client contacted the Docker daemon.
 2. The Docker daemon pulled the "hello-world" image from the Docker Hub.
    (amd64)
 3. The Docker daemon created a new container from that image which runs the
    executable that produces the output you are currently reading.
 4. The Docker daemon streamed that output to the Docker client, which sent it
    to your terminal.

To try something more ambitious, you can run an Ubuntu container with:
 $ docker run -it ubuntu bash

Share images, automate workflows, and more with a free Docker ID:
 https://hub.docker.com/

For more examples and ideas, visit:
 https://docs.docker.com/get-started/
# Windows 7 - 8 - 10 (Home Edition)
Because the Docker Engine daemon uses Linux-specific kernel features, you can’t run Docker Engine natively on Windows. Instead, you must create and attach to a small Linux VM on your machine. This VM hosts Docker Engine for you on your Windows system. Docker Desktop for Windows that we mentioned one section above uses native hyper-v virtualization technology which you'll be able to get with Windows 10 Professional & Enterprise editions. But Windows 7 - 8 - 10 (Home Edition) don't have hyper-v virtualization technology. That's the reason why you can't install Docker Desktop for Windows on these operating systems.
Instead of that Docker published another tool called Docker Toolbox which uses docker-machine tool, to create and attach to a small Linux VM on these operating system. This VM hosts Docker Engine for you on these systems.
Docker Toolbox includes the following Docker tools:
- Docker CLI client for running Docker Engine to create images and containers
- Docker Machine so you can run Docker Engine commands from Windows terminals
- Docker Compose for running the docker-compose command
- Kitematic, the Docker GUI the Docker QuickStart shell pre-configured for a - Docker command-line environment
- Oracle VM VirtualBox
Prerequisites
- To run Docker, your machine must have a 64-bit operating system. 32-bit operating system must be upgraded to 64-bit versions
- Make sure your Windows system supports Hardware Virtualization Technology and that virtualization is enabled.
For Windows 10 | Run Speccy --> https://www.piriform.com/speccy, and look at the CPU information.
For Windows 8 or 8.1 | Choose Start > Task Manager and navigate to the Performance tab. Under CPU you should see the Virtualization section which must be "Enabled".
For Windows 7 Run Speccy --> https://www.piriform.com/speccyand follow the on-screen instructions.
If virtualization is not enabled on your system, follow the manufacturer’s instructions for enabling it.
Installation
- Visit "docker/toolbox" releases section of the Github Repository --> https://github.com/docker/toolbox/releases (opens new window)
- Click the latest DockerToolbox-xx.xx.x.exe file under the latest releases assets section and download the file.
- Double-click DockerToolbox-xx.xx.x.exe to run the installer.
- The installer launches the Setup - Docker Toolbox dialog. If Windows security dialog prompts you to allow the program to make a change, choose Yes. The system displays the Setup - Docker Toolbox for Windows wizard.
- Press Next to accept all the defaults and then Install. Accept all the installer defaults. The installer takes a few minutes to install all the components:
- Docker Client for Windows
- Docker Compose
- Docker Toolbox management tool and ISO
- Git MSYS-git UNIX tools
- Kitematic, the Docker GUI
- the Docker QuickStart shell pre-configured for a Docker command-line environment
- Oracle VM VirtualBox
When notified by Windows Security the installer will make changes, make sure you allow the installer to make the necessary changes. When it completes, the installer reports it was successful.
The installer adds Docker Toolbox, VirtualBox, and Kitematic to your Applications folder. On your Desktop, find the Docker QuickStart Terminal icon.
Click the Docker QuickStart icon to launch a pre-configured Docker Toolbox terminal. If the system displays a User Account Control prompt to allow VirtualBox to make changes to your computer. Choose Yes. The terminal does several things to set up Docker Toolbox for you. When it is done, the terminal displays the $ prompt. The terminal runs a special bash environment instead of the standard Windows command prompt.
After the installation, check if everything works as expected. On the terminal, execute the docker version and docker run hello-world commands. If you get the similar outputs as below, it means that your docker installation has been successfully completed.
$ docker version
Client: Docker Engine - Community
 Version:           19.03.8
 API version:       1.40
 Go version:        go1.12.17
 Git commit:        afacb8b7f0
 Built:             Wed Mar 11 01:25:46 2020
 OS/Arch:           linux/amd64
 Experimental:      false

Server: Docker Engine - Community
 Engine:
  Version:          19.03.8
  API version:      1.40 (minimum version 1.12)
  Go version:       go1.12.17
  Git commit:       afacb8b
  Built:            Wed Mar 11 01:29:16 2020
  OS/Arch:          linux/amd64
  Experimental:     false
 containerd:
  Version:          v1.2.13
  GitCommit:        7ad184331fa3e55e52b890ea95e65ba581ae3429
 runc:
  Version:          1.0.0-rc10
  GitCommit:        dc9208a3303feef5b3839f4323d9beb36df0a9dd
 docker-init:
  Version:          0.18.0
  GitCommit:        fec3683
$ docker run hello-world

Hello from Docker!
This message shows that your installation appears to be working correctly.

To generate this message, Docker took the following steps:
 1. The Docker client contacted the Docker daemon.
 2. The Docker daemon pulled the "hello-world" image from the Docker Hub.
    (amd64)
 3. The Docker daemon created a new container from that image which runs the
    executable that produces the output you are currently reading.
 4. The Docker daemon streamed that output to the Docker client, which sent it
    to your terminal.

To try something more ambitious, you can run an Ubuntu container with:
 $ docker run -it ubuntu bash

Share images, automate workflows, and more with a free Docker ID:
 https://hub.docker.com/

For more examples and ideas, visit:
 https://docs.docker.com/get-started/
# Linux
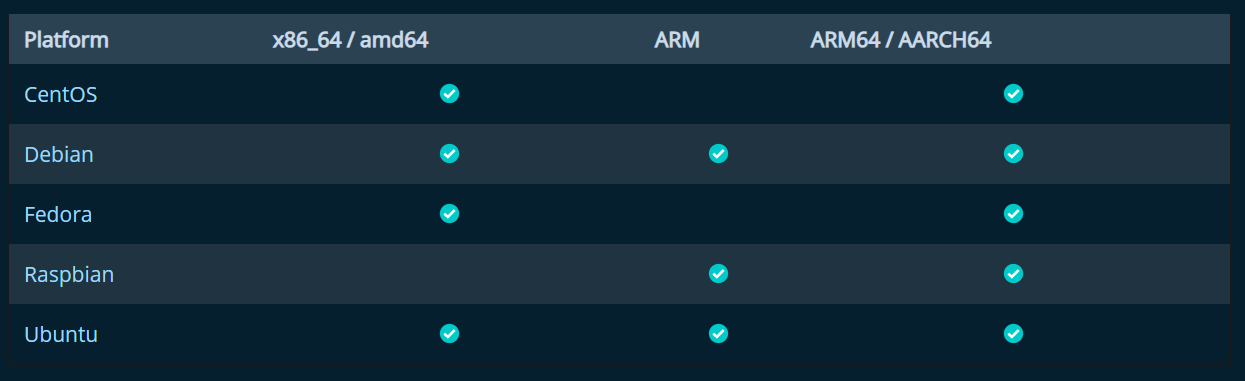
Docker Engine is available on a variety of Linux platforms as a static binary installation. Docker provides .deb and .rpm packages from the following Linux distributions and architectures:
Installation
Follow the instructions below to install Docker on your distro:
- https://docs.docker.com/engine/install/centos/
- https://docs.docker.com/engine/install/debian/
- https://docs.docker.com/engine/install/fedora/
- https://docs.docker.com/engine/install/ubuntu/
Ubuntu:
Open your terminal application and execute the following commands.
- Older versions of Docker were called docker, docker.io, or docker-engine. If these are installed, uninstall them:
$ sudo apt-get remove docker docker-engine docker.io containerd runc
- Download and run the installation script.
$ curl -fsSL https://get.docker.com -o get-docker.sh
$ sudo sh get-docker.sh
- If you would like to use Docker as a non-root user, you should now consider adding your user to the “docker” group with something like:
$ sudo usermod -aG docker your-user
- After the installation, check if everything works as expected. On the terminal, execute the docker version and docker run hello-world commands. If you get the similar outputs as below, it means that your docker installation has been successfully completed.
$ docker version
Client: Docker Engine - Community
 Version:           19.03.8
 API version:       1.40
 Go version:        go1.12.17
 Git commit:        afacb8b7f0
 Built:             Wed Mar 11 01:25:46 2020
 OS/Arch:           linux/amd64
 Experimental:      false

Server: Docker Engine - Community
 Engine:
  Version:          19.03.8
  API version:      1.40 (minimum version 1.12)
  Go version:       go1.12.17
  Git commit:       afacb8b
  Built:            Wed Mar 11 01:29:16 2020
  OS/Arch:          linux/amd64
  Experimental:     false
 containerd:
  Version:          v1.2.13
  GitCommit:        7ad184331fa3e55e52b890ea95e65ba581ae3429
 runc:
  Version:          1.0.0-rc10
  GitCommit:        dc9208a3303feef5b3839f4323d9beb36df0a9dd
 docker-init:
  Version:          0.18.0
  GitCommit:        fec3683
$ docker run hello-world

Hello from Docker!
This message shows that your installation appears to be working correctly.

To generate this message, Docker took the following steps:
 1. The Docker client contacted the Docker daemon.
 2. The Docker daemon pulled the "hello-world" image from the Docker Hub.
    (amd64)
 3. The Docker daemon created a new container from that image which runs the
    executable that produces the output you are currently reading.
 4. The Docker daemon streamed that output to the Docker client, which sent it
    to your terminal.

To try something more ambitious, you can run an Ubuntu container with:
 $ docker run -it ubuntu bash

Share images, automate workflows, and more with a free Docker ID:
 https://hub.docker.com/

For more examples and ideas, visit:
 https://docs.docker.com/get-started/
# Docker Hub
If you didn't sign up yet, we recommend you to sign up and create your Docker ID. This will allow you to create public and private repositories to store your own Docker Images.
- Visit https://hub.docker.com/ (opens new window) and fill the form, click Sign Up button and create your Docker ID.
- Check your mailbox and confirm your account creation.
# Visual Studio Code
To work with all the samples provided in this workshop, you will need an IDE. To target a wide range of developers/architects, we will be using Visual Studio Code as it runs cross-platform.
Therefore, go to https://code.visualstudio.com/docs/setup/setup-overview (opens new window) and install it on your machine.
# Useful Extensions
After the setup is complete, open "Visual Studio" and open the "Extensions" sidebar:

Search and install the following extension:
- Docker for Visual Studio Code https://marketplace.visualstudio.com/items?itemName=ms-azuretools.vscode-docker (opens new window)