# Challenge 01: GitHub project boards
⏲️ Est. time to complete: 20 min. ⏲️
# Here is what you will learn 🎯
In this challenge you will learn how to:
- Create a GitHub project board
- Assign permissions to a team
- Add project administrators
- Working with cards
- Plan milestones (sprints)
- Use GitHub labels to classify issues and pull requests
- See how issues and pull requests flow automatically through the different board's columns
# Table of content
- Create a GitHub project board
- Assign permissions to a team
- Add project Administrators
- Working with cards
- Use GitHub labels to classify issues and pull requests
- See how issues and pull requests flow automatically through the different board's columns
- Plan your work for day4
- Summary and outlook
# Create a GitHub project board
Project boards on GitHub help you organize and prioritize your work. You can create project boards for specific feature work, comprehensive roadmaps or even release checklists. With project boards, you have the flexibility to create customized workflows that suit your needs.
To organize and prioritize your work, we are going to create a project board at the organizational level. Of course it's possible to create a board on repository level, but as we will create more repositories during the day and we want to visualize our work across all repositories, we create a board on organization level. GitHub provides different templates for a project board. Today, we use the template Automated Kanban. With this template, we get a simple board with three columns:
- To do, for cards that represent future work
- In progress, to display cards we are currently working on
- Done, cards we have completed
Let us create the project board. Navigate to the Project section of your organization and create a new project. Name the project AzDC-Day4-Project and give it a description.
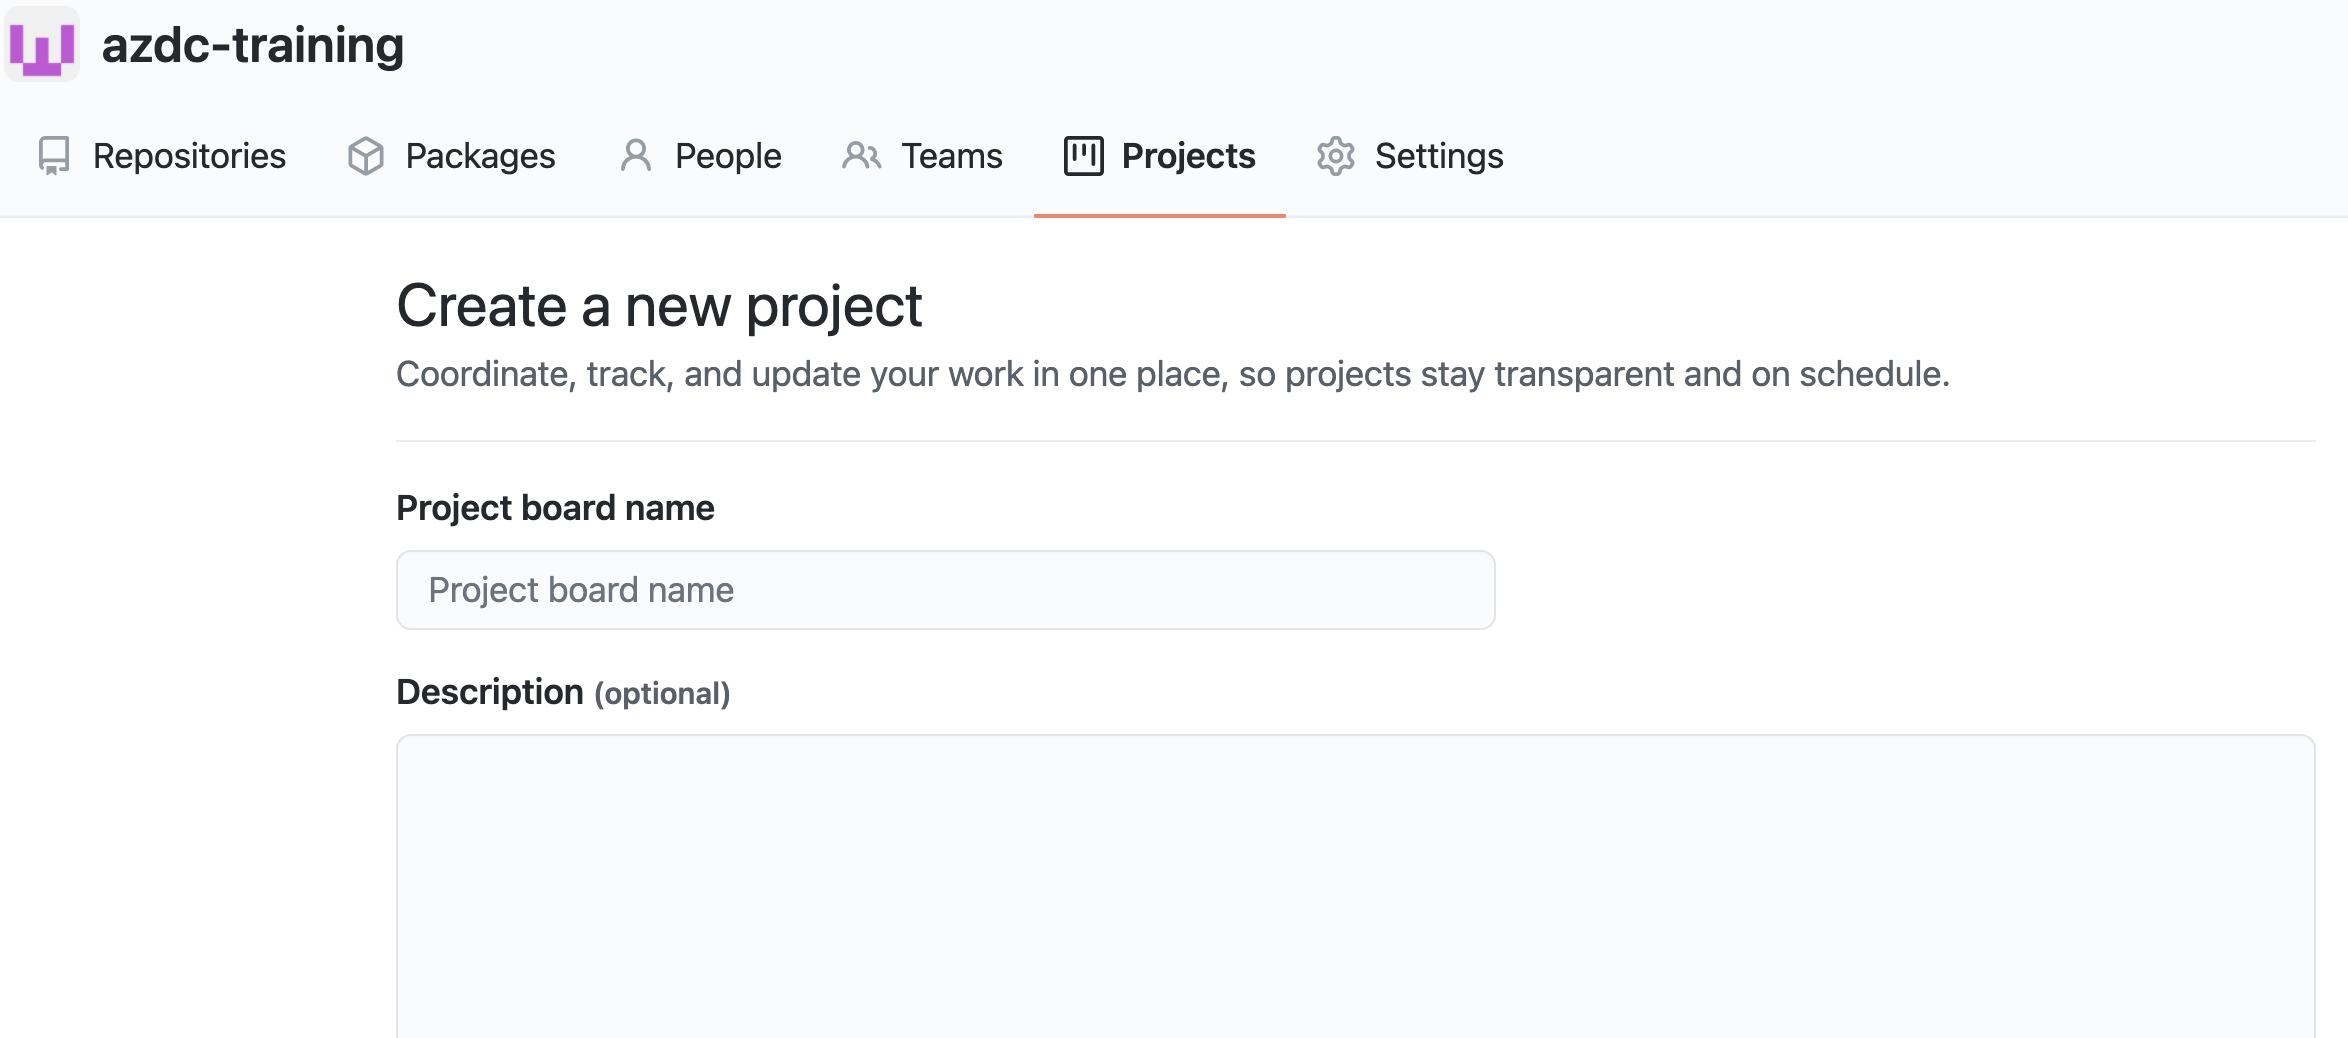
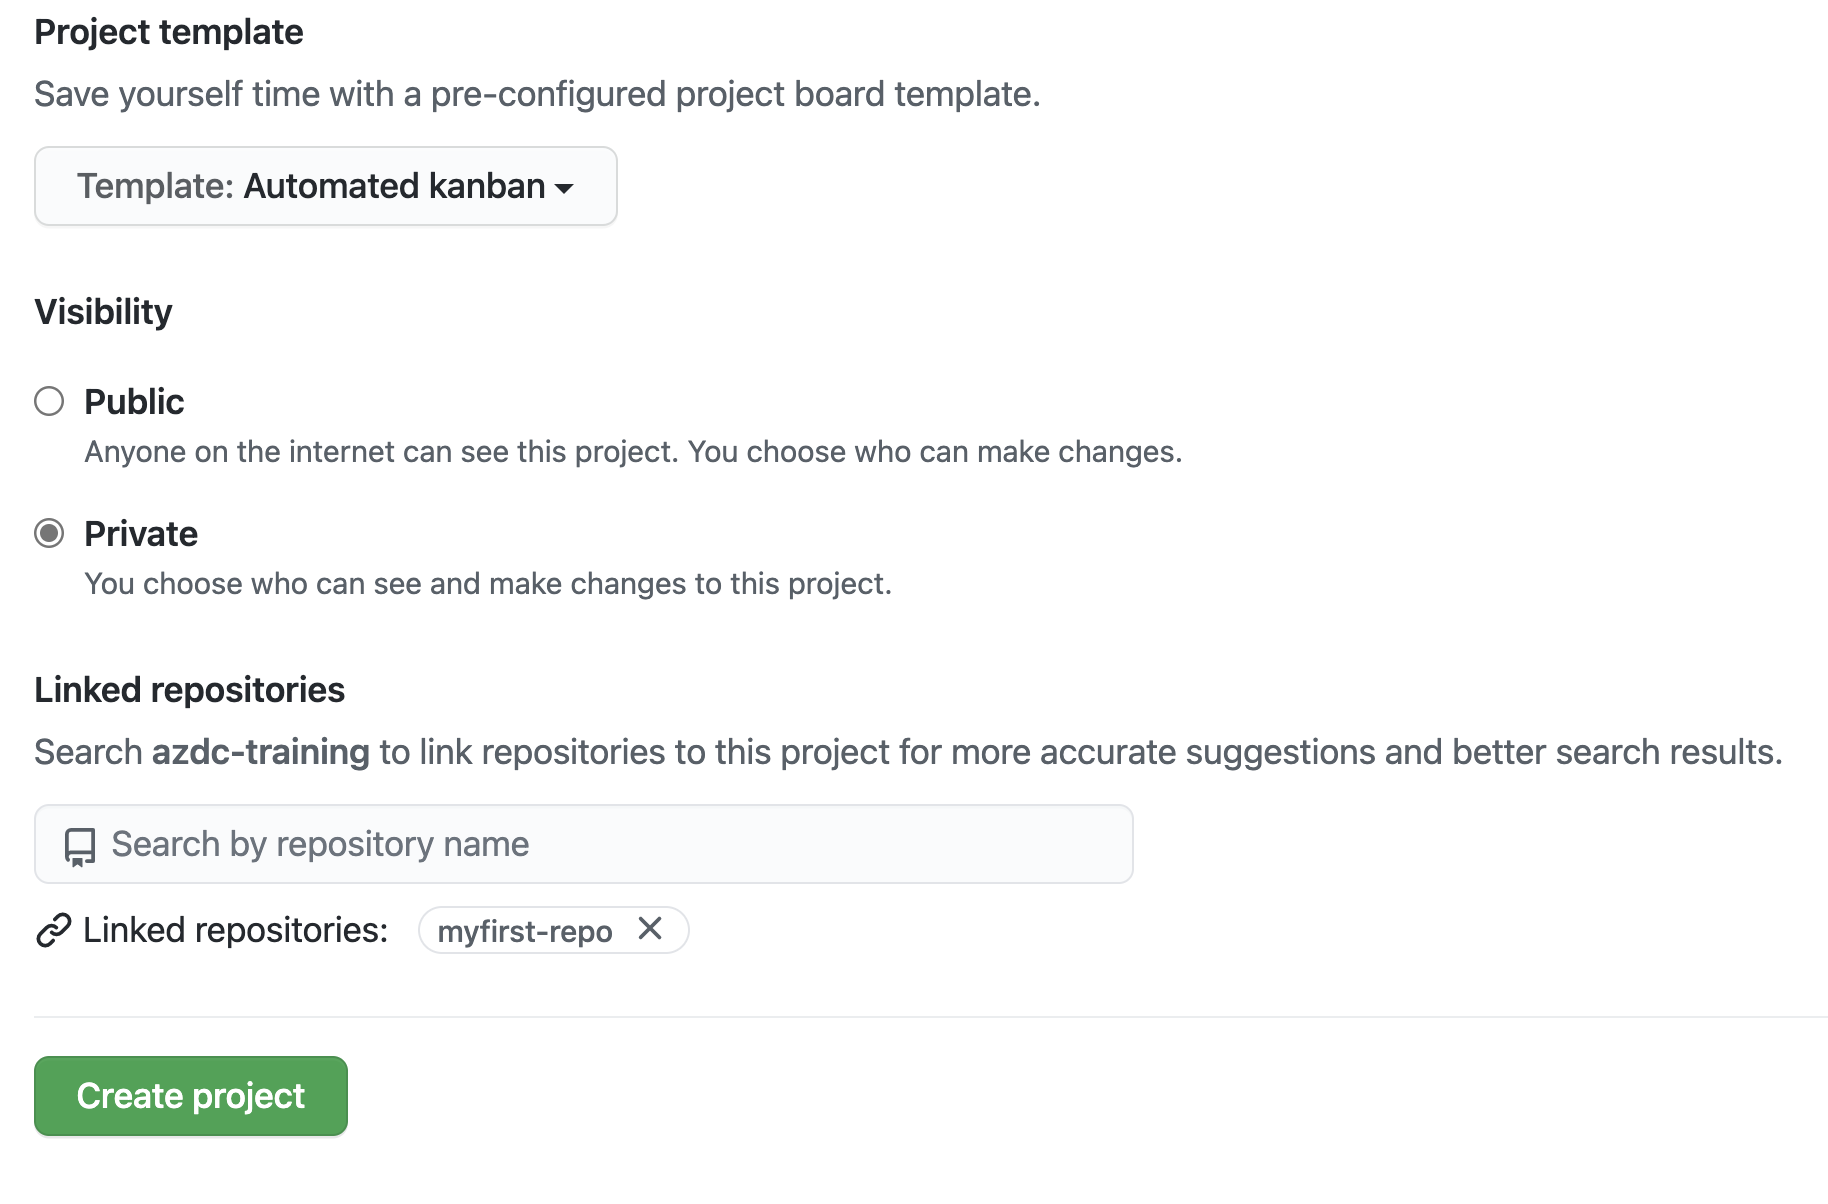
Select the Automated kanban template and choose Private for the visibility of the project. Link the project to your repository myfirst-repo as well to be able to show issues and pull requests on the board later.
After the project has been created, we can add notes to plan and track our work. Some example notes are created in the To Do column of the board. You can delete these notes, as we don't need them. A project board is made up of issues, pull requests and notes which are displayed as cards. Cards are categorized in columns of your choice. We can move cards from one column to another. As we have selected the Automated kanban template, the board is made up of three columns, but you can add more columns to the board to categorize cards the way you want.
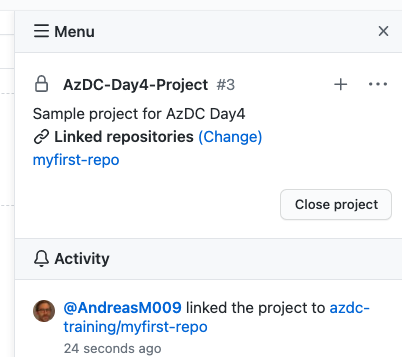
The project is already linked to the repository myfirst-repo. There is a Menu button at the upper right corner of the board. When you click the button, you get an overview of activities and a list of linked repositories.
TIP
📝 If the button is not visible, there is the fly-out displayed that allows you to add cards. Close it and you will see the Menu button.
# Assign permissions to a team
Only project creators, organization owners and project members can add and manage cards.
We need to assign permissions to a team so they can create and items on the board.
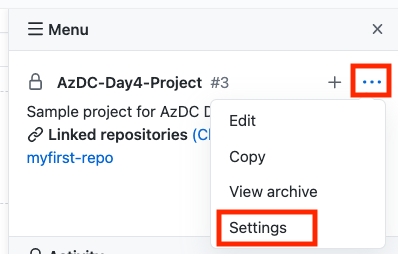
Open the board's menu again. Click the ellipsis ... button and open the
Settings.
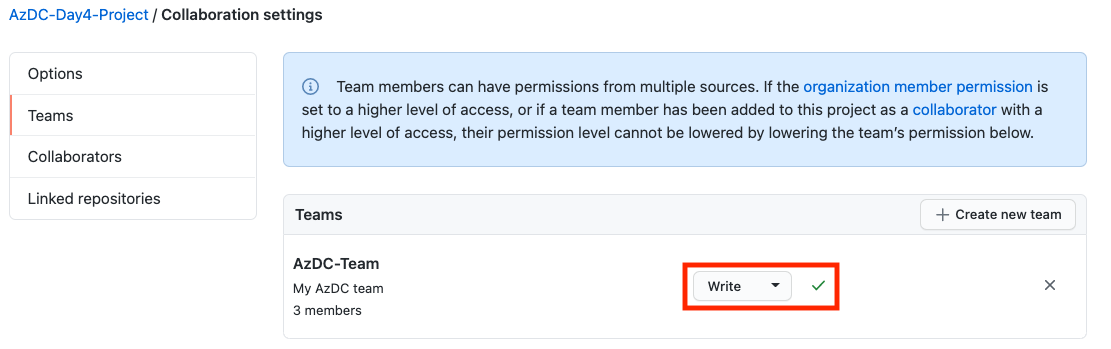
In the Options section you can manage the visibility of the project and organization member's permissions. Write is the default baseline permission level for all members of the organization.
TIP
📝 To restrict access to all organization members, set Read as baseline permission level.
Since we are working with a single team in our organization today and we may have already added Outside collaborators to this team, we still need to give Write permissions to this team. Navigate to the Teams section and assign Write permissions to the AzDC-Team team.
# Add project Administrators
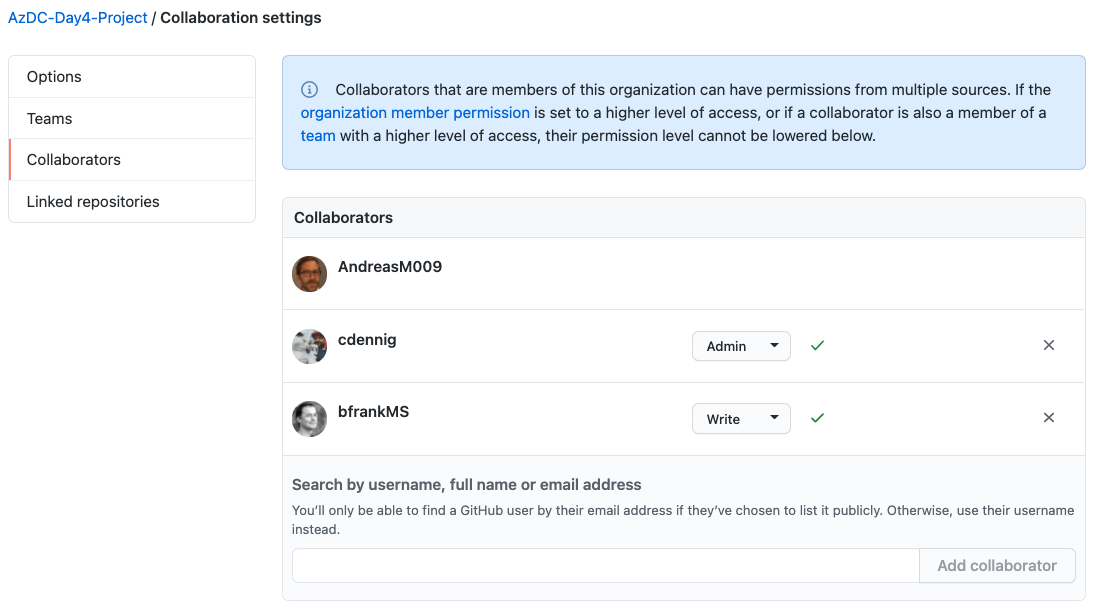
As the organization owner and project creator, only you have full administrative rights in this project. We can make both members of the organization, but also Outside collaborators project administrators. In the Collaborators section you can add collaborators and give them Admin permissions.
# Working with cards
If we want to plan and prioritize our work, we can work with notes in the board. You can add notes to serve as task reminders or to add information related to the project you are working on.
TIP
📝 You can format your notes using Markdown syntax.
Let's create a note and take a closer look at how to convert the note into an issue when you start working.
Click the + button in the To do column to add a note and set the following text:
#### Convert note to issue.

A sample note to see how a note is converted to an issue.
Now let's create another note to take a closer look at how we can reference an issue. Add the node and set the following text:
#### Reference an issue

A sample note to see how a note can reference an issue.
You can drag and drop to reorder notes and move them between columns.
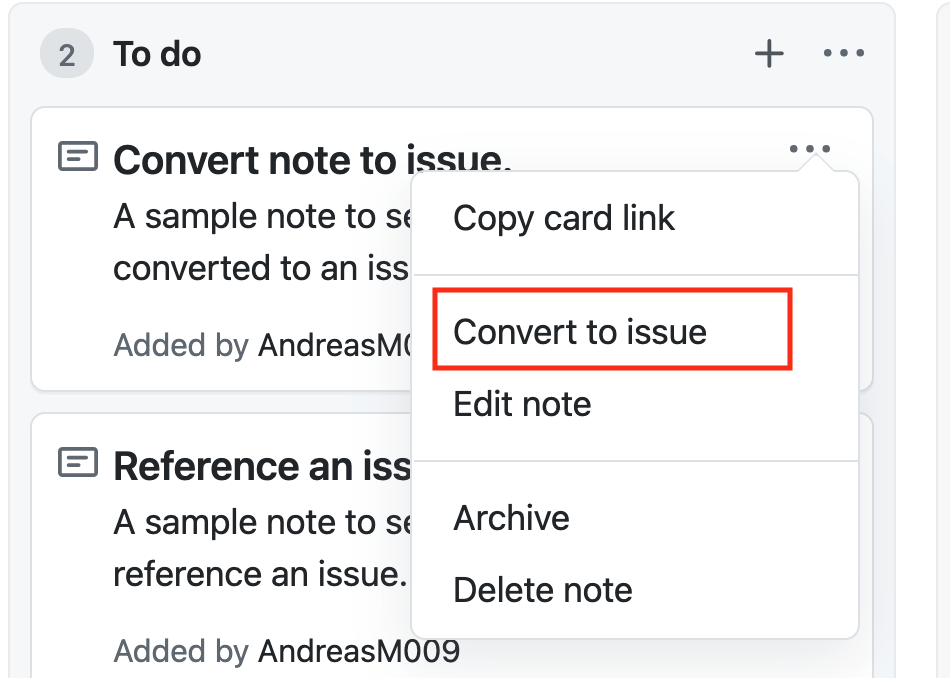
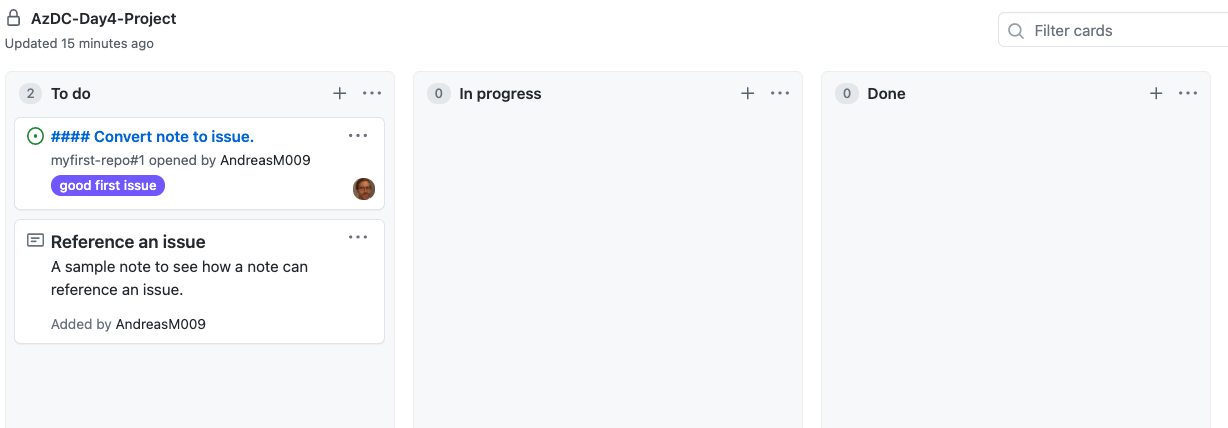
Now let us convert the first note Convert note to issue to an issue to assign it to a repository.
Click the ellipsis ... button on the Convert to issue card and click Convert to issue.
Choose the myfirst-repo repository and convert the note to an issue.
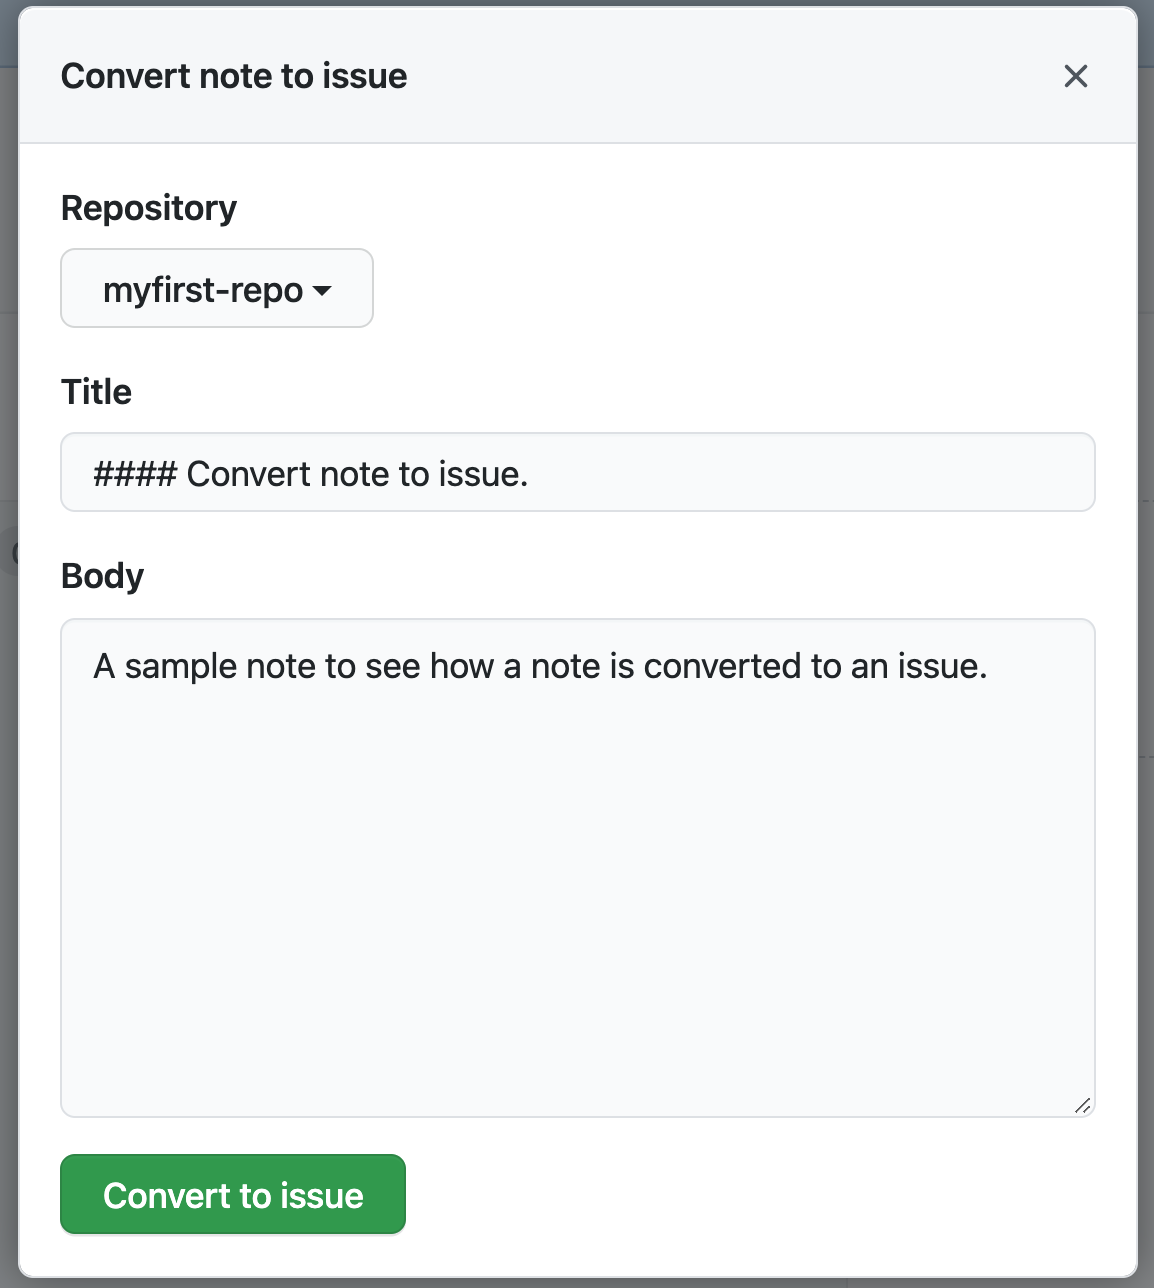
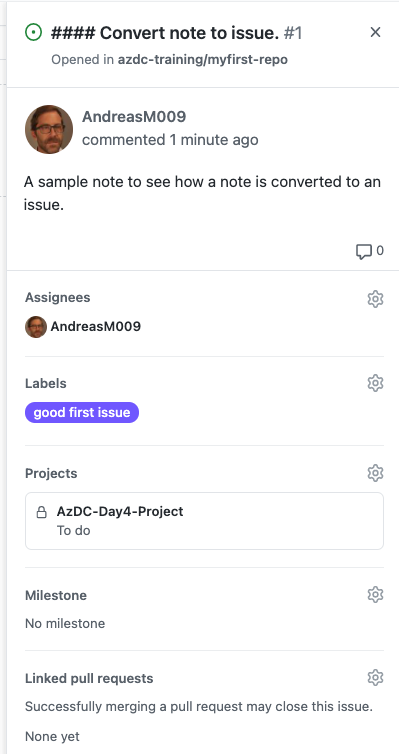
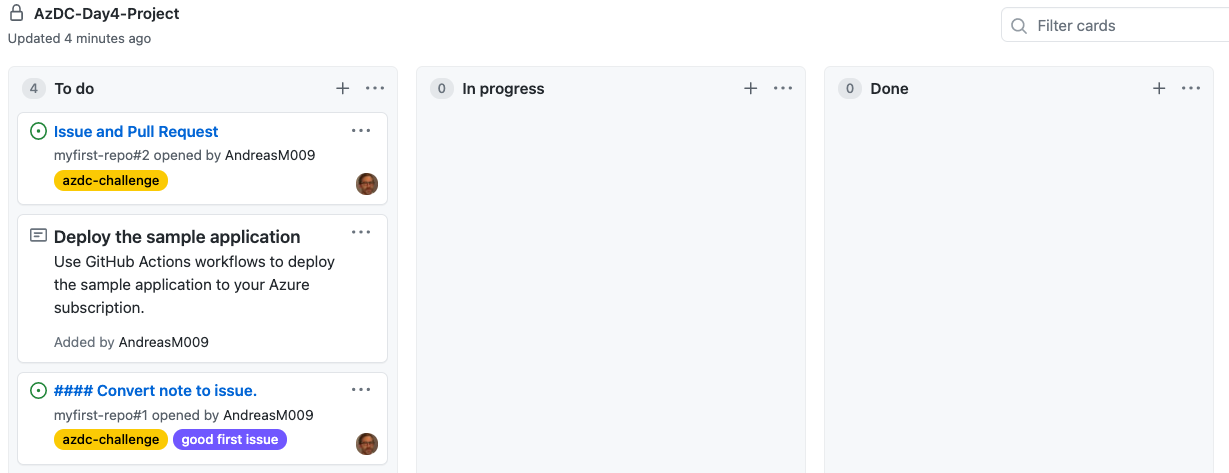
After the converting the note, open the issue detail and have a look at the additional option we have, to specify more information about the issue. Make yourself the assignee of the issue and set the label good first issue.
Your board should now look like this:
Now you may wonder why you convert a note into an issue. In an issue we can additionally specify more detailed information. We can specify who is responsible for the issue, which repository it refers to and we can assign labels to classify the issue. With this approach, we could map the following workflow:
We use notes to plan and prioritize the work for our next milestone (sprint). When we start working on the task, we convert the note into an issue, choose a repository, assign a responsible person, classify it and push it to the In progress column.
This is a very simple but agile process flow. But maybe this flow is not sufficient, especially if notes do not always refer to only one repository, but are spread over several repositories. Notes can be used to summarize issues in different repositories. If we work according to agile methods, we can e.g. store a UserStory as a note in our board and create tasks in different repositories as an issue. Or we can go one level higher and use Notes to map Features and Issues to map UserStories in a repository. Ultimately, there are many ways to map an agile process with GitHub project boards. There is no one-size-fits-all solution.
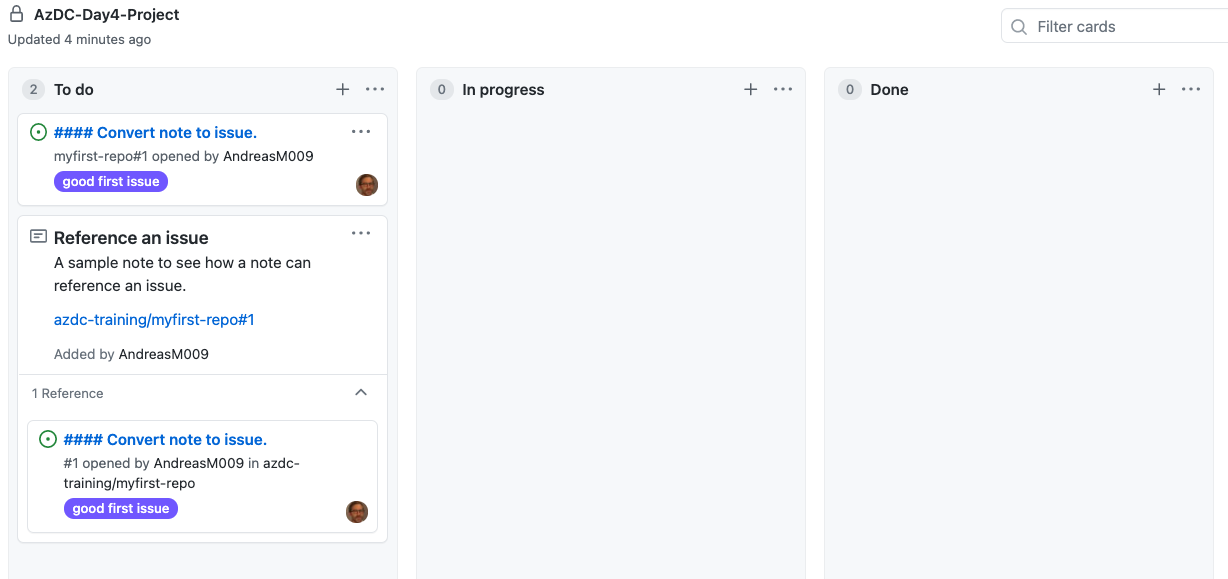
Finally, let's look at how we can reference Issues in a note. Navigate to your myfirst-repo repository and go to the Issues section. You see that there is already an issue listed. It's the issue that we created earlier. Now, add a new Issue name it Referenced Issue, set the label good first issue, assign yourself and submit the new issue. Copy the issue's URL from the browser's address bar and go back to your project board. Edit the note Reference an issue and paste the issue's URL.
Your board should now look like this:
# Plan milestones (sprints)
You can use milestones to group and track on groups of issues and pull requests in a repository. Unfortunately you can not define milestones at organization level. Therefore it's not possible to set a uniform rhythm for all projects within an organization. Instead you have to define milestones in each repository and keep them in sync.
Milestones would be an excellent way to plan a Sprint. But as mentioned, milestones cannot be created on an organizational level. We need to find another way to assign tasks to a Sprint. For example, we could work with labels and create a label for each Sprint. We can then assign these Sprint labels to issues and pull requests.
Another option would be to create a new project for each sprint and put the sprint name at the end of the project name.
If you want to take a closer look at Milestones, check out the GitHub documentation here (opens new window).
# Use GitHub labels to classify issues and pull requests
GitHub labels are used to classify issues, pull requests and discussions. You can apply labels in the repository the label was created in. As with Milestones it is not possible to manage labels at organization level, but you can manage default labels which are automatically added to a repository when the repository is created.
Now we want to add two new default labels which will be added to each new repository. Navigate to your organization's settings, go to Repository defaults and add the following labels:
| Name | Description | Color |
|---|---|---|
| azdc-challenege | An AzDC-Challenge | your choice |
| azdc-breakout | An AzDC-Breakout session | your choice |
We have to add these labels to the myfirst-repo manually, because there is no syncing in the background to add these labels to already created repositories. Navigate to myfirst-repo, go to Issues and add these labels.
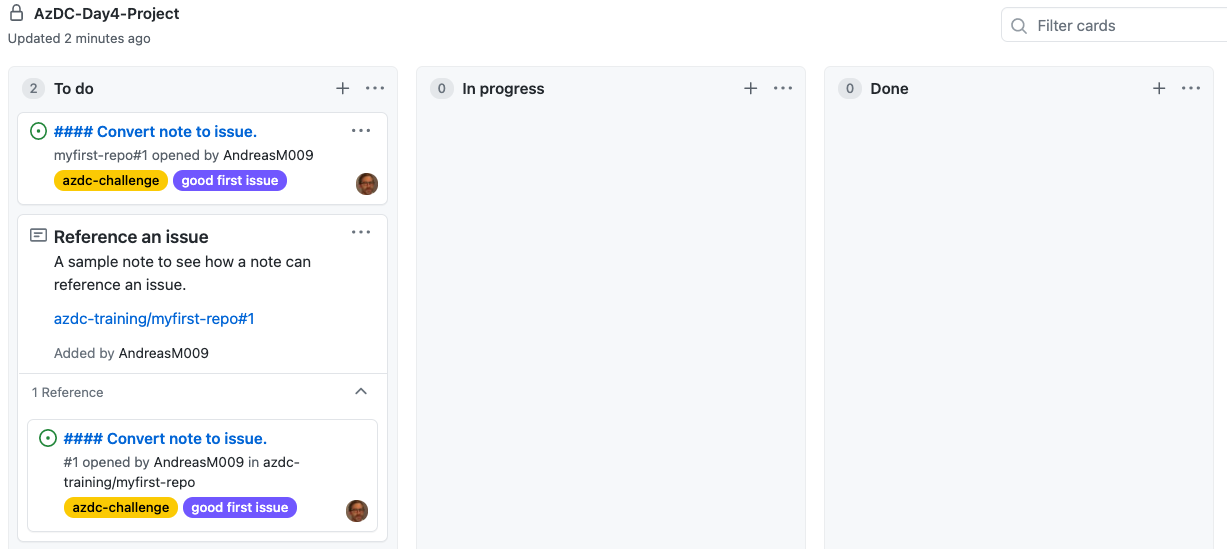
Now go back to your project board and assign the azdc-challenge label to both issues we created earlier.
Your board should look like this:
In the last part of this challenge we will describe how to plan the rest of the work for today. We will add a note now for the Breakout Session where we will deploy the Azure Developer College's sample application to Azure with GitHub Actions workflows. Add the note with the following text:
#### Deploy the sample application

Use GitHub Actions workflows to deploy the sample application to your Azure
subscription.
Labels help us to classify our issues. We can filter the board by labels etc. to
get a reduced view on our project. Click on the filters/search box in the board
to get an overview of how filtering works in GitHub. Try to filter by the label
azdc-challenge.
# See how issues and pull requests flow automatically through the different board's columns
In the previous section we have seen how we can use a project board to plan our work. Now it's time to see how an issue and a pull request automatically flow through the different board's column to track progress. We add a new Note, convert it to an issue and edit the README.md file within a feature branch. We commit and push changes to the feature branch and create a pull request to merge these changes to the main branch.
First, go to your project board and add a Note with the following text:
Issue and Pull Request

Change README.md in a feature branch, commit and push changes and merge these
changes to the _main_ branch with a pull request
Next, convert the Note to an issue, link it to the repository myfirst-repo, assign yourself and set the label azdc-challenge.
TIP
📝 Note down the issue's id, because we need it later to reference it in the pull request. You can find the id after the '#' character.
Your board should look like this:
Now, drag and drop the issue to the In progress column to show project members that you are working on that topic.
Open a terminal and navigate to the folder where you have cloned the repository. Use the git branch and git checkout commands to create a new branch and check it out:
git branch issueprdemo
git checkout issueprdemo

or

git checkout -b issueprdemo
Change the text in the README.md file and commit and push your changes:
git add .
git commit -m "Changed text"
git push --set-upstream origin issueprdemo
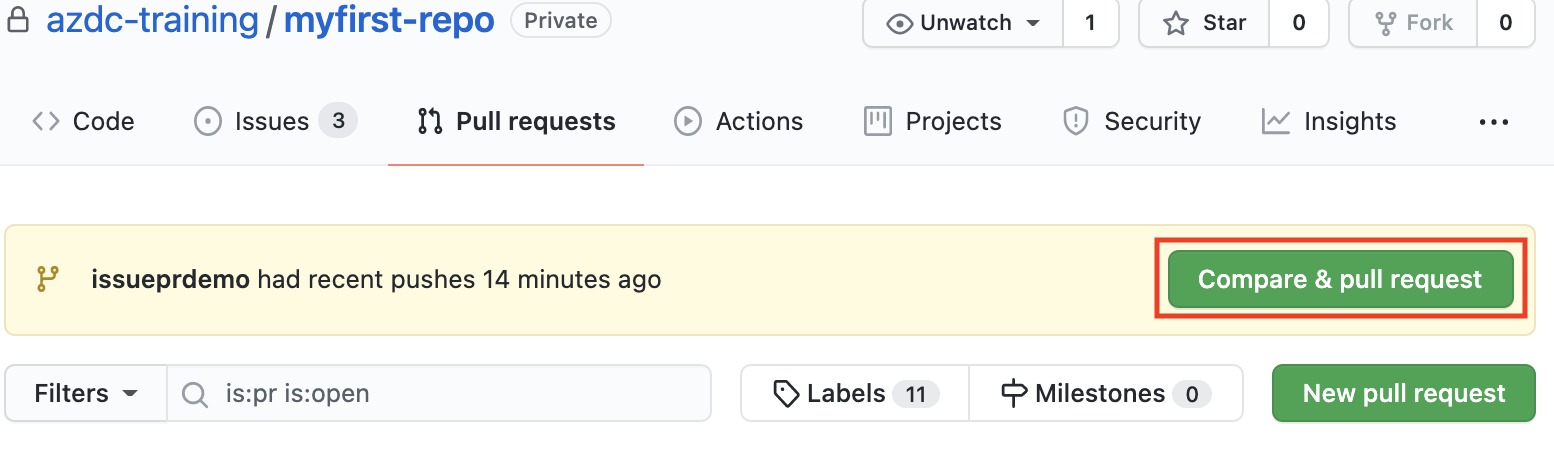
In your browser, navigate to the repository myfirst-repo and go to the section Pull requests. You will see that GitHub informs us that there are recent pushes to the branch issueprdemo available. Click Compare & pull request.
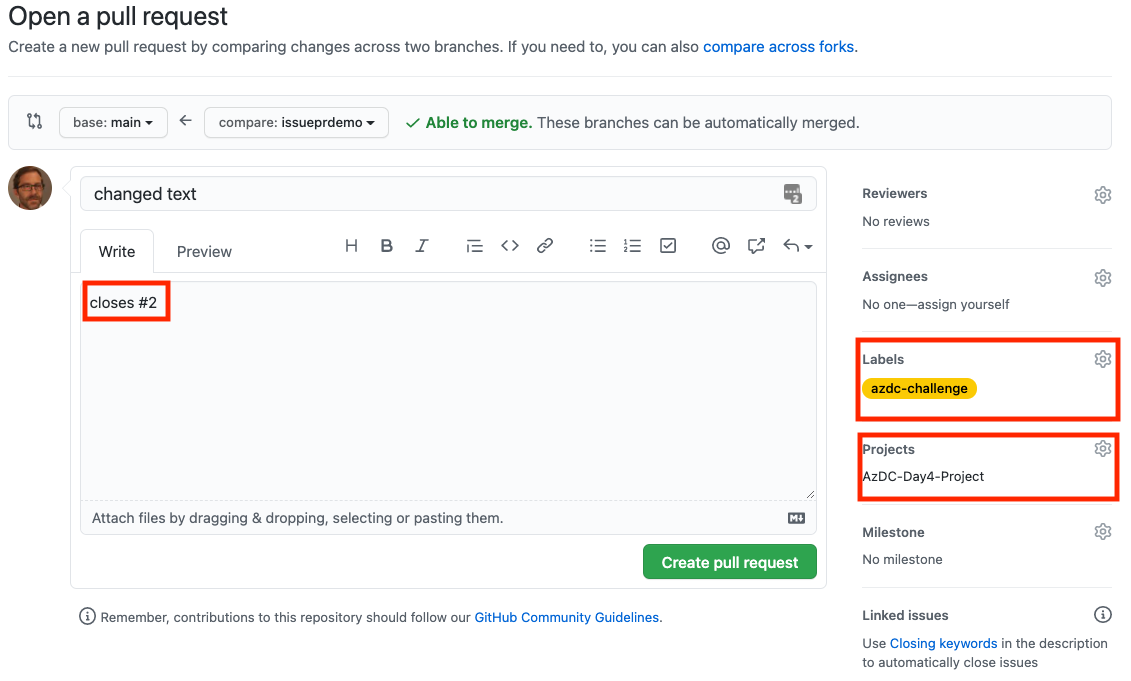
In the Open a pull request view, set the label azdc-challenge and the project AzDC-Day4-Project to link the pull request to the project. In the pull request's body we use the keyword close and the character # to link the pull request to our issue (please use your issue's id) and to inform GitHub that this issue is closed when the pull request is merged into the main branch.
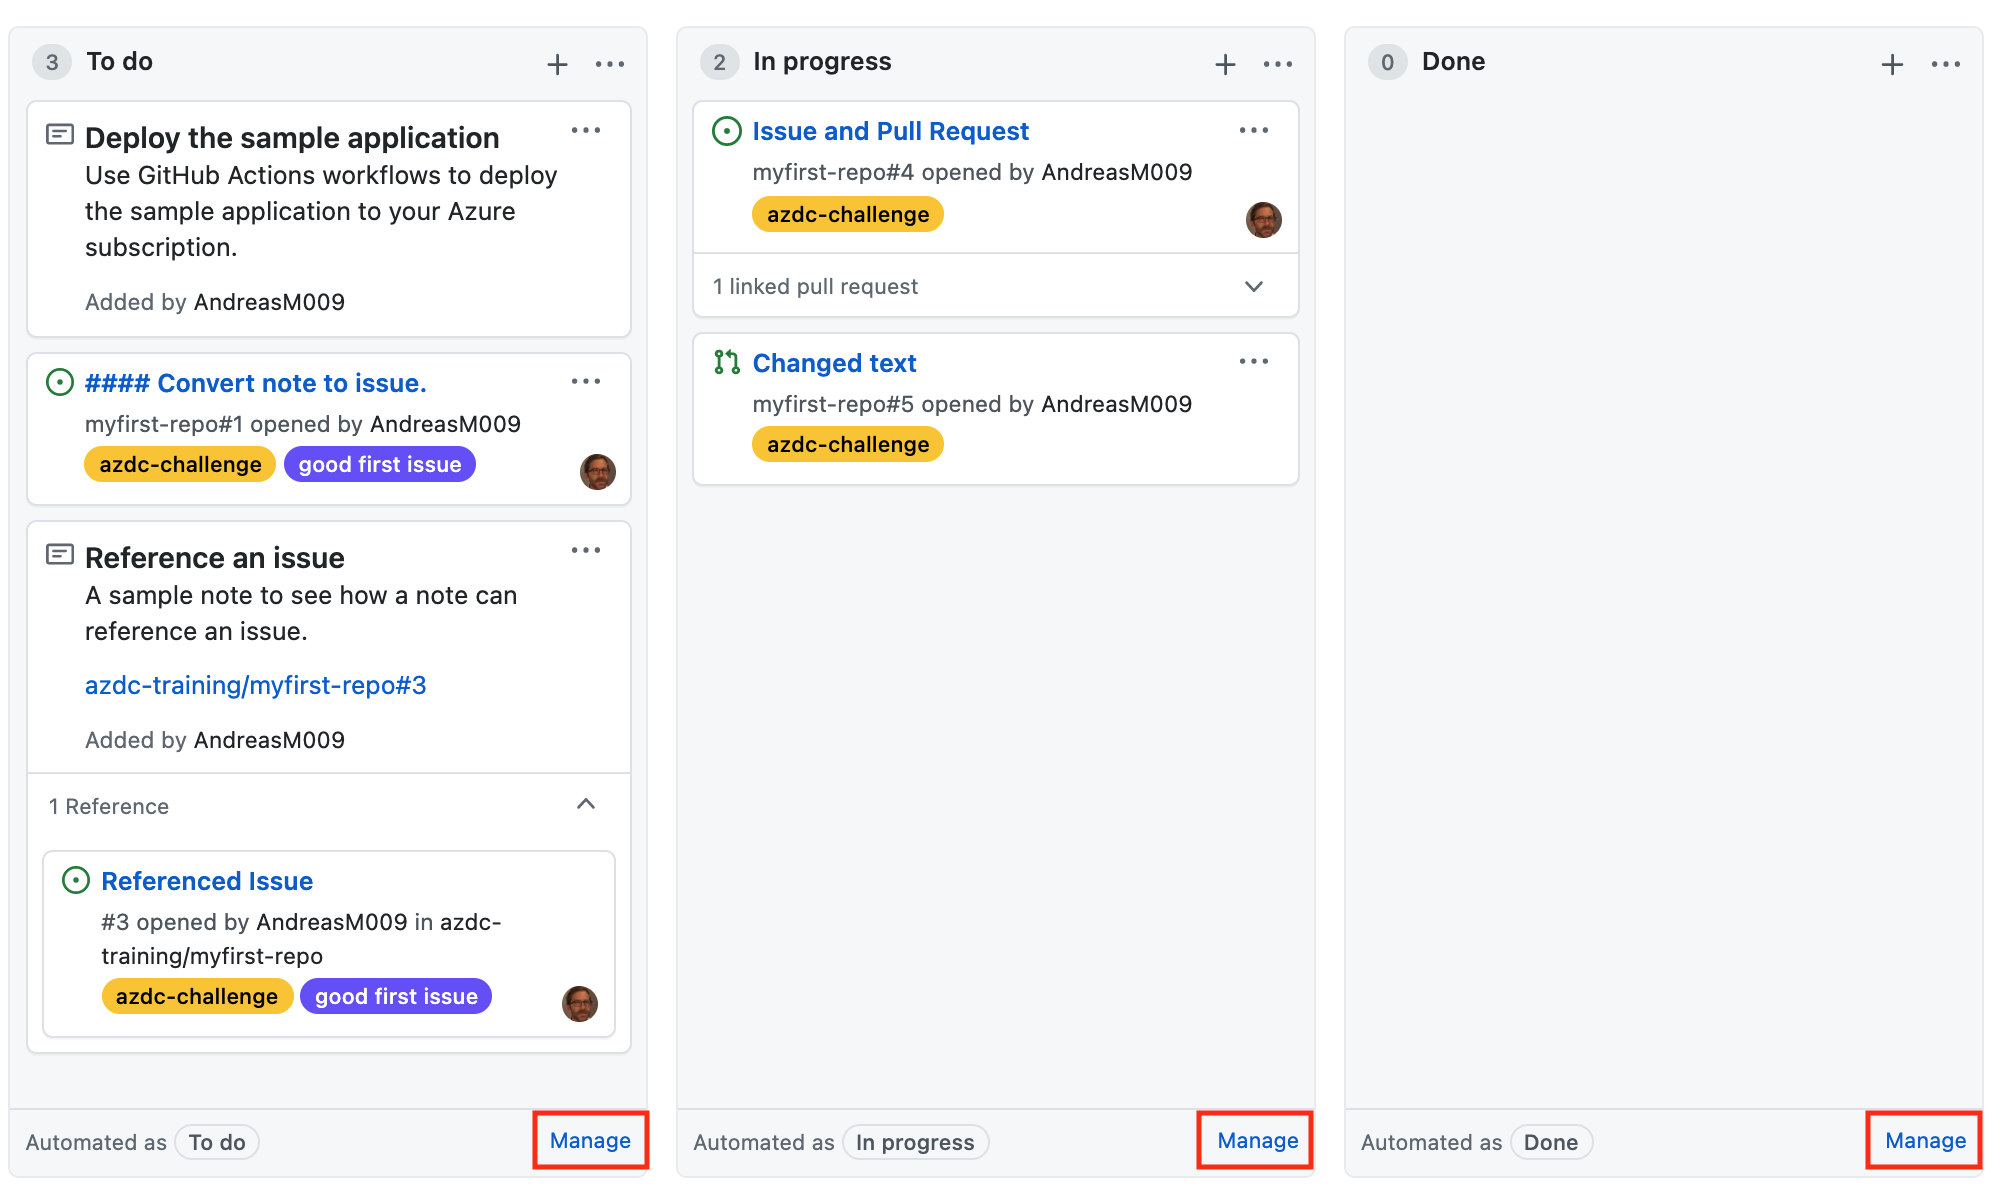
Navigate back to your project board. You will see that there is a new card with the pull request symbol displayed. Why is the pull request displayed on the board?
When we created the board we used the template Automated kanban which comes with predefined automation rules. These rules allows us to display issues and pull requests on the board, as long as they are linked to our project. Both are displayed depending on their status in the columns of the board. You can find the rules by clicking at the Manage link in each column. Take your time and checkout the rules for each column.
Now let's look at how both cards automatically move from the In progress column to the Done column when we complete our pull request. To do this, we navigate to the open pull request and merge it into the main branch.
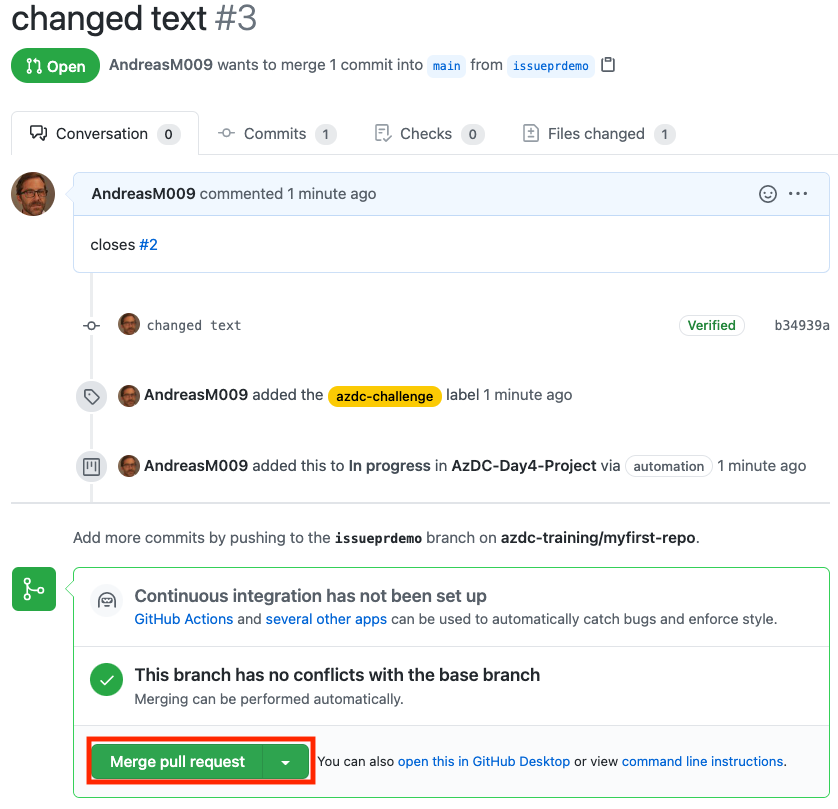
After the pull request is merged, we see that both cards were moved to the Done column.
# Plan your work for day4
As the day goes on, we will keep reflecting our work on the board in the challenges that are still to come. In the respective challenges it's pointed out to create Notes or Issues and to link them to our project.
# Summary and outlook
We have seen how to plan and track our work with GitHub project boards. There are many ways to map an agile process, but certainly no one-size-fits-all solution. Projects can be created and managed at the organizational or repository level. Labels, milestones and issues are always assigned to a repository, which makes the handling of a project at the organizational level somewhat difficult, especially if you want to manage a project across multiple repositories.
GitHub is working on the next generation of Project planning and it will be exciting to see how more complex planning scenarios can be managed with it. If you are interested, why don't you sign up for the beta? GitHub Issues - Project planning for developers (opens new window).
If you've already worked with Azure Boards, you can also connect Azure Boards to GitHub: Azure Boards & GitHub (opens new window)