# Challenge 8: Networking and VPN - Enabling Hybrid Networking with a Site-2-Site (Onprem to Azure) VPN Connection
# Here is what you will learn 🎯
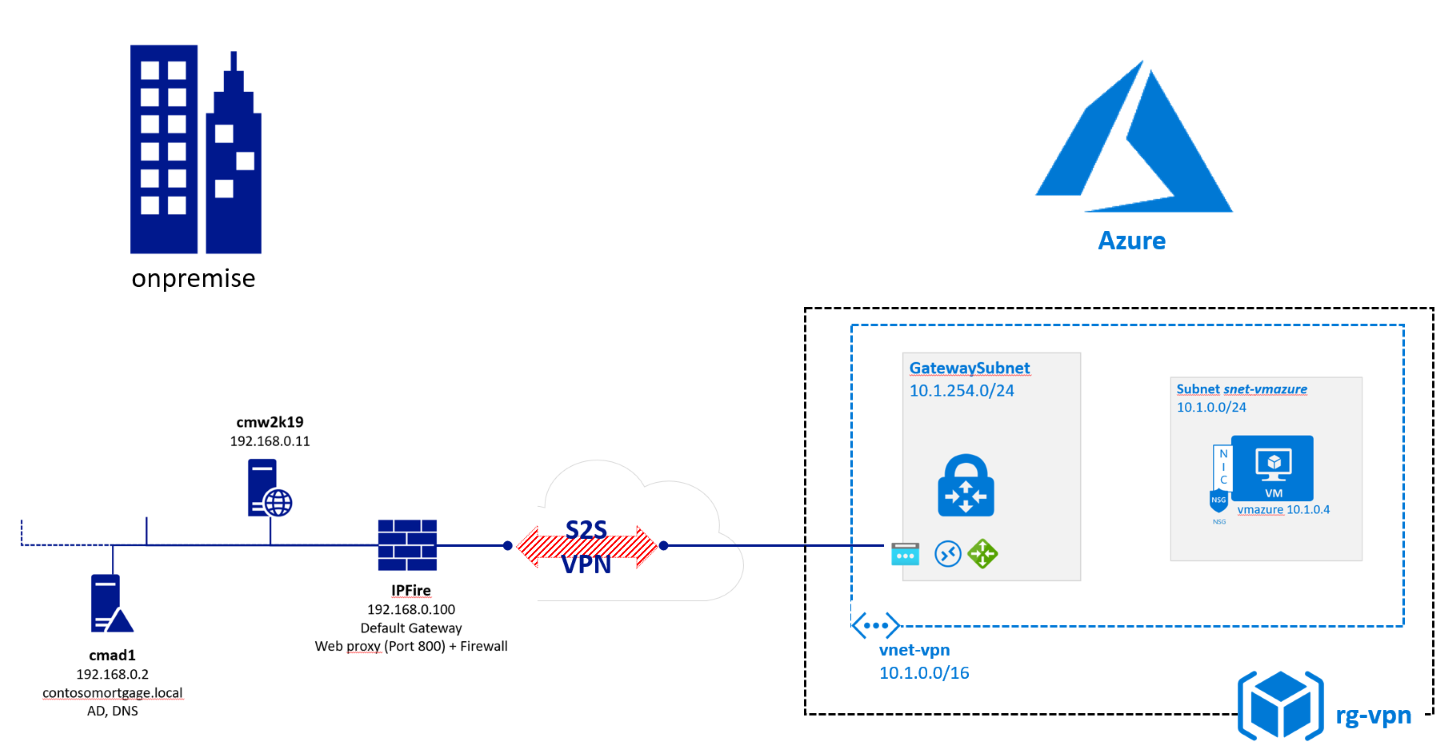
What it takes to implement a VPN tunnel between your onprem firewall <---VPN S2S---> Azure. Our final architecture will look like this:
An Azure S2S VPN requires:
| onprem | Azure |
|---|---|
| A supported device Azure can talk to. |
|
# Table of Contents
- Starting Point
- Create a VPN Gateway and a Public IP using the Azure portal
- Create a Local Network Gateway in Azure
- Create a connection object with shared key in Azure
- Configure your onpremise VPN counterpart
- Apply a more secure cipher for the VPN tunnel (optional)
- Cleanup
# Starting Point
Your instructor has setup for you the onprem part - ask him for the details:
Click on the  button to get the Azure resources to start with:
| Name | Value |
|---|---|
| Resource group | (new) rg-vpn |
| Location | North Europe |
| Admin user | demouser |
| Admin password | %some complex value% |
| Vm Size | Standard_B2s or try e.g. Standard_F2s_v2 |
| Disk Sku | StandardSSD_LRS |
# Create a VPN Gateway and a Public IP using the Azure portal
[Azure Portal]
-> '+ Create a resource'
-> type "Virtual network gateway"
-> Create
Use the following parameter values:
| Parameter Name | Values |
|---|---|
| _Name | myAzVPNGWay |
| _Region | West Europe |
| _Gateway type | VPN |
| _VPN Type | Route based |
| _Gateway type | VPN |
| _SKU | VpnGw1 |
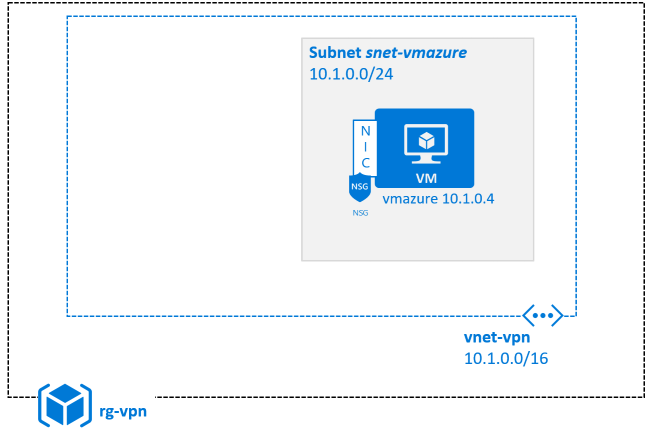
| _Virtual Network | vnet-vpn |
| _Gateway subnet address range | e.g. 10.1.254.192/26 |
| _Public IP address | Create new |
| _Public IP address name | myAzVPNGWay-IP |
| _Enable active-active mode | Disabled |
| _Configure BGP | Disabled |
The GW setup will take approx 30 mins. to create. So come back later (e.g. in the meantime you can do the next lab 😃)
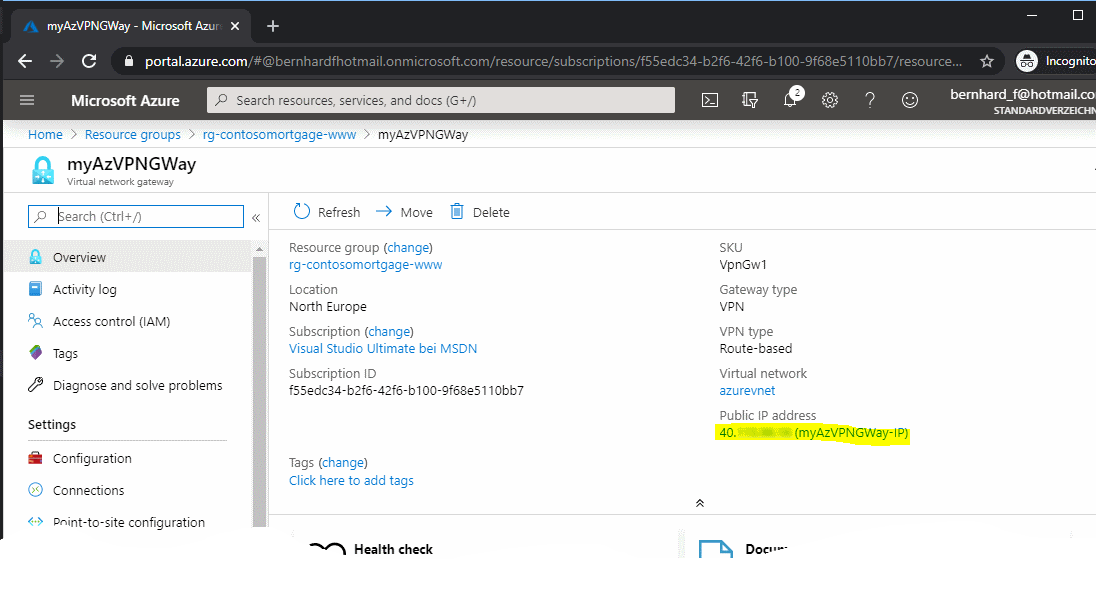
When your GW has been assigned a public IP address then you know it is online.
# Create a Local Network Gateway in Azure
The purpose of this task is to tell Azure how to contact the onpremise firewall:
[Azure Portal]
-> '+ Add'
-> type 'Local network gateway'
-> Create
| Parameter Name | Values |
|---|---|
| Name | l-gw-ipfire |
| _IP address | %external IP of your Firewall - ask instructor% |
| Address Space | 192.168.0.0/24 |
| Resource Group | rg-vpn |
| Location | West Europe |
# Create a connection object with shared key in Azure
[Azure Portal]
-> Resource Groups
-> rg-vpn
-> myAzVPNGWay
-> Connections
| Parameter Name | Values |
|---|---|
| Name | azure-to-onprem |
| Connection Type | Site-to-Site (IPSec) |
| Virtual Network Gateway | myAzVPNGWay |
| Local Network Gateway | l-gw-ipfire |
| Shared Key | %your choice here% |
| IKE Protocol | IKEv2 |
| Resource Group | rg-vpn |
| Location | West Europe |
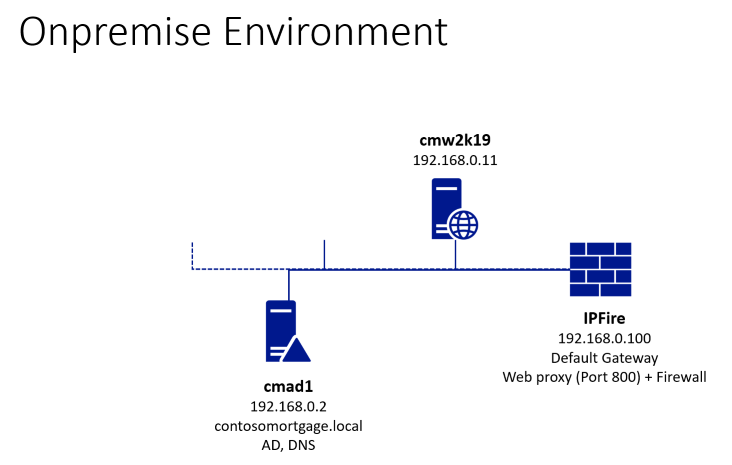
# Configure your onpremise VPN counterpart
We now need to configure the other end of the vpn tunnel: the onpremise firewall in our case a linux FW called IPFire.
- For this use the remote desktop client to RDP into your onpremise environment (ask your instructor for connection details):
Internet -- 1st RDP
-> onprem Lab (HyperV Host) -- 2nd RDP
-> cmW2k19 (192.168.0.11) --https
->IPFire (192.168.0.100)
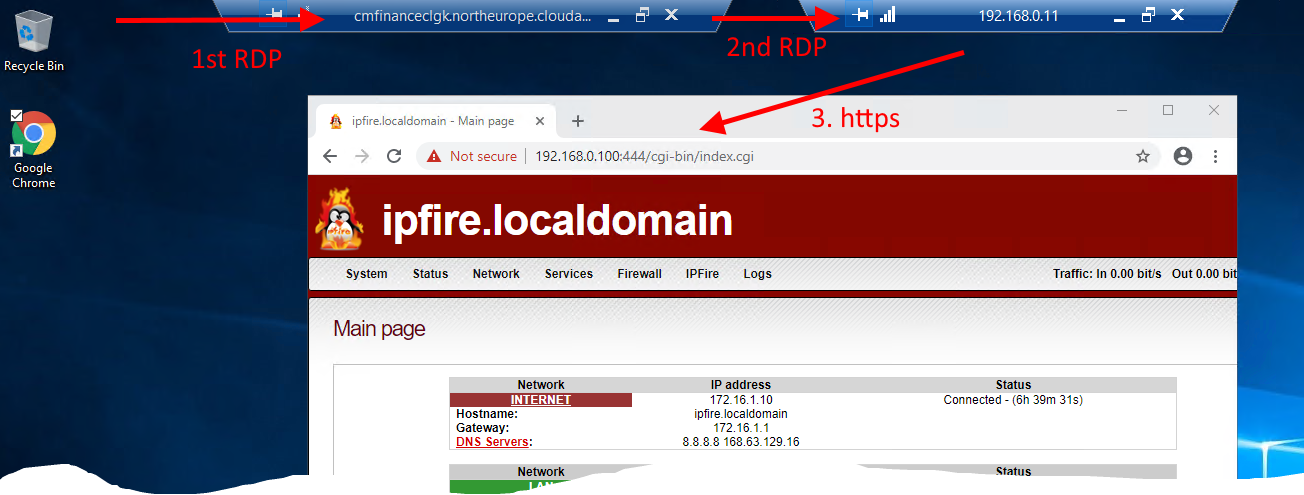
| Parameter Name | Values |
|---|---|
| connect to 1st RDP |
|
| within this session connect to 2nd RDP |
|
| open browser and do https ( ignore certificate warning -> proceed) |
|
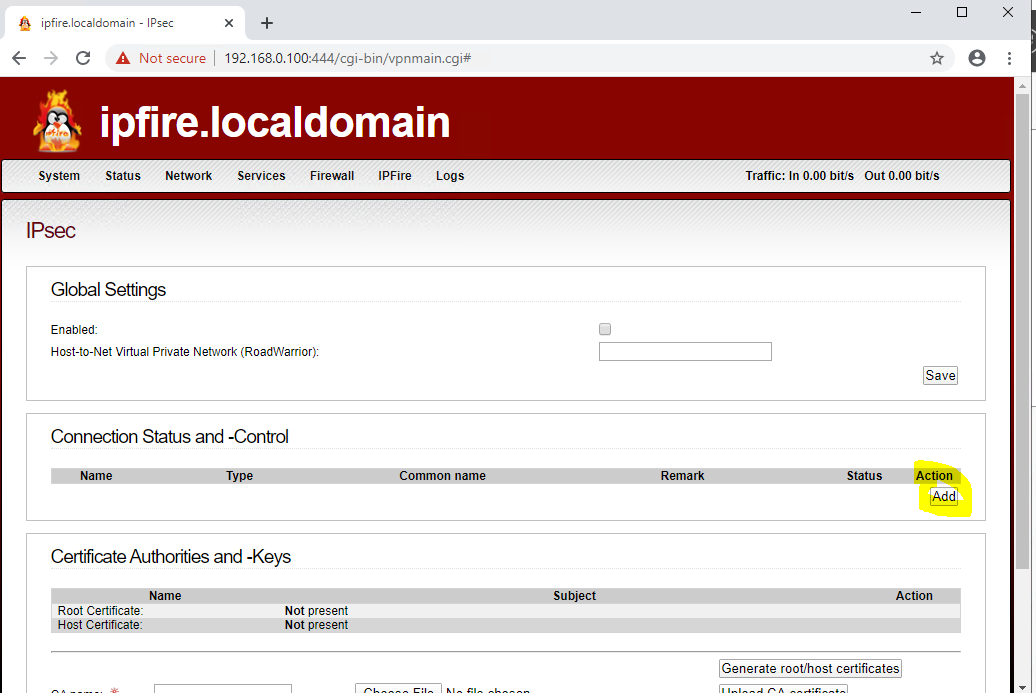
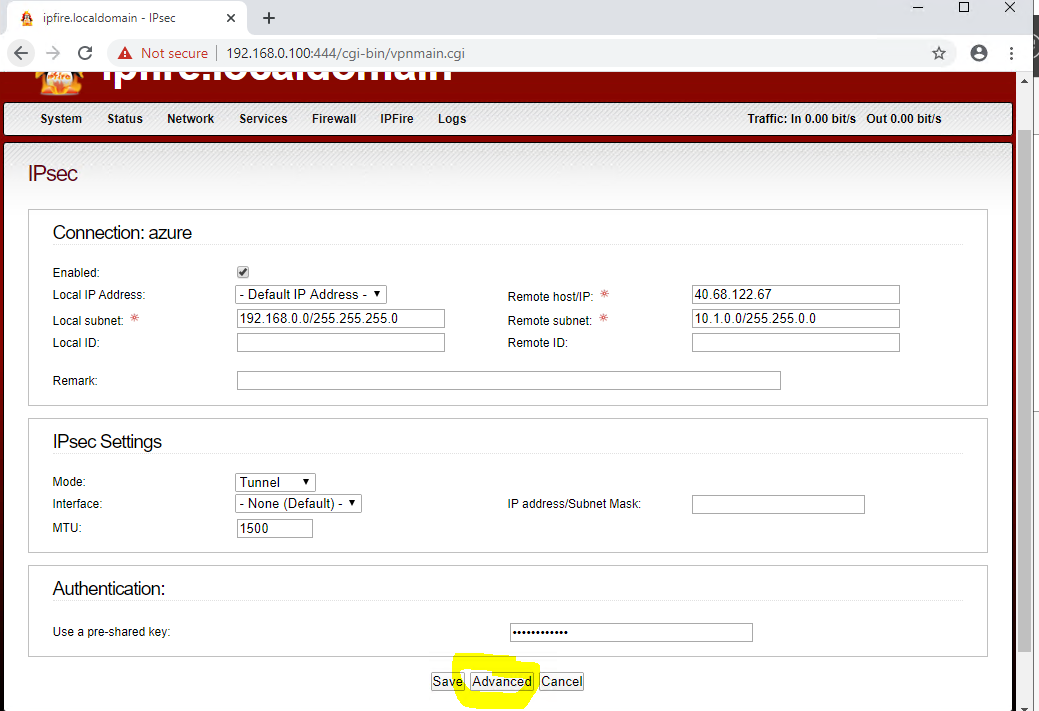
- Add the VPN details and save
IPFire
-> Services
-> IPSec
-> 'Connection Status and -Control'
-> Add
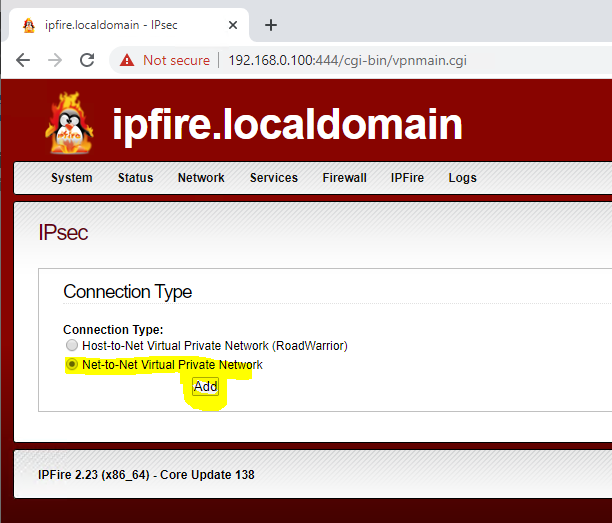
"Net-to-Net Virtual Private Network" -> Add
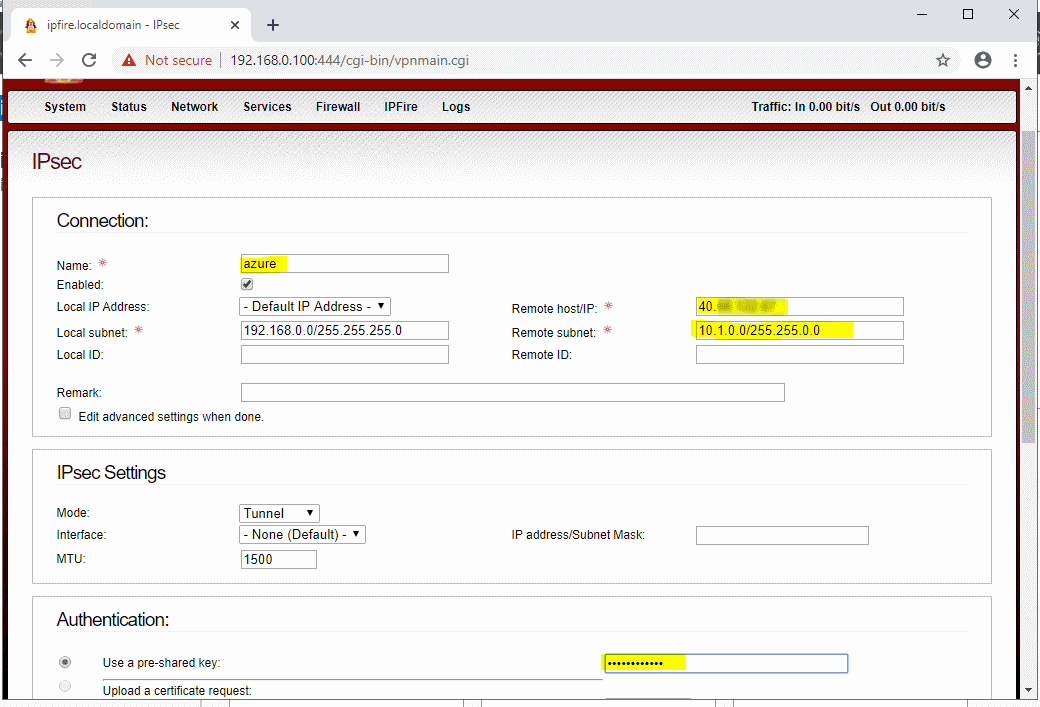
| Parameter Name | Values |
|---|---|
| Name | azure |
| Local subnet | 192.168.0.0/255.255.255.0 |
| Remote Host/IP | %myAzVPNGWay IP Address% (Azure Portal -> VPN Gateway -> Public IP address) |
| Remote subnet | %Address Range of the virtual network in azure% (in our case 10.1.0.0/255.255.0.0) |
| Use a pre-shared key | %Shared Key you used above% (Azure Portal -> VPN Gateway -> Connections -> Shared Key) |
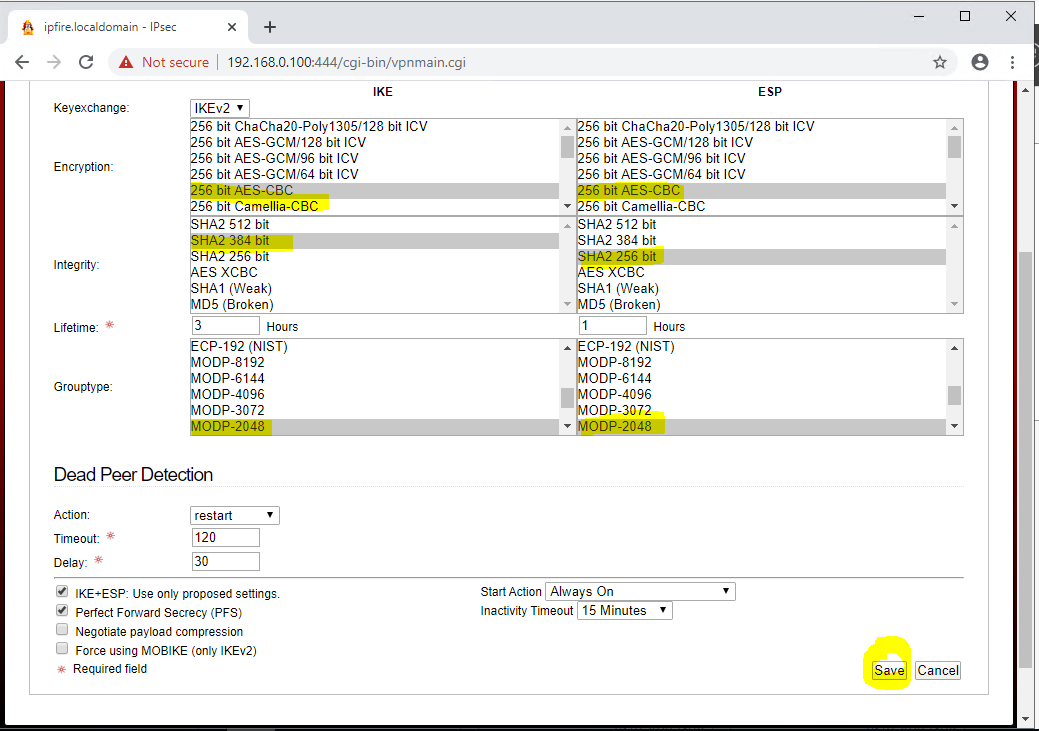
- Modify the algorithms used for the connection. Click on the pencil symbol and choose 'Advanced':
3.1 You must select the following algorithms/suites for the connection:
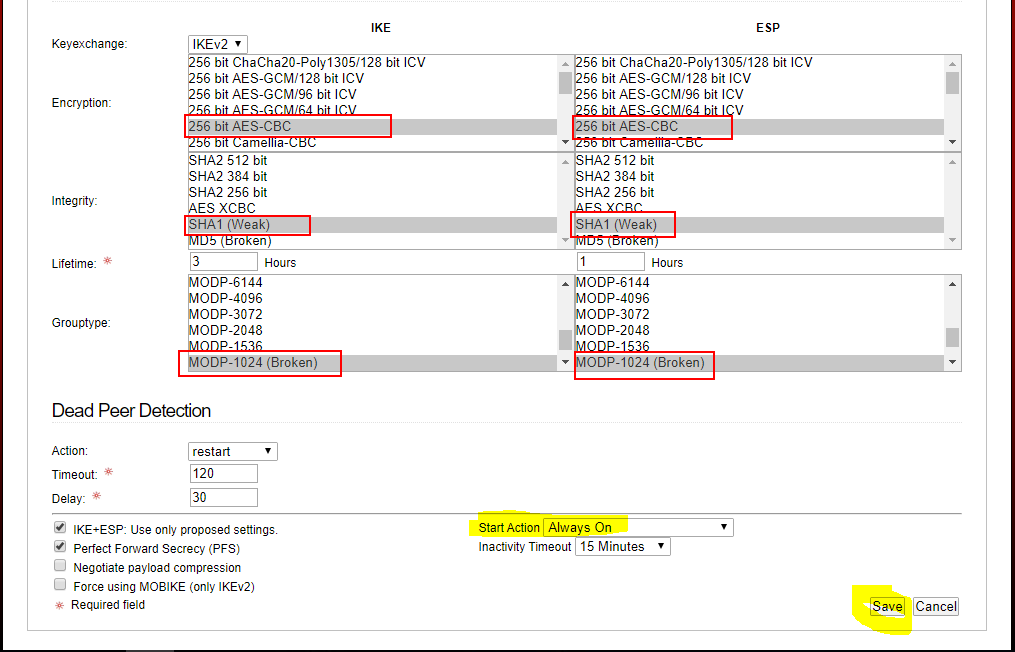
3.2 Select Always on, then save
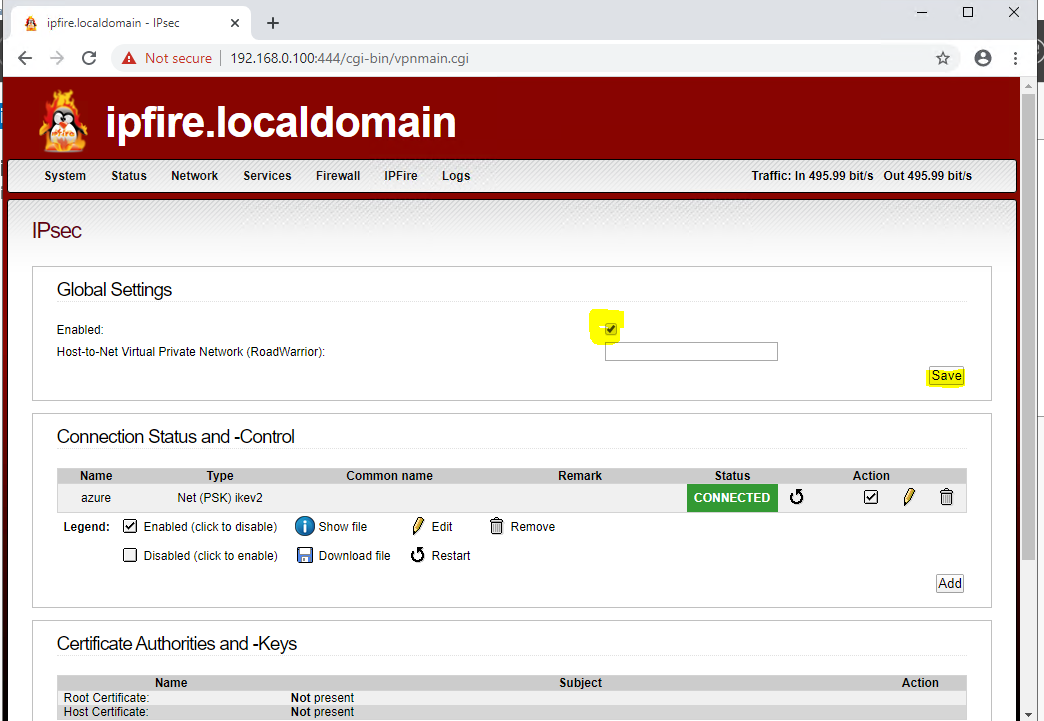
3.3 Tick checkbox to enable connection. The connection status should go to green:
- Now let's ping your Azure VM (e.g. vmazure) under its private ip (probably: 10.1.0.4) from onpremise:
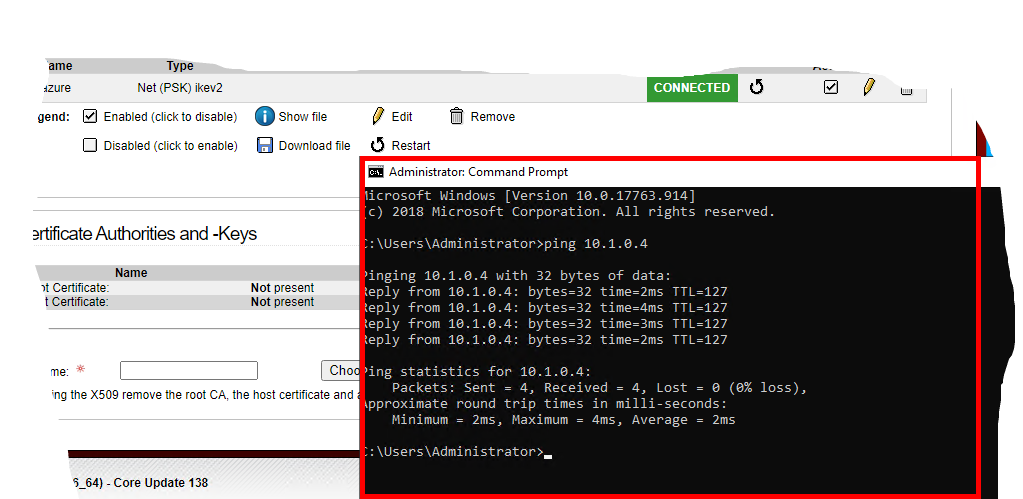 Do you receive a response?
# Apply a more secure cipher for the VPN tunnel (optional)
The following ARM Template (VPNMoreSecureConnPolicy.json) defines a more secure cipher / algorithm to use for the VPN tunnel:
| Parameter Name | Values |
|---|---|
| ipsecEncryption | AES256 |
| ipsecIntegrity | SHA256 |
| ikeEncryption | AES256 |
| ikeIntegrity | SHA384 |
| dhGroup | DHGroup14 |
| pfsGroup | PFS2048 |
To deploy it, click the
button and select correct parameters to apply new ciphers to your current connection.
However, you also need to apply this to the onprem firewall:
# Cleanup
Delete the resource group rg-vpn